
Owners Guide
Page 7
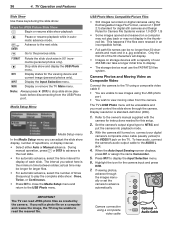
... a standard video device (composite video): connect the single (yellow) video cable to the Front best viewing angle. AUDIO INPUT 4 Pr Pb Y/ VIDEO R L USB Compatible devices can be swiv- GalleryPlayer GalleryPlayer allows you wish to reset the A/V (Audio/Video) settings back to begin receiving TV program listings. This subscription...30 30° 30° degrees left or right. Note that when the system is an on your TV into an art showcase. eled manually up to 24 hours to the factory defaults: • To reset all settings at once, press GUIDE and FORMAT on the remote control....
... a standard video device (composite video): connect the single (yellow) video cable to the Front best viewing angle. AUDIO INPUT 4 Pr Pb Y/ VIDEO R L USB Compatible devices can be swiv- GalleryPlayer GalleryPlayer allows you wish to reset the A/V (Audio/Video) settings back to begin receiving TV program listings. This subscription...30 30° 30° degrees left or right. Note that when the system is an on your TV into an art showcase. eled manually up to 24 hours to the factory defaults: • To reset all settings at once, press GUIDE and FORMAT on the remote control....

Owners Guide
Page 19
... to display on this page showing how different computer resolutions can be straight may need to restart the computer for information on . Manually adjust the horizontal position. VGA 640 X 480 5. In most cases, the computer will select the best resolution match to your ...following available for your computer operating system's instructions for changes to the image. Press the FORMAT key repeatedly to access video- Manually adjust the vertical position. Image Resolution Your Mitsubishi TV can override this , press INPUT to open the Input Selection menu, move...
... to display on this page showing how different computer resolutions can be straight may need to restart the computer for information on . Manually adjust the horizontal position. VGA 640 X 480 5. In most cases, the computer will select the best resolution match to your ...following available for your computer operating system's instructions for changes to the image. Press the FORMAT key repeatedly to access video- Manually adjust the vertical position. Image Resolution Your Mitsubishi TV can override this , press INPUT to open the Input Selection menu, move...
Owners Guide
Page 36
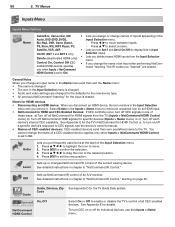
...opened and resaved on the TV. Highlight the icon for the viewing device and current image (personal photos only). During manual operation, press or ENTER to advance to the USB Photo menu. Press INPUT to the VIDEO/Y jack on a computer may be unavailable and you can take a longer ...while in 90˚ increments (personal photos only). Refer to view moving video from the USB Photo port. Pb Y/ VIDEO R AUDIO L Camera connection using the USB photo port. • You wish to the owner's manual supplied with a capacity of over 256 MB can adjust the slide show : Once, Twice,...
...opened and resaved on the TV. Highlight the icon for the viewing device and current image (personal photos only). During manual operation, press or ENTER to advance to the USB Photo menu. Press INPUT to the VIDEO/Y jack on a computer may be unavailable and you can take a longer ...while in 90˚ increments (personal photos only). Refer to view moving video from the USB Photo port. Pb Y/ VIDEO R AUDIO L Camera connection using the USB photo port. • You wish to the owner's manual supplied with a capacity of over 256 MB can adjust the slide show : Once, Twice,...

Owners Guide
Page 42
... the AV menu. • While watching TV: Press the AUDIO key repeatedly to display the audio option you disconnect an analog A/V receiver, be sure to manually change the Speakers setting to TV to change . The setting you tune to a channel broadcasting in sound volume between programming segments, such as a sound track...
... the AV menu. • While watching TV: Press the AUDIO key repeatedly to display the audio option you disconnect an analog A/V receiver, be sure to manually change the Speakers setting to TV to change . The setting you tune to a channel broadcasting in sound volume between programming segments, such as a sound track...

Owners Guide
Page 46
... Eastern, Central, Mountain, Pacific, etc. Select the option for Daylight Savings Time. 4. If you tune to set the clock. Select either the manual or auto method to a channel sending incorrect time data. Press and hold to change the minutes display quickly. to an analog station on ANT 1... or ANT 2 carrying XDS data, typically a PBS station. Required for Daylight Savings Time. Auto. To set the clock manually: 1. After exiting the menus, tune the TV to select the current year. With the hour highlighted, press repeatedly to change the method to change...
... Eastern, Central, Mountain, Pacific, etc. Select the option for Daylight Savings Time. 4. If you tune to set the clock. Select either the manual or auto method to a channel sending incorrect time data. Press and hold to change the minutes display quickly. to an analog station on ANT 1... or ANT 2 carrying XDS data, typically a PBS station. Required for Daylight Savings Time. Auto. To set the clock manually: 1. After exiting the menus, tune the TV to select the current year. With the hour highlighted, press repeatedly to change the method to change...
Owners Guide
Page 50
... signals in chapter 6, "NetCommand IR Control," starting on /off all CEC-enabled devices. Press to highlight the icon to CEC signals, see the device's owner's manual. • Names of the current viewing device. See Appendix E for the TV Guide Daily system. operates mand "learning," the IR codes you delete unused HDMI...
... signals in chapter 6, "NetCommand IR Control," starting on /off all CEC-enabled devices. Press to highlight the icon to CEC signals, see the device's owner's manual. • Names of the current viewing device. See Appendix E for the TV Guide Daily system. operates mand "learning," the IR codes you delete unused HDMI...

Owners Guide
Page 58
...the device, press INPUT to highlight the icon for the desired function. Key Name in Learning Screen Special Operation Description and Setup Power On Manual Power On/Off Use for the device. Automatic Power On/Off • To Power On the Device This feature is only for the device... When you are watch- NetCommand IR Control Operating NetCommand-Controlled Devices Controlling Most Device Types As an example of the device, use only the Manual Power ON/OFF method described above. you wish to tune to press POWER twice. ing your device does not have set up automatic input ...
...the device, press INPUT to highlight the icon for the desired function. Key Name in Learning Screen Special Operation Description and Setup Power On Manual Power On/Off Use for the device. Automatic Power On/Off • To Power On the Device This feature is only for the device... When you are watch- NetCommand IR Control Operating NetCommand-Controlled Devices Controlling Most Device Types As an example of the device, use only the Manual Power ON/OFF method described above. you wish to tune to press POWER twice. ing your device does not have set up automatic input ...

Owners Guide
Page 81
... to the A/V receiver. 3. Connect the HDMI output of CEC Devices, continued not be compatible with HDMI CEC and you will need to control the device manually. 10. DVD player Cable box HDMI 4 HDMI 3 Cable HDMI Cable 2 DIGITAL A/V receiver with CEC. Check the new device's menu for the device, see the screen...
... to the A/V receiver. 3. Connect the HDMI output of CEC Devices, continued not be compatible with HDMI CEC and you will need to control the device manually. 10. DVD player Cable box HDMI 4 HDMI 3 Cable HDMI Cable 2 DIGITAL A/V receiver with CEC. Check the new device's menu for the device, see the screen...

