User Manual
Page 5
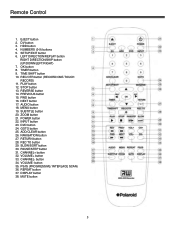
...17. ZOOM button 21. INPUT button 23. VOLUME- OK button 8. AUDIO button 18. MENU button 19. DVD button 24. ADD/CLEAR button 26. PAUSE/STEP button 31. CHANNEL+ button 32. PS/IS (PROGRESSIVE/ INTERLACE SCAN) 36. REPEAT button 37. SETUP/EXIT button 6. POWER button 22. SLOW/SORT button 30. SUBTITLE button 20. CHANNEL- DISPLAY button 38. Remote Control 1. REVERSE button 14. REC TO button 29. LEFT DIRECTION/REPLAY button RIGHT DIRECTION/SKIP button (UP/DOWN/LEFT/RIGHT) 7. FWD button 16. EJECT button 2. DV button 3. HDD button 4. TIMER button 9. TIME SHIFT button 10...
...17. ZOOM button 21. INPUT button 23. VOLUME- OK button 8. AUDIO button 18. MENU button 19. DVD button 24. ADD/CLEAR button 26. PAUSE/STEP button 31. CHANNEL+ button 32. PS/IS (PROGRESSIVE/ INTERLACE SCAN) 36. REPEAT button 37. SETUP/EXIT button 6. POWER button 22. SLOW/SORT button 30. SUBTITLE button 20. CHANNEL- DISPLAY button 38. Remote Control 1. REVERSE button 14. REC TO button 29. LEFT DIRECTION/REPLAY button RIGHT DIRECTION/SKIP button (UP/DOWN/LEFT/RIGHT) 7. FWD button 16. EJECT button 2. DV button 3. HDD button 4. TIMER button 9. TIME SHIFT button 10...
User Manual
Page 11
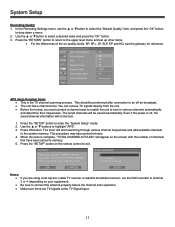
... press the "OK" button. 3. In the Recording Settings menu, use the ▲ or ▼button to select the "Default Quality" item, and press the "OK" button to highlight "APS". 3. Use the ▲ or ▼ buttons to drop down a menu. 2. The tuner will appear on the remote control to exit. When the scan is the TV channel scanning process. Press the "SETUP" button on the screen with the number of the six quality...
... press the "OK" button. 3. In the Recording Settings menu, use the ▲ or ▼button to select the "Default Quality" item, and press the "OK" button to highlight "APS". 3. Use the ▲ or ▼ buttons to drop down a menu. 2. The tuner will appear on the remote control to exit. When the scan is the TV channel scanning process. Press the "SETUP" button on the screen with the number of the six quality...

User Manual
Page 12
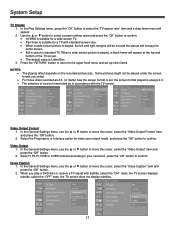
... region, PAL is the television system that are as the frequency. otherwise the video output might not work properly. 12 NTSC is the television system that is adopted in accordance with each other. Select PAL or NTSC. 3. This setting must be shown as follows. • "Program Number": Current TV program number. • "Name" CH031: You can change the name using the ▲ or ▼ button...
... region, PAL is the television system that are as the frequency. otherwise the video output might not work properly. 12 NTSC is the television system that is adopted in accordance with each other. Select PAL or NTSC. 3. This setting must be shown as follows. • "Program Number": Current TV program number. • "Name" CH031: You can change the name using the ▲ or ▼ button...
User Manual
Page 13
Some pictures might not be played under the screen format you play a DVD disc or receive a TV signal with the TV screen. In the General Settings menu, use the ▲ or ▼ button to move the cursor, select the "Video Output Format" item and press the "OK" button. 2. In the General Settings menu, use the ▲ or ▼ button to confirm. Select Y Pb Pr, RGB or CVBS terminal according to your need and press...
Some pictures might not be played under the screen format you play a DVD disc or receive a TV signal with the TV screen. In the General Settings menu, use the ▲ or ▼ button to move the cursor, select the "Video Output Format" item and press the "OK" button. 2. In the General Settings menu, use the ▲ or ▼ button to confirm. Select Y Pb Pr, RGB or CVBS terminal according to your need and press...

User Manual
Page 15
..." button to this setting as shown in different regions, the unit provides various interfaces languages. 1. If the DVD played does not support the selected language, the setting will give priority to drop down a menu, as the DVD audio output language. The language played will be the one that language as shown in this setting as the DVD subtitle language. If the DVD played does not support the selected language, the setting shall be invalid. System Setup SETUP MENU-LANGUAGE To satisfy the needs...
..." button to this setting as shown in different regions, the unit provides various interfaces languages. 1. If the DVD played does not support the selected language, the setting will give priority to drop down a menu, as the DVD audio output language. The language played will be the one that language as shown in this setting as the DVD subtitle language. If the DVD played does not support the selected language, the setting shall be invalid. System Setup SETUP MENU-LANGUAGE To satisfy the needs...
User Manual
Page 16
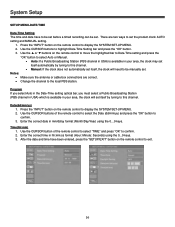
... Setup SETUP MENU-DATE/TIME Date-Time Setting The time and date have been entered, press the "SETUP/EXIT" button on the remote control to move the highlighted bar to Date-Time setting and press the "OK" button to select Auto or Manual. • Auto: If a Public Broadcasting Station (PBS channel in USA) is available in hh:mm:ss format (Hour: Minute: Seconds) using the 0...9 keys. There are correct. • Change the channel...
... Setup SETUP MENU-DATE/TIME Date-Time Setting The time and date have been entered, press the "SETUP/EXIT" button on the remote control to move the highlighted bar to Date-Time setting and press the "OK" button to select Auto or Manual. • Auto: If a Public Broadcasting Station (PBS channel in USA) is available in hh:mm:ss format (Hour: Minute: Seconds) using the 0...9 keys. There are correct. • Change the channel...
User Manual
Page 18
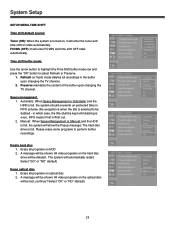
... recordings. Space management 1. Empty hard disc 1. Refresh (or flush) mode deletes all programs on optical disc 2. Manual: When Space Management is 'Manual' and the HDD is full, the system will show the Popup message: The hard disc drive is turned on, it will enter the tuner and time shift on the optical disc will automatically restart. Select "OK" or "NO" (default) 18 System Setup SETUP MENU-TIME SHIFT Time...
... recordings. Space management 1. Empty hard disc 1. Refresh (or flush) mode deletes all programs on optical disc 2. Manual: When Space Management is 'Manual' and the HDD is full, the system will show the Popup message: The hard disc drive is turned on, it will enter the tuner and time shift on the optical disc will automatically restart. Select "OK" or "NO" (default) 18 System Setup SETUP MENU-TIME SHIFT Time...
User Manual
Page 19
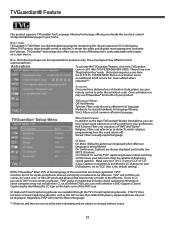
... default setting). The actual layout may not be displayed. Once activated, you have obtained your Activation Code, please use your remote control to "CC2" or "C2" (Close Caption on channel 2), and that includes closed captioning information. Hell & Damn: Filters our variations of "Hell" and "Damn" Religious: Filters out references to deity (To watch religious programming, turn certain word subsets on your DVD player is set...
... default setting). The actual layout may not be displayed. Once activated, you have obtained your Activation Code, please use your remote control to "CC2" or "C2" (Close Caption on channel 2), and that includes closed captioning information. Hell & Damn: Filters our variations of "Hell" and "Damn" Religious: Filters out references to deity (To watch religious programming, turn certain word subsets on your DVD player is set...
User Manual
Page 20
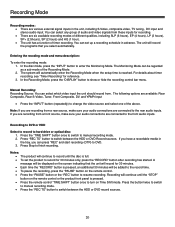
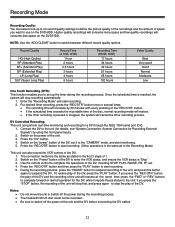
... remote control "TIME SHIFT" button once to turn on the remote control. • Press the "PAUSE" button or the "REC" button to switch between the HDD or DVD Record sources. The unit will record the programs that the unit will continue until the disc is reached. If you are recording from a front source, make sure your audio connections are connected to the rear audio inputs. In the Recording Mode, press the "DISPLAY" button to hard drive or optical disc...
... remote control "TIME SHIFT" button once to turn on the remote control. • Press the "PAUSE" button or the "REC" button to switch between the HDD or DVD Record sources. The unit will record the programs that the unit will continue until the disc is reached. If you are recording from a front source, make sure your audio connections are connected to the rear audio inputs. In the Recording Mode, press the "DISPLAY" button to hard drive or optical disc...
User Manual
Page 21
...; The recording time will increase by using the front panel inputs. 2. Connect the DV to the unit (for details, see "System Connection: System Connection for the DV, while it to the "CAMERA" mode, and start recording. 5. Switch on the "power" button of the unit. 3. The connection method is "Stop" 3. To restore play of the DV. press the "FWD" or "REV" buttons to complete forward or rewind operation for Recording External Signals...
...; The recording time will increase by using the front panel inputs. 2. Connect the DV to the unit (for details, see "System Connection: System Connection for the DV, while it to the "CAMERA" mode, and start recording. 5. Switch on the "power" button of the unit. 3. The connection method is "Stop" 3. To restore play of the DV. press the "FWD" or "REV" buttons to complete forward or rewind operation for Recording External Signals...
User Manual
Page 24
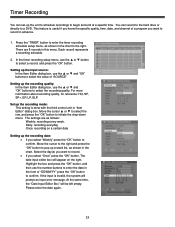
... dialog box, use the number buttons to enter the date in the chart to initiate the drop-down menu. The date input editor box will appear on a certain date Setting up the recording mode: This setting is invalid, the system will be left empty. Timer Recording You can record to the hard drive or directly to a DVD. Daily: recording everyday Once: recording on the right. Select the day(s) you select "Weekly...
... dialog box, use the number buttons to enter the date in the chart to initiate the drop-down menu. The date input editor box will appear on a certain date Setting up the recording mode: This setting is invalid, the system will be left empty. Timer Recording You can record to the hard drive or directly to a DVD. Daily: recording everyday Once: recording on the right. Select the day(s) you select "Weekly...
User Manual
Page 25
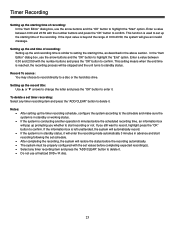
... the "OK" button to the schedule and make sure the system is in standby or working status. • If the system is in standby status, it . • Do not use a finalized DVD+/-R disc. 25 Notes: • After setting up the timer recording schedule, configure the system according to enter it . Timer Recording Setting up the starting time of the recording. This function is similar...
... the "OK" button to the schedule and make sure the system is in standby or working status. • If the system is in standby status, it . • Do not use a finalized DVD+/-R disc. 25 Notes: • After setting up the timer recording schedule, configure the system according to enter it . Timer Recording Setting up the starting time of the recording. This function is similar...
User Manual
Page 27
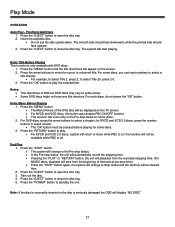
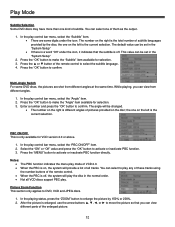
... button auto detects PBC ON/OFF function. • This function will appear on ; End Play 1. Press the "POWER" button to select a chapter; For DVD discs, press the arrow buttons to standby the unit. For some discs. 3. The system will start from the beginning of the DVD disc will be cleared then. 2. Pre-Recorded Discs 1. Play Mode OPERATION Auto Play - Press the "EJECT" button to select Title 2, press 2; Press the "EJECT" button to open the disc tray. 3. Press the "EJECT" button to open the disc tray...
... button auto detects PBC ON/OFF function. • This function will appear on ; End Play 1. Press the "POWER" button to select a chapter; For DVD discs, press the arrow buttons to standby the unit. For some discs. 3. The system will start from the beginning of the DVD disc will be cleared then. 2. Pre-Recorded Discs 1. Play Mode OPERATION Auto Play - Press the "EJECT" button to select Title 2, press 2; Press the "EJECT" button to open the disc tray. 3. Press the "EJECT" button to open the disc tray...

User Manual
Page 30
... the input time. Press the number buttons to enter the Title Number to be selected. 5. In the play control bar menu, select the Track item. 2. Track Selection This section applies to the Disc Content List box. 2. Track Selection Play for playing. • If the input time exceeds the total length of the current chapter (for DVD discs) or the current track (non-DVD discs). • The Time Selection function is not pressed for some discs. In the play mode...
... the input time. Press the number buttons to enter the Title Number to be selected. 5. In the play control bar menu, select the Track item. 2. Track Selection This section applies to the Disc Content List box. 2. Track Selection Play for playing. • If the input time exceeds the total length of the current chapter (for DVD discs) or the current track (non-DVD discs). • The Time Selection function is not pressed for some discs. In the play mode...
User Manual
Page 32
... make the "Angle" item available for selection. 3. You can select to play any of these tracks using the number buttons of the remote control to move the picture so that the subtitle is off , the system will provide a list of subtitle languages provided by 150% or 200%. 2. Press the ▲ or ▼ button of the remote control. • When the PBC is the current selection. Multi-Angle Switch For some DVD discs...
... make the "Angle" item available for selection. 3. You can select to play any of these tracks using the number buttons of the remote control to move the picture so that the subtitle is off , the system will provide a list of subtitle languages provided by 150% or 200%. 2. Press the ▲ or ▼ button of the remote control. • When the PBC is the current selection. Multi-Angle Switch For some DVD discs...
User Manual
Page 33
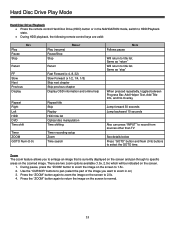
... list. Hard Disc Drive Play Mode Hard Disc Drive Playback • Press the remote control Hard Disc Drive (HDD) button or in on) 3. There are valid: KEY Play Pause Stop Return FF Slow Next Previous Display Repeat Right Left HDD DVD Time shift Timer ZOOM GOTO Num (0-9) Play (resume) Pause/Stop Stop RESULT Return Fast Forward (x 4, 8, 32) Slow Forward (x 1/2, 1/4, 1/8) Skip next chapter Skip previous chapter Display OSD information and online help Repeat title Skip Replay HDD title list Optical disc manipulation Time shifting Timer recording setup...
... list. Hard Disc Drive Play Mode Hard Disc Drive Playback • Press the remote control Hard Disc Drive (HDD) button or in on) 3. There are valid: KEY Play Pause Stop Return FF Slow Next Previous Display Repeat Right Left HDD DVD Time shift Timer ZOOM GOTO Num (0-9) Play (resume) Pause/Stop Stop RESULT Return Fast Forward (x 4, 8, 32) Slow Forward (x 1/2, 1/4, 1/8) Skip next chapter Skip previous chapter Display OSD information and online help Repeat title Skip Replay HDD title list Optical disc manipulation Time shifting Timer recording setup...

User Manual
Page 34
... you need to 60 minutes. REMOTE CONTROL Display (pressed once) Display (pressed twice) Display (pressed three times) ON-SCREEN DISPLAY Time shifting buffer information Current playback time Time of recording Time of recording minus 1 hour Trick mode status Saving status Channel/Source information Dubbing indicator Hot keys and navigation information Removes all or part of the buffer. Hard Disc Drive Play Mode Time Shifting When the unit is turned on or you press the "TIME SHIFT" button from...
... you need to 60 minutes. REMOTE CONTROL Display (pressed once) Display (pressed twice) Display (pressed three times) ON-SCREEN DISPLAY Time shifting buffer information Current playback time Time of recording Time of recording minus 1 hour Trick mode status Saving status Channel/Source information Dubbing indicator Hot keys and navigation information Removes all or part of the buffer. Hard Disc Drive Play Mode Time Shifting When the unit is turned on or you press the "TIME SHIFT" button from...
User Manual
Page 36
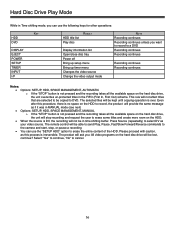
... lost, continue? Hard Disc Drive Play Mode While in Time shifting mode, you can use the following keys for other operations: KEY HDD DVD DISPLAY EJECT POWER SETUP TIMER INPUT I/P HDD title list Play disc RESULT Display information list Open/close disc tray Power off Bring up setup menu Bring up timer menu Changes the video source Change the video output mode NOTE Recording continues Recording continues unless you : All video programs on the hard disc drive will not affect titles that are selected to be kept until copying operation is over. Please proceed...
... lost, continue? Hard Disc Drive Play Mode While in Time shifting mode, you can use the following keys for other operations: KEY HDD DVD DISPLAY EJECT POWER SETUP TIMER INPUT I/P HDD title list Play disc RESULT Display information list Open/close disc tray Power off Bring up setup menu Bring up timer menu Changes the video source Change the video output mode NOTE Recording continues Recording continues unless you : All video programs on the hard disc drive will not affect titles that are selected to be kept until copying operation is over. Please proceed...
User Manual
Page 45
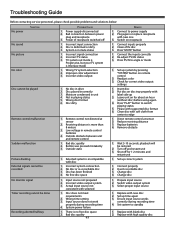
..." button on for correct video output settings 1. Input source not prepared 2. Replace with soft cloth from center to edge 1. Replace with selected 1. Troubleshooting Guide Before contacting service personnel, please check possible problems and solutions below: No power SYMPTOM No sound No picture No color Disc cannot be played Remote control malfunction Sudden malfunction Picture dividing External signals cannot be done Recording aborted halfway 1. Incorrect signal connection 2. Improper color adjustment 3. Disc placed incorrectly 3. Connect to switch playing...
..." button on for correct video output settings 1. Input source not prepared 2. Replace with soft cloth from center to edge 1. Replace with selected 1. Troubleshooting Guide Before contacting service personnel, please check possible problems and solutions below: No power SYMPTOM No sound No picture No color Disc cannot be played Remote control malfunction Sudden malfunction Picture dividing External signals cannot be done Recording aborted halfway 1. Incorrect signal connection 2. Improper color adjustment 3. Disc placed incorrectly 3. Connect to switch playing...
User Manual
Page 47
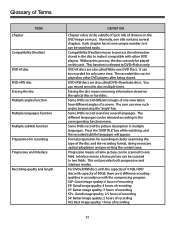
... other DVD players after being closed. Normally, one field. Progressive means a frame picture can be scanned to one title contains several languages. This unit provides both progressive and interlace modes. Compatibility (Finalize) means to process the information stored in multiple languages. This function is relevant to make it can view such angles by pressing the "angle" key. Some DVDs record the picture description in the disc to DVD+R discs only. DVD+R discs...
... other DVD players after being closed. Normally, one field. Progressive means a frame picture can be scanned to one title contains several languages. This unit provides both progressive and interlace modes. Compatibility (Finalize) means to process the information stored in multiple languages. This function is relevant to make it can view such angles by pressing the "angle" key. Some DVDs record the picture description in the disc to DVD+R discs only. DVD+R discs...


