User Manual
Page 2
... power cord to constitute a risk of important operating and maintenance (servicing) instructions in the slot marked "Power In". Plug the two-prong end of the DVD player in the literature accompanying the appliance. If you have difficulty inserting the plug, turn it over and reinsert it, if the unit will not the...
... power cord to constitute a risk of important operating and maintenance (servicing) instructions in the slot marked "Power In". Plug the two-prong end of the DVD player in the literature accompanying the appliance. If you have difficulty inserting the plug, turn it over and reinsert it, if the unit will not the...
User Manual
Page 4
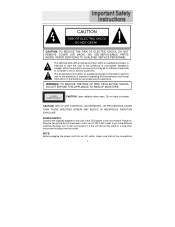
...screen by U.S. patents and other limited viewing uses only unless otherwise authorized by region. CLASS 1 LASER PRODUCT 2. Region code information:DVD players and discs are no user serviceable parts inside the unit. The region code of this copyright protection technology must be authorized by Macrovision,...direct exposure to qualified service personnel. CAUTION: Do not open and interlock failed or defeated. If the region number described on the DVD disc does not correspond to the region number of this product, this unit is intended for home and other intellectual property rights....
...screen by U.S. patents and other limited viewing uses only unless otherwise authorized by region. CLASS 1 LASER PRODUCT 2. Region code information:DVD players and discs are no user serviceable parts inside the unit. The region code of this copyright protection technology must be authorized by Macrovision,...direct exposure to qualified service personnel. CAUTION: Do not open and interlock failed or defeated. If the region number described on the DVD disc does not correspond to the region number of this product, this unit is intended for home and other intellectual property rights....
User Manual
Page 9
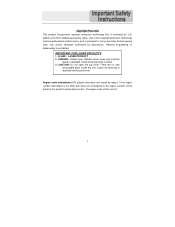
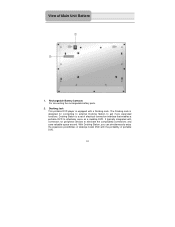
...options, or to resume the playback. 18. Remote Control Sensor 21. Unit latch hook 22. Power Indicator Lights green when the player is over. 20. turn red when the player is in standby mode. 19. If it is charged; OPEN Switch Push to resume playback from the stopped spot. Charge indicator... Lights red when the battery is a DVD disc, it again to search backward fast. 14. View of Main Unit 11. SLOW button ...
...options, or to resume the playback. 18. Remote Control Sensor 21. Unit latch hook 22. Power Indicator Lights green when the player is over. 20. turn red when the player is in standby mode. 19. If it is charged; OPEN Switch Push to resume playback from the stopped spot. Charge indicator... Lights red when the battery is a DVD disc, it again to search backward fast. 14. View of Main Unit 11. SLOW button ...
User Manual
Page 11
With Docking Station, you can simultaneously enjoy the expansion possibilities of portable DVD. 10 View of electrical connection interface that enables a portable DVD to effectively serve as a desktop DVD. Docking Jack This portable DVD player is equipped with the portability of desktop model DVD with a Docking Jack. It typically integrated with connectors for connecting to external Docking...
With Docking Station, you can simultaneously enjoy the expansion possibilities of portable DVD. 10 View of electrical connection interface that enables a portable DVD to effectively serve as a desktop DVD. Docking Jack This portable DVD player is equipped with the portability of desktop model DVD with a Docking Jack. It typically integrated with connectors for connecting to external Docking...
User Manual
Page 13
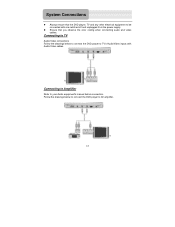
System Connections z Always ensure that you observe the color coding when connecting audio and video cables. Follow the drawings below to connect the DVD player to be connected with Audio/Video cables. Connecting to Amplifier Refer to AV amplifier. 12 Connecting to TV Audio/Video connections Follow the drawings below to connect the DVD player to your Audio equipment's manual before connection. z Ensure that the DVD player, TV and any other electrical equipment to TV's Audio/Video inputs with are switched off and unplugged from the power supply.
System Connections z Always ensure that you observe the color coding when connecting audio and video cables. Follow the drawings below to connect the DVD player to be connected with Audio/Video cables. Connecting to Amplifier Refer to AV amplifier. 12 Connecting to TV Audio/Video connections Follow the drawings below to connect the DVD player to your Audio equipment's manual before connection. z Ensure that the DVD player, TV and any other electrical equipment to TV's Audio/Video inputs with are switched off and unplugged from the power supply.

User Manual
Page 14
NOTE: Noise may occur in speakers when input external audio signal while playing a DVD disc. System Connections Connecting to External AV Signal Source This player can be connected to connect the player and the external AV signal source. Use the audio/video cable to an AV signal input source such as a video cassette player, video game etc. Ensure that you observe the color coding when connecting audio and video cables. Please unplug the audio cord to AV IN. After connecting, switch the AV IN/DVD switch to clear the noise. 13
NOTE: Noise may occur in speakers when input external audio signal while playing a DVD disc. System Connections Connecting to External AV Signal Source This player can be connected to connect the player and the external AV signal source. Use the audio/video cable to an AV signal input source such as a video cassette player, video game etc. Ensure that you observe the color coding when connecting audio and video cables. Please unplug the audio cord to AV IN. After connecting, switch the AV IN/DVD switch to clear the noise. 13
User Manual
Page 15
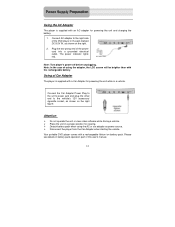
...user's manual. 14 Connect the Car Adapter Power Plug to the unit's power jack and plug the other end to the right side of the DVD player in a proper position for viewing. ¾ Detach battery pack when using the adapter, the LCD screen will be brighter than with an AC ... a vehicle. ¾ Place the unit in the jack marked DC 9.5V IN, as shown on the right figure. Note: Turn player's power off before unplugging. Your portable DVD player comes with a Car Adapter for powering the unit and charging the battery. 1. The power indicator lights red. Using of using the AC...
...user's manual. 14 Connect the Car Adapter Power Plug to the unit's power jack and plug the other end to the right side of the DVD player in a proper position for viewing. ¾ Detach battery pack when using the adapter, the LCD screen will be brighter than with an AC ... a vehicle. ¾ Place the unit in the jack marked DC 9.5V IN, as shown on the right figure. Note: Turn player's power off before unplugging. Your portable DVD player comes with a Car Adapter for powering the unit and charging the battery. 1. The power indicator lights red. Using of using the AC...

User Manual
Page 16
... places. ¾ Maintain well-ventilated conditions around the product to avoid overheating. To exit the standby mode, connect the battery and DVD player to AC or DC power. 15 Working conditions and precautions for the rechargeable battery ¾ New batteries should be fully charged before ... Do not expose the battery to high temperatures or store in standby mode. About the Rechargeable Battery About Rechargeable Battery Pack Your portable DVD player comes with a lithium ion rechargeable battery that may block ventilation to the product. ¾ Do not short the battery terminals. &#...
... places. ¾ Maintain well-ventilated conditions around the product to avoid overheating. To exit the standby mode, connect the battery and DVD player to AC or DC power. 15 Working conditions and precautions for the rechargeable battery ¾ New batteries should be fully charged before ... Do not expose the battery to high temperatures or store in standby mode. About the Rechargeable Battery About Rechargeable Battery Pack Your portable DVD player comes with a lithium ion rechargeable battery that may block ventilation to the product. ¾ Do not short the battery terminals. &#...
User Manual
Page 17
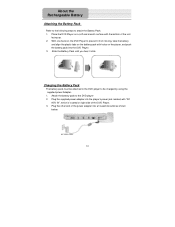
...tabs on the battery pack with "DC 9.5V IN", which is located on right side of the DVD Player. 3. With one hand on the DVD Player to the DVD player 2. Plug the supplied power adapter into the player's power jack marked with holes on a soft and smooth surface with the bottom of the power adapter... into the DVD Player. 3. Plug the other end of the unit facing up. 2. Charging the Battery Pack The battery pack must be attached to the DVD player to attach the Battery Pack: 1. Attach the battery pack to prevent it click....
...tabs on the battery pack with "DC 9.5V IN", which is located on right side of the DVD Player. 3. With one hand on the DVD Player to the DVD player 2. Plug the supplied power adapter into the player's power jack marked with holes on a soft and smooth surface with the bottom of the power adapter... into the DVD Player. 3. Plug the other end of the unit facing up. 2. Charging the Battery Pack The battery pack must be attached to the DVD player to attach the Battery Pack: 1. Attach the battery pack to prevent it click....

User Manual
Page 18
...pack should first be used for long periods of the player and slide the rechargeable battery from the main unit (see drawings below). 2. About the Rechargeable Battery Detaching the Battery Pack If the DVD Player is disconnected before detaching the Battery Pack. Store the ...rechargeable battery in STANDBY mode. When the DVD Player is turned OFF, the DVD Player is still consuming some power in a safe place. 17 This will ...
...pack should first be used for long periods of the player and slide the rechargeable battery from the main unit (see drawings below). 2. About the Rechargeable Battery Detaching the Battery Pack If the DVD Player is disconnected before detaching the Battery Pack. Store the ...rechargeable battery in STANDBY mode. When the DVD Player is turned OFF, the DVD Player is still consuming some power in a safe place. 17 This will ...

User Manual
Page 20
..., switch the "POWER ON/OFF" on the left panel to "OFF". Push OPEN button on the DVD player. 3. To turn on the unit to power supply through the provided AC adaptor. 2. See the below ) 4. Connect the unit to open the disc tray cover, ... side facing up. Using of brightness, contrast and color. Playback Operation PLEASE READ THE FOLLOWING INSTRUCTIONS CAREFULLY BEFORE USING YOUR DVD PLAYER FOR THE FIRST TIME. Adjust the volume with + and - The player will search disc and enter the disc searching status. 5. WARNING: Do not play poor-quality discs to change the menu...
..., switch the "POWER ON/OFF" on the left panel to "OFF". Push OPEN button on the DVD player. 3. To turn on the unit to power supply through the provided AC adaptor. 2. See the below ) 4. Connect the unit to open the disc tray cover, ... side facing up. Using of brightness, contrast and color. Playback Operation PLEASE READ THE FOLLOWING INSTRUCTIONS CAREFULLY BEFORE USING YOUR DVD PLAYER FOR THE FIRST TIME. Adjust the volume with + and - The player will search disc and enter the disc searching status. 5. WARNING: Do not play poor-quality discs to change the menu...

User Manual
Page 21
Then when you press button, the player will play the segment between A and B continuously. Then the player will play . Zoom button A-B Button Press ZOOM button repeatedly to stop the A-B repeat. 20 Press it twice repeatedly to shift among 1X, ...2X, 3X, 4X zooming effect and normal playback. Press A-B button once to set the end point B. Playback Operation DVD Playback Buttons Operation Play ...
Then when you press button, the player will play the segment between A and B continuously. Then the player will play . Zoom button A-B Button Press ZOOM button repeatedly to stop the A-B repeat. 20 Press it twice repeatedly to shift among 1X, ...2X, 3X, 4X zooming effect and normal playback. Press A-B button once to set the end point B. Playback Operation DVD Playback Buttons Operation Play ...
User Manual
Page 31
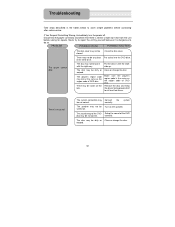
... code is no sound The system connection may not as the same as the region code of DVD disc. Remove the disc and keep the player being powered off . turned on the speaker. Close the disc cover. side up. warped. 30 Troubleshooting Take steps described in the tables below ...to do so. correctly. warped. There may be any discs Put a disc in the DVD drive. system The speaker may ...
... code is no sound The system connection may not as the same as the region code of DVD disc. Remove the disc and keep the player being powered off . turned on the speaker. Close the disc cover. side up. warped. 30 Troubleshooting Take steps described in the tables below ...to do so. correctly. warped. There may be any discs Put a disc in the DVD drive. system The speaker may ...


