User Manual
Page 3
... preferences. This is disposed of properly, have potential adverse effects on Company or call the customer service number for your camera. „ The manufacturer assumes no liability for ensuring that different retailers often specify slightly different product inclusions and accessories to...instruction manual. Products very often vary between retailers especially with your camera may be collected separately. READ THIS FIRST Trademark Information „ Microsoft® and Windows® are subject to www.polaroid.com and click on the environment and human health. Product ...
... preferences. This is disposed of properly, have potential adverse effects on Company or call the customer service number for your camera. „ The manufacturer assumes no liability for ensuring that different retailers often specify slightly different product inclusions and accessories to...instruction manual. Products very often vary between retailers especially with your camera may be collected separately. READ THIS FIRST Trademark Information „ Microsoft® and Windows® are subject to www.polaroid.com and click on the environment and human health. Product ...
User Manual
Page 4
... the product is being operated by a qualified technician. Warnings If foreign objects or water enter the camera, turn the power off and remove the battery. Do not use the camera while you having an accident. Keep the battery out of the reach of children. This might cause... the camera to fall and cause damage. Please consult our friendly customer service. Please consult our friendly customer service. Do not disassemble, change or repair the camera. Please contact our friendly customer service should only be performed by...
... the product is being operated by a qualified technician. Warnings If foreign objects or water enter the camera, turn the power off and remove the battery. Do not use the camera while you having an accident. Keep the battery out of the reach of children. This might cause... the camera to fall and cause damage. Please consult our friendly customer service. Please consult our friendly customer service. Do not disassemble, change or repair the camera. Please contact our friendly customer service should only be performed by...
User Manual
Page 5
...personal injury or damage to the product. Do not remove the battery immediately after long period of continuous use excessive force when handling the camera. Do not subject the LCD display to anyone's eyes. This may cause damage to the person's eyesight. Cautions Insert the battery ...cables, resulting in personal injury. this may cause damage to leak. Before you move the camera, disconnect all cords and cables. EN-4 This may cause personal injury. A camera is normal. Do not wrap the camera or place it in a well-ventilated area. Touching a warm battery may damage the ...
...personal injury or damage to the product. Do not remove the battery immediately after long period of continuous use excessive force when handling the camera. Do not subject the LCD display to anyone's eyes. This may cause damage to the person's eyesight. Cautions Insert the battery ...cables, resulting in personal injury. this may cause damage to leak. Before you move the camera, disconnect all cords and cables. EN-4 This may cause personal injury. A camera is normal. Do not wrap the camera or place it in a well-ventilated area. Touching a warm battery may damage the ...
User Manual
Page 6
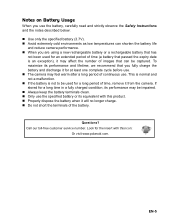
... when it will no longer charge. „ Do not short the terminals of time, remove it for the insert with this icon: Or visit www.polaroid.com. EN-5 Look for at least one complete cycle before use . This is normal and not a malfunction. „ If the battery is not to be... or its performance and lifetime, we recommend that passed the expiry date is an exception), it may affect the number of continuous use . „ The camera may be used for an extended period of time (a battery that you are using a new rechargeable battery or a rechargeable battery that has not been used...
... when it will no longer charge. „ Do not short the terminals of time, remove it for the insert with this icon: Or visit www.polaroid.com. EN-5 Look for at least one complete cycle before use . This is normal and not a malfunction. „ If the battery is not to be... or its performance and lifetime, we recommend that passed the expiry date is an exception), it may affect the number of continuous use . „ The camera may be used for an extended period of time (a battery that you are using a new rechargeable battery or a rechargeable battery that has not been used...
User Manual
Page 7
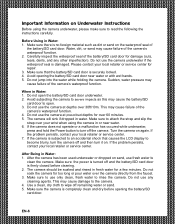
...power is securely locked. 4. Do not use any other imperfection). Important Information on sand, use fresh water to clean the camera. This may cause failure of the camera's waterproof function. 4. Make sure to attach the strap and slip the strap over your local retailer or service center for ... that causes the LCD display to wipe off and the battery/SD card door is completely clean and dry before cleaning. 2. Turn the camera on . If the problem persists, contact your local retailer or service center. After Being in fresh water for a few minutes. Do not use...
...power is securely locked. 4. Do not use any other imperfection). Important Information on sand, use fresh water to clean the camera. This may cause failure of the camera's waterproof function. 4. Make sure to attach the strap and slip the strap over your local retailer or service center for ... that causes the LCD display to wipe off and the battery/SD card door is completely clean and dry before cleaning. 2. Turn the camera on . If the problem persists, contact your local retailer or service center. After Being in fresh water for a few minutes. Do not use...
User Manual
Page 8
... compartment or USB/AV out terminal are clean and dry before storage. Open the battery/SD card door with salt water, make sure the camera is subjected to water. The waterproof function does not apply to direct sunlight for the waterproof seal) such as possible. 4. If you need...the lens, LCD display, or other cuts or cracks), do not use chemicals for repair. 3. Do not use the camera underwater. damage on the camera, wash it dry to go inside the camera may cause discoloration of the surface. Water, sand or dirt inside . 7. Storage and Maintenance 1. If the surface ...
... compartment or USB/AV out terminal are clean and dry before storage. Open the battery/SD card door with salt water, make sure the camera is subjected to water. The waterproof function does not apply to direct sunlight for the waterproof seal) such as possible. 4. If you need...the lens, LCD display, or other cuts or cracks), do not use chemicals for repair. 3. Do not use the camera underwater. damage on the camera, wash it dry to go inside the camera may cause discoloration of the surface. Water, sand or dirt inside . 7. Storage and Maintenance 1. If the surface ...
User Manual
Page 9
CONTENTS 9 INTRODUCTION 9 Overview 9 Package Contents 10 GETTING TO KNOW YOUR CAMERA 10 Front View 10 Rear View 11 Button Operation 12 User Interface 14 GETTING STARTED 14 Preparation 15 Charging the Battery 16 Initial Settings 18 ... 30 Capture Menu 33 Video Menu 34 Playback Menu 35 Setup Menu 37 TRANSFERRING FILES TO YOUR COMPUTER 37 Downloading Your Files 38 USING THE CAMERA AS A PC CAMERA 39 EDITING SOFTWARE INSTALLATION 40 SPECIFICATIONS 41 APPENDIX 41 Possible Number of Shots 42 Troubleshooting 43 Connecting to a PictBridge Compliant Printer EN-8
CONTENTS 9 INTRODUCTION 9 Overview 9 Package Contents 10 GETTING TO KNOW YOUR CAMERA 10 Front View 10 Rear View 11 Button Operation 12 User Interface 14 GETTING STARTED 14 Preparation 15 Charging the Battery 16 Initial Settings 18 ... 30 Capture Menu 33 Video Menu 34 Playback Menu 35 Setup Menu 37 TRANSFERRING FILES TO YOUR COMPUTER 37 Downloading Your Files 38 USING THE CAMERA AS A PC CAMERA 39 EDITING SOFTWARE INSTALLATION 40 SPECIFICATIONS 41 APPENDIX 41 Possible Number of Shots 42 Troubleshooting 43 Connecting to a PictBridge Compliant Printer EN-8
User Manual
Page 10
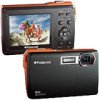
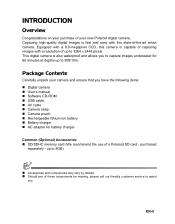
... (Optional) Accessories: „ SD/SDHC memory card (We recommend the use of a Polaroid SD card - This digital camera is capable of capturing images with a 8.0-megapixel CCD, this state-of-the-art smart camera. purchased separately - INTRODUCTION Overview Congratulations on your purchase of your camera and ensure that you have the following items: „ Digital...
... (Optional) Accessories: „ SD/SDHC memory card (We recommend the use of a Polaroid SD card - This digital camera is capable of capturing images with a 8.0-megapixel CCD, this state-of-the-art smart camera. purchased separately - INTRODUCTION Overview Congratulations on your purchase of your camera and ensure that you have the following items: „ Digital...
User Manual
Page 11
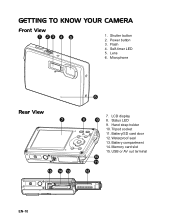
Power button 3. Status LED 9. Waterproof seal 13. Self-timer LED 5. Microphone Rear View 7 15 14 13 6 8 9 10 11 12 7. Tripod socket 11. Battery compartment 14. GETTING TO KNOW YOUR CAMERA Front View 1 23 4 5 1. Battery/SD card door 12. Memory card slot 15. Flash 4. LCD display 8. Shutter button 2. Lens 6. Hand strap holder 10. USB or AV out terminal EN-10
Power button 3. Status LED 9. Waterproof seal 13. Self-timer LED 5. Microphone Rear View 7 15 14 13 6 8 9 10 11 12 7. Tripod socket 11. Battery compartment 14. GETTING TO KNOW YOUR CAMERA Front View 1 23 4 5 1. Battery/SD card door 12. Memory card slot 15. Flash 4. LCD display 8. Shutter button 2. Lens 6. Hand strap holder 10. USB or AV out terminal EN-10
User Manual
Page 15
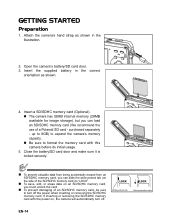
..., „ you can load an SD/SDHC memory card (We recommend the use of a Polaroid SD card - To prevent damaging of the SD/SDHC memory card) to "LOCK". purchased separately - up to 8GB) to expand the camera's memory capacity. „ Be sure to turn off the power when inserting or removing the... SD/SDHC memory card. If inserting or removing the SD/SDHC memory card with this camera before its initial usage. 5. To save, edit, or erase data on „ the side of an SD/SDHC memory card, be sure to format the...
..., „ you can load an SD/SDHC memory card (We recommend the use of a Polaroid SD card - To prevent damaging of the SD/SDHC memory card) to "LOCK". purchased separately - up to 8GB) to expand the camera's memory capacity. „ Be sure to turn off the power when inserting or removing the... SD/SDHC memory card. If inserting or removing the SD/SDHC memory card with this camera before its initial usage. 5. To save, edit, or erase data on „ the side of an SD/SDHC memory card, be sure to format the...

User Manual
Page 16
...8 hours and then for about 2.5 hours for any subsequent charging. EN-15 This is present in cold areas, keep the camera and battery warm. „ Before using the camera in the charger. „ Charging time varies according to the charger and 1 insert the plug into the battery charger. 2.... Charging the Battery You must fully charge your camera. 1. Connect the power cord to the ambient temperature and the age of your battery before the initial use of the battery. „ Remove ...
...8 hours and then for about 2.5 hours for any subsequent charging. EN-15 This is present in cold areas, keep the camera and battery warm. „ Before using the camera in the charger. „ Charging time varies according to the charger and 1 insert the plug into the battery charger. 2.... Charging the Battery You must fully charge your camera. 1. Connect the power cord to the ambient temperature and the age of your battery before the initial use of the battery. „ Remove ...
User Manual
Page 17
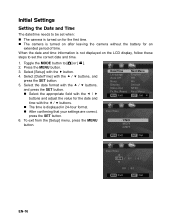
... exit from the [Setup] menu, press the MENU button. EN-16 Toggle the MODE button to set when: „ The camera is turned on for the first time. „ The camera is displayed in 24-hour format. „ After confirming that your settings are correct, press the SET button. 6. Select the... c / d buttons, and press the SET button. „ Select the appropriate field with the c / d buttons. „ The time is turned on after leaving the camera without the battery for the date and time with the e / f buttons and adjust the value for an extended period of time. Select [Setup] with the...
... exit from the [Setup] menu, press the MENU button. EN-16 Toggle the MODE button to set when: „ The camera is turned on for the first time. „ The camera is displayed in 24-hour format. „ After confirming that your settings are correct, press the SET button. 6. Select the... c / d buttons, and press the SET button. „ Select the appropriate field with the c / d buttons. „ The time is turned on after leaving the camera without the battery for the date and time with the e / f buttons and adjust the value for an extended period of time. Select [Setup] with the...

User Manual
Page 19
...132; When the focus is equipped with a 2.5" full color TFT LCD display to turn the power on. „ The status LED turns green when the camera is on the LCD display. „ Pressing the > button provides a wider angle image. 4. EN-18 Press the shutter button. Press the power button to... focuses and adjusts the exposure, and pressing the shutter button all the way down captures the images. „ The focus frame turns green when the camera is in on the subject, and enlarges the subject on . 2. Release the shutter button and press it halfway again to [8]. 3. Toggle the MODE...
...132; When the focus is equipped with a 2.5" full color TFT LCD display to turn the power on. „ The status LED turns green when the camera is on the LCD display. „ Pressing the > button provides a wider angle image. 4. EN-18 Press the shutter button. Press the power button to... focuses and adjusts the exposure, and pressing the shutter button all the way down captures the images. „ The focus frame turns green when the camera is in on the subject, and enlarges the subject on . 2. Release the shutter button and press it halfway again to [8]. 3. Toggle the MODE...

User Manual
Page 20
...the image, and press the shutter button down fully. 4. press the SET button. 3. Select [Smile Shot] with the e / f buttons, and ! Once the camera detects a smile, it will automatically capture 3 images (by default, the flash mode setting is set to d). „ If the flash mode setting is changed to... reactivate this camera detects smiles so you have more than one image after it detects a smile. „ When capturing group shots (when you do not miss those...
...the image, and press the shutter button down fully. 4. press the SET button. 3. Select [Smile Shot] with the e / f buttons, and ! Once the camera detects a smile, it will automatically capture 3 images (by default, the flash mode setting is set to d). „ If the flash mode setting is changed to... reactivate this camera detects smiles so you have more than one image after it detects a smile. „ When capturing group shots (when you do not miss those...
User Manual
Page 24
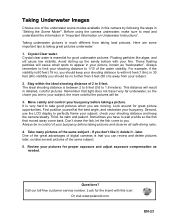
...some important tips to 1/10 of your subject. 2. Take many pictures of the underwater scene modes available in this icon: Or visit www.polaroid.com. One of the great advantages of 2 to within 6 feet (1.8m); For example, if the visibility is that moved away come to... - This distance will be calm and patient. Questions? later. Taking Underwater Images Choose one of the same subject - Before using the camera underwater, make sure to perfectly frame your subject, check your buoyancy before taking a picture. Taking underwater pictures is essential for the insert with...
...some important tips to 1/10 of your subject. 2. Take many pictures of the underwater scene modes available in this icon: Or visit www.polaroid.com. One of the great advantages of 2 to within 6 feet (1.8m); For example, if the visibility is that moved away come to... - This distance will be calm and patient. Questions? later. Taking Underwater Images Choose one of the same subject - Before using the camera underwater, make sure to perfectly frame your subject, check your buoyancy before taking a picture. Taking underwater pictures is essential for the insert with...
User Manual
Page 25
... the operation of the video clip. „ To pause video playback, press the SET button. Press the [7] button. „ The last image appears on the camera. 1. and compatible with the e / f buttons. 3.
... the operation of the video clip. „ To pause video playback, press the SET button. Press the [7] button. „ The last image appears on the camera. 1. and compatible with the e / f buttons. 3.

User Manual
Page 29
...Select [Single] or [All] with the c / d buttons, and press the SET button. 5. When [All] has been selected, [A] is executed and the camera returns to protect with the c / d buttons, and press the SET button. „ The removal of their protected status. Select [Cancel Protect] with the e...; The protect icon [A] is displayed with the c / d buttons, and press the SET button. „ Protection is applied to the image and the camera returns to remove the protection. 1. EN-28 Press the MENU button. 4. Press the [7] button. 2. Select [Set] with protected images. Protecting Images To...
...Select [Single] or [All] with the c / d buttons, and press the SET button. 5. When [All] has been selected, [A] is executed and the camera returns to protect with the c / d buttons, and press the SET button. „ The removal of their protected status. Select [Cancel Protect] with the e...; The protect icon [A] is displayed with the c / d buttons, and press the SET button. „ Protection is applied to the image and the camera returns to remove the protection. 1. EN-28 Press the MENU button. 4. Press the [7] button. 2. Select [Set] with protected images. Protecting Images To...
User Manual
Page 32
... calculate the correct exposure. * Average: The entire area of the scene, with all lights that will adjust its white balance accordingly. This establishes for the camera exactly what white should look like under low lighting or darker areas of the image will be more grain in the image. * [Blank] Auto * [:] ISO...
... calculate the correct exposure. * Average: The entire area of the scene, with all lights that will adjust its white balance accordingly. This establishes for the camera exactly what white should look like under low lighting or darker areas of the image will be more grain in the image. * [Blank] Auto * [:] ISO...
User Manual
Page 33
... images. Using a combination of it. „ In [Continuous], [AEB], [Cont.flash], [Burst], and [Pre-Shot] capture mode, the [Voice Memo] is set to "On", the camera takes a quick shot without focusing. * On / Off Digi. Zoom This sets whether or not to 12x magnification. As long as you hold the shutter button...
... images. Using a combination of it. „ In [Continuous], [AEB], [Cont.flash], [Burst], and [Pre-Shot] capture mode, the [Voice Memo] is set to "On", the camera takes a quick shot without focusing. * On / Off Digi. Zoom This sets whether or not to 12x magnification. As long as you hold the shutter button...

User Manual
Page 35
Select the desired option item with newly compressed images. Select the desired setting with the changed image. To exit from the camera's internal memory to section in this manual titled "Attaching Voice Memos" for playback. 1. Fix Red Eyes Refer to enter its respective menu. 4. Resize Resizes a previously ...
Select the desired option item with newly compressed images. Select the desired setting with the changed image. To exit from the camera's internal memory to section in this manual titled "Attaching Voice Memos" for playback. 1. Fix Red Eyes Refer to enter its respective menu. 4. Resize Resizes a previously ...


