Polaroid 633060 - Mio Instant Camera Support and Manuals
Get Help and Manuals for this Polaroid item

View All Support Options Below
Free Polaroid 633060 manuals!
Problems with Polaroid 633060?
Ask a Question
Free Polaroid 633060 manuals!
Problems with Polaroid 633060?
Ask a Question
Most Recent Polaroid 633060 Questions

Popular Polaroid 633060 Manual Pages
User Guide - Page 1

... dark (p.11) Image too light (p.11) Image too dark due to back lighting (p.12)
13 Precautions 16 One-year Limited Warranty
Register your mio (p.16)
Camera features
Instant film
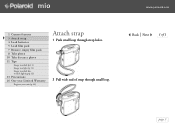
Next
1 of 2
Flash Auto range finder
Retractable lens
Shutter button
page 1
User Guide - Page 2

... (no icon) Fill flash ( )
Film exit slot
Strap holes
Film door lock
www.polaroid.com
Back Next
2 of 2
Status/film count LCD
Film counter Lighten photo on Darken photo on Fill flash on Distance setting on
Power button
Flash/function indicator light Viewfinder
Battery door
Film status window
yellow bar indicates film pack is in camera
Film compartment door
page 2
User Guide - Page 3
mio
www.polaroid.com
1 Camera features 3 Attach strap 4 Load batteries 5 Load film pack 7 Remove empty film pack 8 Take photo 10 Take distance photo 11 Tips
Image too dark (p....
User Guide - Page 4

... compartment door.
2 Insert batteries as shown. Back Next
1 of 1
CAUTION: DO NOT mix old or new batteries. mio
www.polaroid.com
1 Camera features 3 Attach strap 4 Load batteries 5 Load film pack 7 Remove empty film pack 8 Take photo 10 Take ...13 Precautions 16 One-year Limited Warranty
Register your mio (p.16)
Load batteries
This camera uses two 3V CR2 batteries.
page 4
User Guide - Page 5

...the center of 2
Use with the corresponding mark inside the film compartment. mio
www.polaroid.com
1 Camera features 3 Attach strap 4 Load batteries 5 Load film pack 7 Remove empty fi... open the film compartment door. Do not press on the film pack aligns with Polaroid mio instant film
2 Insert the film pack. Back Next
1 of the film pack. Hold the...
User Guide - Page 6

... 10.
2 of 2 page 6
The status LCD shows a dash.
4 Press the Shutter button to take pictures. the flash/ function light blinks once.
mio
www.polaroid.com
1 Camera features 3 Attach strap 4 Load batteries 5 Load film pack 7 Remove empty film pack 8 Take photo 10 Take distance photo 11 Tips
Image too dark...
User Guide - Page 7

...;lm compartment door and remove
CAUTION: DO NOT open film compartment door with film remaining in film pack.
1 of 1
page 7 mio
www.polaroid.com
1 Camera features 3 Attach strap 4 Load batteries 5 Load film pack 7 Remove empty film pack 8 Take photo 10 Take distance photo 11 Tips
Image too...
User Guide - Page 8

mio
www.polaroid.com
1 Camera features 3 Attach strap 4 Load batteries 5 Load film pack 7 Remove empty film pack 8 Take ... (p.12)
13 Precautions 16 One-year Limited Warranty
Register your subject. the flash/ function light blinks once. Back Next
The camera lens extends; Stand between 2.5 feet and 10 feet from your mio (p.16)
Take photo
1 Press the Power button .
2 Aim...
User Guide - Page 9

The photo ejects automatically. CAUTION: DO NOT pull on the photo. • For vertical pictures, hold camera as shown. Back Next
• For horizontal pictures, hold camera as shown with flash on top.
1 of 2
page 9 mio
www.polaroid.com
1 Camera features 3 Attach strap 4 Load batteries 5 Load film pack 7 Remove empty film pack...
User Guide - Page 10

The distance symbol appears in the status LCD.
1 of 1
page 10
mio
www.polaroid.com
1 Camera features 3 Attach strap 4 Load batteries 5 Load film pack 7 Remove empty film pack 8 Take photo 10 Take distance photo 11 Tips
Image too dark (p....
User Guide - Page 11
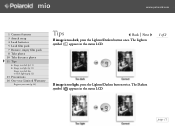
The Darken symbol ( ) appears in the status LCD. The Lighten symbol ( ) appears in the status LCD.
1 of 2
page 11 mio
www.polaroid.com
1 Camera features 3 Attach strap 4 Load batteries 5 Load film pack 7 Remove empty film pack 8 Take photo 10 Take distance photo 11 Tips
Image too dark (p....
User Guide - Page 12

mio
www.polaroid.com
1 Camera features 3 Attach strap 4 Load batteries 5 Load film pack 7 Remove empty film pack 8 Take photo 10 Take distance photo 11 Tips
Image too dark (p....
User Guide - Page 13

... off and lens will retract after 5 minutes.
1 of 3
page 13
Back Next
• DO NOT lay camera down on extended lens. mio
www.polaroid.com
1 Camera features 3 Attach strap 4 Load batteries 5 Load film pack 7 Remove empty film pack 8 Take photo 10 Take ...13 Precautions 16 One-year Limited Warranty
Register your mio (p.16)
Precautions
• DO NOT pull film from camera.
User Guide - Page 15

...Precautions
Back Next
Caution: This camera is battery operated. Film Caution: This process uses a caustic paste. Do not cut or take apart photos. mio
www.polaroid.com
1 Camera features 3 Attach strap 4 ... fluids, disassemble, or operate if dropped or damaged. Contact a Polaroid Service Center for repair information. To avoid electrical shock, do not expose to back lighting (p.12...
User Guide - Page 16

... one of the trademarks "Polaroid and Pixel Design" and "mio". Film and accessories also available. The warranty period is determined by , one -year limited
warranty FREE!
©2001 Polaroid Corporation, Cambridge, MA 02139 U.S.A., owner of the Polaroid Service Centers.
Register your mio visit us online at our option, repair or replace any camera found defective in manufacture within...
Polaroid 633060 Reviews
We have not received any reviews for Polaroid yet.