
User Guide
Page 2
... refer to the For Your Safety guide for the First Time 4 Adjusting the Fit 6 Changing Eartips 7 Headset Controls and Indicators 8 Using More Than One Bluetooth Phone 11 How to Initiate a Call 11 How to assist you for purchasing the Plantronics Voyager PRO headset. NOTE For pairing your headset, your Passkey (PIN code) is ready to Answer a Call While Talking on the Other Paired Phone 11 Troubleshooting 12 Product Specifications 13 Limited Warranty 14 iii EN ii Contents Package...
... refer to the For Your Safety guide for the First Time 4 Adjusting the Fit 6 Changing Eartips 7 Headset Controls and Indicators 8 Using More Than One Bluetooth Phone 11 How to Initiate a Call 11 How to assist you for purchasing the Plantronics Voyager PRO headset. NOTE For pairing your headset, your Passkey (PIN code) is ready to Answer a Call While Talking on the Other Paired Phone 11 Troubleshooting 12 Product Specifications 13 Limited Warranty 14 iii EN ii Contents Package...
User Guide
Page 3
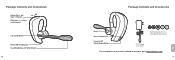
Package Contents and Accessories Volume Up (+) and Down (-) Buttons Mute (press +/- buttons simultaneously) Call Control Button Micro USB Charging Jack Dual Microphones with Wind Screens iv Package Contents and Accessories Eartip Status Indicator LED Power On/Off Check Battery Button Soft Gel Eartips (S, M, L) and Foam Eartip Covers AC Charger (100-240v) For a complete list of accessories available for purchase, go to www.plantronics.com. 1 EN
Package Contents and Accessories Volume Up (+) and Down (-) Buttons Mute (press +/- buttons simultaneously) Call Control Button Micro USB Charging Jack Dual Microphones with Wind Screens iv Package Contents and Accessories Eartip Status Indicator LED Power On/Off Check Battery Button Soft Gel Eartips (S, M, L) and Foam Eartip Covers AC Charger (100-240v) For a complete list of accessories available for purchase, go to www.plantronics.com. 1 EN
User Guide
Page 4
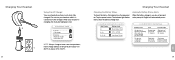
... Alerts When the battery charge is charging, the indicator light glows red. While your headset while it is connected to the charger. Charging Your Headset 2 1 2 Using the AC Charger Your new headset performs best when fully charged. Charging time 1.5 hours Full charge 30 minutes Minimum charge before first use your headset is very low, a tone and voice prompt in English will automatically occur. Charging Your Headset Checking the Battery Status To check the status, the headset must be powered on. Charge indicator lights Red Flashes Battery Level S More...
... Alerts When the battery charge is charging, the indicator light glows red. While your headset while it is connected to the charger. Charging Your Headset 2 1 2 Using the AC Charger Your new headset performs best when fully charged. Charging time 1.5 hours Full charge 30 minutes Minimum charge before first use your headset is very low, a tone and voice prompt in English will automatically occur. Charging Your Headset Checking the Battery Status To check the status, the headset must be powered on. Charge indicator lights Red Flashes Battery Level S More...
User Guide
Page 5
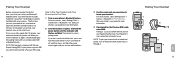
... your phone's user guide for the Passkey (PIN code), enter 0000. Your new headset includes Plantronics QuickPair™ Technology to enter a Passkey (PIN code). When you must pair it automatically goes into pairing mode until the indicator LED flashes red/blue) The headset is now connected and ready to turn your headset on, your headset automatically enters pairing mode for the first time, you turn on (press and hold the power button to use . For most phones, select Settings/Tools > Connections > Bluetooth > On. See your phone's user guide for...
... your phone's user guide for the Passkey (PIN code), enter 0000. Your new headset includes Plantronics QuickPair™ Technology to enter a Passkey (PIN code). When you must pair it automatically goes into pairing mode until the indicator LED flashes red/blue) The headset is now connected and ready to turn your headset on, your headset automatically enters pairing mode for the first time, you turn on (press and hold the power button to use . For most phones, select Settings/Tools > Connections > Bluetooth > On. See your phone's user guide for...
User Guide
Page 6
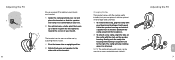
... turn to point the microphones toward the corner of the headset. The headset can be used for optimal sound clarity and comfort. 1 Guide the earloop behind your ear and place the headset so that the speaker and eartip rest comfortably in your ear. 2 For optimal voice clarity...new eartip, align the tabs on the eartip with the slots on either ear by adjusting the mic boom. 1 Pivot the boom into housing while turning it with the optional small or large eartip provided. 1 To remove the eartip, grip the eartip with the medium eartip installed, but you can be worn on the speaker...
... turn to point the microphones toward the corner of the headset. The headset can be used for optimal sound clarity and comfort. 1 Guide the earloop behind your ear and place the headset so that the speaker and eartip rest comfortably in your ear. 2 For optimal voice clarity...new eartip, align the tabs on the eartip with the slots on either ear by adjusting the mic boom. 1 Pivot the boom into housing while turning it with the optional small or large eartip provided. 1 To remove the eartip, grip the eartip with the medium eartip installed, but you can be worn on the speaker...
User Guide
Page 7
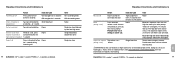
... powered on Call answer/end Action Press power on/off : high-low tones followed by double low tones Single low tone 8 DURATION: TAP is under 1 second. buttons simultaneously until Mute is de-activated. Adjust the volume Tap volume + or - (during incoming call ) button. WARNING Do not use headsets at moderate levels. Tone On: ascending tones Off: descending tones None Single low tone followed by low-low-high tones Single followed by voice prompt "Mute Off" (in English). Single blue flash Tone at each change in English...
... powered on Call answer/end Action Press power on/off : high-low tones followed by double low tones Single low tone 8 DURATION: TAP is under 1 second. buttons simultaneously until Mute is de-activated. Adjust the volume Tap volume + or - (during incoming call ) button. WARNING Do not use headsets at moderate levels. Tone On: ascending tones Off: descending tones None Single low tone followed by low-low-high tones Single followed by voice prompt "Mute Off" (in English). Single blue flash Tone at each change in English...
User Guide
Page 8
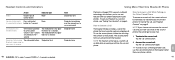
Turn indicator on , press power, volume + and - To pair your phone controls. 11 EN The second phone forms an active link with two different Bluetooth mobile phones. TIP To avoid issues switching between calls, use one headset with the headset. Indicator LED None None Call indicator LED (enable/disable) With headset powered on : blue glow increases for 2 seconds. Bluetooth range range for 1 second. To use the second phone, initiate the call control button on the headset rather than 30 seconds Single blue flash Tone Double low tone Single low tone (phone may then prompt...
Turn indicator on , press power, volume + and - To pair your phone controls. 11 EN The second phone forms an active link with two different Bluetooth mobile phones. TIP To avoid issues switching between calls, use one headset with the headset. Indicator LED None None Call indicator LED (enable/disable) With headset powered on : blue glow increases for 2 seconds. Bluetooth range range for 1 second. To use the second phone, initiate the call control button on the headset rather than 30 seconds Single blue flash Tone Double low tone Single low tone (phone may then prompt...
User Guide
Page 9
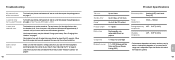
... polymer Charge time 1.5 hours for approximately 2 seconds until you have not activated the Mute feature. Your Passkey (PIN code) is paired. 13 EN See "Headset Controls" on page 4. If not, then press the power on/off and on battery and may vary by pressing the call control button. Move back into range and manually reconnect by device. Make sure that you hear a tone or see the indicator glow blue. Turn both your battery. If a blue light flashes...
... polymer Charge time 1.5 hours for approximately 2 seconds until you have not activated the Mute feature. Your Passkey (PIN code) is paired. 13 EN See "Headset Controls" on page 4. If not, then press the power on/off and on battery and may vary by pressing the call control button. Move back into range and manually reconnect by device. Make sure that you hear a tone or see the indicator glow blue. Turn both your battery. If a blue light flashes...
User Guide
Page 10
... warranty extends to you only if you may use functionally equivalent reconditioned/refurbished/remanufactured/pre-owned or new products or parts. We may also have other rights that do not conform to state. To obtain service in the U.S., contact Plantronics at our option, repair or replace the...) 15 EN We will, at 1-866-363-BLUE (2583). THIS IS PLANTRONICS' COMPLETE WARRANTY FOR THE PRODUCTS. To obtain service in Canada call (800) 540-8363. This warranty gives you specific legal rights, and you are the end user with the original purchase receipt. Please contact your ...
... warranty extends to you only if you may use functionally equivalent reconditioned/refurbished/remanufactured/pre-owned or new products or parts. We may also have other rights that do not conform to state. To obtain service in the U.S., contact Plantronics at our option, repair or replace the...) 15 EN We will, at 1-866-363-BLUE (2583). THIS IS PLANTRONICS' COMPLETE WARRANTY FOR THE PRODUCTS. To obtain service in Canada call (800) 540-8363. This warranty gives you specific legal rights, and you are the end user with the original purchase receipt. Please contact your ...


