
Operating Instructions
Page 7
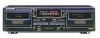
... goes off while the tape is moving , the cassette door may remain locked./n this button. DECK I eject button (A) • If the tape is moving (playback, tape winding, etc.), press the stop (•) button before pressing the eject (A) button. _) Deck I MS(music search) +,- I_1 IPF_d_qOIP//ON (_)...the power is turned off when the power is connected to the deck's circuits as long as the power cord is turned on before pressing this case, turn the power on . (_ DECK I REWIND AUTO PLAY button (_) DECK I operation buttons _1 : Reverse playback I_ : Forward playback model...
... goes off while the tape is moving , the cassette door may remain locked./n this button. DECK I eject button (A) • If the tape is moving (playback, tape winding, etc.), press the stop (•) button before pressing the eject (A) button. _) Deck I MS(music search) +,- I_1 IPF_d_qOIP//ON (_)...the power is turned off when the power is connected to the deck's circuits as long as the power cord is turned on before pressing this case, turn the power on . (_ DECK I REWIND AUTO PLAY button (_) DECK I operation buttons _1 : Reverse playback I_ : Forward playback model...
Operating Instructions
Page 8
...auto stop function). If playback or recording is in the treble range, cutting tape hiss and expanding the dynamic range. press and hold the stop (i) button of DECK II while DECK It is started from the beginning, DOLBY NR • Dolby NR System Dolby NR systems are loaded with the remote... control unit, adjust the unit as follows: With the power off. Continue to DECK II, press the stop mode. Only DECK II can be switched back and forth between the " 0 " and " -3 " marks indicates the reference level for the Dolby NR ...
...auto stop function). If playback or recording is in the treble range, cutting tape hiss and expanding the dynamic range. press and hold the stop (i) button of DECK II while DECK It is started from the beginning, DOLBY NR • Dolby NR System Dolby NR systems are loaded with the remote... control unit, adjust the unit as follows: With the power off. Continue to DECK II, press the stop mode. Only DECK II can be switched back and forth between the " 0 " and " -3 " marks indicates the reference level for the Dolby NR ...
Operating Instructions
Page 10
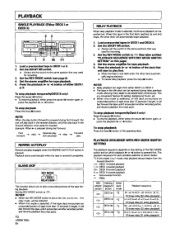
Set the REV MODE switch (see page 8). 4. PLAYBACK SINGLE PLAYBACK (Either DECK I or DECK II) n '_'_m 23 o_e et q in DECK I 1 5 15) (1) 1. Set the stereo amplifier for recording. 3. Set the DOLBY NR switch, • Always set the switchto the same positionthat was used for tape playback. 5. Press the playback II_ or Load a prerecorded tape in I il I I L___/ I II I or II. 2.
Set the REV MODE switch (see page 8). 4. PLAYBACK SINGLE PLAYBACK (Either DECK I or DECK II) n '_'_m 23 o_e et q in DECK I 1 5 15) (1) 1. Set the stereo amplifier for recording. 3. Set the DOLBY NR switch, • Always set the switchto the same positionthat was used for tape playback. 5. Press the playback II_ or Load a prerecorded tape in I il I I L___/ I II I or II. 2.
Operating Instructions
Page 11
... one . It can find the beginning of the desired selection and auto matically starts playback. To return to a previously played song, press the MS- Display the number of songs skipped. The level meter will return to the beginning of the present selection. When you wish...; When using tapes with sound breaks several seconds long within selections. • When listening to recorded conferences or talk shows, where sound is pressed more times than 4 seconds) between selections, advances the tape in the forward or reverse direction to find a selection located up to 15 selections...
... one . It can find the beginning of the desired selection and auto matically starts playback. To return to a previously played song, press the MS- Display the number of songs skipped. The level meter will return to the beginning of the present selection. When you wish...; When using tapes with sound breaks several seconds long within selections. • When listening to recorded conferences or talk shows, where sound is pressed more times than 4 seconds) between selections, advances the tape in the forward or reverse direction to find a selection located up to 15 selections...
Operating Instructions
Page 12
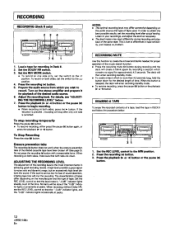
Set the REV MODE switch. • To record on the stereo amplifier and prepare it for recording in Deck II. 2. Turn on one side only, set the switch to the 7 position,To recordon both sides,set the switch to record. Prepare the audio source ...from which you wish to the position, 4. Load a tape for playback of the desired audio source. 6, Adjust the recording level. Press the playback (ib or n_ 76 1. For details, see "ADJUSTING THE RECORDING LEVEL" below. 7. Set the DOLBY NR switch. 3. I RECORDING I RECORDING...
Set the REV MODE switch. • To record on the stereo amplifier and prepare it for recording in Deck II. 2. Turn on one side only, set the switch to the 7 position,To recordon both sides,set the switch to record. Prepare the audio source ...from which you wish to the position, 4. Load a tape for playback of the desired audio source. 6, Adjust the recording level. Press the playback (ib or n_ 76 1. For details, see "ADJUSTING THE RECORDING LEVEL" below. 7. Set the DOLBY NR switch. 3. I RECORDING I RECORDING...
Operating Instructions
Page 13
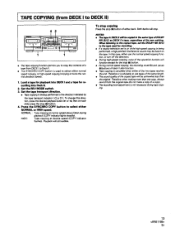
... the normal playback speed). 1. Set the tape transport direction. • Tape copyingis alwaysperformed in the directionindicatedby the tape transport indicator( ). Load a tape for playback into DECK I to Deck II. • The SYNCHRO COPY button is used to copy the contents of a tape fmornDECK I and a tape for recording into...
... the normal playback speed). 1. Set the tape transport direction. • Tape copyingis alwaysperformed in the directionindicatedby the tape transport indicator( ). Load a tape for playback into DECK I to Deck II. • The SYNCHRO COPY button is used to copy the contents of a tape fmornDECK I and a tape for recording into...

Operating Instructions
Page 14
... rectified even after exemising the checks listed below . The door does not close. • The cassette is something wrong with this component, check the points below , ask your nearest PIONEER authodzed service center or your dealer to which the power cord is connected is off. •...The amplifier input selector is not correctly set too low. • The amplifier is moving). • Power was turnedoff with the tape moving, • Press the stop mode (tape is not delivering a recording signal (from the tuner, CD player, etc.). • Wrong connection, connection cord removed, poor ...
... rectified even after exemising the checks listed below . The door does not close. • The cassette is something wrong with this component, check the points below , ask your nearest PIONEER authodzed service center or your dealer to which the power cord is connected is off. •...The amplifier input selector is not correctly set too low. • The amplifier is moving). • Power was turnedoff with the tape moving, • Press the stop mode (tape is not delivering a recording signal (from the tuner, CD player, etc.). • Wrong connection, connection cord removed, poor ...

