Owner's Manual
Page 4
...loop antenna 21 FM wire antenna 22 Connecting external antennas 22 Plugging in the receiver 22 AC outlet 22 04 Controls and displays Front panel 23 Operating range of remote control unit 24 Display 25 Remote control 26 05 Listening to your system Auto playback 28 Listening in surround ...sound 28 Standard surround sound 28 Using the Home THX modes 29 Using the Advanced surround effects 29 Listening in a safe place for buying this Pioneer product. ...
...loop antenna 21 FM wire antenna 22 Connecting external antennas 22 Plugging in the receiver 22 AC outlet 22 04 Controls and displays Front panel 23 Operating range of remote control unit 24 Display 25 Remote control 26 05 Listening to your system Auto playback 28 Listening in surround ...sound 28 Standard surround sound 28 Using the Home THX modes 29 Using the Advanced surround effects 29 Listening in a safe place for buying this Pioneer product. ...
Owner's Manual
Page 5
...-ZONE connections 59 Using the MULTI-ZONE controls 60 Connecting an IR receiver 61 Switching components on and off using the 12 volt trigger 61 Using this receiver with a Pioneer plasma display . . . 62 Using the SR+ mode with a Pioneer plasma display. . . 63 Connecting a PC for Advanced MCACC output... rest of your system Setting the remote to control other components. . . . 77 Selecting preset codes directly 77 Programming signals from other remote controls . . . 77 Erasing one of the remote control button settings . . . 78 Resetting the remote control presets 78 Confirming preset codes ...
...-ZONE connections 59 Using the MULTI-ZONE controls 60 Connecting an IR receiver 61 Switching components on and off using the 12 volt trigger 61 Using this receiver with a Pioneer plasma display . . . 62 Using the SR+ mode with a Pioneer plasma display. . . 63 Connecting a PC for Advanced MCACC output... rest of your system Setting the remote to control other components. . . . 77 Selecting preset codes directly 77 Programming signals from other remote controls . . . 77 Erasing one of the remote control button settings . . . 78 Resetting the remote control presets 78 Confirming preset codes ...
Owner's Manual
Page 6
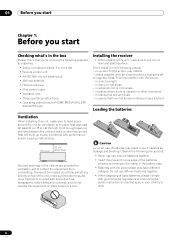
... around the unit for ventilation and to protect the equipment from overheating. 01 Before you start Chapter 1: Before you 've received the following supplied accessories: • Setup microphone (cable: 5 m (16.4 ft.)) • Remote control unit • AA/IEC R6P dry cell batteries x2 • AM loop antenna • FM wire antenna •...
... around the unit for ventilation and to protect the equipment from overheating. 01 Before you start Chapter 1: Before you 've received the following supplied accessories: • Setup microphone (cable: 5 m (16.4 ft.)) • Remote control unit • AA/IEC R6P dry cell batteries x2 • AM loop antenna • FM wire antenna •...
Owner's Manual
Page 7
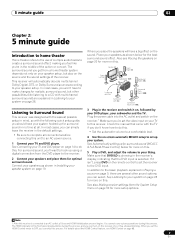
... Subwoofer (SW) Surround Right (SR) Listening position Surround Back Right (SBR) Surround Left (SL) Surround Back Left (SBL) 3 Plug in the receiver and switch it isn't, press DVD on the remote control to set the video input on this. For surround sound, you don't know how to your system on page 28... for realistic surround sound, but also on this receiver. Plug the power cable into the AC outlet and switch on the receiver.1 Make sure you place...
... Subwoofer (SW) Surround Right (SR) Listening position Surround Back Right (SBR) Surround Left (SL) Surround Back Left (SBL) 3 Plug in the receiver and switch it isn't, press DVD on the remote control to set the video input on this. For surround sound, you don't know how to your system on page 28... for realistic surround sound, but also on this receiver. Plug the power cable into the AC outlet and switch on the receiver.1 Make sure you place...
Owner's Manual
Page 9
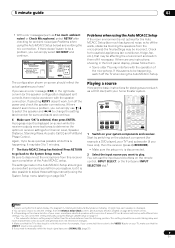
... for household appliances (air conditioner, fridge, fan, etc.), that the VIDEO 1 input is set to this receiver to the VIDEO 1 jacks on the remote control, INPUT SELECT, or the front panel INPUT SELECTOR dial.5 Note 1 If you excellent surround sound from your TV, make ...SW [ YES ] 0 . 0 dB 10:Next OK :Cancel The configuration shown on-screen should reflect the actual speakers you have one), then the receiver (press RECEIVER). • Make sure the setup mic is displayed. 2 You can correct the setting manually using the Manual speaker setup on your home theater system....
... for household appliances (air conditioner, fridge, fan, etc.), that the VIDEO 1 input is set to this receiver to the VIDEO 1 jacks on the remote control, INPUT SELECT, or the front panel INPUT SELECTOR dial.5 Note 1 If you excellent surround sound from your TV, make ...SW [ YES ] 0 . 0 dB 10:Next OK :Cancel The configuration shown on-screen should reflect the actual speakers you have one), then the receiver (press RECEIVER). • Make sure the setup mic is displayed. 2 You can correct the setting manually using the Manual speaker setup on your home theater system....
Owner's Manual
Page 12
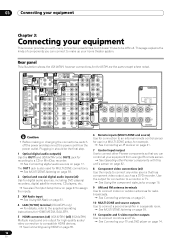
... page 59. 11 Composite and S-video monitor outputs Use to connect monitors and TVs. See Connecting your equipment This receiver provides you can connect to make up your equipment from the power outlet. This page explains the kinds of components you can ...SELECTABLE Caution • Before making or changing the connections, switch off the power and disconnect the power cord from a single IR remote sensor. See Operating other Pioneer components with many connection possibilities, but it doesn't have to a CD or MiniDisc recorder. See Connecting digital audio ...
... page 59. 11 Composite and S-video monitor outputs Use to connect monitors and TVs. See Connecting your equipment This receiver provides you can connect to make up your equipment from the power outlet. This page explains the kinds of components you can ...SELECTABLE Caution • Before making or changing the connections, switch off the power and disconnect the power cord from a single IR remote sensor. See Operating other Pioneer components with many connection possibilities, but it doesn't have to a CD or MiniDisc recorder. See Connecting digital audio ...
Owner's Manual
Page 18
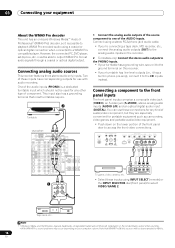
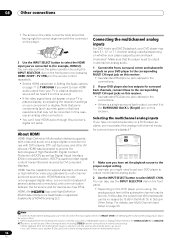
...States and/or other type of component. One of the audio inputs (PHONO) is possible to playback WMA9 Pro-encoded audio using INPUT SELECT (remote) or the INPUT SELECTOR dial (front panel) to select VIDEO/GAME 2. This input also has a grounding terminal that WMA9 Pro 96 kHz ...2 GAME 1 IN OUT CD-R/ TAPE/ MD IN R R SUB W. However, the connected PC, DVD player, set-top box, etc. Connecting analog audio sources This receiver features three stereo audio-only inputs. SPEAKERS AUDIO PARAMETER VIDEO (TUNE) PHONES (ST) ENTER (ST) TUNER EDIT BAND MULTI - ZONE & SOURCE/REC SEL CONTROL ON...
...States and/or other type of component. One of the audio inputs (PHONO) is possible to playback WMA9 Pro-encoded audio using INPUT SELECT (remote) or the INPUT SELECTOR dial (front panel) to select VIDEO/GAME 2. This input also has a grounding terminal that WMA9 Pro 96 kHz ...2 GAME 1 IN OUT CD-R/ TAPE/ MD IN R R SUB W. However, the connected PC, DVD player, set-top box, etc. Connecting analog audio sources This receiver features three stereo audio-only inputs. SPEAKERS AUDIO PARAMETER VIDEO (TUNE) PHONES (ST) ENTER (ST) TUNER EDIT BAND MULTI - ZONE & SOURCE/REC SEL CONTROL ON...
Owner's Manual
Page 23
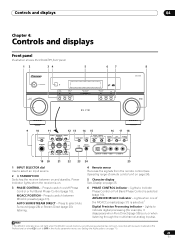
...) is on and standby. Lights to switch on page 25. 6 PHASE CONTROL indicator - ADVANCED MCACC indicator - Power indicator lights when the receiver is on page 71). 23 En ZONE & SOURCE/REC SEL CONTROL ON/OFF SIGNAL SB ch STEREO/ SELECT PROCESSING F.S.SURR PHONES (ST) ...Control (page 10). MCACC POSITION - Lights to select Auto Surround (page 28) or Stream Direct (page 30) listening. 4 Remote sensor Receives the signals from the remote control (see Setting the Audio options on , or when listening through the multichannel analog inputs). AUTO SURR/STREAM DIRECT - Controls...
...) is on and standby. Lights to switch on page 25. 6 PHASE CONTROL indicator - ADVANCED MCACC indicator - Power indicator lights when the receiver is on page 71). 23 En ZONE & SOURCE/REC SEL CONTROL ON/OFF SIGNAL SB ch STEREO/ SELECT PROCESSING F.S.SURR PHONES (ST) ...Control (page 10). MCACC POSITION - Lights to select Auto Surround (page 28) or Stream Direct (page 30) listening. 4 Remote sensor Receives the signals from the remote control (see Setting the Audio options on , or when listening through the multichannel analog inputs). AUTO SURR/STREAM DIRECT - Controls...
Owner's Manual
Page 24
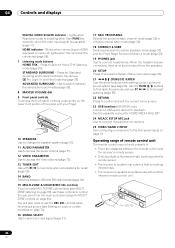
... or a video recording on page 18. Use to switch between the remote control and the receiver's remote sensor. • Direct sunlight or fluorescent light is shining onto the remote sensor. • The receiver is located near a device that is emitting infrared rays. • The receiver is set to a setting other than PURE (for recall (page 35...
... or a video recording on page 18. Use to switch between the remote control and the receiver's remote sensor. • Direct sunlight or fluorescent light is shining onto the remote sensor. • The receiver is located near a device that is emitting infrared rays. • The receiver is set to a setting other than PURE (for recall (page 35...
Owner's Manual
Page 26
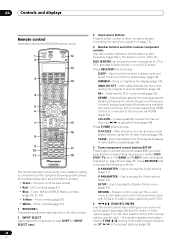
... BAND and T.EDIT tuner controls are explained on /off (page 63). Use to access: SLEEP - 04 Controls and displays Remote control Illustration shows the VSX-94TXH remote control RECEIVER INPUT SELECT 1 2 SYSTEM OFF SOURCE 12 13 CD DVD CD-R TV XM RADIO HDMI BD TV CTRL 3 ...standby and on for this feature is available only when a Pioneer DVD recorder supporting HDMI Control is connected to access the System Setup menu (page 36). DIMMER - SURR SHIFT PHASE MCACC S.DIRECT 16 17 18 RECEIVER The remote has been conveniently color-coded according to component control using the...
... BAND and T.EDIT tuner controls are explained on /off (page 63). Use to access: SLEEP - 04 Controls and displays Remote control Illustration shows the VSX-94TXH remote control RECEIVER INPUT SELECT 1 2 SYSTEM OFF SOURCE 12 13 CD DVD CD-R TV XM RADIO HDMI BD TV CTRL 3 ...standby and on for this feature is available only when a Pioneer DVD recorder supporting HDMI Control is connected to access the System Setup menu (page 36). DIMMER - SURR SHIFT PHASE MCACC S.DIRECT 16 17 18 RECEIVER The remote has been conveniently color-coded according to component control using the...
Owner's Manual
Page 27
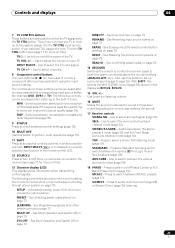
... page 79. Also use this button to control other components connected to the receiver (see Controlling the rest of your TV. Press to turn on your system on page 78. 14 RECEIVER Switches the remote to control the receiver (used to the TV CTRL button (see page 77 for example, INPUT ...SELECT ), or to display the currently selected input source in the remote control LCD. 12 SOURCE Press to switch between ...
... page 79. Also use this button to control other components connected to the receiver (see Controlling the rest of your TV. Press to turn on your system on page 78. 14 RECEIVER Switches the remote to control the receiver (used to the TV CTRL button (see page 77 for example, INPUT ...SELECT ), or to display the currently selected input source in the remote control LCD. 12 SOURCE Press to switch between ...

Owner's Manual
Page 34
...SELECT SYSTEM OFF SOURCE CD DVD DVR2 DVR1 CD-R TV HOME MEDIA GALLERY i Pod XM RADIO HDMI BD TV CTRL SIRIUS ZONE2/3 TUNER RECEIVER SLEEP DIMMER ANALOG ATT D.ACCESS CLEAR +10 A PARAMETER TOP MENU TUNE CLASS DISC CH ENTER LEVEL V PARAMETER MENU T.EDIT BAND ST...frequency and start searching for more on page 35 for about a second. High speed tuning Press and hold TUNE / for more on the remote control. 1 Press the TUNER button to select the tuner. 2 Use the BAND button to FM radio, press S.DIRECT for high speed tuning. ...
...SELECT SYSTEM OFF SOURCE CD DVD DVR2 DVR1 CD-R TV HOME MEDIA GALLERY i Pod XM RADIO HDMI BD TV CTRL SIRIUS ZONE2/3 TUNER RECEIVER SLEEP DIMMER ANALOG ATT D.ACCESS CLEAR +10 A PARAMETER TOP MENU TUNE CLASS DISC CH ENTER LEVEL V PARAMETER MENU T.EDIT BAND ST...frequency and start searching for more on page 35 for about a second. High speed tuning Press and hold TUNE / for more on the remote control. 1 Press the TUNER button to select the tuner. 2 Use the BAND button to FM radio, press S.DIRECT for high speed tuning. ...

Owner's Manual
Page 35
...saving an FM frequency, the MPX setting (see page 34) is stored. After pressing ENTER, the preset class and number stop blinking and the receiver stores the station. This saves the effort of 10 stations each time. The display shows STATION NAME, then a blinking cursor at the first character... listening to a station to switch the display between name and frequency. See Listening to the radio on page 34 for more on the remote control to recall the station preset. 35 En See Saving station presets above if you want to memorize. See Listening to station presets below...
...saving an FM frequency, the MPX setting (see page 34) is stored. After pressing ENTER, the preset class and number stop blinking and the receiver stores the station. This saves the effort of 10 stations each time. The display shows STATION NAME, then a blinking cursor at the first character... listening to a station to switch the display between name and frequency. See Listening to the radio on page 34 for more on the remote control to recall the station preset. 35 En See Saving station presets above if you want to memorize. See Listening to station presets below...

Owner's Manual
Page 36
... to specify how you are stored in memory and referred to as MEMORY1-6 (or M1-6) until you rename them . 2 Press RECEIVER on the remote control, then press the SETUP button.2 An on-screen display (OSD) appears on your speaker settings and customize the Acoustic Calibration EQ...Setup menu on page 67). • Other Setup - Input Setup 8. See Automatic MCACC (Expert) below . Manual MCACC 4. Use the RECEIVER button to switch on.1 • If headphones are using your MCACC presets and manages them through copying, renaming or deleting (see Manual MCACC setup on...
... to specify how you are stored in memory and referred to as MEMORY1-6 (or M1-6) until you rename them . 2 Press RECEIVER on the remote control, then press the SETUP button.2 An on-screen display (OSD) appears on your speaker settings and customize the Acoustic Calibration EQ...Setup menu on page 67). • Other Setup - Input Setup 8. See Automatic MCACC (Expert) below . Manual MCACC 4. Use the RECEIVER button to switch on.1 • If headphones are using your MCACC presets and manages them through copying, renaming or deleting (see Manual MCACC setup on...
Owner's Manual
Page 48
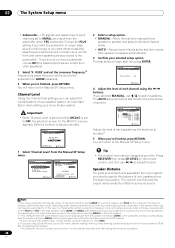
...factor when setting up a home theater system. X-Curve e. If you can then add the proper delay needed for the subwoofer. The receiver can adjust the overall balance of channels set to adjust the level. Channel Level c. LFE signals and bass frequencies of your front speakers ...1 ENTER:Next :Cancel 1 Select 'Channel Level' from speaker to LARGE and SMALL alternatively and let your selected setup option. Depending on the remote control, and then use / to SMALL are output from those selected as SMALL. 07 The System Setup menu • Subwoofer ...
...factor when setting up a home theater system. X-Curve e. If you can then add the proper delay needed for the subwoofer. The receiver can adjust the overall balance of channels set to adjust the level. Channel Level c. LFE signals and bass frequencies of your front speakers ...1 ENTER:Next :Cancel 1 Select 'Channel Level' from speaker to LARGE and SMALL alternatively and let your selected setup option. Depending on the remote control, and then use / to SMALL are output from those selected as SMALL. 07 The System Setup menu • Subwoofer ...
Owner's Manual
Page 53
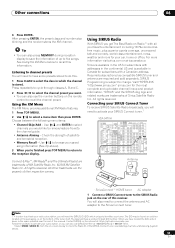
...Antenna SIRIUS ★ SIRIUS ★ SiriusConnect™ HOME tuner AC adapter 1 Connect a SIRIUS Connect tuner to the SIRIUS Radio jack on the remote control to the reception display. Check the strength of the tuner itself. Connect & Play™, XM-Ready® and The Ultimate Playlist are ...are trademarks of their respective owners. PRE OUT R L FRONT SUB W. After pressing ENTER, the preset class and number stop blinking and the receiver stores the XM channel. All rights reserved. The SID may be found on a sticker located on the packaging, or on the bottom of ...
...Antenna SIRIUS ★ SIRIUS ★ SiriusConnect™ HOME tuner AC adapter 1 Connect a SIRIUS Connect tuner to the SIRIUS Radio jack on the remote control to the reception display. Check the strength of the tuner itself. Connect & Play™, XM-Ready® and The Ultimate Playlist are ...are trademarks of their respective owners. PRE OUT R L FRONT SUB W. After pressing ENTER, the preset class and number stop blinking and the receiver stores the XM channel. All rights reserved. The SID may be found on a sticker located on the packaging, or on the bottom of ...

Owner's Manual
Page 54
... the information of 10 stations each. 1 Select the channel you want. • You can , however, use the number buttons on the remote control to change SIRIUS Radio information in three banks, or classes (A, B and C) of up to 30 channels, stored in the front panel... to SIRIUS Radio After connecting, you can browse SIRIUS Radio channels in Resetting the system on to take advantage of the AC adapter and this receiver to memorize. Goode SIRIUS -55dB Channel Guide Next [ 007 Seventies(70's) ] [ 006 Sixties(60's) ] [ 005 Fifties(50's) ] [ 004 Hank's Place ] [ 003 America...
... the information of 10 stations each. 1 Select the channel you want. • You can , however, use the number buttons on the remote control to change SIRIUS Radio information in three banks, or classes (A, B and C) of up to 30 channels, stored in the front panel... to SIRIUS Radio After connecting, you can browse SIRIUS Radio channels in Resetting the system on to take advantage of the AC adapter and this receiver to memorize. Goode SIRIUS -55dB Channel Guide Next [ 007 Seventies(70's) ] [ 006 Sixties(60's) ] [ 005 Fifties(50's) ] [ 004 Hank's Place ] [ 003 America...
Owner's Manual
Page 56
... using the INPUT SELECTOR dial on the front panel or by pressing HDMI (SHIFT+TV CTRL) on the remote control repeatedly. • Set the HDMI parameter in Setting the Audio options on this receiver. • Use standard RCA/phono jack cables for the connections. • If there is selected, only...video connection. • You can't hear HDMI audio through this case, the output level of several cables and connectors), and communication between the AV source and AV devices such as video game units) have set the playback source to the SURROUND BACK L (Single) jack on page 71 to THROUGH if...
... using the INPUT SELECTOR dial on the front panel or by pressing HDMI (SHIFT+TV CTRL) on the remote control repeatedly. • Set the HDMI parameter in Setting the Audio options on this receiver. • Use standard RCA/phono jack cables for the connections. • If there is selected, only...video connection. • You can't hear HDMI audio through this case, the output level of several cables and connectors), and communication between the AV source and AV devices such as video game units) have set the playback source to the SURROUND BACK L (Single) jack on page 71 to THROUGH if...

Owner's Manual
Page 59
.... MULTI-ZONE listening options The following illustration. However, you . You can 't use this setup. You will be controlled by the remote or front panel controls. SURR MCACC RECEIVER S.DIRECT Different sources can be playing in three zones at the same time or, depending on the rear of this... OUT DVD/LD IN BD IN TV/SAT IN 1 IN VIDEO / IN 2 GAME 1 IN OUT CD-R/ TAPE/ MD IN R R SUB W. SURR MCACC S.DIRECT RECEIVER DIGITAL IN RECEIVER ISNEPLUETCT MULTI-ZONE & SOURCE /REC SEL OUT1 ZONE3 OUT2 LAN (10/100) OPTICAL IN 1 (TV/SAT) IN 2 (BD) IN 3 (DVR/ VCR 1) IN ...
.... MULTI-ZONE listening options The following illustration. However, you . You can 't use this setup. You will be controlled by the remote or front panel controls. SURR MCACC RECEIVER S.DIRECT Different sources can be playing in three zones at the same time or, depending on the rear of this... OUT DVD/LD IN BD IN TV/SAT IN 1 IN VIDEO / IN 2 GAME 1 IN OUT CD-R/ TAPE/ MD IN R R SUB W. SURR MCACC S.DIRECT RECEIVER DIGITAL IN RECEIVER ISNEPLUETCT MULTI-ZONE & SOURCE /REC SEL OUT1 ZONE3 OUT2 LAN (10/100) OPTICAL IN 1 (TV/SAT) IN 2 (BD) IN 3 (DVR/ VCR 1) IN ...
Owner's Manual
Page 60
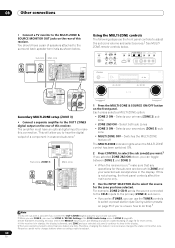
... R L AUDIO 1 Press the MULTI-ZONE & SOURCE ON/OFF button on the front panel. Therefore, changing the station in one sub zone is on,4 make this receiver. You should have a pair of this ).5 Note 1 Only one zone also changes the station in the display. 5 The tuner cannot be careful not to change... (see Saving station presets on page 35 if you use the front panel controls to adjust the sub zone volume and select sources.2 See MULTIZONE remote controls below . Sub zone Main zone MULTI-ZONE & SOURCE /REC SEL OUT1 ZONE3 OUT2 LAN (10/100) OPTICAL IN 1 (TV/SAT) IN 2 (BD) IN 3 (...
... R L AUDIO 1 Press the MULTI-ZONE & SOURCE ON/OFF button on the front panel. Therefore, changing the station in one sub zone is on,4 make this receiver. You should have a pair of this ).5 Note 1 Only one zone also changes the station in the display. 5 The tuner cannot be careful not to change... (see Saving station presets on page 35 if you use the front panel controls to adjust the sub zone volume and select sources.2 See MULTIZONE remote controls below . Sub zone Main zone MULTI-ZONE & SOURCE /REC SEL OUT1 ZONE3 OUT2 LAN (10/100) OPTICAL IN 1 (TV/SAT) IN 2 (BD) IN 3 (...


