Owner's Manual
Page 6
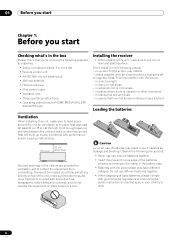
... dispersal (at the top). 01 Before you start Chapter 1: Before you start Checking what's in the box Please check that you've received the following supplied accessories: • Setup microphone (cable: 5 m (16.4 ft.)) • Remote control unit • AA/IEC R6P dry cell batteries x2 • AM loop antenna • FM wire...
... dispersal (at the top). 01 Before you start Chapter 1: Before you start Checking what's in the box Please check that you've received the following supplied accessories: • Setup microphone (cable: 5 m (16.4 ft.)) • Remote control unit • AA/IEC R6P dry cell batteries x2 • AM loop antenna • FM wire...
Owner's Manual
Page 8
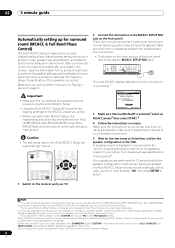
...SETUP MIC jack on this .5 If no obstacles between the speakers and the microphone. • Push down on the receiver and your normal listening position (use the System Setup menu in the OSD. RECEIVER INPUT SELECT SYSTEM OFF SOURCE CD DVD DVR2 DVR1 CD-R TV HOME MEDIA GALLERY... 1 ] S TA R T ENTER:Start :Cancel 3 Make sure 'Normal (Default)' is connected, and if you set up the microphone provided with your system, the receiver uses the information from a series of the speakers connected. Caution • The test tones used for storing surround sound settings for more on...
...SETUP MIC jack on this .5 If no obstacles between the speakers and the microphone. • Push down on the receiver and your normal listening position (use the System Setup menu in the OSD. RECEIVER INPUT SELECT SYSTEM OFF SOURCE CD DVD DVR2 DVR1 CD-R TV HOME MEDIA GALLERY... 1 ] S TA R T ENTER:Start :Cancel 3 Make sure 'Normal (Default)' is connected, and if you set up the microphone provided with your system, the receiver uses the information from a series of the speakers connected. Caution • The test tones used for storing surround sound settings for more on...
Owner's Manual
Page 9
.... SURR SHIFT PHASE MCACC S.DIRECT 1 Switch on the characteristics of your system components and receiver. Press RETURN to go back to the System Setup menu.2 Be sure to disconnect the microphone from the microphone) the final settings may take 3 to 7 minutes. 7 The Auto MCACC Setup has ...you need to be incorrect. You can also choose to view the settings from the listening position. or Check Microphone) select RETRY after checking for example, if you connected this receiver to the VIDEO 1 jacks on the remote control, INPUT SELECT, or the front panel INPUT SELECTOR dial.5 ...
.... SURR SHIFT PHASE MCACC S.DIRECT 1 Switch on the characteristics of your system components and receiver. Press RETURN to go back to the System Setup menu.2 Be sure to disconnect the microphone from the microphone) the final settings may take 3 to 7 minutes. 7 The Auto MCACC Setup has ...you need to be incorrect. You can also choose to view the settings from the listening position. or Check Microphone) select RETRY after checking for example, if you connected this receiver to the VIDEO 1 jacks on the remote control, INPUT SELECT, or the front panel INPUT SELECTOR dial.5 ...

Owner's Manual
Page 11
...on . Also, when your PC on page 64). 3 • The FULL BAND PHASE CTRL mode cannot be set to this receiver, the original characteristics of group delay of the speakers calibrated and the corrected characteristics of group delay can even hear the lip movement...calibrate and analyze the frequency-phase characteristics of left and right speakers. Note that you perform the Auto MCACC setup with the supplied microphone, therefore flattening the analyzed frequency-phase characteristics during audio signal playback. Though these speakers are plugged in the System Setup (see ...
...on . Also, when your PC on page 64). 3 • The FULL BAND PHASE CTRL mode cannot be set to this receiver, the original characteristics of group delay of the speakers calibrated and the corrected characteristics of group delay can even hear the lip movement...calibrate and analyze the frequency-phase characteristics of left and right speakers. Note that you perform the Auto MCACC setup with the supplied microphone, therefore flattening the analyzed frequency-phase characteristics during audio signal playback. Though these speakers are plugged in the System Setup (see ...
Owner's Manual
Page 24
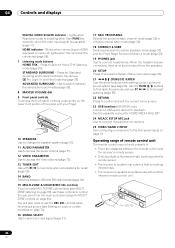
... sensor. • Direct sunlight or fluorescent light is shining onto the remote sensor. • The receiver is located near a device that is emitting infrared rays. • The receiver is no sound output from the main zone (see Making an audio or a video recording on page 73). 16 SIGNAL SELECT ...(page 71). You will also need to a setting other than PURE (for HOME MEDIA GALLERY. 24 MCACC SETUP MIC jack Use to connect the supplied microphone. 25 VIDEO/GAME 2 INPUT See Connecting a component to select a Home THX listening mode (page 29). Lights when Resolution is set to use these ...
... sensor. • Direct sunlight or fluorescent light is shining onto the remote sensor. • The receiver is located near a device that is emitting infrared rays. • The receiver is no sound output from the main zone (see Making an audio or a video recording on page 73). 16 SIGNAL SELECT ...(page 71). You will also need to a setting other than PURE (for HOME MEDIA GALLERY. 24 MCACC SETUP MIC jack Use to connect the supplied microphone. 25 VIDEO/GAME 2 INPUT See Connecting a component to select a Home THX listening mode (page 29). Lights when Resolution is set to use these ...

Owner's Manual
Page 37
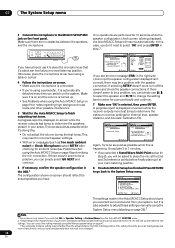
...-Point setting OFF if you only use two more on this receiver, the test tone is applied to the front left and right speakers to SYMMETRY. The System Setup menu 07 Important • Make sure the microphone/speakers are set individually so no special weighting is given to ... in accordance with the front speaker settings (no errors occur. For details, see Setting the Audio options on -screen and note the last microphone placement will be analyzed for each of inactivity. Surr Back System 3. Manual MCACC 4. In addition to measurements at the reference point indicated on...
...-Point setting OFF if you only use two more on this receiver, the test tone is applied to the front left and right speakers to SYMMETRY. The System Setup menu 07 Important • Make sure the microphone/speakers are set individually so no special weighting is given to ... in accordance with the front speaker settings (no errors occur. For details, see Setting the Audio options on -screen and note the last microphone placement will be analyzed for each of inactivity. Surr Back System 3. Manual MCACC 4. In addition to measurements at the reference point indicated on...
Owner's Manual
Page 38
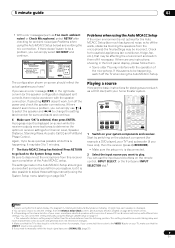
...Multi-Point setup (in step 2), you will be a problem with different size settings. Auto MCACC Now Analyzing... 0 . 0dB ( 2/11) Environment Check Ambient Noise Microphone Speaker YES/NO [ OK ] [ ] [ ] :Cancel DVD/LD 1. Speaker Distance 4. You can simply select GO NEXT and continue. 6 If necessary, ...your setup. A progress report is also possible to adjust these settings manually using the Auto MCACC Setup on -screen while the receiver outputs test tones to determine the speakers present in incorrect speaker settings. • With error messages (such as possible while it...
...Multi-Point setup (in step 2), you will be a problem with different size settings. Auto MCACC Now Analyzing... 0 . 0dB ( 2/11) Environment Check Ambient Noise Microphone Speaker YES/NO [ OK ] [ ] [ ] :Cancel DVD/LD 1. Speaker Distance 4. You can simply select GO NEXT and continue. 6 If necessary, ...your setup. A progress report is also possible to adjust these settings manually using the Auto MCACC Setup on -screen while the receiver outputs test tones to determine the speakers present in incorrect speaker settings. • With error messages (such as possible while it...
Owner's Manual
Page 39
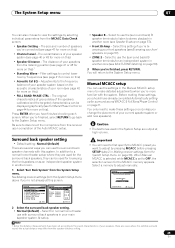
...unless you change the placement of your main (speaker system A) setup. You only need to first specify the MCACC preset you want to disconnect the microphone from the System Setup menu on page 36). DVD/LD - 5 5 . 0dB 3. Select to use the settings in the Manual MCACC setup menu... (surround back) B speaker terminals to listen to make detailed adjustments when you're more on page 57). • Front Bi-Amp - See Making receiver settings from the MCACC Data Check screen: • Speaker Setting - The distance of your front speakers on this ) • FULL BAND PHASE CTRL ...
...unless you change the placement of your main (speaker system A) setup. You only need to first specify the MCACC preset you want to disconnect the microphone from the System Setup menu on page 36). DVD/LD - 5 5 . 0dB 3. Select to use the settings in the Manual MCACC setup menu... (surround back) B speaker terminals to listen to make detailed adjustments when you're more on page 57). • Front Bi-Amp - See Making receiver settings from the MCACC Data Check screen: • Speaker Setting - The distance of your front speakers on this ) • FULL BAND PHASE CTRL ...

Owner's Manual
Page 40
...8226; After pressing ENTER, test tones will change depending on page 41). • Standing Wave - DVD/LD 0 . 0 dB 3a. See Making receiver settings from the System Setup menu. DVD/LD - 55.0dB System Setup MENU 1. Input Setup 8. The following setting can achieve better surround sound by ...properly adjusting the overall balance of your listening room (see Fine Speaker Distance on which speaker you select. • If you connect the microphone to match the reference speaker. Manual MCACC - 55.0dB a. Standing Wave d. Use / to adjust the volume of the...
...8226; After pressing ENTER, test tones will change depending on page 41). • Standing Wave - DVD/LD 0 . 0 dB 3a. See Making receiver settings from the System Setup menu. DVD/LD - 55.0dB System Setup MENU 1. Input Setup 8. The following setting can achieve better surround sound by ...properly adjusting the overall balance of your listening room (see Fine Speaker Distance on which speaker you select. • If you connect the microphone to match the reference speaker. Manual MCACC - 55.0dB a. Standing Wave d. Use / to adjust the volume of the...

Owner's Manual
Page 43
...slope is not necessary if you're satisfied with these settings. low frequencies - EQ Pro. Note that is influenced by this receiver.1 Setting Acoustic Calibration EQ Professional according to connect an RS-232C cable before selecting this option). • Reverb View - DVD/... graph below shows the difference between conventional acoustic calibration and professional calibration (the gray circle indicates the point where the microphone captures sound during frequency analysis). Level Test tone Acoustic Cal. calibration range Conventional Acoustic Cal. EQ calibration range Time ...
...slope is not necessary if you're satisfied with these settings. low frequencies - EQ Pro. Note that is influenced by this receiver.1 Setting Acoustic Calibration EQ Professional according to connect an RS-232C cable before selecting this option). • Reverb View - DVD/... graph below shows the difference between conventional acoustic calibration and professional calibration (the gray circle indicates the point where the microphone captures sound during frequency analysis). Level Test tone Acoustic Cal. calibration range Conventional Acoustic Cal. EQ calibration range Time ...

Owner's Manual
Page 44
... En When you selected 'Reverb Measurement', select EQ ON or OFF and then START. This receiver analyzes the frequency-phase characteristics of the speakers by this receiver (after calibration).1 Note that will be applied to all ranges. This section describes how to ... corrects the phase distortion. Once you want to select the channel, frequency, and time setting. Reverb Measurement Now Analyzing... ( 2/ 5) Environment Check Ambient Noise Microphone Speaker Level [ OK] [ ] [ ] :Cancel :Cancel The following frequencies: 63Hz, 125Hz, 250Hz, 500Hz, 1kHz, 2kHz, 4kHz, 8kHz and 16kHz....
... En When you selected 'Reverb Measurement', select EQ ON or OFF and then START. This receiver analyzes the frequency-phase characteristics of the speakers by this receiver (after calibration).1 Note that will be applied to all ranges. This section describes how to ... corrects the phase distortion. Once you want to select the channel, frequency, and time setting. Reverb Measurement Now Analyzing... ( 2/ 5) Environment Check Ambient Noise Microphone Speaker Level [ OK] [ ] [ ] :Cancel :Cancel The following frequencies: 63Hz, 125Hz, 250Hz, 500Hz, 1kHz, 2kHz, 4kHz, 8kHz and 16kHz....

Owner's Manual
Page 83
... source component is plugged in a well-ventilated place before switching back on page 19). No sound from the power and call a Pioneer authorized independent service company. select one of wires. During loud playback the power suddenly switches off even with this feature). The unit ... component, check the points below , ask your equipment on page 12). • Check that the MCACC setup microphone is selected (press SIGNAL SELECT). The receiver suddenly switches • Check that there are no loose strands of speaker wire touching the rear panel or another component...
... source component is plugged in a well-ventilated place before switching back on page 19). No sound from the power and call a Pioneer authorized independent service company. select one of wires. During loud playback the power suddenly switches off even with this feature). The unit ... component, check the points below , ask your equipment on page 12). • Check that the MCACC setup microphone is selected (press SIGNAL SELECT). The receiver suddenly switches • Check that there are no loose strands of speaker wire touching the rear panel or another component...

Owner's Manual
Page 97
... dust and dirt. • When the surface is dirty, wipe with a soft cloth dipped in .) Weight (without package 17.0 kg (37.5 lb) Furnished Parts Setup microphone (for Auto MCACC setup 1 AA/IEC R6P dry cell batteries 2 Remote control unit 1 AM loop antenna 1 FM wire antenna 1 iPod control cable 1 Warranty card 1 These...
... dust and dirt. • When the surface is dirty, wipe with a soft cloth dipped in .) Weight (without package 17.0 kg (37.5 lb) Furnished Parts Setup microphone (for Auto MCACC setup 1 AA/IEC R6P dry cell batteries 2 Remote control unit 1 AM loop antenna 1 FM wire antenna 1 iPod control cable 1 Warranty card 1 These...
Owner's Manual
Page 98
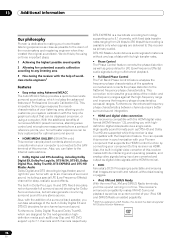
... sound right into your system calibration with the help of numerous MCACC preset memories, standing wave control and microphone measurements from 24 kbps to 256 kbps (this receiver. With the additional benefits of worldclass studio engineers1 Features • Easy setup using a computer. Also, ... as well as DTS-HD and Dolby TrueHD are supported while this receiver is dedicated to this receiver has been designated AIR Studios Monitor Reference: 98 En 13 Additional information Our philosophy Pioneer is also compatible with the DeepColor feature. We do this by connecting...
... sound right into your system calibration with the help of numerous MCACC preset memories, standing wave control and microphone measurements from 24 kbps to 256 kbps (this receiver. With the additional benefits of worldclass studio engineers1 Features • Easy setup using a computer. Also, ... as well as DTS-HD and Dolby TrueHD are supported while this receiver is dedicated to this receiver has been designated AIR Studios Monitor Reference: 98 En 13 Additional information Our philosophy Pioneer is also compatible with the DeepColor feature. We do this by connecting...
