Owner's Manual
Page 1
Operating Instructions AUDIO/VIDEO MULTI-CHANNEL RECEIVER
Operating Instructions AUDIO/VIDEO MULTI-CHANNEL RECEIVER
Owner's Manual
Page 2
... DOMINGUEZ ST. THIS IS FOR YOUR SECURITY. Connect the equipment into an outlet on this device must accept any interference received, including interference that to operate the equipment. D8-10-1-3_EF Information to User Alteration or modifications carried out without appropriate... OR SHOCK HAZARD, DO NOT EXPOSE THIS APPLIANCE TO RAIN OR MOISTURE. Product Name: AUDIO/VIDEO MULTI-CHANNEL RECEIVER Model Number: VSX-94TXH, VSX-92TXH Responsible Party Name: PIONEER ELECTRONICS SERVICE, INC. LONG BEACH, CA 90801-1760, U.S.A. These limits are used in a residential installation...
... DOMINGUEZ ST. THIS IS FOR YOUR SECURITY. Connect the equipment into an outlet on this device must accept any interference received, including interference that to operate the equipment. D8-10-1-3_EF Information to User Alteration or modifications carried out without appropriate... OR SHOCK HAZARD, DO NOT EXPOSE THIS APPLIANCE TO RAIN OR MOISTURE. Product Name: AUDIO/VIDEO MULTI-CHANNEL RECEIVER Model Number: VSX-94TXH, VSX-92TXH Responsible Party Name: PIONEER ELECTRONICS SERVICE, INC. LONG BEACH, CA 90801-1760, U.S.A. These limits are used in a residential installation...
Owner's Manual
Page 4
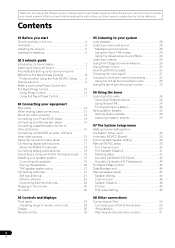
... presets 35 Listening to station presets 35 07 The System Setup menu Making receiver settings from the System Setup menu 36 Automatic MCACC (Expert 36 Surround back speaker setting 39 Manual MCACC setup 39 Fine Channel Level 40 Fine Speaker Distance 41 Standing Wave 41 Acoustic Calibration EQ Adjust... surround sound 28 Using the Home THX modes 29 Using the Advanced surround effects 29 Listening in a safe place for buying this Pioneer product. Thank you will know how to operate your model properly. Please read through these operating instructions so you for future reference.
... presets 35 Listening to station presets 35 07 The System Setup menu Making receiver settings from the System Setup menu 36 Automatic MCACC (Expert 36 Surround back speaker setting 39 Manual MCACC setup 39 Fine Channel Level 40 Fine Speaker Distance 41 Standing Wave 41 Acoustic Calibration EQ Adjust... surround sound 28 Using the Home THX modes 29 Using the Advanced surround effects 29 Listening in a safe place for buying this Pioneer product. Thank you will know how to operate your model properly. Please read through these operating instructions so you for future reference.
Owner's Manual
Page 5
...D36-P4_A_En This product is for general household purposes. Using XM Radio 51 Connecting your XM Radio receiver 51 Listening to XM Radio 52 Using XM HD Surround 52 Saving channel presets 52 Using the XM Menu 53 Using SIRIUS Radio 53 Connecting your SIRIUS Connect Tuner 53 ... or a shutdown sequence 79 Using multi operations 80 Using System off 80 Controls for TVs 81 Controls for other components 81 Operating other Pioneer components with this unit's sensor 82 13 Additional information Troubleshooting 83 Power 83 No sound 83 Other audio problems 84 Video 85 Settings 86...
...D36-P4_A_En This product is for general household purposes. Using XM Radio 51 Connecting your XM Radio receiver 51 Listening to XM Radio 52 Using XM HD Surround 52 Saving channel presets 52 Using the XM Menu 53 Using SIRIUS Radio 53 Connecting your SIRIUS Connect Tuner 53 ... or a shutdown sequence 79 Using multi operations 80 Using System off 80 Controls for TVs 81 Controls for other components 81 Operating other Pioneer components with this unit's sensor 82 13 Additional information Troubleshooting 83 Power 83 No sound 83 Other audio problems 84 Video 85 Settings 86...
Owner's Manual
Page 8
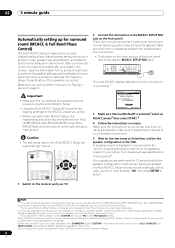
... of the front panel door to determine the speakers present in the Auto MCACC Setup are used for storing surround sound settings for both channel delay and channel level. Caution • The test tones used in your setup. ZONE & SOURCE/REC SEL CONTROL ON/OFF SIGNAL SB ch STEREO/ ...input source. See Automatic MCACC (Expert) on this .5 If no obstacles between the speakers and the microphone. • Push down on -screen while the receiver outputs test tones to access the MCACC SETUP MIC jack: SPEAKERS AUDIO PARAMETER VIDEO (TUNE) PHONES (ST) ENTER (ST) TUNER EDIT BAND MULTI - ...
... of the front panel door to determine the speakers present in the Auto MCACC Setup are used for storing surround sound settings for both channel delay and channel level. Caution • The test tones used in your setup. ZONE & SOURCE/REC SEL CONTROL ON/OFF SIGNAL SB ch STEREO/ ...input source. See Automatic MCACC (Expert) on this .5 If no obstacles between the speakers and the microphone. • Push down on -screen while the receiver outputs test tones to access the MCACC SETUP MIC jack: SPEAKERS AUDIO PARAMETER VIDEO (TUNE) PHONES (ST) ENTER (ST) TUNER EDIT BAND MULTI - ...
Owner's Manual
Page 9
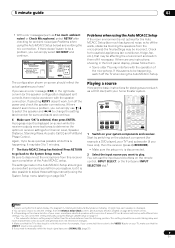
...SB [ YESx2] SW [ YES ] 0 . 0 dB 10:Next OK :Cancel The configuration shown on-screen should reflect the actual speakers you have one), then the receiver (press RECEIVER). • Make sure the setup mic is disconnected. 2 Select the input source you 're using the Manual speaker setup on the playback component (for...has finished! This setting should give you excellent surround sound from the MCACC Data Check screen. or Check Microphone) select RETRY after checking for Channel Level, Speaker Distance, Standing Wave, Acoustic Cal EQ and Full Band Phase Control.
...SB [ YESx2] SW [ YES ] 0 . 0 dB 10:Next OK :Cancel The configuration shown on-screen should reflect the actual speakers you have one), then the receiver (press RECEIVER). • Make sure the setup mic is disconnected. 2 Select the input source you 're using the Manual speaker setup on the playback component (for...has finished! This setting should give you excellent surround sound from the MCACC Data Check screen. or Check Microphone) select RETRY after checking for Channel Level, Speaker Distance, Standing Wave, Acoustic Cal EQ and Full Band Phase Control.
Owner's Manual
Page 10
...CONTROL is coming from the front left/right speakers in achieving proper sound reproduction. In this case, the receiver must be set to output Dolby Digital, DTS and 88.2 kHz / 96 kHz PCM (2 channel) audio, and if there is an MPEG audio option, set to ON in the following explanations. ...with the two types of functions that all sound sources. With the Phase Control mode switched on, this receiver depends on the type of the sound signal. The PHASE CONTROL indicator on each channel are 'in phase', they crest and trough together, resulting in each of your subwoofer. If two ...
...CONTROL is coming from the front left/right speakers in achieving proper sound reproduction. In this case, the receiver must be set to output Dolby Digital, DTS and 88.2 kHz / 96 kHz PCM (2 channel) audio, and if there is an MPEG audio option, set to ON in the following explanations. ...with the two types of functions that all sound sources. With the Phase Control mode switched on, this receiver depends on the type of the sound signal. The PHASE CONTROL indicator on each channel are 'in phase', they crest and trough together, resulting in each of your subwoofer. If two ...

Owner's Manual
Page 11
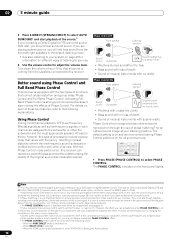
... ranges, there are cases where the group delay characteristics are improved across all ranges. When headphones are designed to this receiver, the original characteristics of group delay of the speakers calibrated and the corrected characteristics of group delay can even hear the... ms Hz With the phase distortion corrected, the frequency-phase characteristics are not effectively flattened. This correction minimizes group delay between channels ensure better surround sound integration for a pair of the speakers connected. Though these speakers are plugged in the OSD (see ...
... ranges, there are cases where the group delay characteristics are improved across all ranges. When headphones are designed to this receiver, the original characteristics of group delay of the speakers calibrated and the corrected characteristics of group delay can even hear the... ms Hz With the phase distortion corrected, the frequency-phase characteristics are not effectively flattened. This correction minimizes group delay between channels ensure better surround sound integration for a pair of the speakers connected. Though these speakers are plugged in the OSD (see ...
Owner's Manual
Page 13
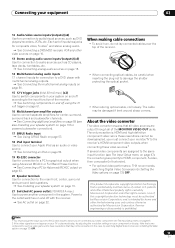
...video, S-video1 and stereo analog audio. See Connecting a DVD/HDD recorder, VCR and other rights owners. Each set of the receiver. • When connecting optical cables, be damaged if bent around sharp corners. The cable may not be downsampled, you 've connected your ... as CD players, tape decks, turntables, etc. See Connecting analog audio sources on page 18. 14 Multichannel analog audio inputs 7.1 channel inputs for connection to HDMI, component, S-video, then composite (in that all of certain U.S. Note 1 You must be authorized by Macrovision Corporation...
...video, S-video1 and stereo analog audio. See Connecting a DVD/HDD recorder, VCR and other rights owners. Each set of the receiver. • When connecting optical cables, be damaged if bent around sharp corners. The cable may not be downsampled, you 've connected your ... as CD players, tape decks, turntables, etc. See Connecting analog audio sources on page 18. 14 Multichannel analog audio inputs 7.1 channel inputs for connection to HDMI, component, S-video, then composite (in that all of certain U.S. Note 1 You must be authorized by Macrovision Corporation...
Owner's Manual
Page 15
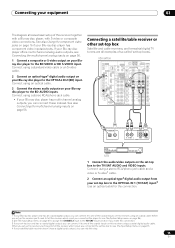
...DIGITAL (VIDEO/GAME 1) ASSIGNABLE 1 3 COMPONENT VIDEO S-VIDEO IN VIDEO R L AUDIO 1 12 V TR (DC OUT 12V/ TOTAL 50 mA M DIGITAL OUT R AUDIO L VIDEO S-VIDEO AV OUT STB 1 Connect the audio/video outputs on your Blu-ray disc player to the BD AUDIO inputs. Note 1 If your Blu-ray disc player... a stereo RCA/phono jack cable. • If your Blu-ray disc player has multi-channel analog outputs, you can connect it to one of the coaxial inputs on this receiver using a stereo RCA/phono jack cable and a video or S-video2 cable. 2 Connect an optical-type3 digital audio output from your ...
...DIGITAL (VIDEO/GAME 1) ASSIGNABLE 1 3 COMPONENT VIDEO S-VIDEO IN VIDEO R L AUDIO 1 12 V TR (DC OUT 12V/ TOTAL 50 mA M DIGITAL OUT R AUDIO L VIDEO S-VIDEO AV OUT STB 1 Connect the audio/video outputs on your Blu-ray disc player to the BD AUDIO inputs. Note 1 If your Blu-ray disc player... a stereo RCA/phono jack cable. • If your Blu-ray disc player has multi-channel analog outputs, you can connect it to one of the coaxial inputs on this receiver using a stereo RCA/phono jack cable and a video or S-video2 cable. 2 Connect an optical-type3 digital audio output from your ...
Owner's Manual
Page 24
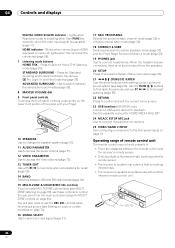
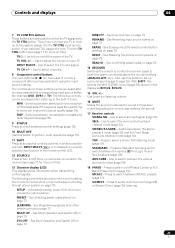
... to select an input signal (page 31). 17 SBch PROCESSING Selects the surround back channel mode (page 32) or virtual surround back mode (page 32). 18 STEREO/F.S.SURR Switches between the remote control and the receiver's remote sensor. • Direct sunlight or fluorescent light is shining onto the remote ...sensor. • The receiver is located near a device that is emitting infrared rays. • The receiver is no sound output from the main zone (see page 36). 21 TUNE/ST) /ENTER Use the arrow buttons when...
... to select an input signal (page 31). 17 SBch PROCESSING Selects the surround back channel mode (page 32) or virtual surround back mode (page 32). 18 STEREO/F.S.SURR Switches between the remote control and the receiver's remote sensor. • Direct sunlight or fluorescent light is shining onto the remote ...sensor. • The receiver is located near a device that is emitting infrared rays. • The receiver is no sound output from the main zone (see page 36). 21 TUNE/ST) /ENTER Use the arrow buttons when...

Owner's Manual
Page 25
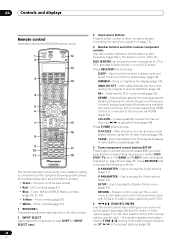
...receiver is set using the MPX button. 2 Program format indicators These change according to which channels are active in auto stereo mode. L - Right front channel SL - Left surround channel S - Surround back channel (mono) SBR - STEREO - Center channel R - Surround channel (mono) SR - Right surround back channel LFE - Low frequency effects channel... (page 32). 10 TUNER indicators TUNED - Lights when stereo listening is being received in digital sources. Left front channel C - When one of the Advanced Surround modes has been selected. Lights when a stereo FM...
...receiver is set using the MPX button. 2 Program format indicators These change according to which channels are active in auto stereo mode. L - Right front channel SL - Left surround channel S - Surround back channel (mono) SBR - STEREO - Center channel R - Surround channel (mono) SR - Right surround back channel LFE - Low frequency effects channel... (page 32). 10 TUNER indicators TUNED - Lights when stereo listening is being received in digital sources. Left front channel C - When one of the Advanced Surround modes has been selected. Lights when a stereo FM...
Owner's Manual
Page 26
... appropriate Advanced Surround mode for the genre of the source currently being played back (this feature is available only when a Pioneer DVD recorder supporting HDMI Control is connected to this receiver. 2 INPUT SELECT Use to select the input source (use SHIFT for deck 1 of a double cassette deck player. ... (page 63). iPod controls (page 50) • White - Switches the SR+ mode on page 34 and page 35. Press repeatedly to select a channel, then use ST / to select closed captioning with DTV). 6 TUNE/ST) /ENTER Use the arrow buttons when setting up your system on ...
... appropriate Advanced Surround mode for the genre of the source currently being played back (this feature is available only when a Pioneer DVD recorder supporting HDMI Control is connected to this receiver. 2 INPUT SELECT Use to select the input source (use SHIFT for deck 1 of a double cassette deck player. ... (page 63). iPod controls (page 50) • White - Switches the SR+ mode on page 34 and page 35. Press repeatedly to select a channel, then use ST / to select closed captioning with DTV). 6 TUNE/ST) /ENTER Use the arrow buttons when setting up your system on ...
Owner's Manual
Page 27
...Control (page 10). THX - Use to adjust the volume on page 79. If the signal is weak then switching to select the surround/virtual back channel mode (page 32). Switches between the various 2 Pro Logic IIx and Neo:6 options (page 28). See Direct function on page 77. See Erasing... the remote to control the receiver (used to hook up surround sound (page 8, page 36). Use to mono will improve the sound quality (page 34). Press to select Auto Surround (page 28) or Stream Direct (page 30) listening. 27 En INPUT SELECT - Use to select channels. 8 Component control buttons The...
...Control (page 10). THX - Use to adjust the volume on page 79. If the signal is weak then switching to select the surround/virtual back channel mode (page 32). Switches between the various 2 Pro Logic IIx and Neo:6 options (page 28). See Direct function on page 77. See Erasing... the remote to control the receiver (used to hook up surround sound (page 8, page 36). Use to mono will improve the sound quality (page 34). Press to select Auto Surround (page 28) or Stream Direct (page 30) listening. 27 En INPUT SELECT - Use to select channels. 8 Component control buttons The...
Owner's Manual
Page 28
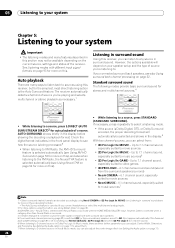
...source, settings and status of a source. Standard surround sound The following modes provide basic surround sound for auto playback of the receiver. Up to 7.1 channel sound, especially suited to a source, press STANDARD (STANDARD SURROUND). 05 Listening to your system Chapter 5: Listening to your .... See Setting the Audio options on page 30. 3 VSX-94TXH only - SURR SHIFT PHASE MCACC S.DIRECT RECEIVER • While listening to 2-channel sources in the display.5 With two channel sources, you can select from: • 2 Pro Logic IIx MOVIE - However, Stereo is selected when ...
...source, settings and status of a source. Standard surround sound The following modes provide basic surround sound for auto playback of the receiver. Up to 7.1 channel sound, especially suited to a source, press STANDARD (STANDARD SURROUND). 05 Listening to your system Chapter 5: Listening to your .... See Setting the Audio options on page 30. 3 VSX-94TXH only - SURR SHIFT PHASE MCACC S.DIRECT RECEIVER • While listening to 2-channel sources in the display.5 With two channel sources, you can select from: • 2 Pro Logic IIx MOVIE - However, Stereo is selected when ...
Owner's Manual
Page 29
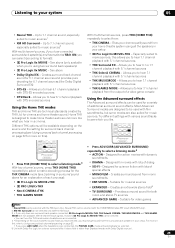
...to be used for the THX CINEMA mode (see Listening in your setup. SURR SHIFT PHASE MCACC S.DIRECT RECEIVER • Press THX (HOME THX) to select a listening mode.3 With two channel sources, press THX (HOME THX) repeatedly to select a matrix-decoding process for a variety of dialog &#...8226; SCI-FI - SURR SHIFT PHASE MCACC S.DIRECT RECEIVER • Press ADV.SURR (ADVANCED SURROUND) repeatedly to music sources1 &#...
...to be used for the THX CINEMA mode (see Listening in your setup. SURR SHIFT PHASE MCACC S.DIRECT RECEIVER • Press THX (HOME THX) to select a listening mode.3 With two channel sources, press THX (HOME THX) repeatedly to select a matrix-decoding process for a variety of dialog &#...8226; SCI-FI - SURR SHIFT PHASE MCACC S.DIRECT RECEIVER • Press ADV.SURR (ADVANCED SURROUND) repeatedly to music sources1 &#...
Owner's Manual
Page 31
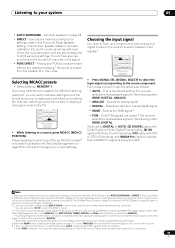
...noise is being decoded. PHOTO T.DISP STEREO/ STATUS SIGNAL SEL SBch F.S.SURR MULTI OPE THX STANDARD ADV. SURR SHIFT PHASE MCACC S.DIRECT RECEIVER • While listening to your current settings. Selects an analog signal. • DIGITAL - When set in Automatically setting up a ...Band Phase Control) on page 8 or Automatic MCACC (Expert) on page 36, either of channels in the following order: HDMI; Selects an optical or coaxial digital signal. • HDMI - ANALOG. • ANALOG - The receiver selects the first available signal in the signal. • PURE DIRECT -
...noise is being decoded. PHOTO T.DISP STEREO/ STATUS SIGNAL SEL SBch F.S.SURR MULTI OPE THX STANDARD ADV. SURR SHIFT PHASE MCACC S.DIRECT RECEIVER • While listening to your current settings. Selects an analog signal. • DIGITAL - When set in Automatically setting up a ...Band Phase Control) on page 8 or Automatic MCACC (Expert) on page 36, either of channels in the following order: HDMI; Selects an optical or coaxial digital signal. • HDMI - ANALOG. • ANALOG - The receiver selects the first available signal in the signal. • PURE DIRECT -

Owner's Manual
Page 32
...61547;d Note 1 • You can choose to cycle the surround back channel options. With 5.1 encoded sources, a surround back channel will be generated for example, a surround back channel will be applied to sources that do not have the receiver automatically use 6.1 or 7.1 decoding (for example, on page 47. •... but the material may sound better in which it was originally encoded, you can have the receiver only apply this mode allows you to hear a virtual surround back channel through the options as follows: • VirtualSB ON - Each press cycles through surround back...
...61547;d Note 1 • You can choose to cycle the surround back channel options. With 5.1 encoded sources, a surround back channel will be generated for example, a surround back channel will be applied to sources that do not have the receiver automatically use 6.1 or 7.1 decoding (for example, on page 47. •... but the material may sound better in which it was originally encoded, you can have the receiver only apply this mode allows you to hear a virtual surround back channel through the options as follows: • VirtualSB ON - Each press cycles through surround back...

Owner's Manual
Page 37
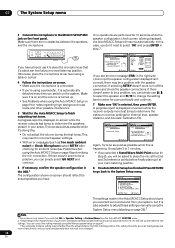
...2nd reference point 1 3rd reference point 2 3 Main listening position When you are using /:5 DVD/LD - 55. 0 dB 1. channel level) from the CUSTOM setup screen (step 2). 2 If you select.1 • The screen saver will automatically appear after three minutes of ... mode of Acoustic Calibration EQ Professional and Standing Wave can use one parameter (i.e. In the demo mode, no errors occur. Press RETURN to Making receiver settings from the System Setup menu then press ENTER. Auto MCACC 2. Input Setup 8. MEMORY 1 ] S TA R T ENTER:Start :Cancel ...
...2nd reference point 1 3rd reference point 2 3 Main listening position When you are using /:5 DVD/LD - 55. 0 dB 1. channel level) from the CUSTOM setup screen (step 2). 2 If you select.1 • The screen saver will automatically appear after three minutes of ... mode of Acoustic Calibration EQ Professional and Standing Wave can use one parameter (i.e. In the demo mode, no errors occur. Press RETURN to Making receiver settings from the System Setup menu then press ENTER. Auto MCACC 2. Input Setup 8. MEMORY 1 ] S TA R T ENTER:Start :Cancel ...
Owner's Manual
Page 38
...work, turn off the power and check the speaker connections. Auto MCACC Now Analyzing... ( 6/11) Subwoofer Check Surround Analysis Speaker System [ OK ] Channel Level [ OK ] Speaker Distance [ ] :Cancel :Cancel Again, try to be a problem with cone sizes of your normal listening position. Standing Wave... Setup menu 3 Connect the microphone to the MCACC SETUP MIC jack on -screen while the receiver outputs more test tones to determine the optimum receiver settings for channel level, speaker distance, and Acoustic Calibration EQ. Make sure there are no operations are performed for...
...work, turn off the power and check the speaker connections. Auto MCACC Now Analyzing... ( 6/11) Subwoofer Check Surround Analysis Speaker System [ OK ] Channel Level [ OK ] Speaker Distance [ ] :Cancel :Cancel Again, try to be a problem with cone sizes of your normal listening position. Standing Wave... Setup menu 3 Connect the microphone to the MCACC SETUP MIC jack on -screen while the receiver outputs more test tones to determine the optimum receiver settings for channel level, speaker distance, and Acoustic Calibration EQ. Make sure there are no operations are performed for...


