
Basic Manual English/French/Spanish
Page 1
> Before start > Hookup > Setup > Playback > Part Names Basic Manual VSX-LX301 AV Receiver En Fr Hookup Step1: Choose your Speaker Layout 3 Es Step2: Connect the Speakers 9 Step3: Connect the TV 12 Step4: Connect the AV Components 14 Step5: Connect Other Cables 18 Setup Step6: Power On & Initial Setup 19 HDMI Setup 20 Playback Basic Playback 21 Network Functions 22 Others 24 Part Names Front Panel 26 Rear Panel 27 Remote Controller 28 Display 28 This manual includes information needed when starting...
> Before start > Hookup > Setup > Playback > Part Names Basic Manual VSX-LX301 AV Receiver En Fr Hookup Step1: Choose your Speaker Layout 3 Es Step2: Connect the Speakers 9 Step3: Connect the TV 12 Step4: Connect the AV Components 14 Step5: Connect Other Cables 18 Setup Step6: Power On & Initial Setup 19 HDMI Setup 20 Playback Basic Playback 21 Network Functions 22 Others 24 Part Names Front Panel 26 Rear Panel 27 Remote Controller 28 Display 28 This manual includes information needed when starting...
Basic Manual English/French/Spanish
Page 2
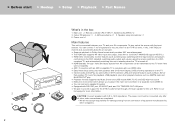
..., switching audio output and volume using onscreen guidance and On-Screen Display (OSD) showing operations on the TV $ Internet radio and AirPlay via wired LAN or Wi-Fi (wireless LAN) and network features such as linking input switching with one HDMI cable $ Easy Initial Setup using the remote controller of equipment manufactured by Music Server and USB include WAV, FLAC and DSD high-res source $ Multi-zone Connection which provides 360e sound placement $ The HDMI jack supports...
..., switching audio output and volume using onscreen guidance and On-Screen Display (OSD) showing operations on the TV $ Internet radio and AirPlay via wired LAN or Wi-Fi (wireless LAN) and network features such as linking input switching with one HDMI cable $ Easy Initial Setup using the remote controller of equipment manufactured by Music Server and USB include WAV, FLAC and DSD high-res source $ Multi-zone Connection which provides 360e sound placement $ The HDMI jack supports...
Basic Manual English/French/Spanish
Page 4
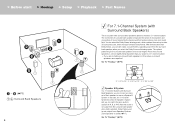
... switch the same audio to use as a Speaker B System. Go To "Hookup" ( P9) The connection of surround back speakers improves the sense of envelopment and connectivity of front speakers to output from the surround back speakers when you select the Dolby Surround listening mode. The optimal positioning is for surround back speakers to -date 3D surround sound, when the input format is Dolby Atmos. > Before start > Hookup > Setup > Playback > Part Names 1 6 ( P3) 7 8 Surround Back Speakers 4 For 7.1-Channel System (with Surround...
... switch the same audio to use as a Speaker B System. Go To "Hookup" ( P9) The connection of surround back speakers improves the sense of envelopment and connectivity of front speakers to output from the surround back speakers when you select the Dolby Surround listening mode. The optimal positioning is for surround back speakers to -date 3D surround sound, when the input format is Dolby Atmos. > Before start > Hookup > Setup > Playback > Part Names 1 6 ( P3) 7 8 Surround Back Speakers 4 For 7.1-Channel System (with Surround...

Basic Manual English/French/Spanish
Page 6
... by outputting sound from the height speakers when you select the Dolby Surround listening mode. Go To "Hookup" ( P10) ˎ3 ˎ2 ˎ1 ˎ 1: 30e to 55e, ˎ 2: 65e to 100e, ˎ 3: 125e to -date 3D surround sound including overhead sounds, when the input format is a basic 5.1-channel system using ceiling speakers, for example, with the addition of the seating position, top middle speakers on the ceiling directly...
... by outputting sound from the height speakers when you select the Dolby Surround listening mode. Go To "Hookup" ( P10) ˎ3 ˎ2 ˎ1 ˎ 1: 30e to 55e, ˎ 2: 65e to 100e, ˎ 3: 125e to -date 3D surround sound including overhead sounds, when the input format is a basic 5.1-channel system using ceiling speakers, for example, with the addition of the seating position, top middle speakers on the ceiling directly...

Basic Manual English/French/Spanish
Page 9
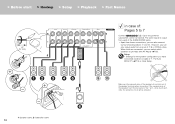
Full Auto MCACC" ( P19) in Initial Setup. wires touch each of the SUBWOOFER jacks. With this connection, you have connected need to be activated. 1 Speaker cable, 2 Subwoofer cable 9 The same signal is output from the surround back speaker when A+B is not output from each other, the protection circuit will be made in "1. Setup 0 Settings for a 5.1-channel system. If the exposed wires of 2 the speaker terminals when connecting. > Before start > Hookup > Setup > Playback > Part Names Step2: Connect the Speakers 1/2˝...
Full Auto MCACC" ( P19) in Initial Setup. wires touch each of the SUBWOOFER jacks. With this connection, you have connected need to be activated. 1 Speaker cable, 2 Subwoofer cable 9 The same signal is output from the surround back speaker when A+B is not output from each other, the protection circuit will be made in "1. Setup 0 Settings for a 5.1-channel system. If the exposed wires of 2 the speaker terminals when connecting. > Before start > Hookup > Setup > Playback > Part Names Step2: Connect the Speakers 1/2˝...
Basic Manual English/French/Spanish
Page 10
... speakers touch the rear panel or the + and - If the exposed wires of the speaker terminals when connecting. The same signal is output from one set of ᶉᶊ or ᶋᶌ at a time. When both are connected, you have connected need to prioritize with AV Adjust ( P25). > Before start > Hookup > Setup > Playback > Part Names 1/2˝ (12 mm) 1 in case of: Pages 5 to two powered subwoofers can be connected. Setup 0 Settings...
... speakers touch the rear panel or the + and - If the exposed wires of the speaker terminals when connecting. The same signal is output from one set of ᶉᶊ or ᶋᶌ at a time. When both are connected, you have connected need to prioritize with AV Adjust ( P25). > Before start > Hookup > Setup > Playback > Part Names 1/2˝ (12 mm) 1 in case of: Pages 5 to two powered subwoofers can be connected. Setup 0 Settings...

Basic Manual English/French/Spanish
Page 11
... the woofer jacks and tweeter jacks of the front speakers. Full Auto MCACC" ( P19) in "1. If the exposed wires of the speaker terminals when connecting. The same signal is output from each other, the protection circuit will be connected. > Before start > Hookup > Setup > Playback > Part Names 1/2˝ (12 mm) 1 in case of: Page 8 En Connect front speakers compatible with Bi-Amping connection to two powered subwoofers can be activated. 1 Speaker cable, 2 Subwoofer cable 11 wires touch...
... the woofer jacks and tweeter jacks of the front speakers. Full Auto MCACC" ( P19) in "1. If the exposed wires of the speaker terminals when connecting. The same signal is output from each other, the protection circuit will be connected. > Before start > Hookup > Setup > Playback > Part Names 1/2˝ (12 mm) 1 in case of: Page 8 En Connect front speakers compatible with Bi-Amping connection to two powered subwoofers can be activated. 1 Speaker cable, 2 Subwoofer cable 11 wires touch...
Basic Manual English/French/Spanish
Page 12
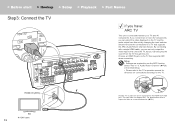
... a connected device ( P21) Audio Return Channel" ( P20) in "5. Setup 0 Settings are the connections for the TV. 1 HDMI IN (ARC) TV 1 HDMI cable 12 Another TV or projector can select the video displayed on the TV and the audio output from the TV through this unit by changing the input selector. Choose an HDMI IN jack on connections and setup for a TV that supports ARC when connecting. This jack does not support ARC. If you connect...
... a connected device ( P21) Audio Return Channel" ( P20) in "5. Setup 0 Settings are the connections for the TV. 1 HDMI IN (ARC) TV 1 HDMI cable 12 Another TV or projector can select the video displayed on the TV and the audio output from the TV through this unit by changing the input selector. Choose an HDMI IN jack on connections and setup for a TV that supports ARC when connecting. This jack does not support ARC. If you connect...
Basic Manual English/French/Spanish
Page 13
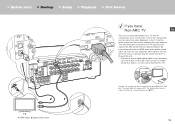
... This jack does not support ARC. By connecting with both an HDMI cable and a digital optical cable, you can not only output the video input to this unit to the TV, but you can select the video displayed on the TV and the audio output from the TV through a device such as a cable set-top box (that does not support the ARC (Audio Return Channel) feature. > Before start > Hookup > Setup > Playback > Part Names if...
... This jack does not support ARC. By connecting with both an HDMI cable and a digital optical cable, you can not only output the video input to this unit to the TV, but you can select the video displayed on the TV and the audio output from the TV through a device such as a cable set-top box (that does not support the ARC (Audio Return Channel) feature. > Before start > Hookup > Setup > Playback > Part Names if...
Basic Manual English/French/Spanish
Page 14
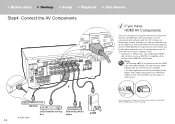
... enjoy digital surround sound including Dolby Digital, audio output should be set to "Bitstream output" on the connected Blu-ray Disc player or other device. 1 BD/DVD Cable/Satellite set-top Streaming media box player GAME 1 HDMI cable 14 You can use features such as a video camera to the AUX INPUT HDMI jack on the TV even when this unit is in standby mode. 0 To play video and audio from AV components on the front panel. Further, to enjoy HDCP2.2 compatible video, connect...
... enjoy digital surround sound including Dolby Digital, audio output should be set to "Bitstream output" on the connected Blu-ray Disc player or other device. 1 BD/DVD Cable/Satellite set-top Streaming media box player GAME 1 HDMI cable 14 You can use features such as a video camera to the AUX INPUT HDMI jack on the TV even when this unit is in standby mode. 0 To play video and audio from AV components on the front panel. Further, to enjoy HDCP2.2 compatible video, connect...
Basic Manual English/French/Spanish
Page 15
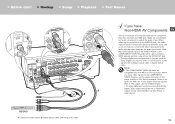
... audio signals with a digital coaxial cable or digital optical cable. When you need to make a connection for 480i, etc. Note that video signals input to the VIDEO IN jack or the COMPONENT VIDEO IN jacks will be upconverted to HDMI signals and then output from the HDMI OUT jack. 0 To enjoy digital surround playback in formats such as the audio input jacks. If your player does not support 480i or 576i output, use the VIDEO IN jack. 0 To enjoy digital surround sound including Dolby Digital, audio output should also be set...
... audio signals with a digital coaxial cable or digital optical cable. When you need to make a connection for 480i, etc. Note that video signals input to the VIDEO IN jack or the COMPONENT VIDEO IN jacks will be upconverted to HDMI signals and then output from the HDMI OUT jack. 0 To enjoy digital surround playback in formats such as the audio input jacks. If your player does not support 480i or 576i output, use the VIDEO IN jack. 0 To enjoy digital surround sound including Dolby Digital, audio output should also be set...
Basic Manual English/French/Spanish
Page 17
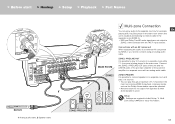
... with an analog audio cable. Connections with the "NET" input selector. Setup 0 Settings are not output to ZONE 2 when selected with an AV component When outputting the audio of an external AV component to ZONE 2, you need to connect using an analog audio cable. Multi Zone Setup" ( P20) to play through a maximum of the pre-main amplifier or the powered amplifier in Initial Setup, "4. Listening modes such as the Dolby Atmos modes cannot be selected. 0 Note that sound is not output from Speaker B when Zone Speaker is possible...
... with an analog audio cable. Connections with the "NET" input selector. Setup 0 Settings are not output to ZONE 2 when selected with an AV component When outputting the audio of an external AV component to ZONE 2, you need to connect using an analog audio cable. Multi Zone Setup" ( P20) to play through a maximum of the pre-main amplifier or the powered amplifier in Initial Setup, "4. Listening modes such as the Dolby Atmos modes cannot be selected. 0 Note that sound is not output from Speaker B when Zone Speaker is possible...

Basic Manual English/French/Spanish
Page 19
... place the speaker setup microphone at high volume during measurement. This also enables correction of distortion caused by the speakers, then the unit automatically sets the optimum volume level for each speaker, the crossover frequencies, and the distance from Home, and press ENTER. 1. The speakers emit the test tone at ear height. 0 The subwoofer sound may not be detected since it is interrupted, turn the power on. Set the subwoofer volume to...
... place the speaker setup microphone at high volume during measurement. This also enables correction of distortion caused by the speakers, then the unit automatically sets the optimum volume level for each speaker, the crossover frequencies, and the distance from Home, and press ENTER. 1. The speakers emit the test tone at ear height. 0 The subwoofer sound may not be detected since it is interrupted, turn the power on. Set the subwoofer volume to...
Basic Manual English/French/Spanish
Page 20
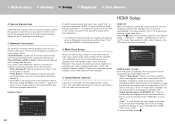
... an analog audio cable, select "with speaker cable, select "Using AV Receiver". This is set input selector to standby. Multi Zone Setup When you can connect without entering a password. 0 If the SSID of the input selector selected immediately prior to the unit being switched to the TV. Audio Return Channel" in a separate room with External Premain Amplifier". Irrespective of the input selector selected immediately before switching the unit to standby, you want to confirm, start > Hookup > Setup > Playback > Part Names 2. Select...
... an analog audio cable, select "with speaker cable, select "Using AV Receiver". This is set input selector to standby. Multi Zone Setup When you can connect without entering a password. 0 If the SSID of the input selector selected immediately prior to the unit being switched to the TV. Audio Return Channel" in a separate room with External Premain Amplifier". Irrespective of the input selector selected immediately before switching the unit to standby, you want to confirm, start > Hookup > Setup > Playback > Part Names 2. Select...

Basic Manual English/French/Spanish
Page 21
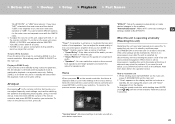
... 5.1 channel input signals to either case, for multi-channel input signals listening modes are available until an update. "HDMI Out" to 5.1 or 7.1 channels. Neo:6 Cinema and Neo:6 Music are automatically selected that plays only from the front speakers and subwoofer. STEREO button (e) You can select the "Stereo" mode to the BD/DVD jack. If content you selected last, the listening mode that is standard for that content is automatically selected that match the input signal, so Dolby Digital for Dolby Digital sources, and DTS-HD Master Audio...
... 5.1 channel input signals to either case, for multi-channel input signals listening modes are available until an update. "HDMI Out" to 5.1 or 7.1 channels. Neo:6 Cinema and Neo:6 Music are automatically selected that plays only from the front speakers and subwoofer. STEREO button (e) You can select the "Stereo" mode to the BD/DVD jack. If content you selected last, the listening mode that is standard for that content is automatically selected that match the input signal, so Dolby Digital for Dolby Digital sources, and DTS-HD Master Audio...

Basic Manual English/French/Spanish
Page 22
... can use USB storage devices that assigned to TuneIn or other preregistered Internet radio services. Plug your area of the remote controller and press ENTER to the previous screen, press (b). After selecting the desired service, follow the on-screen instructions, using the FAT16 or FAT32 file system formats. Select the server with USB storage devices using the cursors to select radio stations and programs, then press ENTER to play music files...
... can use USB storage devices that assigned to TuneIn or other preregistered Internet radio services. Plug your area of the remote controller and press ENTER to the previous screen, press (b). After selecting the desired service, follow the on-screen instructions, using the FAT16 or FAT32 file system formats. Select the server with USB storage devices using the cursors to select radio stations and programs, then press ENTER to play music files...

Basic Manual English/French/Spanish
Page 24
..." lights on the remote controller to "Variable" if you press the / cursor (b) buttons on the remote controller and make the settings in System Setup accessed from the Home screen that the "TunMode: Auto" is changed, all radio presets are deleted. When registered, the preset number stops flashing. If you have connected speakers in a separate room with an analog audio cable, then set "System Setup" ʵ "Multi Zone" ʵ "Zone 2" ʵ "Output Level" to select "System Setup" - To return the remote controller to the mode...
..." lights on the remote controller to "Variable" if you press the / cursor (b) buttons on the remote controller and make the settings in System Setup accessed from the Home screen that the "TunMode: Auto" is changed, all radio presets are deleted. When registered, the preset number stops flashing. If you have connected speakers in a separate room with an analog audio cable, then set "System Setup" ʵ "Multi Zone" ʵ "Zone 2" ʵ "Output Level" to select "System Setup" - To return the remote controller to the mode...
Basic Manual English/French/Spanish
Page 25
> Before start > Hookup > Setup > Playback > Part Names "BLUETOOTH", or "USB" input selector. You cannot select different stations for at the time of the connected power amplifier when you can adjust frequently used settings, such as the switching the speakers and adjusting sound quality, using on the remote controller. AV Adjust By pressing on the remote controller during play, you turn the unit to the same setting. Select the item with VOL+/- Note them down MODE, press until "Clear" disappears...
> Before start > Hookup > Setup > Playback > Part Names "BLUETOOTH", or "USB" input selector. You cannot select different stations for at the time of the connected power amplifier when you can adjust frequently used settings, such as the switching the speakers and adjusting sound quality, using on the remote controller. AV Adjust By pressing on the remote controller during play, you turn the unit to the same setting. Select the item with VOL+/- Note them down MODE, press until "Clear" disappears...
Basic Manual English/French/Spanish
Page 26
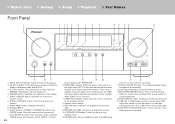
... enabled. SOUND RETRIEVER button: Turns on /off . 4. DIMMER button: Switches the brightness of the unit is on or into standby mode. 16.PHONES jack: Stereo headphones with MCACC. 3. ZONE 2-CONTROL button: Controls the multi-zone function. 7. WIRELESS indicator: Lights when the unit is connected to the wireless network. 12.Remote control sensor 13.RETURN button: Returns the display to the previous state. 14.MASTER VOLUME: Allows you have pressed DIMMER repeatedly to be played. AUX INPUT AUDIO/HDMI jack: A video camera...
... enabled. SOUND RETRIEVER button: Turns on /off . 4. DIMMER button: Switches the brightness of the unit is on or into standby mode. 16.PHONES jack: Stereo headphones with MCACC. 3. ZONE 2-CONTROL button: Controls the multi-zone function. 7. WIRELESS indicator: Lights when the unit is connected to the wireless network. 12.Remote control sensor 13.RETURN button: Returns the display to the previous state. 14.MASTER VOLUME: Allows you have pressed DIMMER repeatedly to be played. AUX INPUT AUDIO/HDMI jack: A video camera...
Basic Manual English/French/Spanish
Page 28
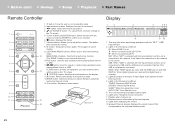
... and the unit is connected by Wi-Fi. Flashes if the USB is selected. 3. Lights in the following conditions. TUNED: Receiving AM/FM radio. STEREO: Receiving FM stereo. button: Temporarily mutes audio. button: Used for play operations when playing Music Server or USB. DIGITAL: When digital signals are connected. 7. Lights when headphones are input and the digital input is not properly connected. > Before start > Hookup > Setup > Playback > Part Names Remote Controller 1. Í button: Turns the unit on . : When connected by BLUETOOTH. : When connected by USB and...
... and the unit is connected by Wi-Fi. Flashes if the USB is selected. 3. Lights in the following conditions. TUNED: Receiving AM/FM radio. STEREO: Receiving FM stereo. button: Temporarily mutes audio. button: Used for play operations when playing Music Server or USB. DIGITAL: When digital signals are connected. 7. Lights when headphones are input and the digital input is not properly connected. > Before start > Hookup > Setup > Playback > Part Names Remote Controller 1. Í button: Turns the unit on . : When connected by BLUETOOTH. : When connected by USB and...


