Owner's Manual
Page 4
...the receiver 5 Making cable connections 5 Loading the batteries 5 Operating range of remote control unit 5 2 5 minute guide Introduction to home theater 6 Listening to Surround Sound 7 Using the Quick Setup 10 3 Connecting up Audio/Video cords 11 S-video cables (VSX-D511 only 11 Digital audio cords/Optical cables ...improve AM reception 15 Connecting the speakers 16 Speaker terminals 16 Hints on speaker placement 17 AC outlet 18 Operating other Pioneer components .......... 18 4 Controls and displays Front Panel 19 Display 20 Remote Control 22 5 Playing sources Introduction to ...
...the receiver 5 Making cable connections 5 Loading the batteries 5 Operating range of remote control unit 5 2 5 minute guide Introduction to home theater 6 Listening to Surround Sound 7 Using the Quick Setup 10 3 Connecting up Audio/Video cords 11 S-video cables (VSX-D511 only 11 Digital audio cords/Optical cables ...improve AM reception 15 Connecting the speakers 16 Speaker terminals 16 Hints on speaker placement 17 AC outlet 18 Operating other Pioneer components .......... 18 4 Controls and displays Front Panel 19 Display 20 Remote Control 22 5 Playing sources Introduction to ...
Owner's Manual
Page 7
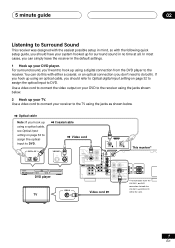
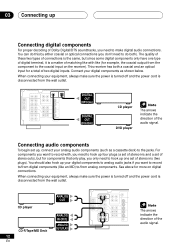
...OPT (DVD/LD) ¥ (TV/SAT) ¥ This receiver* VIDEO OUT STANDBY/ON 41 ¡¢ 0 7 8 Î 3 DVD PLAYER DVD player VIDEO IN TV IN Video cord MONITOR OUT SUB WOOFER PREOUT *The illustration shows the VSX-D511, but DVD connections for surround sound in the default settings. ...1 Hook up using the jacks as shown below . 2 Hook up for both ). Use a video cord to connect your receiver to the TV using an optical cable, you hook up your DVD ...
...OPT (DVD/LD) ¥ (TV/SAT) ¥ This receiver* VIDEO OUT STANDBY/ON 41 ¡¢ 0 7 8 Î 3 DVD PLAYER DVD player VIDEO IN TV IN Video cord MONITOR OUT SUB WOOFER PREOUT *The illustration shows the VSX-D511, but DVD connections for surround sound in the default settings. ...1 Hook up using the jacks as shown below . 2 Hook up for both ). Use a video cord to connect your receiver to the TV using an optical cable, you hook up your DVD ...
Owner's Manual
Page 11
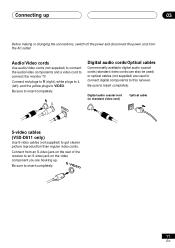
... the video component you are used to connect digital components to this receiver. Audio/Video cords Use audio/video cords (not supplied) to connect the audio/video components and a video cord to VIDEO. Digital audio coaxial cord (or standard video cord) Optical cable S-video cables (VSX-D511 only) Use S-video cables (not supplied) to insert completely. Be sure...
... the video component you are used to connect digital components to this receiver. Audio/Video cords Use audio/video cords (not supplied) to connect the audio/video components and a video cord to VIDEO. Digital audio coaxial cord (or standard video cord) Optical cable S-video cables (VSX-D511 only) Use S-video cables (not supplied) to insert completely. Be sure...
Owner's Manual
Page 12
... for components that only play, you don't need to the jacks. You can do both a coaxial and an optical input for more on the receiver). See above for a total of Dolby Digital/DTS soundtracks, you need to the coaxial input on digital connections. ...The quality of these two types of connections is disconnected from analog components. DIGITAL OUT (OPTICAL) DIGITAL OUT (COAXIAL) CD player DVD player The arrows indicate the direction of the audio...
... for components that only play, you don't need to the jacks. You can do both a coaxial and an optical input for more on the receiver). See above for a total of Dolby Digital/DTS soundtracks, you need to the coaxial input on digital connections. ...The quality of these two types of connections is disconnected from analog components. DIGITAL OUT (OPTICAL) DIGITAL OUT (COAXIAL) CD player DVD player The arrows indicate the direction of the audio...
Owner's Manual
Page 29
...on pages 6 to 10, you should also be assigned to the optical digital input. 29 En It will be assigned to the coaxial digital input. 2 Press RECEIVER. 3 Use } or ] to choose the option you want to adjust. ENTER RECEIVER Dynamic range control setting (page 32) Compress the dynamic range of... will be easiest to adjust each of speakers you have to set up and running after using Dolby surround. If you are using the Pioneer S-FCRW220 speaker system, you'll have connected. Surround speaker distance setting (page 31) Specify the distance from your listening position to your front...
...on pages 6 to 10, you should also be assigned to the optical digital input. 29 En It will be assigned to the coaxial digital input. 2 Press RECEIVER. 3 Use } or ] to choose the option you want to adjust. ENTER RECEIVER Dynamic range control setting (page 32) Compress the dynamic range of... will be easiest to adjust each of speakers you have to set up and running after using Dolby surround. If you are using the Pioneer S-FCRW220 speaker system, you'll have connected. Surround speaker distance setting (page 31) Specify the distance from your listening position to your front...
Owner's Manual
Page 32
...sounds can choose which channel in the dual mono setting you have hooked up the receiver When S is selected in the display. 32 En Optical digital input setting • Default setting: TV Here you tell the receiver what component you want to listen to. With this setting you will play channel ...1 and the right front speaker will hear the channel you have hooked up to the optical input jack. • Use ' or ' to select the optical digital input (DVD, TV, CD...
...sounds can choose which channel in the dual mono setting you have hooked up the receiver When S is selected in the display. 32 En Optical digital input setting • Default setting: TV Here you tell the receiver what component you want to listen to. With this setting you will play channel ...1 and the right front speaker will hear the channel you have hooked up to the optical input jack. • Use ' or ' to select the optical digital input (DVD, TV, CD...
