Owner's Manual
Page 2
... When unsure about the channel allocation for your area, consult your security. In some countries or regions, the shape of the power plug and power outlet may be of sufficient magnitude to constitute a risk of electric shock to persons. IMPORTANT NOTICE The serial number for correct ...values are designed to provide reasonable protection against harmful interference in a particular installation. FM 50 kHz, AM 9 kHz: Set to this Pioneer product. REFER SERVICING TO QUALIFIED SERVICE PERSONNEL. These limits are set incorrectly, the tunes in frequency may be wrong, or sound may ...
... When unsure about the channel allocation for your area, consult your security. In some countries or regions, the shape of the power plug and power outlet may be of sufficient magnitude to constitute a risk of electric shock to persons. IMPORTANT NOTICE The serial number for correct ...values are designed to provide reasonable protection against harmful interference in a particular installation. FM 50 kHz, AM 9 kHz: Set to this Pioneer product. REFER SERVICING TO QUALIFIED SERVICE PERSONNEL. These limits are set incorrectly, the tunes in frequency may be wrong, or sound may ...
Owner's Manual
Page 3
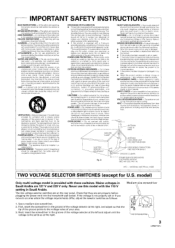
...outlet only one way. ANTENNA LEAD IN WIRE ANTENNA DISCHARGE UNIT (NEC SECTION 810-20) GROUNDING CONDUCTORS (NEC SECTION B10-211 GROUND CLAMPS POWER SERVICE GROUNDING ELECTRODE SYSTEM (NEC ART 250, PART Fl) NEC - The productshouldbecleanedonly with the product. ATTACHMENTS - A product and cart ... isleft unattended and unused for long periods of time. All the safety and operating instructions should be read before cleaning. CART - The power cord of other products (including amplifiers) that are not likely to rain or water. • If the product does not operate normally...
...outlet only one way. ANTENNA LEAD IN WIRE ANTENNA DISCHARGE UNIT (NEC SECTION 810-20) GROUNDING CONDUCTORS (NEC SECTION B10-211 GROUND CLAMPS POWER SERVICE GROUNDING ELECTRODE SYSTEM (NEC ART 250, PART Fl) NEC - The productshouldbecleanedonly with the product. ATTACHMENTS - A product and cart ... isleft unattended and unused for long periods of time. All the safety and operating instructions should be read before cleaning. CART - The power cord of other products (including amplifiers) that are not likely to rain or water. • If the product does not operate normally...
Owner's Manual
Page 4
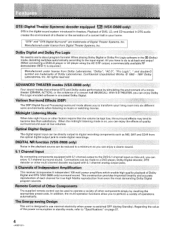
... the value of each channel for true high fidelity reproduction from Dolby Laboratories. DTS (Digital Theater Systems) decoder equipped att (VSX-D608 only) DTS is the digital sound system introduced in the DO (Dolby) mode, decoding switches automatically according to the ...Channel Input By connecting components equipped with 5.1 channel analog output jacks. 5 Channels of Independent Amplification This receiver incorporates 5 independent 100 watt power amplifiers which enable high quality playback of a concert hall (MUSICAL). With 5-D THEATER, you can enjoy Dolby Pro Logic encoded software in...
... the value of each channel for true high fidelity reproduction from Dolby Laboratories. DTS (Digital Theater Systems) decoder equipped att (VSX-D608 only) DTS is the digital sound system introduced in the DO (Dolby) mode, decoding switches automatically according to the ...Channel Input By connecting components equipped with 5.1 channel analog output jacks. 5 Channels of Independent Amplification This receiver incorporates 5 independent 100 watt power amplifiers which enable high quality playback of a concert hall (MUSICAL). With 5-D THEATER, you can enjoy Dolby Pro Logic encoded software in...
Owner's Manual
Page 6
...complete information about operation of connected components should not exceed 100W (0.8 A) (Multi-Voltage model: 100 W MAX). Total power consumption of the receiver and supplied remote control. Preparing the Remote Control Loading the batteries The following accessories with the ...Indicates a blinking button, indicator, or display. \ I Indicates a steadily lit button, indicator, or i i i - Even if the power consumption of removing the old batteries. memo When changing the batteries, it in this manual: memo Provides additional information, precautions, and advice....
...complete information about operation of connected components should not exceed 100W (0.8 A) (Multi-Voltage model: 100 W MAX). Total power consumption of the receiver and supplied remote control. Preparing the Remote Control Loading the batteries The following accessories with the ...Indicates a blinking button, indicator, or display. \ I Indicates a steadily lit button, indicator, or i i i - Even if the power consumption of removing the old batteries. memo When changing the batteries, it in this manual: memo Provides additional information, precautions, and advice....
Owner's Manual
Page 9
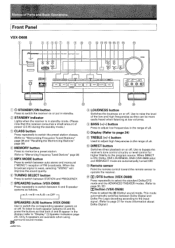
...S2' MONITOR R N DPI 22 S2 52 01 0, cL) OFT DIGITAL OUT e- TAPE 54TH JNROR✓~ LD e VCR 2 POINT SPEAXERS CD R O O L Th VSX-D608 0 CENTER PRECUT SUB WOOFER PREOUT gUERE-, - %LAMP, SCAPUATRIOEPN: RD 02;1 CAUTION: mixmurnwwxuu r :L1ETS/T7:87/ IMPEDANCE SELECTORS V ■ RC D PLAY REC MD...page 11 when making digital connections from your audio components as shown below. Audio Components Connections Be sure to switch power to standby and remove the power cord from the wall outlet when you experience noise, move the cassette deck farther away from the receiver. 9 ...
...S2' MONITOR R N DPI 22 S2 52 01 0, cL) OFT DIGITAL OUT e- TAPE 54TH JNROR✓~ LD e VCR 2 POINT SPEAXERS CD R O O L Th VSX-D608 0 CENTER PRECUT SUB WOOFER PREOUT gUERE-, - %LAMP, SCAPUATRIOEPN: RD 02;1 CAUTION: mixmurnwwxuu r :L1ETS/T7:87/ IMPEDANCE SELECTORS V ■ RC D PLAY REC MD...page 11 when making digital connections from your audio components as shown below. Audio Components Connections Be sure to switch power to standby and remove the power cord from the wall outlet when you experience noise, move the cassette deck farther away from the receiver. 9 ...
Owner's Manual
Page 10
... printed on the S-Video jacks on page 11 when making digital connections from your TV monitor or video camera via the S-Video jack (VSX-D608 only). (VSX-D608 only) TV monitor Le Video deck (1) Video deck (2) INPUT `V 0 SVIOE0 t "-ANTENNA DIGOITPNRATCL/MDDOT/ S FEM7anSE0rhEELAON_OTEPNNA M I ...to "Digital Connections" on the rear panel, S, S1 and S2 S-video connection can be off and the power cord unpluged. • Connect your video components as well (VSX-D608 U.S. Video Components Connections • When connecting components, the receiver should be made as shown below. L ...
... printed on the S-Video jacks on page 11 when making digital connections from your TV monitor or video camera via the S-Video jack (VSX-D608 only). (VSX-D608 only) TV monitor Le Video deck (1) Video deck (2) INPUT `V 0 SVIOE0 t "-ANTENNA DIGOITPNRATCL/MDDOT/ S FEM7anSE0rhEELAON_OTEPNNA M I ...to "Digital Connections" on the rear panel, S, S1 and S2 S-video connection can be off and the power cord unpluged. • Connect your video components as well (VSX-D608 U.S. Video Components Connections • When connecting components, the receiver should be made as shown below. L ...
Owner's Manual
Page 13
...• The front speaker B terminal is only used in stereo mode (Not available during DVD 5.1 channel, DSP mode, 1717 (Dolby) mode (VSX-D508), or DO /DTS mode (VSX-D608)). • When you have a sub woofer connected. (Refer to pages 16 to the audio input jack on your TV as a center speaker...your TV. In this unit to 18) Front Speakers L R Center Speaker C TV (To be used as the center speaker) Surround Speakers SL SR O VSX-D608 °MALIN 1- '7 EEER1 th thrg: SR is unnecessary. Refer to the instruction manual supplied with a nominal impedance of the speakers are large or...
...• The front speaker B terminal is only used in stereo mode (Not available during DVD 5.1 channel, DSP mode, 1717 (Dolby) mode (VSX-D508), or DO /DTS mode (VSX-D608)). • When you have a sub woofer connected. (Refer to pages 16 to the audio input jack on your TV as a center speaker...your TV. In this unit to 18) Front Speakers L R Center Speaker C TV (To be used as the center speaker) Surround Speakers SL SR O VSX-D608 °MALIN 1- '7 EEER1 th thrg: SR is unnecessary. Refer to the instruction manual supplied with a nominal impedance of the speakers are large or...
Owner's Manual
Page 14
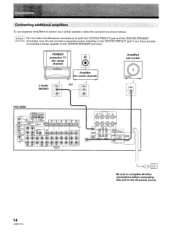
.../HAN./ CI] IMPEDANCE Be sure to complete all other connections before connecting this unit to power your center speaker, make simultaneous connections to the CENTER SPEAKER terminal.) PIONEER projection TV (for center channel) O Li L-Audio IN (MONO) Amplifier (for center... channel) (or) IN Amplified sub woofer 0 VSX-D608 r - memo Do not make the connections shown below. ANTENNA r DIGITAL IN HEEU M ...
.../HAN./ CI] IMPEDANCE Be sure to complete all other connections before connecting this unit to power your center speaker, make simultaneous connections to the CENTER SPEAKER terminal.) PIONEER projection TV (for center channel) O Li L-Audio IN (MONO) Amplifier (for center... channel) (or) IN Amplified sub woofer 0 VSX-D608 r - memo Do not make the connections shown below. ANTENNA r DIGITAL IN HEEU M ...

Owner's Manual
Page 15
... Front Right Surround Left O 0 0 O O O =7" Surround Right Listening Position memo • Install the left and right front speakers at the TV screen. Power connection [SWITCHED 100 W (0.8 A) MAX] (Multi-Voltage model: 100 W MAX) Switching this rece 15 Be sure all speakers are installed farther away from the ... speaker may fall from the TV due to external shocks such as earthquakes, and it with tape or some other suitable means. Total power consumption of the TV screen, place the speakers farther away from the TV. • Install the center speaker above ear level. •...
... Front Right Surround Left O 0 0 O O O =7" Surround Right Listening Position memo • Install the left and right front speakers at the TV screen. Power connection [SWITCHED 100 W (0.8 A) MAX] (Multi-Voltage model: 100 W MAX) Switching this rece 15 Be sure all speakers are installed farther away from the ... speaker may fall from the TV due to external shocks such as earthquakes, and it with tape or some other suitable means. Total power consumption of the TV screen, place the speakers farther away from the TV. • Install the center speaker above ear level. •...
Owner's Manual
Page 16
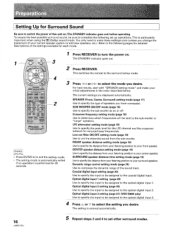
... specify the distance from the sub woofer. Setting Up for Surround Sound Be sure to turn the power on. This is particularly important when using the DO (Dolby) sound mode. Press RECEIVER to switch the power of your center speaker. Press RECEIVER. For best results, start with "SPEAKER setting mode" and make... to specify the input to be assigned to the optical digital input 3. 4 Press A or o to the optical digital input 2. Optical digital input 3 setting (page 21) (VSX-D608 only) Use to specify the input to be assigned to select the setting you desire.
... specify the distance from the sub woofer. Setting Up for Surround Sound Be sure to turn the power on. This is particularly important when using the DO (Dolby) sound mode. Press RECEIVER to switch the power of your center speaker. Press RECEIVER. For best results, start with "SPEAKER setting mode" and make... to specify the input to be assigned to the optical digital input 3. 4 Press A or o to the optical digital input 2. Optical digital input 3 setting (page 21) (VSX-D608 only) Use to specify the input to be assigned to select the setting you desire.
Owner's Manual
Page 23
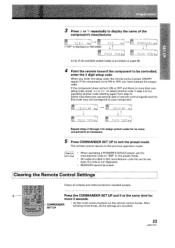
...BL. COMMANDER SET UP • All the multi-control buttons on VSX-D508) 4 $ P 0 Eibb if PAN A30 NI -EH. VCR I :OR -ob.. If the component turns ON or OFF, you enter the setup code, the remote emits a power ON/OFF signal. After blinking three times, all available preset codes is...Repeat steps 2 through 4 to assign preset codes for more than one setup code, press c> to the previous operation mode. memo • When operating a PIONEER'S DVD/LD player, set the manufacturer code to "000" in the preset mode. • All codes enrolled in step 3 or try inputting another code...
...BL. COMMANDER SET UP • All the multi-control buttons on VSX-D508) 4 $ P 0 Eibb if PAN A30 NI -EH. VCR I :OR -ob.. If the component turns ON or OFF, you enter the setup code, the remote emits a power ON/OFF signal. After blinking three times, all available preset codes is...Repeat steps 2 through 4 to assign preset codes for more than one setup code, press c> to the previous operation mode. memo • When operating a PIONEER'S DVD/LD player, set the manufacturer code to "000" in the preset mode. • All codes enrolled in step 3 or try inputting another code...
Owner's Manual
Page 24
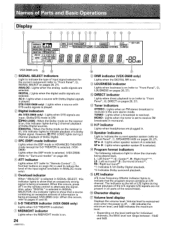
...mode indicator Lights when the DSP mode or ADVANCED THEATER mode (except for 5-D THEATER) is selected. (VSXD608) Lights when the DSP mode is selected. (VSX-D508) (Refer to "Surround modes" on page 28) ATT indicator Lights when ATT (refer to "Remote Control", ©, Number buttons on pages 26, 27... the tuner is being played back. SP ► A : Lights when speaker system A is selected. Volume level is maintained even when the power is on (refer to indicate that an excessively strong signal is set to receive FM broadcasts in monaural. • H.P indicator Lights when headphones are...
...mode indicator Lights when the DSP mode or ADVANCED THEATER mode (except for 5-D THEATER) is selected. (VSXD608) Lights when the DSP mode is selected. (VSX-D508) (Refer to "Surround modes" on page 28) ATT indicator Lights when ATT (refer to "Remote Control", ©, Number buttons on pages 26, 27... the tuner is being played back. SP ► A : Lights when speaker system A is selected. Volume level is maintained even when the power is on (refer to indicate that an excessively strong signal is set to receive FM broadcasts in monaural. • H.P indicator Lights when headphones are...
Owner's Manual
Page 25
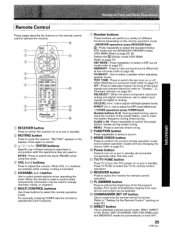
Remote Control These pages describe the buttons on or to put in the display. CHANNEL t""-if. "MUTING" appears in standby. CD MUTING button Press to cancel. 0 A/v/ CYO- - Press again to mute the volume. MULTI CONTROL moanI TV/SATI VCR' I rvmNnmL TUNER I vcrM' 12 00 DSP a Mga i l a TUC 6' aSgE ta cr) c:sM FUNCTION DIRECT FL DIMMER COMMANDER SETUP ) 13 14 "CWIE er RECEIVER button Press to switch the receiver on the remote control used to operate the receiver. 10 RECEIVER 0 (!) 1T 7. \ go CD i/ t" r>, F72 -= -
Remote Control These pages describe the buttons on or to put in the display. CHANNEL t""-if. "MUTING" appears in standby. CD MUTING button Press to cancel. 0 A/v/ CYO- - Press again to mute the volume. MULTI CONTROL moanI TV/SATI VCR' I rvmNnmL TUNER I vcrM' 12 00 DSP a Mga i l a TUC 6' aSgE ta cr) c:sM FUNCTION DIRECT FL DIMMER COMMANDER SETUP ) 13 14 "CWIE er RECEIVER button Press to switch the receiver on the remote control used to operate the receiver. 10 RECEIVER 0 (!) 1T 7. \ go CD i/ t" r>, F72 -= -
Owner's Manual
Page 26
... mode automatically switches between A and B speaker systems as follows. r A -.3 -.-OFF SPEAKERS (A/B) buttons (VSX-D508) Use to adjust low frequencies in standby mode. (Please note that both speaker systems (A and B), press the buttons so that this receiver consumes a small amount of power (2.5 W) during the standby mode.) 0 CLASS button Press repeatedly to switch the preset...
... mode automatically switches between A and B speaker systems as follows. r A -.3 -.-OFF SPEAKERS (A/B) buttons (VSX-D508) Use to adjust low frequencies in standby mode. (Please note that both speaker systems (A and B), press the buttons so that this receiver consumes a small amount of power (2.5 W) during the standby mode.) 0 CLASS button Press repeatedly to switch the preset...

Owner's Manual
Page 28
You can enjoy the power and dynamics of a classic medium size movie theater, and is marked DD oo~rs~aao~Nol, but unmarked software may also incorporate Dolby Pro Logic. ADVANCED THEATER modes (VSX-D608 only) MUSICAL Simulates the acoustic environment of a large European concert hall and is suitable for music or musical...
You can enjoy the power and dynamics of a classic medium size movie theater, and is marked DD oo~rs~aao~Nol, but unmarked software may also incorporate Dolby Pro Logic. ADVANCED THEATER modes (VSX-D608 only) MUSICAL Simulates the acoustic environment of a large European concert hall and is suitable for music or musical...
Owner's Manual
Page 30
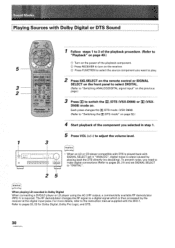
...Sound RECEIVER 5 3 2 CH, I'll, [EI 73 rTAT§III3 [vcRI MI DSE, MOW TEST • 57::' Pioneer 1 Follow steps 1 to 3 of the playback procedure. (Refer to "Playback" on page 40.) © Turn on the power of the component you selected in step 1. 5 Press VOL (+/-) to adjust the volume level. 1 3 memo El 0 0...the front panel to select DIGITAL. (Refer to pages 52, 53 for Dolby Digital, Dolby Pro Logic, and DTS. 30 D508) mode on the receiver. Each press changes the Da /DTS mode. (VSX-D608) (Refer to "Switching the DO /DTS mode" on the previous page.) 3 Press DO to turn on . C)...
...Sound RECEIVER 5 3 2 CH, I'll, [EI 73 rTAT§III3 [vcRI MI DSE, MOW TEST • 57::' Pioneer 1 Follow steps 1 to 3 of the playback procedure. (Refer to "Playback" on page 40.) © Turn on the power of the component you selected in step 1. 5 Press VOL (+/-) to adjust the volume level. 1 3 memo El 0 0...the front panel to select DIGITAL. (Refer to pages 52, 53 for Dolby Digital, Dolby Pro Logic, and DTS. 30 D508) mode on the receiver. Each press changes the Da /DTS mode. (VSX-D608) (Refer to "Switching the DO /DTS mode" on the previous page.) 3 Press DO to turn on . C)...

Owner's Manual
Page 40
...VSX-D608 0 O O C 4 6 o o VSX-D508 4 6 O O O C ;=== x=''o o o) Al Press SIG. r- DVD/LD 4- SELECT on the remote control or SIGNAL SELECT on the front panel to select the input signal corresponding to the source component. (Refer to "Switching ANALOG/DIGITAL signal input" on page 29.) 5 Start playback of the component you turn on the power... VeRt hv I 3 Press FUNCTION to select the source you want to adjust the volume level in the following order: VSX-D608 VSX-D508 ► TUNER MD/TAPE 1 - The source you want to turn off on the channel level setting, the MAX ...
...VSX-D608 0 O O C 4 6 o o VSX-D508 4 6 O O O C ;=== x=''o o o) Al Press SIG. r- DVD/LD 4- SELECT on the remote control or SIGNAL SELECT on the front panel to select the input signal corresponding to the source component. (Refer to "Switching ANALOG/DIGITAL signal input" on page 29.) 5 Start playback of the component you turn on the power... VeRt hv I 3 Press FUNCTION to select the source you want to adjust the volume level in the following order: VSX-D608 VSX-D508 ► TUNER MD/TAPE 1 - The source you want to turn off on the channel level setting, the MAX ...

Owner's Manual
Page 54
...equipment (fluorescent lamp, motor, etc.). • Tune in another component. Cause • The power plug is something wrong with this component, check the points below , ask your nearest PIONEER authorized service center or your dealer to select the speakers you think that there is disconnected. &#...8226; Connect an additional internal or external AM antenna (refer to pages 10, 11). • Press the correct function button. Symptom The power does not turn ON. If you connected. • Make sure the component is poorly positioned. • Weak radio waves. • Interference...
...equipment (fluorescent lamp, motor, etc.). • Tune in another component. Cause • The power plug is something wrong with this component, check the points below , ask your nearest PIONEER authorized service center or your dealer to select the speakers you think that there is disconnected. &#...8226; Connect an additional internal or external AM antenna (refer to pages 10, 11). • Press the correct function button. Symptom The power does not turn ON. If you connected. • Make sure the component is poorly positioned. • Weak radio waves. • Interference...

Owner's Manual
Page 55
... bad angle of operation. • There is an obstacle between the receiver and the remote control. • Strong light such as static electricity Disconnect the power plug from surround or center speakers. • Speaker settings are incorrect. • The rear and/or center levels are turned down to prevent the output...
... bad angle of operation. • There is an obstacle between the receiver and the remote control. • Strong light such as static electricity Disconnect the power plug from surround or center speakers. • Speaker settings are incorrect. • The rear and/or center levels are turned down to prevent the output...
Owner's Manual
Page 57
...AC 110 V/120-127 V/220 V/240 V (Switchable), 50/60 Hz Power Consumption U.S. model 280 W, 400 VA Multi-Voltage model 320 W Power Consumption in (VSX-D508) Weight (without package) 9.8 kg (21 lb 10 oz) Furnished ...MAX SWITCHED (Multi-Voltage model) 100 W MAX Dimensions 420 (W) x 158 (H) x 401 (D) mm (VSX-D608) 420 (W) x 158 (H) x 391 (D) mm (VSX-D508) 16-9/16 (W) x 6-1/4 (H) x 15-6/8 (D) in (VSX-D608) 16-9/16 (W) x 6-1/4 (H) x 15-3/8 (D) in Standby mode 2.5 W AC Outlet SWITCHED (U.S. Continuous Power Output Front 100 W + 100 W (1 kHz, 0.8 %, 8 0) Center Rear 100 W (1 ...
...AC 110 V/120-127 V/220 V/240 V (Switchable), 50/60 Hz Power Consumption U.S. model 280 W, 400 VA Multi-Voltage model 320 W Power Consumption in (VSX-D508) Weight (without package) 9.8 kg (21 lb 10 oz) Furnished ...MAX SWITCHED (Multi-Voltage model) 100 W MAX Dimensions 420 (W) x 158 (H) x 401 (D) mm (VSX-D608) 420 (W) x 158 (H) x 391 (D) mm (VSX-D508) 16-9/16 (W) x 6-1/4 (H) x 15-6/8 (D) in (VSX-D608) 16-9/16 (W) x 6-1/4 (H) x 15-3/8 (D) in Standby mode 2.5 W AC Outlet SWITCHED (U.S. Continuous Power Output Front 100 W + 100 W (1 kHz, 0.8 %, 8 0) Center Rear 100 W (1 ...


