Owner's Manual
Page 5
SET UP Table of Contents Introductory Information 6 Checking the Supplied Accessories 6 How to Use This Manual 6 Power Connection (AC OUTLET 6 Preparing the Remote Control 6 Receiver Installation 7 When Making Cable Connections 7 Connections 8 Antennas ...8 Audio Components Connections 9 Video Components Connections ... in MIDNIGHT Listening Mode 30 Ajusting Bass and Treble Frequencies (Tone Control 31 Tuner Operations 32 Automatic and Manual Tuning 32 Direct Tuning 33 Memorizing Frequently Tuned Stations 34 Recalling the Memorized Stations 35 Other Operations 36 Recording...
SET UP Table of Contents Introductory Information 6 Checking the Supplied Accessories 6 How to Use This Manual 6 Power Connection (AC OUTLET 6 Preparing the Remote Control 6 Receiver Installation 7 When Making Cable Connections 7 Connections 8 Antennas ...8 Audio Components Connections 9 Video Components Connections ... in MIDNIGHT Listening Mode 30 Ajusting Bass and Treble Frequencies (Tone Control 31 Tuner Operations 32 Automatic and Manual Tuning 32 Direct Tuning 33 Memorizing Frequently Tuned Stations 34 Recalling the Memorized Stations 35 Other Operations 36 Recording...

Owner's Manual
Page 6
... overheating, and possible fire risk, do not connect high-wattage appliances such as leakage and bursting. Total power consumption of the receiver and supplied remote control. Even if the power consumption of the connected components in this section under the heading "Preparations" enable you... to Use This Manual This manual is within the acceptable limits, when monitors or TV sets are used throughout this receiver on and off. Introductory Information Checking the Supplied Accessories Please check that you have...
... overheating, and possible fire risk, do not connect high-wattage appliances such as leakage and bursting. Total power consumption of the receiver and supplied remote control. Even if the power consumption of the connected components in this section under the heading "Preparations" enable you... to Use This Manual This manual is within the acceptable limits, when monitors or TV sets are used throughout this receiver on and off. Introductory Information Checking the Supplied Accessories Please check that you have...
Owner's Manual
Page 9
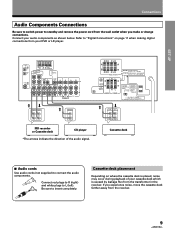
If you make or change connections. Refer to "Digital Connections" on where the cassette deck is caused by leakage flux from the transformer in the receiver. L Connect red plugs to R (right) and white plugs to connect the audio components. OPERA TION 9 PARLEUR 6 ~ LESS THAN 8Ω /...OU 8Ω ~ 16Ω / HAUT-PARLEUR CENTER PREOUT SUB WOOFER PREOUT CENTER SPEAKER RL SURROUND SPEAKERS CAUTION: ATTENTION: SEE INSTRUCTION SE REPOTER AU MANUAL MODE D'EMPLON 8~16Ω / SPEAKER 8~16Ω / HAUT- Cassette deck 7 Audio cords Use audio cords (not supplied) to L (left...
If you make or change connections. Refer to "Digital Connections" on where the cassette deck is caused by leakage flux from the transformer in the receiver. L Connect red plugs to R (right) and white plugs to connect the audio components. OPERA TION 9 PARLEUR 6 ~ LESS THAN 8Ω /...OU 8Ω ~ 16Ω / HAUT-PARLEUR CENTER PREOUT SUB WOOFER PREOUT CENTER SPEAKER RL SURROUND SPEAKERS CAUTION: ATTENTION: SEE INSTRUCTION SE REPOTER AU MANUAL MODE D'EMPLON 8~16Ω / SPEAKER 8~16Ω / HAUT- Cassette deck 7 Audio cords Use audio cords (not supplied) to L (left...
Owner's Manual
Page 11
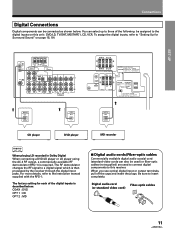
The factory setting for Surround Sound" on this receiver. When you use optical digital input or output terminals, pull off the...8Ω ~ 16Ω / HAUT-PARLEUR CENTER PREOUT SUB WOOFER PREOUT CENTER SPEAKER RL SURROUND SPEAKERS CAUTION: ATTENTION: SEE INSTRUCTION SE REPOTER AU MANUAL MODE D'EMPLON 8~16Ω / SPEAKER 8~16Ω / HAUT- COAX : DVD OPT 1 : CD OPT 2 : MD 7 Digital ...video cord) OPERA TION 11 To assign the digital inputs, refer to the instruction manual supplied with the RFD-1. The RF demodulator changes the RF signal to a digital signal which is then processed ...
The factory setting for Surround Sound" on this receiver. When you use optical digital input or output terminals, pull off the...8Ω ~ 16Ω / HAUT-PARLEUR CENTER PREOUT SUB WOOFER PREOUT CENTER SPEAKER RL SURROUND SPEAKERS CAUTION: ATTENTION: SEE INSTRUCTION SE REPOTER AU MANUAL MODE D'EMPLON 8~16Ω / SPEAKER 8~16Ω / HAUT- COAX : DVD OPT 1 : CD OPT 2 : MD 7 Digital ...video cord) OPERA TION 11 To assign the digital inputs, refer to the instruction manual supplied with the RFD-1. The RF demodulator changes the RF signal to a digital signal which is then processed ...
Owner's Manual
Page 28
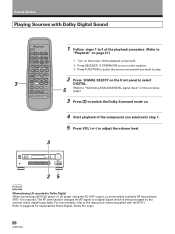
The RF demodulator changes the RF signal to the instruction manual supplied with Dolby Digital Sound 3 SOURCE SELECT CD STANDBY/ON CHANNEL STATION TV FUNC. Sound Modes Playing Sources with the RFD-1. Refer to adjust the ... 3 1 Follow steps 1 to 3 of the playback procedure. (Refer to "Playback" on page 27.) 1 Turn on the power of the playback component. 2 Press RECEIVER STADBY/ON to turn on the receiver. 3 Press FUNCTION to select the source component you want to play. 2 5 Press SIGNAL SELECT on the front panel to select DIGITAL. (Refer...
The RF demodulator changes the RF signal to the instruction manual supplied with Dolby Digital Sound 3 SOURCE SELECT CD STANDBY/ON CHANNEL STATION TV FUNC. Sound Modes Playing Sources with the RFD-1. Refer to adjust the ... 3 1 Follow steps 1 to 3 of the playback procedure. (Refer to "Playback" on page 27.) 1 Turn on the power of the playback component. 2 Press RECEIVER STADBY/ON to turn on the receiver. 3 Press FUNCTION to select the source component you want to play. 2 5 Press SIGNAL SELECT on the front panel to select DIGITAL. (Refer...
Owner's Manual
Page 32
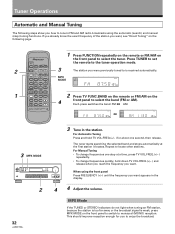
...RECEIVER REMOTE CONTROL UNIT SIGNAL SELECT ANALOG SP A dB j SIGNAL SELECT ANALOG SP A dB 3 MPX MODE 2 32 3 Tune in the display. 4 4 Adjust the volume. Repeat to enjoy the broadcast. This should improve reception enough for about one step at the first station it locates. Tuner Operations Automatic and Manual... SOURCE SELECT CD STANDBY/ON CHANNEL STATION 1 Press FUNCTION repeatedly on the remote or FM/AM on the CHANNEL SELECT LEVEL RECEIVER STANDBY/ON EFFECT MASTER VOLUME 4 front panel to is weak, press MPX MODE on the following steps show you want appears in...
...RECEIVER REMOTE CONTROL UNIT SIGNAL SELECT ANALOG SP A dB j SIGNAL SELECT ANALOG SP A dB 3 MPX MODE 2 32 3 Tune in the display. 4 4 Adjust the volume. Repeat to enjoy the broadcast. This should improve reception enough for about one step at the first station it locates. Tuner Operations Automatic and Manual... SOURCE SELECT CD STANDBY/ON CHANNEL STATION 1 Press FUNCTION repeatedly on the remote or FM/AM on the CHANNEL SELECT LEVEL RECEIVER STANDBY/ON EFFECT MASTER VOLUME 4 front panel to is weak, press MPX MODE on the following steps show you want appears in...

Owner's Manual
Page 34
.... Each press switches the display: = CLASS A = CLASS B = CLASS C 4 Press STATION (+/-) to the desired station. When memorizing FM frequencies, the receiver also memorizes the MPX mode (STEREO or MONO). See "Automatic and Manual Tuning" or "Direct Tuning" on pages 32, 33. 2 Press MEMORY to activate the memory function. Tuner Operations Memorizing Frequently Tuned...
.... Each press switches the display: = CLASS A = CLASS B = CLASS C 4 Press STATION (+/-) to the desired station. When memorizing FM frequencies, the receiver also memorizes the MPX mode (STEREO or MONO). See "Automatic and Manual Tuning" or "Direct Tuning" on pages 32, 33. 2 Press MEMORY to activate the memory function. Tuner Operations Memorizing Frequently Tuned...


