Owner's Manual
Page 2
...EXPOSURE. Consult the dealer or an experienced radio/TV technician for future reference. IMPORTANT NOTICE The serial number for this fine Pioneer product. Information to User Alteration or modifications carried out without appropriate authorization may cause harmful interference to operate the equipment. 2... radio frequency energy and, if not installed and used in a residential installation. THE POWER SWITCH IS SECONDARY CONNECTED AND THEREFORE DOES NOT SEPARATE THE UNIT FROM MAINS POWER IN STANDBY POSITION. If this serial number on a circuit different from that interference will...
...EXPOSURE. Consult the dealer or an experienced radio/TV technician for future reference. IMPORTANT NOTICE The serial number for this fine Pioneer product. Information to User Alteration or modifications carried out without appropriate authorization may cause harmful interference to operate the equipment. 2... radio frequency energy and, if not installed and used in a residential installation. THE POWER SWITCH IS SECONDARY CONNECTED AND THEREFORE DOES NOT SEPARATE THE UNIT FROM MAINS POWER IN STANDBY POSITION. If this serial number on a circuit different from that interference will...
Owner's Manual
Page 3
... Code, ANSI/NFPA 70, provides information with care. HEAT - Never clean with a polishing cloth or a soft dry cloth. POWER-CORD PROTECTION - Article 810 of other hazards. Do not overload wall outlets, extension cords, or integral convenience receptacles as they exit...product exhibits a distinct change in fire, electric shock, or other controls may cause the product and cart combination to lightning and power-line surges. Unauthorized substitutions may result in performance - Upon completion of the appliance should be blocked by a qualified technician to...
... Code, ANSI/NFPA 70, provides information with care. HEAT - Never clean with a polishing cloth or a soft dry cloth. POWER-CORD PROTECTION - Article 810 of other hazards. Do not overload wall outlets, extension cords, or integral convenience receptacles as they exit...product exhibits a distinct change in fire, electric shock, or other controls may cause the product and cart combination to lightning and power-line surges. Unauthorized substitutions may result in performance - Upon completion of the appliance should be blocked by a qualified technician to...
Owner's Manual
Page 4
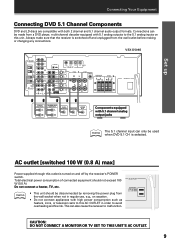
...DVD 5.1 channel input A special 5.1 Channel input makes the VSX-D409/D509S fully compatible with Dolby Digital decoders and DVD players with 5.1 channel outputs. "Dolby", "Pro Logic" and the double-D symbol are trademarks of the power consumption in Standby mode). Dolby** Digital and Dolby Pro Logic ... be used to "Specifications" on , you can be kept low, the surround effects may tend to use minimal electricity when power is designed to become less than satisfactory. When playing Dolby Digital or Dolby Surround software in simulated Dolby Digital. Various Surround Effects...
...DVD 5.1 channel input A special 5.1 Channel input makes the VSX-D409/D509S fully compatible with Dolby Digital decoders and DVD players with 5.1 channel outputs. "Dolby", "Pro Logic" and the double-D symbol are trademarks of the power consumption in Standby mode). Dolby** Digital and Dolby Pro Logic ... be used to "Specifications" on , you can be kept low, the surround effects may tend to use minimal electricity when power is designed to become less than satisfactory. When playing Dolby Digital or Dolby Surround software in simulated Dolby Digital. Various Surround Effects...

Owner's Manual
Page 8
... your analog audio components (cassette deck) use Digital source features you need to hook up , connect your audio components to the jacks as shown below. VSX-D509S IN AM LOOP ANTENNA IN O U T IN AUX CD VCR / DVR IN CONTROL OUT OUT IN IN FM UNBAL 75Ω FM ANTENNA R E C P L A Y R... a set of stereo plugs (two plugs). When connecting your equipment, always make sure the power is turned off and the power cord is disconnected from the transformer in the receiver. NOTE • Only the VSX-D509S has S-video jacks and optical digital out jack. • The arrows indicate the direction...
... your analog audio components (cassette deck) use Digital source features you need to hook up , connect your audio components to the jacks as shown below. VSX-D509S IN AM LOOP ANTENNA IN O U T IN AUX CD VCR / DVR IN CONTROL OUT OUT IN IN FM UNBAL 75Ω FM ANTENNA R E C P L A Y R... a set of stereo plugs (two plugs). When connecting your equipment, always make sure the power is turned off and the power cord is disconnected from the transformer in the receiver. NOTE • Only the VSX-D509S has S-video jacks and optical digital out jack. • The arrows indicate the direction...
Owner's Manual
Page 9
.... This can also cause the receiver to avoid overheating and fire risk. CAUTION: DO NOT CONNECT A MONITOR OR TV SET TO THIS UNIT'S AC OUTLET. 9 VSX-D509S IN AM LOOP ANTENNA IN O U T IN AUX CD VCR / DVR IN CONTROL OUT OUT IN IN FM UNBAL 75Ω FM ANTENNA R E C P ...compatible with 5.1 channel analog output jacks memo The 5.1 channel input can only be used when DVD 5.1 CH is selected. AC outlet [switched 100 W (0.8 A) max] Power supplied through this unit. Do not connect a heater, TV, etc. R / TAPE / MD IN SUB L WOOFER L SURROUND CENTER DVD 5.1 CH INPUT COAX OPT1 OPT2...
.... This can also cause the receiver to avoid overheating and fire risk. CAUTION: DO NOT CONNECT A MONITOR OR TV SET TO THIS UNIT'S AC OUTLET. 9 VSX-D509S IN AM LOOP ANTENNA IN O U T IN AUX CD VCR / DVR IN CONTROL OUT OUT IN IN FM UNBAL 75Ω FM ANTENNA R E C P ...compatible with 5.1 channel analog output jacks memo The 5.1 channel input can only be used when DVD 5.1 CH is selected. AC outlet [switched 100 W (0.8 A) max] Power supplied through this unit. Do not connect a heater, TV, etc. R / TAPE / MD IN SUB L WOOFER L SURROUND CENTER DVD 5.1 CH INPUT COAX OPT1 OPT2...
Owner's Manual
Page 10
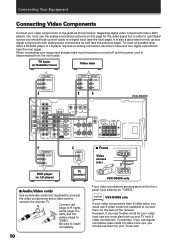
... L A Y R TV / SAT IN DVD / LD IN TO MONTOR TV SUB WOOFER PREOUT OUT R CD - memo VSX-D509S only If your equipment always make sure the power is turned off and the power cord is also a good idea to hook up your video components to VIDEO. R / TAPE / MD IN SUB L WOOFER... and a video cord to insert completely. 10 7 Front Video camera (etc.) S-VIDEO VIDEO INPUT VIDEO L AUDIO R VIDEO INPUT V L R VSX-D509S only Front video connections are accessed via the front panel input selector as "VIDEO." Connecting Your Equipment Connecting Video Components Connect your TV with...
... L A Y R TV / SAT IN DVD / LD IN TO MONTOR TV SUB WOOFER PREOUT OUT R CD - memo VSX-D509S only If your equipment always make sure the power is turned off and the power cord is also a good idea to hook up your video components to VIDEO. R / TAPE / MD IN SUB L WOOFER... and a video cord to insert completely. 10 7 Front Video camera (etc.) S-VIDEO VIDEO INPUT VIDEO L AUDIO R VIDEO INPUT V L R VSX-D509S only Front video connections are accessed via the front panel input selector as "VIDEO." Connecting Your Equipment Connecting Video Components Connect your TV with...
Owner's Manual
Page 11
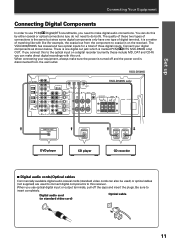
... the power is turned off the caps and insert the plugs. VSX-D509S IN AM LOOP ANTENNA IN O U T IN AUX CD VCR / DVR IN CONTROL OUT OUT IN IN FM UNBAL 75Ω FM ANTENNA R E C P L A Y R TV / SAT IN DVD / LD IN TO MONTOR TV SUB WOOFER PREOUT OUT R CD - The VSX-D409/D509S... Equipment Connecting Digital Components In order to use PCM/2 Digital/DTS soundtracks, you use optical digital input or output terminals, pull off and the power cord is disconnected from the component to coaxial in on a digital recorder (currently these two types of connections is the same but since some ...
... the power is turned off the caps and insert the plugs. VSX-D509S IN AM LOOP ANTENNA IN O U T IN AUX CD VCR / DVR IN CONTROL OUT OUT IN IN FM UNBAL 75Ω FM ANTENNA R E C P L A Y R TV / SAT IN DVD / LD IN TO MONTOR TV SUB WOOFER PREOUT OUT R CD - The VSX-D409/D509S... Equipment Connecting Digital Components In order to use PCM/2 Digital/DTS soundtracks, you use optical digital input or output terminals, pull off and the power cord is disconnected from the component to coaxial in on a digital recorder (currently these two types of connections is the same but since some ...
Owner's Manual
Page 14
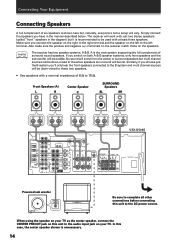
... SPEAKERS CENTER PREOUT S TV / IN SAT S IN DVD / LD SURROUND SPEAKERS RL B FRONT SPEAKERS RL VSX-D509S AC OUTLET Powered sub woofer INPUT Be sure to complete all other connections before connecting this unit to the AC power source. No sound will come from the center or surround speakers but it is unnecessary...
... SPEAKERS CENTER PREOUT S TV / IN SAT S IN DVD / LD SURROUND SPEAKERS RL B FRONT SPEAKERS RL VSX-D509S AC OUTLET Powered sub woofer INPUT Be sure to complete all other connections before connecting this unit to the AC power source. No sound will come from the center or surround speakers but it is unnecessary...
Owner's Manual
Page 16
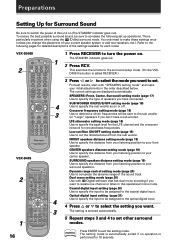
... 4 ¢ 2 DSP TEST TONE CH SELECT CH LEVEL FL DIMMER LOUDNESS FUNCTION MUTING SETUP Î 1 4 3 AV PRE-PROGRAMMED AND LEARNING REMOTE CONTROL UNIT VSX-D409 2 1 Î MULTI CONTROL DVD/LD TV/SAT VCR/DVR CD RECEIVER TUNER CD-R/ TAPE/MD TV CONT 2 DSP MODE MIDNIGHT 5.1CH 1 2 3 4 ...peak level for the LFE channel and the crossover network for rerouted bass frequencies. LFE attenuator setting mode (page 18) Use to turn the power on. CENTER speakers distance setting mode (page 19) Use to specify the distance from your front speaker. The setting is called RECEIVER.) 3...
... 4 ¢ 2 DSP TEST TONE CH SELECT CH LEVEL FL DIMMER LOUDNESS FUNCTION MUTING SETUP Î 1 4 3 AV PRE-PROGRAMMED AND LEARNING REMOTE CONTROL UNIT VSX-D409 2 1 Î MULTI CONTROL DVD/LD TV/SAT VCR/DVR CD RECEIVER TUNER CD-R/ TAPE/MD TV CONT 2 DSP MODE MIDNIGHT 5.1CH 1 2 3 4 ...peak level for the LFE channel and the crossover network for rerouted bass frequencies. LFE attenuator setting mode (page 18) Use to turn the power on. CENTER speakers distance setting mode (page 19) Use to specify the distance from your front speaker. The setting is called RECEIVER.) 3...
Owner's Manual
Page 25
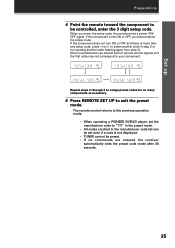
... for as many components as necessary. 5 Press REMOTE SET UP to your component. The remote control returns to the previous operation mode. • When operating a PIONEER DVD/LD player, set even if a code is more than one setup code, press @ or # to "111" in the preset mode. • All codes enrolled... manufacturer code to select another code (starting again from step 2). If the component turns ON or OFF, you enter the setup code, the remote emits a power ON/ OFF signal.
... for as many components as necessary. 5 Press REMOTE SET UP to your component. The remote control returns to the previous operation mode. • When operating a PIONEER DVD/LD player, set even if a code is more than one setup code, press @ or # to "111" in the preset mode. • All codes enrolled... manufacturer code to select another code (starting again from step 2). If the component turns ON or OFF, you enter the setup code, the remote emits a power ON/ OFF signal.
Owner's Manual
Page 30
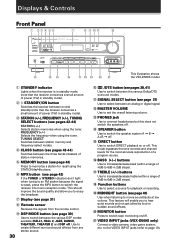
...DTS SIGNAL SELECT PHONES 1 R BASS VIDEO TREBLE MIDNIGHT AUX S-VIDEO VIDEO INPUT VIDEO L AUDIO R ~ !@ # $% ^ & * This illustration shows the VSX-D509S model. 1 STANDBY indicator Lights when the receiver is weak, press the MPX button to switch the receiver into mono reception mode. FREQUENCY (+/-) Selects the...sounds and not get jolted by loud or sudden sound effects. & MONITOR button Press to switch between the three banks (classes) of power (1W) in standby mode). 2 STANDBY/ON button Switches the receiver between on and standby.(note that the receiver consumes a small amount ...
...DTS SIGNAL SELECT PHONES 1 R BASS VIDEO TREBLE MIDNIGHT AUX S-VIDEO VIDEO INPUT VIDEO L AUDIO R ~ !@ # $% ^ & * This illustration shows the VSX-D509S model. 1 STANDBY indicator Lights when the receiver is weak, press the MPX button to switch the receiver into mono reception mode. FREQUENCY (+/-) Selects the...sounds and not get jolted by loud or sudden sound effects. & MONITOR button Press to switch between the three banks (classes) of power (1W) in standby mode). 2 STANDBY/ON button Switches the receiver between on and standby.(note that the receiver consumes a small amount ...
Owner's Manual
Page 31
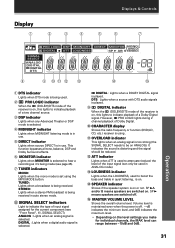
... a recording as it's being made (see "Front Panel", -, SIGNAL SELECT). ANALOG : Lights when an analog signal is played. Volume level is maintained even when the power is off . @ MASTER VOLUME LEVEL Shows the overall volume level. DTS: Lights when a source with DTS audio signals is played. 9 2 DIGITAL indicator When the 2 (DOLBY...
... a recording as it's being made (see "Front Panel", -, SIGNAL SELECT). ANALOG : Lights when an analog signal is played. Volume level is maintained even when the power is off . @ MASTER VOLUME LEVEL Shows the overall volume level. DTS: Lights when a source with DTS audio signals is played. 9 2 DIGITAL indicator When the 2 (DOLBY...
Owner's Manual
Page 33
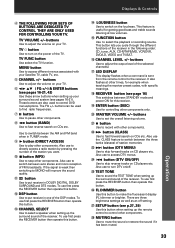
... forward tracks on CD players etc. The FQ +/- To use first press the RECEIVER button then operate this button to skip reverse tracks on the power of the DSP modes. To use the CLASS feature to switch between the AM and FM band when in DOLBY DIGITAL, DOLBY SURROUND and DTS... CD players etc. buttons Use to switch on /off setting. ™ SETUP button (see pages 16-21). buttons Use to switch between STANDBY mode and power ON for example when teaching the receiver preset codes, with your Satellite TV, cable TV, etc. 5 CHANNEL +/- To use to adjust the output level of...
... forward tracks on CD players etc. The FQ +/- To use first press the RECEIVER button then operate this button to skip reverse tracks on the power of the DSP modes. To use the CLASS feature to switch between the AM and FM band when in DOLBY DIGITAL, DOLBY SURROUND and DTS... CD players etc. buttons Use to switch on /off setting. ™ SETUP button (see pages 16-21). buttons Use to switch between STANDBY mode and power ON for example when teaching the receiver preset codes, with your Satellite TV, cable TV, etc. 5 CHANNEL +/- To use to adjust the output level of...

Owner's Manual
Page 35
...subtract the amount of effect in the following order: CD, tuner, AUX, CDR/TAPE, VCDR/DVR, DVD/ LD, DVD 5.1 CH., and TV/SAT. 0 RECEIVER (POWER) button This switches between the three banks (classes) of a double cassette deck player. These buttons are inputting. To use first press the RECEIVER button then... for example when teaching the receiver preset codes, with your surround sound system (see pages 43, 44) Use to switch between STANDBY mode and power ON for the source your TV. SIGNAL SELECT (see pages 16-21, 42) Use these arrow buttons when setting up the levels of the ...
...subtract the amount of effect in the following order: CD, tuner, AUX, CDR/TAPE, VCDR/DVR, DVD/ LD, DVD 5.1 CH., and TV/SAT. 0 RECEIVER (POWER) button This switches between the three banks (classes) of a double cassette deck player. These buttons are inputting. To use first press the RECEIVER button then... for example when teaching the receiver preset codes, with your surround sound system (see pages 43, 44) Use to switch between STANDBY mode and power ON for the source your TV. SIGNAL SELECT (see pages 16-21, 42) Use these arrow buttons when setting up the levels of the ...
Owner's Manual
Page 36
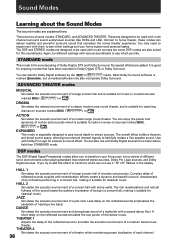
...coupled with reverberation effects create a dynamic and beautiful sound characteristic of the reflected sound to home theater, these modes can deliver realistic and powerful surround sound that have been recorded in a concert hall, making it suitable for music or musical sources marked 1 ( R ) ...Simulates the acoustic environment of a large concert hall of hearing a live band. Less delay on the reflected sounds emulates the raw power of each channel. 36 A short delay on the reflected sounds emphasizes the sensation of wooden construction. THEATER 2 Simulates the acoustic ...
...coupled with reverberation effects create a dynamic and beautiful sound characteristic of the reflected sound to home theater, these modes can deliver realistic and powerful surround sound that have been recorded in a concert hall, making it suitable for music or musical sources marked 1 ( R ) ...Simulates the acoustic environment of a large concert hall of hearing a live band. Less delay on the reflected sounds emulates the raw power of each channel. 36 A short delay on the reflected sounds emphasizes the sensation of wooden construction. THEATER 2 Simulates the acoustic ...

Owner's Manual
Page 38
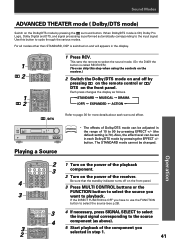
... CLASS MPX BAND 7 8 3 D.ACCESS 1¡ CHANNEL 4¢ LOUDNESS FUNCTION MUTING RECEIVER FL DIMMER REMOTE SETUP MASTER VOLUME 3 5 8 1 Turn on the power of the playback component. 2 Turn on . 7 Start playback of the receiver. Be sure that the standby indicator turns off on the front panel. 3 Press... To prevent noise, you need to make digital connections (Refer to pages 11) and set the remote to select the sound mode. (On the VSX-D409 the button is called RECEIVER.) 5 Press SIGNAL SELECT to select DIGITAL. (Refer to "Switching ANALOG/DIGITAL signal input" on the previous page.) ...
... CLASS MPX BAND 7 8 3 D.ACCESS 1¡ CHANNEL 4¢ LOUDNESS FUNCTION MUTING RECEIVER FL DIMMER REMOTE SETUP MASTER VOLUME 3 5 8 1 Turn on the power of the playback component. 2 Turn on . 7 Start playback of the receiver. Be sure that the standby indicator turns off on the front panel. 3 Press... To prevent noise, you need to make digital connections (Refer to pages 11) and set the remote to select the sound mode. (On the VSX-D409 the button is called RECEIVER.) 5 Press SIGNAL SELECT to select DIGITAL. (Refer to "Switching ANALOG/DIGITAL signal input" on the previous page.) ...
Owner's Manual
Page 41
... sets the remote to cycle through the various modes. Also, the effect level can skip this button to select the sound mode. (On the D409 the button is OFF you selected in the range of the component you have to use the FUNCTION button to select the source (see p.28...; 0 EFFECT 4 ‡ E¢ NTER LOUDNESS FUNCTION MUTING RECEIVER FL DIMMER REMOTE SETUP MASTER VOLUME AUDIO/VIDEO PRE-PROGRAMMED REMOTE CONTROL UNIT 3 4 1 Turn on the power of the receiver. For all modes other than STANDARD, DSP is 70). Be sure that the standby indicator turns off by pressing 2 on the remote...
... sets the remote to cycle through the various modes. Also, the effect level can skip this button to select the sound mode. (On the D409 the button is OFF you selected in the range of the component you have to use the FUNCTION button to select the source (see p.28...; 0 EFFECT 4 ‡ E¢ NTER LOUDNESS FUNCTION MUTING RECEIVER FL DIMMER REMOTE SETUP MASTER VOLUME AUDIO/VIDEO PRE-PROGRAMMED REMOTE CONTROL UNIT 3 4 1 Turn on the power of the receiver. For all modes other than STANDARD, DSP is 70). Be sure that the standby indicator turns off by pressing 2 on the remote...
Owner's Manual
Page 44
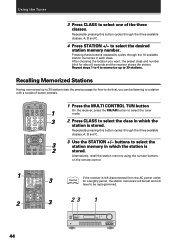
... ST MENU ST ENTER TOP MENU FQ SOURCE CLASS MPX BAND 7 8 3 D.ACCESS 1¡ CHANNEL 4¢ 3 3 memo If the receiver is left disconnected from the AC power outlet for about 5 seconds and the receiver stores the station. SOURCE RECEIVER DVD RCV TV VCR MULTI CONTROL CD TUN CD-R TVC 1 2 3 MIDNIGHT 5.1CH ATT...
... ST MENU ST ENTER TOP MENU FQ SOURCE CLASS MPX BAND 7 8 3 D.ACCESS 1¡ CHANNEL 4¢ 3 3 memo If the receiver is left disconnected from the AC power outlet for about 5 seconds and the receiver stores the station. SOURCE RECEIVER DVD RCV TV VCR MULTI CONTROL CD TUN CD-R TVC 1 2 3 MIDNIGHT 5.1CH ATT...
Owner's Manual
Page 49
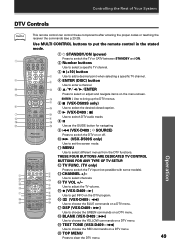
...Use to adjust the TV volume. @ ¶ (VSX-D409 : 3) Use to get INFO on the DTV program. # 2 (VSX-D409 : 1) Use to choose the BLUE commands on a DTV menu. $ DSP (VSX-D409 : ¡) Use to choose the GREEN commands on a DTV menu. % BLANK (VSX-D409 : ¢) Use to choose the YELLOW commands ...162; LOUDNESS FUNCTION MUTING RECEIVER FL DIMMER REMOTE SETUP MASTER VOLUME AUDIO/VIDEO PRE-PROGRAMMED REMOTE CONTROL UNIT 2 4 ~ 5 & 8 @ % ^ 1 STANDBY/ON (power) Press to switch the TV or CATV between STANDBY and ON. 2 Number buttons Use to select a specific TV channel. 3 ¶ (+10) button Use to ...
...Use to adjust the TV volume. @ ¶ (VSX-D409 : 3) Use to get INFO on the DTV program. # 2 (VSX-D409 : 1) Use to choose the BLUE commands on a DTV menu. $ DSP (VSX-D409 : ¡) Use to choose the GREEN commands on a DTV menu. % BLANK (VSX-D409 : ¢) Use to choose the YELLOW commands ...162; LOUDNESS FUNCTION MUTING RECEIVER FL DIMMER REMOTE SETUP MASTER VOLUME AUDIO/VIDEO PRE-PROGRAMMED REMOTE CONTROL UNIT 2 4 ~ 5 & 8 @ % ^ 1 STANDBY/ON (power) Press to switch the TV or CATV between STANDBY and ON. 2 Number buttons Use to select a specific TV channel. 3 ¶ (+10) button Use to ...
Owner's Manual
Page 51
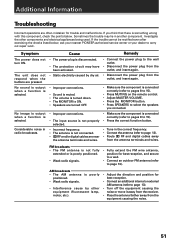
...operations are often mistaken for best reception. • Connect an additional internal or external AM antenna (refer to carry out repair work. Symptom The power does not turn ON. AM broadcasts • The AM antenna is poorly positioned. • Weak radio signals. • Interference cause by dry ... (refer to page 13). If you think that there is something wrong with this component, check the points below , ask your nearest PIONEER authorized service center or your dealer to page 13). • Turn off the equipment causing the noise or move it away from the receiver...
...operations are often mistaken for best reception. • Connect an additional internal or external AM antenna (refer to carry out repair work. Symptom The power does not turn ON. AM broadcasts • The AM antenna is poorly positioned. • Weak radio signals. • Interference cause by dry ... (refer to page 13). If you think that there is something wrong with this component, check the points below , ask your nearest PIONEER authorized service center or your dealer to page 13). • Turn off the equipment causing the noise or move it away from the receiver...


