Operating Instructions
Page 2
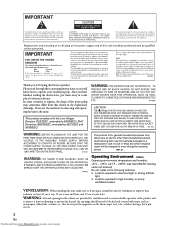
... instructions in the explanatory drawings. CAUTION: THE -OFF/_ON BUTTON IS SECONDARY CONNECTED AND THEREFORE DOES NOT SEPARATE THE UNIT FROM MAINS POWER IN STANDBY POSITION. Any failure due to use for buying this Pioneer product. Also do not put them away in the following locations • ... OF ELECTRIC SHOCK DO NOT OPEN CAUTION: TO PREVENT THE RISK OF ELECTRIC SHOCK, DO NOT REMOVE COVER (OR BACK). However, the method of connecting and operating the unit is the same. K041_En Operating Environment H045 En Operating environment temperature and humidity: +5°C - +35°C (+41°F...
... instructions in the explanatory drawings. CAUTION: THE -OFF/_ON BUTTON IS SECONDARY CONNECTED AND THEREFORE DOES NOT SEPARATE THE UNIT FROM MAINS POWER IN STANDBY POSITION. Any failure due to use for buying this Pioneer product. Also do not put them away in the following locations • ... OF ELECTRIC SHOCK DO NOT OPEN CAUTION: TO PREVENT THE RISK OF ELECTRIC SHOCK, DO NOT REMOVE COVER (OR BACK). However, the method of connecting and operating the unit is the same. K041_En Operating Environment H045 En Operating environment temperature and humidity: +5°C - +35°C (+41°F...

Operating Instructions
Page 4
...19 Remote Control 20 04 Basic Playback 22 Automatic Switching between Analog & Digital Signals 22 Checking the Settings on Speaker Placement 15 Connecting Antennas 16 Using External Antennas 16 Operating other ) Player 22 Playing a Source 23 05 Fine Tuning Your Surround Sound 24 Room... 10 02 Connecting Your Equipment 11 Connecting a DVD Player & a TV 11 Audio/Video Cords 11 Optical Cables 11 Connecting a Digital Tuner/Set Top Box 12 Connecting a TV with an Internal Digital Tuner 12 Connecting Video Components 13 Connecting Speakers 14 Hints on Your DVD (or other Pioneer Components with ...
...19 Remote Control 20 04 Basic Playback 22 Automatic Switching between Analog & Digital Signals 22 Checking the Settings on Speaker Placement 15 Connecting Antennas 16 Using External Antennas 16 Operating other ) Player 22 Playing a Source 23 05 Fine Tuning Your Surround Sound 24 Room... 10 02 Connecting Your Equipment 11 Connecting a DVD Player & a TV 11 Audio/Video Cords 11 Optical Cables 11 Connecting a Digital Tuner/Set Top Box 12 Connecting a TV with an Internal Digital Tuner 12 Connecting Video Components 13 Connecting Speakers 14 Hints on Your DVD (or other Pioneer Components with ...
Operating Instructions
Page 6
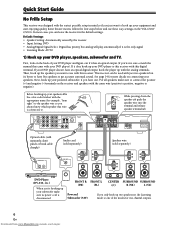
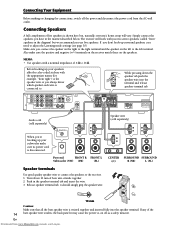
... Subwoofer (SW) If you want to hook up your subwoofer make sure to connect the positive (+) and negative (-)terminals on the VSX-C300/ C300-S. First, look on the back of the modes for more details on connecting your equipment and start enjoying quality home theater movies follow the four steps below and...speaker tab push the speaker wire into the terminal and release speaker terminal tab. For all speakers make sure its power cord is connected to this receiver with this receiver. See page 14 for two channel outputs. 6 En Downloaded from www.Manualslib.com manuals search ...
... Subwoofer (SW) If you want to hook up your subwoofer make sure to connect the positive (+) and negative (-)terminals on the VSX-C300/ C300-S. First, look on the back of the modes for more details on connecting your equipment and start enjoying quality home theater movies follow the four steps below and...speaker tab push the speaker wire into the terminal and release speaker terminal tab. For all speakers make sure its power cord is connected to this receiver with this receiver. See page 14 for two channel outputs. 6 En Downloaded from www.Manualslib.com manuals search ...
Operating Instructions
Page 7
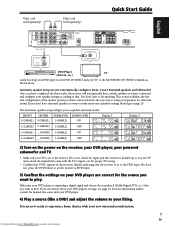
... speaker settings should go to page 25. This setup establishes the size and configuration of the speaker system you want to hear. You don't have connected and is hooked up your DVD player to the DVD IN VIDEO and your TV to the MONITOR OUT VIDEO terminals as shown above tasks... receiver is the easy way to setup your speaker settings according to do anything. The Automatic speaker setup will automatically detect which speakers you have connected and configure your speakers for the source you have to that.
... speaker settings should go to page 25. This setup establishes the size and configuration of the speaker system you want to hear. You don't have connected and is hooked up your DVD player to the DVD IN VIDEO and your TV to the MONITOR OUT VIDEO terminals as shown above tasks... receiver is the easy way to setup your speaker settings according to do anything. The Automatic speaker setup will automatically detect which speakers you have connected and configure your speakers for the source you have to that.
Operating Instructions
Page 8
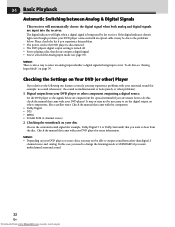
... Digital Signals This receiver is turned off . • The digital output of the player sending the signal is equipped with the VSX-C300/C300S and the possibilities of sources, speaker configurations and sound reproduction. After that help you get better sound and let you started with...can do this problem. It is being input. The VSX-C300/C300-S has many different listening modes to automatically select a digital or analog signal depending upon what suits your equipment more effectively. If you have made a digital connection (see above is being input or not. These ...
... Digital Signals This receiver is turned off . • The digital output of the player sending the signal is equipped with the VSX-C300/C300S and the possibilities of sources, speaker configurations and sound reproduction. After that help you get better sound and let you started with...can do this problem. It is being input. The VSX-C300/C300-S has many different listening modes to automatically select a digital or analog signal depending upon what suits your equipment more effectively. If you have made a digital connection (see above is being input or not. These ...
Operating Instructions
Page 9
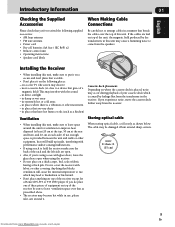
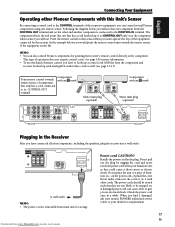
... this unit, make sure to leave space around the unit for ventilation to hold the receiver make sure the back of the receiver except for a Pioneer DV-444 or 545 DVD player. more + than = (15 cm) 9 En Downloaded from the transformer in direct sunlight - If not enough space...• Dry cell batteries (AA Size / IEC R6P) x2 • Remote control unit • Operating instructions • Speaker cord labels When Making Cable Connections Be careful not to arrange cables in a manner that bends the cables over that as prescribed above. • The receiver may become hot while in...
... this unit, make sure to leave space around the unit for ventilation to hold the receiver make sure the back of the receiver except for a Pioneer DV-444 or 545 DVD player. more + than = (15 cm) 9 En Downloaded from the transformer in direct sunlight - If not enough space...• Dry cell batteries (AA Size / IEC R6P) x2 • Remote control unit • Operating instructions • Speaker cord labels When Making Cable Connections Be careful not to arrange cables in a manner that bends the cables over that as prescribed above. • The receiver may become hot while in...

Operating Instructions
Page 11
...separately) MONITOR IN TV Optical Cables Commercially available optical cables are used to connect digital components to close after you need an analog connection as well as shown below. Be sure to make digital audio connections. Make sure the cover can close . Audio/Video Cords Use audio/video... DVD player for karaoke you need to play PCM/2 Digital/DTS/MPEG multichannel soundtracks, you don't have plugged it in the optical cable. Connect red plugs to R (right), white plugs to L (left), and the yellow plugs to insert completely. R L VIDEO Video cord (sold separately) R L...
...separately) MONITOR IN TV Optical Cables Commercially available optical cables are used to connect digital components to close after you need an analog connection as well as shown below. Be sure to make digital audio connections. Make sure the cover can close . Audio/Video Cords Use audio/video... DVD player for karaoke you need to play PCM/2 Digital/DTS/MPEG multichannel soundtracks, you don't have plugged it in the optical cable. Connect red plugs to R (right), white plugs to L (left), and the yellow plugs to insert completely. R L VIDEO Video cord (sold separately) R L...
Operating Instructions
Page 12
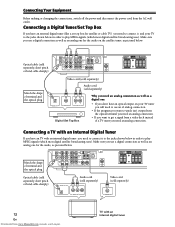
... sharply) DIGITAL OUT Audio cord (sold separately) Video cord (sold separately) ANALOG OUT MONITOR IN 12 En Downloaded from the AC wall outlet. Connecting a Digital Tuner/Set Top Box If you have an external digital tuner (like a set top box for the audio, as pictured below in ... 75Ω R L VCR OUT VIDEO AUDIO SUB WOOFER OUT FRONT R L SPEAKERS CENTER SURROUND R L Match the shape of terminal and the optical plug. Connecting a TV with an Internal Digital Tuner If you don't have an TV with an internal digital tuner Match the shape of terminal and the optical...
... sharply) DIGITAL OUT Audio cord (sold separately) Video cord (sold separately) ANALOG OUT MONITOR IN 12 En Downloaded from the AC wall outlet. Connecting a Digital Tuner/Set Top Box If you have an external digital tuner (like a set top box for the audio, as pictured below in ... 75Ω R L VCR OUT VIDEO AUDIO SUB WOOFER OUT FRONT R L SPEAKERS CENTER SURROUND R L Match the shape of terminal and the optical plug. Connecting a TV with an Internal Digital Tuner If you don't have an TV with an internal digital tuner Match the shape of terminal and the optical...
Operating Instructions
Page 13
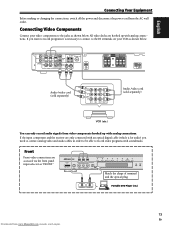
... SIGNAL DIGITAL MULTI ch 2PROLOGIC 2DIGITAL DTS OFF ON PHONES VIDEO L AUDIO R DIGITAL IN MPEG VIRTUAL PHONES SURR. Connecting Video Components Connect your video components to the IN terminals on your VCR as "FRONT." All video decks are accessed via the front... Audio /video cord (sold separately) VCR (etc.) You can only record audio signals from the AC wall outlet. English Connecting Your Equipment Before making or changing the connections, switch off the power and disconnect the power cord from video components hooked up with soundtracks. Front Front video...
... SIGNAL DIGITAL MULTI ch 2PROLOGIC 2DIGITAL DTS OFF ON PHONES VIDEO L AUDIO R DIGITAL IN MPEG VIRTUAL PHONES SURR. Connecting Video Components Connect your video components to the IN terminals on your VCR as "FRONT." All video decks are accessed via the front... Audio /video cord (sold separately) VCR (etc.) You can only record audio signals from the AC wall outlet. English Connecting Your Equipment Before making or changing the connections, switch off the power and disconnect the power cord from video components hooked up with soundtracks. Front Front video...
Operating Instructions
Page 14
... positive and negative (+/-) terminals on the receiver match those on the left to 16 Ω. Also make sure its power cord is connected to cut off the power and disconnect the power cord from www.Manualslib.com manuals search engine Before hooking up your speakers affix the...OUT FRONT R L SPEAKERS CENTER SURROUND R L IN OUT CONTROL AC IN Audio cord (sold separately) Speaker wire (sold separately) ANALOG IN When you connect the speaker on the right to the right terminal and the speaker on the speakers. MEMO: • Use speakers with a nominal impedance of five ...
... positive and negative (+/-) terminals on the receiver match those on the left to 16 Ω. Also make sure its power cord is connected to cut off the power and disconnect the power cord from www.Manualslib.com manuals search engine Before hooking up your speakers affix the...OUT FRONT R L SPEAKERS CENTER SURROUND R L IN OUT CONTROL AC IN Audio cord (sold separately) Speaker wire (sold separately) ANALOG IN When you connect the speaker on the right to the right terminal and the speaker on the speakers. MEMO: • Use speakers with a nominal impedance of five ...

Operating Instructions
Page 15
English Connecting Your Equipment Hints on Speaker Placement Speakers are usually designed with your speakers as shown on the right. Some are installed securely to reduce the ...
English Connecting Your Equipment Hints on Speaker Placement Speakers are usually designed with your speakers as shown on the right. Some are installed securely to reduce the ...
Operating Instructions
Page 16
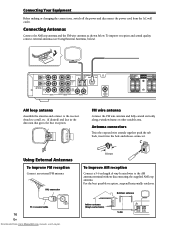
...antenna terminal without disconnecting the supplied AM loop antenna. Attach to the receiver. Using External Antennas To improve FM reception Connect an external FM antenna. For the best possible reception, suspend horizontally outdoors. Antenna connectors Twist the exposed wire strands together...fully extend vertically along a window frame or other suitable area. To improve reception and sound quality, connect external antennas (see Using External Antennas, below . Connecting Antennas Connect the AM loop antenna and the FM wire antenna as shown below ). PAL connector 75 Ω...
...antenna terminal without disconnecting the supplied AM loop antenna. Attach to the receiver. Using External Antennas To improve FM reception Connect an external FM antenna. For the best possible reception, suspend horizontally outdoors. Antenna connectors Twist the exposed wire strands together...fully extend vertically along a window frame or other suitable area. To improve reception and sound quality, connect external antennas (see Using External Antennas, below . Connecting Antennas Connect the AM loop antenna and the FM wire antenna as shown below ). PAL connector 75 Ω...
Operating Instructions
Page 17
...audio/video cords as well (see that they are wet as this Unit's Sensor By connecting a control cord to the CONTROL terminals of the respective equipment, you can control several Pioneer components using one component feeds the CONTROL OUT terminal and on the left. SPEAKERS CENTER .... 17 En A damaged power cord can also control Pioneer components by this kind of the equipment connected by pointing the receiver's remote control directly at that only has a cord connected to hook up a control cord AND the have connected all your components, including the speakers, plug the receiver...
...audio/video cords as well (see that they are wet as this Unit's Sensor By connecting a control cord to the CONTROL terminals of the respective equipment, you can control several Pioneer components using one component feeds the CONTROL OUT terminal and on the left. SPEAKERS CENTER .... 17 En A damaged power cord can also control Pioneer components by this kind of the equipment connected by pointing the receiver's remote control directly at that only has a cord connected to hook up a control cord AND the have connected all your components, including the speakers, plug the receiver...
Operating Instructions
Page 18
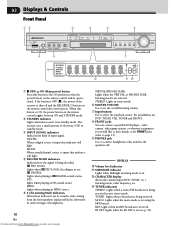
... SIGNAL DIGITAL MULTI ch 2PROLOGIC 2DIGITAL DTS OFF ON PHONES VIDEO L AUDIO R DIGITAL IN AUDIO/VIDEO MULTI-CHANNEL RECEIVER VSX-C300 MPEG VIRTUAL PHONES SURR. When this button to connect headphones (this indicator will light. MONO: Lights when the mono mode is on the remote control will be operational. ...7 Input buttons Use to select the playback source: the possibilities are DVD, TV/SAT, VCR, TUNER and FRONT. 8 FRONT jacks You can connect a portable DVD player, video camera, video game system, or whatever equipment you would like to have handy, to the FRONT jacks (refer to ...
... SIGNAL DIGITAL MULTI ch 2PROLOGIC 2DIGITAL DTS OFF ON PHONES VIDEO L AUDIO R DIGITAL IN AUDIO/VIDEO MULTI-CHANNEL RECEIVER VSX-C300 MPEG VIRTUAL PHONES SURR. When this button to connect headphones (this indicator will light. MONO: Lights when the mono mode is on the remote control will be operational. ...7 Input buttons Use to select the playback source: the possibilities are DVD, TV/SAT, VCR, TUNER and FRONT. 8 FRONT jacks You can connect a portable DVD player, video camera, video game system, or whatever equipment you would like to have handy, to the FRONT jacks (refer to ...

Operating Instructions
Page 19
To be able to play MPEG and other PIONEER equipment, that bears the Î mark, so that you can use the optical digital terminal here. 3 VCR IN/OUT terminals (connect a VCR here, see page 13) Use these terminals to the video terminals and both the analog and optical digital terminals for ... to hook up the power cord to output the signal from a VCR (or a video camera, DVD recorder, etc.). Make sure to connect to make digital connections. To be able to play Dolby Digital and other surround soundtracks you need to the video terminals and both the analog and optical digital...
To be able to play MPEG and other PIONEER equipment, that bears the Î mark, so that you can use the optical digital terminal here. 3 VCR IN/OUT terminals (connect a VCR here, see page 13) Use these terminals to the video terminals and both the analog and optical digital terminals for ... to hook up the power cord to output the signal from a VCR (or a video camera, DVD recorder, etc.). Make sure to connect to make digital connections. To be able to play Dolby Digital and other surround soundtracks you need to the video terminals and both the analog and optical digital...
Operating Instructions
Page 22
... Settings on your surround sound (for example: no sound whatsoever; MEMO: • Depending on your DVD player or source discs you have your DVD player connected with the component. • Dolby Digital • DTS • MPEG • 96 kHz PCM (2 channel stereo) 2 Checking the soundtrack on Your DVD (or other) Player...
... Settings on your surround sound (for example: no sound whatsoever; MEMO: • Depending on your DVD player or source discs you have your DVD player connected with the component. • Dolby Digital • DTS • MPEG • 96 kHz PCM (2 channel stereo) 2 Checking the soundtrack on Your DVD (or other) Player...
Operating Instructions
Page 25
... settings are displayed automatically. • SPEAKERS (Front, Center, Surround) setting mode (page 26) Use to specify the size and configuration of the speakers you have connected. • SUBWOOFER ON/PLUS/OFF setting mode (page 26) Use to specify if the subwoofer is so high as to distort. • FRONT speakers distance...
... settings are displayed automatically. • SPEAKERS (Front, Center, Surround) setting mode (page 26) Use to specify the size and configuration of the speakers you have connected. • SUBWOOFER ON/PLUS/OFF setting mode (page 26) Use to specify if the subwoofer is so high as to distort. • FRONT speakers distance...

Operating Instructions
Page 26
...size (diameter) of your speaker(s) is 12 centimeters or smaller, set . SMALL: If the cone size (diameter) of your speaker(s) is connected. Sound coming from this Crossover frequency setting mode channel in the original source will determine if bass sounds are some cases where no speaker(s) hooked...8226; There are sent by the receiver to the speakers you have the option of selecting the PLS setting, which you are used , you have connected more exactly than 12 centimeters, set up. In the display, "F", "C", and "S" refer to a previous receiver setting mode. SUBWOOFER ON/Plus/...
...size (diameter) of your speaker(s) is 12 centimeters or smaller, set . SMALL: If the cone size (diameter) of your speaker(s) is connected. Sound coming from this Crossover frequency setting mode channel in the original source will determine if bass sounds are some cases where no speaker(s) hooked...8226; There are sent by the receiver to the speakers you have the option of selecting the PLS setting, which you are used , you have connected more exactly than 12 centimeters, set up. In the display, "F", "C", and "S" refer to a previous receiver setting mode. SUBWOOFER ON/Plus/...
Operating Instructions
Page 42
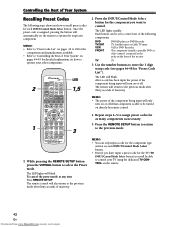
... DVD/LD player or DVD Recorder TV, Satellite tuner or Cable TV tuner VCR or DVD Recorder The component (usually a portable DVD or video camera) connected to the jacks on or off if that component is assigned, pressing the button will blink. MEMO: • Refer to "Preset Code List" on pages...
... DVD/LD player or DVD Recorder TV, Satellite tuner or Cable TV tuner VCR or DVD Recorder The component (usually a portable DVD or video camera) connected to the jacks on or off if that component is assigned, pressing the button will blink. MEMO: • Refer to "Preset Code List" on pages...
Operating Instructions
Page 49
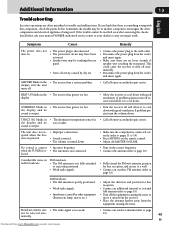
... other equipment (fluorescent lamp, motor, etc.). • Adjust the direction and position for best reception, and secure to a wall. • Connect an outdoor FM antenna (refer to shut off . • Call a Pioneer-accredited repair center. AMP ERR blinks in radio broadcasts. not be rectified even after exercising the checks listed below . Additional...
... other equipment (fluorescent lamp, motor, etc.). • Adjust the direction and position for best reception, and secure to a wall. • Connect an outdoor FM antenna (refer to shut off . • Call a Pioneer-accredited repair center. AMP ERR blinks in radio broadcasts. not be rectified even after exercising the checks listed below . Additional...


