
Owner's Manual
Page 4
... sound (MCACC 31 Other problems when using the Auto MCACC Setup 33 02 Controls and displays Front panel 9 Operating range of remote control 10 Display 11 Remote control 13 03 Connecting your equipment Determining the speakers' application . . . . . 16 Other speaker connection 17 Placing the ...playback 35 Listening in surround sound 35 Using the Advanced surround effects . . . . . 36 Listening in a safe place for buying this Pioneer product. Contents 01 Before you for future reference. After you will know how to station presets 53 Naming preset stations 53 4 En Please ...
... sound (MCACC 31 Other problems when using the Auto MCACC Setup 33 02 Controls and displays Front panel 9 Operating range of remote control 10 Display 11 Remote control 13 03 Connecting your equipment Determining the speakers' application . . . . . 16 Other speaker connection 17 Placing the ...playback 35 Listening in surround sound 35 Using the Advanced surround effects . . . . . 36 Listening in a safe place for buying this Pioneer product. Contents 01 Before you for future reference. After you will know how to station presets 53 Naming preset stations 53 4 En Please ...
Owner's Manual
Page 5
...to Music Contents of Bluetooth wireless technology device with Your System 68 Listening to Satellite Radio 69 Connecting your system Setting the remote to SIRIUS Radio 70 Saving channel presets 71 Using the SIRIUS Menu 71 11 Additional information Troubleshooting 72 HDMI 75 Important ... Controlling the rest of your SiriusConnectTM Tuner . . . 70 Listening to control other components 55 Selecting preset codes directly 55 Clearing all the remote control settings. . . . . 56 Controls for TVs 57 Controls for other U.S. Product includes software. © DTS, Inc. DTS and...
...to Music Contents of Bluetooth wireless technology device with Your System 68 Listening to Satellite Radio 69 Connecting your system Setting the remote to SIRIUS Radio 70 Saving channel presets 71 Using the SIRIUS Menu 71 11 Additional information Troubleshooting 72 HDMI 75 Important ... Controlling the rest of your SiriusConnectTM Tuner . . . 70 Listening to control other components 55 Selecting preset codes directly 55 Clearing all the remote control settings. . . . . 56 Controls for TVs 57 Controls for other U.S. Product includes software. © DTS, Inc. DTS and...
Owner's Manual
Page 6
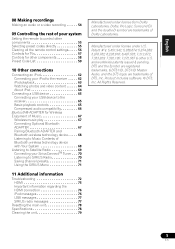
... Audio options (page 40) • Choosing the input signal (page 43) • Manual speaker setup (page 45) 9 Making maximum use of the remote control • Setting the remote to control other than the recommended connections.) 6 Use the on your system • Automatically setting up for the best surround sound effect...
... Audio options (page 40) • Choosing the input signal (page 43) • Manual speaker setup (page 45) 9 Making maximum use of the remote control • Setting the remote to control other than the recommended connections.) 6 Use the on your system • Automatically setting up for the best surround sound effect...
Owner's Manual
Page 7
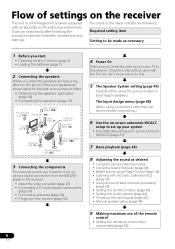
... Français Italiano Nederlands Español Before you start 01 Chapter 1: Before you 've received the following supplied accessories: • Setup microphone • Remote control • Dry cell batteries (AAA size IEC R03) x2 • AM loop antenna • FM wire antenna • iPod cable • These operating instructions...
... Français Italiano Nederlands Español Before you start 01 Chapter 1: Before you 've received the following supplied accessories: • Setup microphone • Remote control • Dry cell batteries (AAA size IEC R03) x2 • AM loop antenna • FM wire antenna • iPod cable • These operating instructions...
Owner's Manual
Page 9
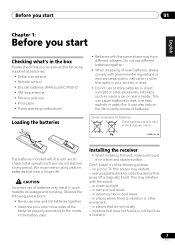
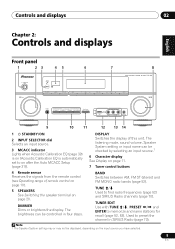
DISPLAY Switches the display of remote control on page 10). 5 SPEAKERS See Switching the speaker terminal on the input source you have selected. 9 En TUNE / Used to memorize and ... be checked by selecting an input source.1 6 Character display See Display on page 11. 7 Tuner control buttons 4 Remote sensor Receives the signals from the remote control (see Operating range of this unit. CHANNEL RECEIVER VSX-920 TUNE TUNER EDIT PRESET ENTER MASTER VOLUME PHONES AUTO/DIRECT LISTENING MODE STEREO/ALC STANDARD ADV SURROUND iPod...
DISPLAY Switches the display of remote control on page 10). 5 SPEAKERS See Switching the speaker terminal on the input source you have selected. 9 En TUNE / Used to memorize and ... be checked by selecting an input source.1 6 Character display See Display on page 11. 7 Tuner control buttons 4 Remote sensor Receives the signals from the remote control (see Operating range of this unit. CHANNEL RECEIVER VSX-920 TUNE TUNER EDIT PRESET ENTER MASTER VOLUME PHONES AUTO/DIRECT LISTENING MODE STEREO/ALC STANDARD ADV SURROUND iPod...
Owner's Manual
Page 10
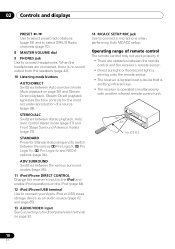
... may not work properly if: • There are connected, there is operated simultaneously with another infrared remote control unit. 30° 30° 7 m (23 ft.) 10 En Operating range of a source (page 38). When the headphones are obstacles between stereo ... to the front panel video terminal on page 35) and Stream Direct playback. STEREO/ALC Switches between the remote control and the receiver's remote sensor. • Direct sunlight or fluorescent light is shining onto the remote sensor. • The receiver is located near a device that is emitting infrared rays. • The...
... may not work properly if: • There are connected, there is operated simultaneously with another infrared remote control unit. 30° 30° 7 m (23 ft.) 10 En Operating range of a source (page 38). When the headphones are obstacles between stereo ... to the front panel video terminal on page 35) and Stream Direct playback. STEREO/ALC Switches between the remote control and the receiver's remote sensor. • Direct sunlight or fluorescent light is shining onto the remote sensor. • The receiver is located near a device that is emitting infrared rays. • The...
Owner's Manual
Page 13
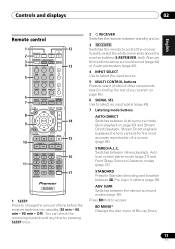
... time by pressing SLEEP once. 2 RECEIVER Switches the receiver between Auto surround mode (Auto playback on . 3 RECEIVER Switches the remote to control the receiver (used to select the white commands above the number buttons (S.RETRIEVER, etc)). Switches between the various surround modes (page...) and Front Stage Surround Advance modes (page 37). Controls and displays 02 English Deutsch Français Italiano Nederlands Español PRESET Remote control 1 RECEIVER SLEEP TV SOURCE CONTROL 2 3 RECEIVER INPUT SELECT INPUT 4 BD DVD TV 12 13 DVR CD CD-R CH 5 ...
... time by pressing SLEEP once. 2 RECEIVER Switches the receiver between Auto surround mode (Auto playback on . 3 RECEIVER Switches the remote to control the receiver (used to select the white commands above the number buttons (S.RETRIEVER, etc)). Switches between the various surround modes (page...) and Front Stage Surround Advance modes (page 37). Controls and displays 02 English Deutsch Français Italiano Nederlands Español PRESET Remote control 1 RECEIVER SLEEP TV SOURCE CONTROL 2 3 RECEIVER INPUT SELECT INPUT 4 BD DVD TV 12 13 DVR CD CD-R CH 5 ...
Owner's Manual
Page 15
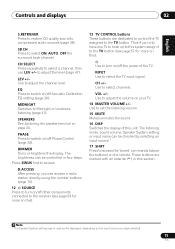
..., Speaker System setting or input name can access a radio station directly using the number buttons (page 70). 12 SOURCE Press to turn on the remote. DIMMER Dims or brightens the display. Use to select the TV input signal. LEV +/- English Deutsch Français Italiano Nederlands Español Controls...
..., Speaker System setting or input name can access a radio station directly using the number buttons (page 70). 12 SOURCE Press to turn on the remote. DIMMER Dims or brightens the display. Use to select the TV input signal. LEV +/- English Deutsch Français Italiano Nederlands Español Controls...
Owner's Manual
Page 30
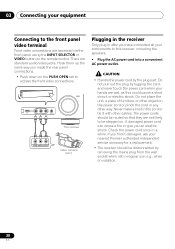
... plug by the plug part. Never make a knot in a while. Check the power cord once in the cord or tie it damaged, ask your nearest Pioneer authorized independent service company for a replacement. • The receiver should be routed so that they are accessed via the front panel using the INPUT SELECTOR... can cause a fire or give you find it with other object on the power cord or pinch the cord in regular use, e.g., when on the remote control. There are wet, as this receiver, including the speakers. • Plug the AC power cord into a convenient AC power outlet.
... plug by the plug part. Never make a knot in a while. Check the power cord once in the cord or tie it damaged, ask your nearest Pioneer authorized independent service company for a replacement. • The receiver should be routed so that they are accessed via the front panel using the INPUT SELECTOR... can cause a fire or give you find it with other object on the power cord or pinch the cord in regular use, e.g., when on the remote control. There are wet, as this receiver, including the speakers. • Plug the AC power cord into a convenient AC power outlet.
Owner's Manual
Page 32
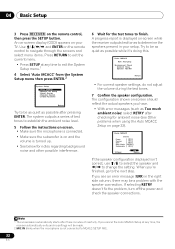
... instructions on-screen. • Make sure the microphone is connected. • Make sure the subwoofer is on and the volume is displayed on the remote control to navigate through the screens and select menu items. Press RETURN to exit the current menu. • Press SETUP at any time to exit... as quiet as possible after pressing ENTER. An on-screen display (OSD) appears on page 33). 1.Auto MCACC Check! The configuration shown on the remote control, then press the SETUP button. Note 1 The screensaver automatically starts after checking for the test tones to change the setting.
... instructions on-screen. • Make sure the microphone is connected. • Make sure the subwoofer is on and the volume is displayed on the remote control to navigate through the screens and select menu items. Press RETURN to exit the current menu. • Press SETUP at any time to exit... as quiet as possible after pressing ENTER. An on-screen display (OSD) appears on page 33). 1.Auto MCACC Check! The configuration shown on the remote control, then press the SETUP button. Note 1 The screensaver automatically starts after checking for the test tones to change the setting.

Owner's Manual
Page 34
... (press RECEIVER). • Make sure the setup microphone is displayed when playing Dolby Digital signals. You can use the input function buttons on the remote control, INPUT SELECT, or the front panel INPUT SELECTOR dial.2 3 Press AUTO/DIRECT to select 'AUTO SURROUND' and start playback of the source.3 If you...
... (press RECEIVER). • Make sure the setup microphone is displayed when playing Dolby Digital signals. You can use the input function buttons on the remote control, INPUT SELECT, or the front panel INPUT SELECTOR dial.2 3 Press AUTO/DIRECT to select 'AUTO SURROUND' and start playback of the source.3 If you...
Owner's Manual
Page 40
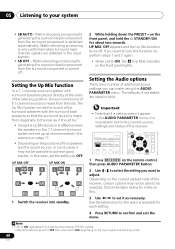
...) indicator on the positions of the receiver. Depending on the front panel, and hold the STANDBY/ON for notes on this function on the remote control, then press AUDIO PARAMETER button. 2 Use / to select the setting you want to turn this . 3 Use / to achieve good results...
...) indicator on the positions of the receiver. Depending on the front panel, and hold the STANDBY/ON for notes on this function on the remote control, then press AUDIO PARAMETER button. 2 Use / to select the setting you want to turn this . 3 Use / to achieve good results...
Owner's Manual
Page 43
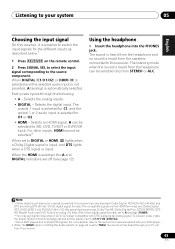
... may get digital noise when a LD or CD player compatible with your DVD player. 2 When the HDMI option in Setting the Audio options on the remote control. 2 Press SIGNAL SEL to select the input signal corresponding to C1/O1/O2 (DIGITAL). • Some DVD players don't output DTS signals. To prevent...
... may get digital noise when a LD or CD player compatible with your DVD player. 2 When the HDMI option in Setting the Audio options on the remote control. 2 Press SIGNAL SEL to select the input signal corresponding to C1/O1/O2 (DIGITAL). • Some DVD players don't output DTS signals. To prevent...
Owner's Manual
Page 44
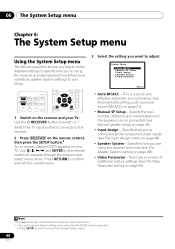
... to the component video inputs (see The Input Assign menu on your TV. Specify what you've connected to the receiver. 2 Press RECEIVER on the remote control, then press the SETUP button.2 An on-screen display (OSD) appears on page 48). • Speaker System - System Setup 1.Auto MCACC 2.Manual SP Setup... TUNE TUNER EDIT MASTER TOOLS VOLUME MENU PRESET PRESET ENTER HOME MENU SETUP iPod CTRL CATEGORY TUNE BAND RETURN DTV/ TV MUTE 1 Switch on the remote control to navigate through the screens and select menu items. Press RETURN to exit the System Setup menu. 44 En
... to the component video inputs (see The Input Assign menu on your TV. Specify what you've connected to the receiver. 2 Press RECEIVER on the remote control, then press the SETUP button.2 An on-screen display (OSD) appears on page 48). • Speaker System - System Setup 1.Auto MCACC 2.Manual SP Setup... TUNE TUNER EDIT MASTER TOOLS VOLUME MENU PRESET PRESET ENTER HOME MENU SETUP iPod CTRL CATEGORY TUNE BAND RETURN DTV/ TV MUTE 1 Switch on the remote control to navigate through the screens and select menu items. Press RETURN to exit the System Setup menu. 44 En

Owner's Manual
Page 48
Back R Surr. You return to this , see the video signal of your TV. on the remote control to navigate through the screens and select menu items. Press RETURN to confirm and exit the current menu. The receiver can then add the ... using a component video input, you may see Using the component video jacks on page 28. 1 Press RECEIVER on the remote control, then press the SETUP button. Use and ENTER on the remote control. 06 The System Setup menu Tip • You can change the channel levels at any source component to the...
Back R Surr. You return to this , see the video signal of your TV. on the remote control to navigate through the screens and select menu items. Press RETURN to confirm and exit the current menu. The receiver can then add the ... using a component video input, you may see Using the component video jacks on page 28. 1 Press RECEIVER on the remote control, then press the SETUP button. Use and ENTER on the remote control. 06 The System Setup menu Tip • You can change the channel levels at any source component to the...
Owner's Manual
Page 49
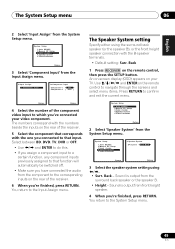
...or OFF. • Use / and ENTER to do this. • If you 're finished, press RETURN. Use and ENTER on the remote control to navigate through the screens and select menu items. Press RETURN to the System Setup menu. 49 En The Speaker System setting Specify either... using /. • Surr. An on-screen display (OSD) appears on the remote control, then press the SETUP button. Sound is output from the component to that input. Sound is output from the Input Assign menu. 3.Input...
...or OFF. • Use / and ENTER to do this. • If you 're finished, press RETURN. Use and ENTER on the remote control to navigate through the screens and select menu items. Press RETURN to the System Setup menu. 49 En The Speaker System setting Specify either... using /. • Surr. An on-screen display (OSD) appears on the remote control, then press the SETUP button. Sound is output from the component to that input. Sound is output from the Input Assign menu. 3.Input...
Owner's Manual
Page 50
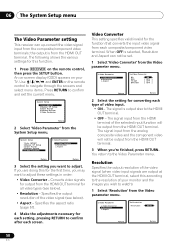
...output from the HDMI OUT terminal. 3 When you may want to the HDMI OUT terminal. • OFF - Use and ENTER on the remote control to navigate through the screens and select menu items. Press RETURN to the Video Parameter menu. Converts video signals for output from the HDMI... from the analog composite video and the component video will be output from the HDMI OUT terminal. An on-screen display (OSD) appears on the remote control, then press the SETUP button. System Setup 1.Auto MCACC 2.Manual SP Setup 3.Input Assign 4.Speaker System 5.Video Parameter Return 2 Select 'Video...
...output from the HDMI OUT terminal. 3 When you may want to the HDMI OUT terminal. • OFF - Use and ENTER on the remote control to navigate through the screens and select menu items. Press RETURN to the Video Parameter menu. Converts video signals for output from the HDMI... from the analog composite video and the component video will be output from the HDMI OUT terminal. An on-screen display (OSD) appears on the remote control, then press the SETUP button. System Setup 1.Auto MCACC 2.Manual SP Setup 3.Input Assign 4.Speaker System 5.Video Parameter Return 2 Select 'Video...
Owner's Manual
Page 53
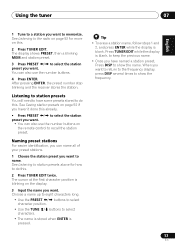
... keep the previous name. • Once you have some presets stored to select the station preset you want. See Listening to the radio on the remote control to show the frequency. 53 En Listening to station presets You will need to have named a station preset, Press DISP to recall the station...
... keep the previous name. • Once you have some presets stored to select the station preset you want. See Listening to the radio on the remote control to show the frequency. 53 En Listening to station presets You will need to have named a station preset, Press DISP to recall the station...
Owner's Manual
Page 55
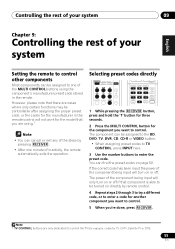
...or off if that you are using the component's manufacturer preset code stored in the remote control will only turn on page 59. You can be assigned to one minute of inactivity, the remote automatically exits the operation. The power of the component being input will turn on directly... Deutsch Français Italiano Nederlands Español Chapter 9: Controlling the rest of your system Setting the remote to control other components Most components can cancel or exit any of the steps by remote control. 4 Repeat steps 2 through 3 to try a different code, or to enter a code for ...
...or off if that you are using the component's manufacturer preset code stored in the remote control will only turn on page 59. You can be assigned to one minute of inactivity, the remote automatically exits the operation. The power of the component being input will turn on directly... Deutsch Français Italiano Nederlands Español Chapter 9: Controlling the rest of your system Setting the remote to control other components Most components can cancel or exit any of the steps by remote control. 4 Repeat steps 2 through 3 to try a different code, or to enter a code for ...

Owner's Manual
Page 56
Default preset codes MULTI CONTROL button Preset code BD 2255 DVD 2256 TV 0291 DVR 2257 VIDEO 1053 CD 5000 CD-R 5001 TV CONTROL 0291 56 En 09 Controlling the rest of your system Clearing all the remote control settings You can clear all presets and restore the factory default settings. • While pressing the RECEIVER button, press and hold the '0' button for three seconds.
Default preset codes MULTI CONTROL button Preset code BD 2255 DVD 2256 TV 0291 DVR 2257 VIDEO 1053 CD 5000 CD-R 5001 TV CONTROL 0291 56 En 09 Controlling the rest of your system Clearing all the remote control settings You can clear all presets and restore the factory default settings. • While pressing the RECEIVER button, press and hold the '0' button for three seconds.


