
Owner's Manual
Page 36
...' to exit the current menu. 2 Select 'System Setup' from the HOME MENU. 3 Select 'OSD Language' from the System Setup menu. 4.SystemSetup A/V RECEIVER a.Manual SP Setup b. Changing the OSD display language (OSD Language) The language used on the on-screen display can be changed. • The explanations in these...While holding down ENTER on the remote control) to select SPEAKER 8Ω or SPEAKER 6Ω. • SPEAKER 8Ω - A Graphical User Interface (GUI) screen appears on the remote control, then press HOME MENU. Input Setup c. OSD Language d. Use and ENTER to navigate through...
...' to exit the current menu. 2 Select 'System Setup' from the HOME MENU. 3 Select 'OSD Language' from the System Setup menu. 4.SystemSetup A/V RECEIVER a.Manual SP Setup b. Changing the OSD display language (OSD Language) The language used on the on-screen display can be changed. • The explanations in these...While holding down ENTER on the remote control) to select SPEAKER 8Ω or SPEAKER 6Ω. • SPEAKER 8Ω - A Graphical User Interface (GUI) screen appears on the remote control, then press HOME MENU. Input Setup c. OSD Language d. Use and ENTER to navigate through...
Owner's Manual
Page 39
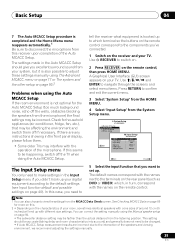
...to set up. You can also choose to view the settings from the System Setup menu. 4.SystemSetup A/V RECEIVER a.Manual SP Setup b. Use RECEIVER to switch on. 2 Press RECEIVER on your room, sometimes identical speakers with cone sizes of the Auto MCACC Setup. Other Setup 4b.Input...remote control. tell the receiver what equipment is hooked up with different size settings. If this seems to the components you excellent surround sound from the listening position. If there are incorrect due to the interaction of the microphone. A Graphical User Interface (GUI) screen ...
...to set up. You can also choose to view the settings from the System Setup menu. 4.SystemSetup A/V RECEIVER a.Manual SP Setup b. Use RECEIVER to switch on. 2 Press RECEIVER on your room, sometimes identical speakers with cone sizes of the Auto MCACC Setup. Other Setup 4b.Input...remote control. tell the receiver what equipment is hooked up with different size settings. If this seems to the components you excellent surround sound from the listening position. If there are incorrect due to the interaction of the microphone. A Graphical User Interface (GUI) screen ...
Owner's Manual
Page 77
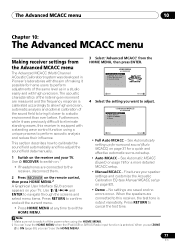
... unique process to perform acoustic analysis and reduce their influence. Use RECEIVER to switch on.1 • If headphones are connected to perform adjustments of the same level as in Pioneer's laboratories with the aim of making it closer to calibrate the sound field automatically... settings and customize the Acoustic Calibration EQ (see Manual MCACC setup on page 37 for a more detailed MCACC setup. • Manual MCACC - The acoustic characteristics of the sound field to bring it possible for home users to this receiver is selected. System Setup Exit Return 4 Select...
... unique process to perform acoustic analysis and reduce their influence. Use RECEIVER to switch on.1 • If headphones are connected to perform adjustments of the same level as in Pioneer's laboratories with the aim of making it closer to calibrate the sound field automatically... settings and customize the Acoustic Calibration EQ (see Manual MCACC setup on page 37 for a more detailed MCACC setup. • Manual MCACC - The acoustic characteristics of the sound field to bring it possible for home users to this receiver is selected. System Setup Exit Return 4 Select...
Owner's Manual
Page 89
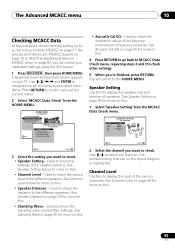
...Standing Wave e. See Channel Level below for more on this . • Channel Level - A Graphical User Interface (GUI) screen appears on your calibrated settings using the GUI screen. 1 Press RECEIVER , then press HOME MENU. Use and ENTER to navigate through the screens and select menu items. ... procedure of Automatic MCACC (Expert) on page 78 or after fine-adjusting at Manual MCACC setup on page 82, you can check your TV. HOME MENU A/V RECEIVER 1. System Setup 2.MCACC Data Check A/V RECEIVER Exit a. Speaker Setting b. Channel Level Use this to display the level of the...
...Standing Wave e. See Channel Level below for more on this . • Channel Level - A Graphical User Interface (GUI) screen appears on your calibrated settings using the GUI screen. 1 Press RECEIVER , then press HOME MENU. Use and ENTER to navigate through the screens and select menu items. ... procedure of Automatic MCACC (Expert) on page 78 or after fine-adjusting at Manual MCACC setup on page 82, you can check your TV. HOME MENU A/V RECEIVER 1. System Setup 2.MCACC Data Check A/V RECEIVER Exit a. Speaker Setting b. Channel Level Use this to display the level of the...
Owner's Manual
Page 93
...HOME MENU. 93 En When you set ZONE 2 to ON (page 69), you want to switch off the power when using the receiver (see Manual speaker setup on page 39). • OSD Language - Use and ENTER to navigate through the screens and select menu items. Press RETURN...following section describes how to the receiver, disconnect them. 2 Press RECEIVER , then press HOME MENU.2 A Graphical User Interface (GUI) screen appears on page 98). Use the RECEIVER button to switch on.1 • If headphones are connected to change the speaker-related settings manually and make various other settings (...
...HOME MENU. 93 En When you set ZONE 2 to ON (page 69), you want to switch off the power when using the receiver (see Manual speaker setup on page 39). • OSD Language - Use and ENTER to navigate through the screens and select menu items. Press RETURN...following section describes how to the receiver, disconnect them. 2 Press RECEIVER , then press HOME MENU.2 A Graphical User Interface (GUI) screen appears on page 98). Use the RECEIVER button to switch on.1 • If headphones are connected to change the speaker-related settings manually and make various other settings (...
Owner's Manual
Page 98
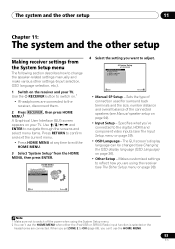
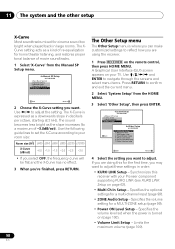
...listening, and restores proper tonal balance of -3.0dB/oct). Speaker Distance 5. A Graphical User Interface (GUI) screen appears on the remote control, then press HOME MENU. Power ...'X-Curve' from the HOME MENU. 3 Select 'Other Setup', then press ENTER. 4.SystemSetup A/V RECEIVER a.Manual SP Setup b. Specifies the optional settings for a MULTI-ZONE setup (page 99). • ... Setup c. X-Curve Exit Return 2 Choose the X-Curve setting you are doing this receiver with your Pioneer component supporting KURO LINK (see KURO LINK Setup on (page 100). • Volume...
...listening, and restores proper tonal balance of -3.0dB/oct). Speaker Distance 5. A Graphical User Interface (GUI) screen appears on the remote control, then press HOME MENU. Power ...'X-Curve' from the HOME MENU. 3 Select 'Other Setup', then press ENTER. 4.SystemSetup A/V RECEIVER a.Manual SP Setup b. Specifies the optional settings for a MULTI-ZONE setup (page 99). • ... Setup c. X-Curve Exit Return 2 Choose the X-Curve setting you are doing this receiver with your Pioneer component supporting KURO LINK (see KURO LINK Setup on (page 100). • Volume...
Owner's Manual
Page 127
...ITEM, USER ATTACHED ANTENNA, ANY DAMAGE TO RECORDS OR RECORDING TAPES OR DISCS, ANY DAMAGE TO THE PRODUCT RESULTING FROM ALTERATIONS, MODIFICATIONS NOT AUTHORIZED IN WRITING BY PIONEER, ACCIDENT... BATTERIES, OR THE USE OF BATTERIES NOT CONFORMING TO THOSE SPECIFIED IN THE OWNER'S MANUAL. PIONEER LIMITS ITS OBLIGATIONS UNDER ANY IMPLIED WARRANTIES INCLUDING, BUT NOT LIMITED TO, THE IMPLIED ... PUSA or POC, without charge. NO WARRANTIES SHALL APPLY AFTER THE WARRANTY PERIOD. To receive warranty service you why it , transportation prepaid by Title I of the warranty period. ...
...ITEM, USER ATTACHED ANTENNA, ANY DAMAGE TO RECORDS OR RECORDING TAPES OR DISCS, ANY DAMAGE TO THE PRODUCT RESULTING FROM ALTERATIONS, MODIFICATIONS NOT AUTHORIZED IN WRITING BY PIONEER, ACCIDENT... BATTERIES, OR THE USE OF BATTERIES NOT CONFORMING TO THOSE SPECIFIED IN THE OWNER'S MANUAL. PIONEER LIMITS ITS OBLIGATIONS UNDER ANY IMPLIED WARRANTIES INCLUDING, BUT NOT LIMITED TO, THE IMPLIED ... PUSA or POC, without charge. NO WARRANTIES SHALL APPLY AFTER THE WARRANTY PERIOD. To receive warranty service you why it , transportation prepaid by Title I of the warranty period. ...


