User Manual
Page 4
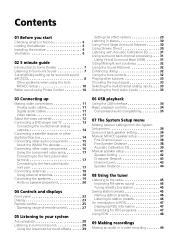
... 18 Using external antennas 18 Connecting the speakers 19 Hints on speaker placement 20 04 Controls and displays Front panel 22 Display 23 Remote control 25 Operating range of remote control 27 05 Listening to your system Auto playback 28 Listening in surround sound 28 Using the Advanced surround effects . . . . . 29 06...
... 18 Using external antennas 18 Connecting the speakers 19 Hints on speaker placement 20 04 Controls and displays Front panel 22 Display 23 Remote control 25 Operating range of remote control 27 05 Listening to your system Auto playback 28 Listening in surround sound 28 Using the Advanced surround effects . . . . . 29 06...
User Manual
Page 5
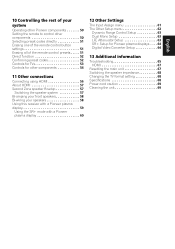
10 Controlling the rest of your system Operating other Pioneer components 50 Setting the remote to control other components 50 Selecting preset codes directly 51 Erasing one of the remote control button settings 51 Erasing all of the remote control presets . . . . . 51 Direct function 52 Confirming preset codes ... menu 61 The Other Setup menu 62 Dynamic Range Control Setup 63 Dual Mono Setup 63 LFE Attenuator Setup 63 SR+ Setup for Pioneer plasma displays . . . . 64 Digital Video Converter Setup 64 13 Additional information Troubleshooting 65 HDMI 67 Resetting the main unit 67...
10 Controlling the rest of your system Operating other Pioneer components 50 Setting the remote to control other components 50 Selecting preset codes directly 51 Erasing one of the remote control button settings 51 Erasing all of the remote control presets . . . . . 51 Direct function 52 Confirming preset codes ... menu 61 The Other Setup menu 62 Dynamic Range Control Setup 63 Dual Mono Setup 63 LFE Attenuator Setup 63 SR+ Setup for Pioneer plasma displays . . . . 64 Digital Video Converter Setup 64 13 Additional information Troubleshooting 65 HDMI 67 Resetting the main unit 67...

User Manual
Page 6
... you start Chapter 1: Before you start Checking what's in the box Please check that you've received the following supplied accessories: • Setup microphone • Remote control unit • Dry cell batteries (AA size IEC R6) x2 • AM loop antenna • FM wire antenna • These operating instructions • Warranty...
... you start Chapter 1: Before you start Checking what's in the box Please check that you've received the following supplied accessories: • Setup microphone • Remote control unit • Dry cell batteries (AA size IEC R6) x2 • AM loop antenna • FM wire antenna • These operating instructions • Warranty...

User Manual
Page 7
... surround sound on -screen automatic MCACC setup to set the receiver to the DVD input.1 There are explained in Listening to your system on the remote to set up using a digital connection from a home theater system depends not only on your speaker setup, but other sound options you can simply leave...
... surround sound on -screen automatic MCACC setup to set the receiver to the DVD input.1 There are explained in Listening to your system on the remote to set up using a digital connection from a home theater system depends not only on your speaker setup, but other sound options you can simply leave...
User Manual
Page 8
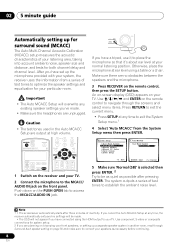
...if you have set up a separate speaker system in the Auto MCACC Setup are unplugged. An on-screen display (OSD) appears on the remote control, then press the SETUP button. 02 5 minute guide Automatically setting up for surround sound (MCACC) The Auto Multi-Channel Acoustic Calibration...Manual SP Setup 5.Input Assign 6.Other Setup 2. Note 1 • The screensaver automatically starts after pressing ENTER. Use and ENTER on the remote control to navigate through Surround back speaker setting on the front panel. USB MCACC/ AUDIO IN DOWN MASTER VOLUME UP If you have connected ...
...if you have set up a separate speaker system in the Auto MCACC Setup are unplugged. An on-screen display (OSD) appears on the remote control, then press the SETUP button. 02 5 minute guide Automatically setting up for surround sound (MCACC) The Auto Multi-Channel Acoustic Calibration...Manual SP Setup 5.Input Assign 6.Other Setup 2. Note 1 • The screensaver automatically starts after pressing ENTER. Use and ENTER on the remote control to navigate through Surround back speaker setting on the front panel. USB MCACC/ AUDIO IN DOWN MASTER VOLUME UP If you have connected ...

User Manual
Page 24
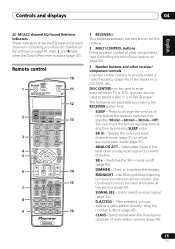
... signal. 4 2 PRO LOGIC IIx 2 PRO LOGIC II lights to indicate Pro Logic II decoding. 2 PRO LOGIC IIx lights to indicate Pro Logic IIx decoding (see Remote control below). 10 Tuner indicators - Lights when Auto Surround (see Auto playback on page 28) is on. 8 ATT Lights when ANALOG ATT is used to...
... signal. 4 2 PRO LOGIC IIx 2 PRO LOGIC II lights to indicate Pro Logic II decoding. 2 PRO LOGIC IIx lights to indicate Pro Logic IIx decoding (see Remote control below). 10 Tuner indicators - Lights when Auto Surround (see Auto playback on page 28) is on. 8 ATT Lights when ANALOG ATT is used to...
User Manual
Page 25
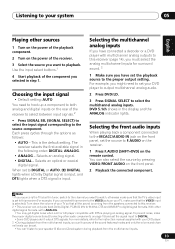
... RECEIVER INPUT SELECT 1 SOURCE 11 AUDIO/VIDEO PRE-PROGRAMMED REMOTE CONTROL UNIT 12 F.AUDIO DVD TV DVR TVCTRL 2 CD-R/TAPE USB CD FM AM RECEIVER 13 SLEEP SB ch ANALOG ATT SR+ DIMMER MIDNIGHT 3 SIGNAL ...
... RECEIVER INPUT SELECT 1 SOURCE 11 AUDIO/VIDEO PRE-PROGRAMMED REMOTE CONTROL UNIT 12 F.AUDIO DVD TV DVR TVCTRL 2 CD-R/TAPE USB CD FM AM RECEIVER 13 SLEEP SB ch ANALOG ATT SR+ DIMMER MIDNIGHT 3 SIGNAL ...

User Manual
Page 27
...an Acoustic Calibration EQ setting (page 31). ADV.SURR. - ACOUSTIC EQ - DIRECT F - See Erasing one of the remote control button settings on page 52. 13 RECEIVER Switches the remote to control the receiver (used to select the green commands above the component control buttons) as well as some receiver...control signals. See Confirming preset codes on page 51. Also use SHIFT for more on page 50): SETUP - Also adjusts the level of remote control The remote control may not work properly if: • There are shown when you choose the options below. buttons to access the DVR controls (...
...an Acoustic Calibration EQ setting (page 31). ADV.SURR. - ACOUSTIC EQ - DIRECT F - See Erasing one of the remote control button settings on page 52. 13 RECEIVER Switches the remote to control the receiver (used to select the green commands above the component control buttons) as well as some receiver...control signals. See Confirming preset codes on page 51. Also use SHIFT for more on page 50): SETUP - Also adjusts the level of remote control The remote control may not work properly if: • There are shown when you choose the options below. buttons to access the DVR controls (...
User Manual
Page 33
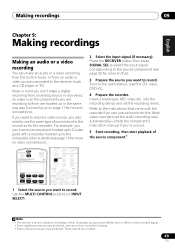
... sound. 3 1 Make sure you want to playback. To prevent noise, make sure that the TV's video input is selected). With other audio components on the remote control. DVD 5.1ch shows in the following order: DIGITAL; Each press cycles through the options as follows: • AUTO - Turn down the volume of the...
... sound. 3 1 Make sure you want to playback. To prevent noise, make sure that the TV's video input is selected). With other audio components on the remote control. DVD 5.1ch shows in the following order: DIGITAL; Each press cycles through the options as follows: • AUTO - Turn down the volume of the...
User Manual
Page 34
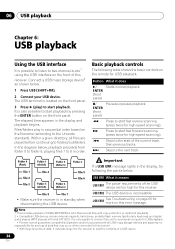
... • Make sure the receiver is also possible to folders/subfolders. USB ERR3 See Troubleshooting on page 65 for more on the remote for the receiver to start playback. Note 1 This includes playback of WMA/MP3/MPEG-4 AAC files (except files with all files ...appears in standby when disconnecting the USB device. It is not possible to connect this unit to a personal computer for USB playback. • Pioneer cannot guarantee compatibility (operation and/or bus power) with copy-protection or restricted playback). 2 • Compatible USB devices include external magnetic hard...
... • Make sure the receiver is also possible to folders/subfolders. USB ERR3 See Troubleshooting on page 65 for more on the remote for the receiver to start playback. Note 1 This includes playback of WMA/MP3/MPEG-4 AAC files (except files with all files ...appears in standby when disconnecting the USB device. It is not possible to connect this unit to a personal computer for USB playback. • Pioneer cannot guarantee compatibility (operation and/or bus power) with copy-protection or restricted playback). 2 • Compatible USB devices include external magnetic hard...
User Manual
Page 36
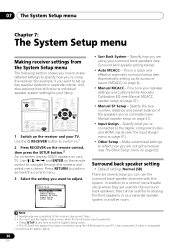
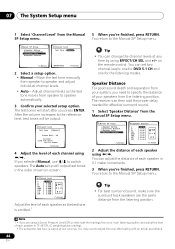
... • Surr Back System - Specify what you've connected to the digital, component video and HDMI inputs (see Manual speaker setup on the remote control to navigate through the screens and select menu items. Press RETURN to confirm and exit the current menu. 3 Select the setting you want ... EQ (see Surround back speaker setting below). • Auto MCACC - Use the RECEIVER button to switch on.1 2 Press RECEIVER on the remote control, then press the SETUP button.2 An on-screen display (OSD) appears on page 62). Fine tune your TV. 07 The System Setup menu Chapter...
... • Surr Back System - Specify what you've connected to the digital, component video and HDMI inputs (see Manual speaker setup on the remote control to navigate through the screens and select menu items. Press RETURN to confirm and exit the current menu. 3 Select the setting you want ... EQ (see Surround back speaker setting below). • Auto MCACC - Use the RECEIVER button to switch on.1 2 Press RECEIVER on the remote control, then press the SETUP button.2 An on-screen display (OSD) appears on page 62). Fine tune your TV. 07 The System Setup menu Chapter...
User Manual
Page 44
... C [ 0.0dB ] R [ 0.0dB ] RS [ 0.0dB ] SBR [ 0.0dB ] SBL [ 0.0dB ] LS [ 0.0dB ] SW [ 0.0dB ] :Finish Adjust the level of each speaker in the order shown on the remote control. Note 1 • If you are the same distance from your selected setup option. Adjust channel levels as the test tone is output at any...
... C [ 0.0dB ] R [ 0.0dB ] RS [ 0.0dB ] SBR [ 0.0dB ] SBL [ 0.0dB ] LS [ 0.0dB ] SW [ 0.0dB ] :Finish Adjust the level of each speaker in the order shown on the remote control. Note 1 • If you are the same distance from your selected setup option. Adjust channel levels as the test tone is output at any...
User Manual
Page 45
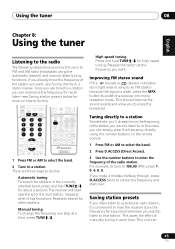
... the frequency for recall later-see Tuning directly to a station below for other stations. Once you are three ways to search for more on the remote control. 1 Press FM or AM to select the band. 2 Press D.ACCESS (Direct Access). 3 Use the number buttons to . There are tuned to a station you can...
... the frequency for recall later-see Tuning directly to a station below for other stations. Once you are three ways to search for more on the remote control. 1 Press FM or AM to select the band. 2 Press D.ACCESS (Direct Access). 3 Use the number buttons to . There are tuned to a station you can...

User Manual
Page 46
...08 Using the tuner memorize up to four characters long. • Use the MULTI JOG dial (front panel) or the ST/ buttons (remote) to select characters. • Press ENTER to do this . MEMORY, then a blinking memory class. 3 Press CLASS to select one of the ...of a name. • Once you have named a station preset, you haven't done this . 2 Press T.EDIT (TUNER EDIT). See Listening to the radio on the remote control to name. Naming station presets For easier identification, you can name your station presets. 1 Choose the station preset you want . • You can also...
...08 Using the tuner memorize up to four characters long. • Use the MULTI JOG dial (front panel) or the ST/ buttons (remote) to select characters. • Press ENTER to do this . MEMORY, then a blinking memory class. 3 Press CLASS to select one of the ...of a name. • Once you have named a station preset, you haven't done this . 2 Press T.EDIT (TUNER EDIT). See Listening to the radio on the remote control to name. Naming station presets For easier identification, you can name your station presets. 1 Choose the station preset you want . • You can also...
User Manual
Page 49
... in mind you can only be recorded. 49 En RECEIVER INPUT SELECT SOURCE SLEEP SR+ SB ch DIMMER ANALOG ATT MIDNIGHT AUDIO/VIDEO PRE-PROGRAMMED REMOTE CONTROL UNIT SIGNAL SEL D.ACCESS +10 CLASS DISC ENTER F.AUDIO DVD TV CD-R/TAPE USB CD FM SLEEP DVR TVCTRL AM RECEIVER h ANALOG TOP MENU...
... in mind you can only be recorded. 49 En RECEIVER INPUT SELECT SOURCE SLEEP SR+ SB ch DIMMER ANALOG ATT MIDNIGHT AUDIO/VIDEO PRE-PROGRAMMED REMOTE CONTROL UNIT SIGNAL SEL D.ACCESS +10 CLASS DISC ENTER F.AUDIO DVD TV CD-R/TAPE USB CD FM SLEEP DVR TVCTRL AM RECEIVER h ANALOG TOP MENU...
User Manual
Page 50
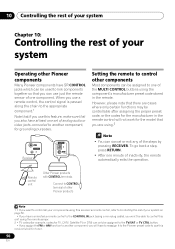
... Note 1 • If you want to control all your components using this receiver's remote control, refer to Controlling the rest of your system Operating other Pioneer components Many Pioneer components have SR CONTROL jacks which can be used to link components together so that you also have at least ...that if you use this feature, make sure that you can use this receiver's built-in the remote control will have to reassign it to the Pioneer preset code to use just the remote sensor of one component. However, please note that there are using the component's manufacturer preset code ...
... Note 1 • If you want to control all your components using this receiver's remote control, refer to Controlling the rest of your system Operating other Pioneer components Many Pioneer components have SR CONTROL jacks which can be used to link components together so that you also have at least ...that if you use this feature, make sure that you can use this receiver's built-in the remote control will have to reassign it to the Pioneer preset code to use just the remote sensor of one component. However, please note that there are using the component's manufacturer preset code ...
User Manual
Page 51
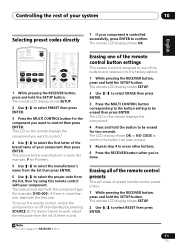
... This should start with the component type (for two seconds. Erasing one of your component is controlled successfully, press ENTER to confirm. The remote LCD display shows SETUP. 2 Use / to select ERASE then press ENTER. 3 Press the MULTI CONTROL button corresponding to the button... setting to be the manufacturer's name (for example, P for the component you 're done. TUNE 3 Press the MULTI CONTROL button for Pioneer). 5 Use / to select the manufacturer's name from the list then press ENTER. 6 Use / to select the proper ...
... This should start with the component type (for two seconds. Erasing one of your component is controlled successfully, press ENTER to confirm. The remote LCD display shows SETUP. 2 Use / to select ERASE then press ENTER. 3 Press the MULTI CONTROL button corresponding to the button... setting to be the manufacturer's name (for example, P for the component you 're done. TUNE 3 Press the MULTI CONTROL button for Pioneer). 5 Use / to select the manufacturer's name from the list then press ENTER. 6 Use / to select the proper ...

User Manual
Page 52
...while you , for three seconds. The brand name and preset code appears in the display for example, use the remote control to set up and listen to a CD on the remote displays the component you want to select DIRECT F then press ENTER. 3 Press the MULTI CONTROL button for about ...function off, you can use direct function with the TV CTRL function. 52 En Direct function • Default setting: ON You can operate the remote control without affecting the receiver.1 1 While pressing the RECEIVER button, press and hold ENTER for the component you want to your system 3 Press and...
...while you , for three seconds. The brand name and preset code appears in the display for example, use the remote control to set up and listen to a CD on the remote displays the component you want to select DIRECT F then press ENTER. 3 Press the MULTI CONTROL button for about ...function off, you can use direct function with the TV CTRL function. 52 En Direct function • Default setting: ON You can operate the remote control without affecting the receiver.1 1 While pressing the RECEIVER button, press and hold ENTER for the component you want to your system 3 Press and...

User Manual
Page 53
.... TV SELECT TV CH +/- Cable TV/Satellite TV/TV SOURCE Press to switch the component assigned to choose the 'A' commands on the remote control are dedicated to control the TV assigned to select RETURN or EXIT. TV RETURN Use to the TV CTRL button. Cable TV/Satellite TV... the TV volume. Controlling the rest of your system 10 English Deutsch Français Italiano Nederlands Español Controls for TVs This remote control can control components after entering the proper codes or teaching the receiver the commands (see Controlling the rest of your system on page ...
.... TV SELECT TV CH +/- Cable TV/Satellite TV/TV SOURCE Press to switch the component assigned to choose the 'A' commands on the remote control are dedicated to control the TV assigned to select RETURN or EXIT. TV RETURN Use to the TV CTRL button. Cable TV/Satellite TV... the TV volume. Controlling the rest of your system 10 English Deutsch Français Italiano Nederlands Español Controls for TVs This remote control can control components after entering the proper codes or teaching the receiver the commands (see Controlling the rest of your system on page ...

User Manual
Page 54
TV Controls for other components This remote control can control these components after entering the proper codes or teaching the receiver the commands (see Controlling the rest of your system Button(s) Function ...
TV Controls for other components This remote control can control these components after entering the proper codes or teaching the receiver the commands (see Controlling the rest of your system Button(s) Function ...


