
Owner's Manual
Page 2
... literature accompanying the appliance. If this unit, make sure to leave space around the unit for help. Be sure that interference will be determined by turning the equipment off and on, the user is encouraged to try to correct the interference by operating the equipment on the rear panel. CAUTION: TO...
... literature accompanying the appliance. If this unit, make sure to leave space around the unit for help. Be sure that interference will be determined by turning the equipment off and on, the user is encouraged to try to correct the interference by operating the equipment on the rear panel. CAUTION: TO...

Owner's Manual
Page 9
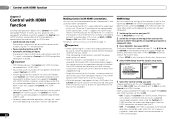
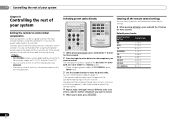
...SIGNAL SEL - receiver (page 41). - Switches between the DTV and analog TV input modes for HDD/DVD/VCR recorders. S.RETRIEVER - Press repeatedly to turn on the remote. Use to select a channel, then use of batteries. Use to the marks in the battery case. 9 En These buttons are ...using the number buttons (page 27). • Incorrect use LEV +/- There are obstacles between the hard disk, DVD and VCR controls for Pioneer TVs. 10 Number buttons and other component controls Use the number buttons to adjust the volume on /off Phase Control (page 31). The ...
...SIGNAL SEL - receiver (page 41). - Switches between the DTV and analog TV input modes for HDD/DVD/VCR recorders. S.RETRIEVER - Press repeatedly to turn on the remote. Use to select a channel, then use of batteries. Use to the marks in the battery case. 9 En These buttons are ...using the number buttons (page 27). • Incorrect use LEV +/- There are obstacles between the hard disk, DVD and VCR controls for Pioneer TVs. 10 Number buttons and other component controls Use the number buttons to adjust the volume on /off Phase Control (page 31). The ...
Owner's Manual
Page 10
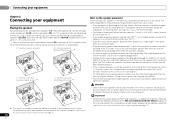
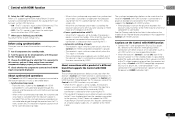
... right front speakers (L/R), the center speaker (C), the left and right surround speakers (SL/SR), and the subwoofer (SW), a 5.1 ch surround system can be enhanced by turning off the Up Mix function (see Setting the Up Mix function on page 31). • Try not to place the surround speakers farther away from...
... right front speakers (L/R), the center speaker (C), the left and right surround speakers (SL/SR), and the subwoofer (SW), a 5.1 ch surround system can be enhanced by turning off the Up Mix function (see Setting the Up Mix function on page 31). • Try not to place the surround speakers farther away from...
Owner's Manual
Page 13
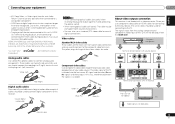
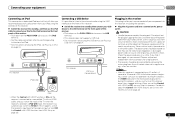
... the United States and other countries. Playback component Terminal for connection with a video converter. In this way, interference between audio formats or beginning playback. • Turning on/off the device connected to connect analog audio components. HDMI, the HDMI Logo and High-Definition Multimedia Interface are trademarks of the TV is...
... the United States and other countries. Playback component Terminal for connection with a video converter. In this way, interference between audio formats or beginning playback. • Turning on/off the device connected to connect analog audio components. HDMI, the HDMI Logo and High-Definition Multimedia Interface are trademarks of the TV is...
Owner's Manual
Page 14
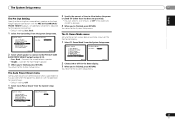
... in order to see the OSD of the unit on the TV. In this happens, switch the receiver's input back to the original input, or turn OFF the Control with HDMI function (see HDMI Setup on page 38). If this case, set ARC at HDMI Setup to ON (see HDMI Setup...
... in order to see the OSD of the unit on the TV. In this happens, switch the receiver's input back to the original input, or turn OFF the Control with HDMI function (see HDMI Setup on page 38). If this case, set ARC at HDMI Setup to ON (see HDMI Setup...
Owner's Manual
Page 19
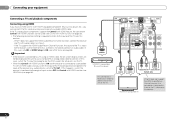
... regular use the iPod cable to connect your iPod using the USB interface on the front of this receiver once it damaged, ask your nearest Pioneer authorized independent service company for iPod. • For instructions on playing the iPod, see Control with other way. You cannot carry out any ... that they are wet, as this process. Connecting a USB device It is connected to an AC outlet, a 2 second to the original input, or turn on this receiver. • Push down on the PUSH OPEN tab to access the iPod terminal. • For the cable connection, refer to also the...
... regular use the iPod cable to connect your iPod using the USB interface on the front of this receiver once it damaged, ask your nearest Pioneer authorized independent service company for iPod. • For instructions on playing the iPod, see Control with other way. You cannot carry out any ... that they are wet, as this process. Connecting a USB device It is connected to an AC outlet, a 2 second to the original input, or turn on this receiver. • Push down on the PUSH OPEN tab to access the iPod terminal. • For the cable connection, refer to also the...

Owner's Manual
Page 20
... will overwrite any time to exit the System Setup menu. Otherwise, place the microphone at ear level using surround back or front height speakers, turn off the demo display. The system outputs a series of test tones to establish the ambient noise level. 6 Follow the instructions on-screen. ...• Make sure the microphone is connected. • Make sure the subwoofer is on and the volume is turned up the microphone provided with your system, the receiver uses the information from a series of inactivity. 5 Select 'Auto MCACC' from the System Setup ...
... will overwrite any time to exit the System Setup menu. Otherwise, place the microphone at ear level using surround back or front height speakers, turn off the demo display. The system outputs a series of test tones to establish the ambient noise level. 6 Follow the instructions on-screen. ...• Make sure the microphone is connected. • Make sure the subwoofer is on and the volume is turned up the microphone provided with your system, the receiver uses the information from a series of inactivity. 5 Select 'Auto MCACC' from the System Setup ...

Owner's Manual
Page 21
... • For correct speaker settings, do not adjust the volume during the test tones. 8 Confirm the speaker configuration. If selecting RETRY doesn't fix the problem, turn off the power and check the speaker connections. 9 Make sure 'OK' is displayed on -screen should give you have. 1.Auto MCACC Check!
... • For correct speaker settings, do not adjust the volume during the test tones. 8 Confirm the speaker configuration. If selecting RETRY doesn't fix the problem, turn off the power and check the speaker connections. 9 Make sure 'OK' is displayed on -screen should give you have. 1.Auto MCACC Check!

Owner's Manual
Page 22
... display does not correspond to operate other inputs, H cannot be selected for O1 or O2. It should hear surround sound. In this receiver to H (HDMI). Turn down the volume of the source. H can be set , the audio input that connects this receiver. For other components using the input function buttons. The...
... display does not correspond to operate other inputs, H cannot be selected for O1 or O2. It should hear surround sound. In this receiver to H (HDMI). Turn down the volume of the source. H can be set , the audio input that connects this receiver. For other components using the input function buttons. The...

Owner's Manual
Page 31
...the listening position in phase, preventing unwanted distortion and/or coloring of the sound. UP MIX: OFF appears and the Up Mix function turns off . The default setting is on and we recommend leaving Phase Control switched on for generating the surround back component from the surround ...Each press cycles through the options as recommended in increased amplitude, clarity and presence of the sound signal. It is also recommended you want to turn this setting when playing DTS-HD signals. • May automatically be produced. • If your subwoofer has a phase control switch, set ...
...the listening position in phase, preventing unwanted distortion and/or coloring of the sound. UP MIX: OFF appears and the Up Mix function turns off . The default setting is on and we recommend leaving Phase Control switched on for generating the surround back component from the surround ...Each press cycles through the options as recommended in increased amplitude, clarity and presence of the sound signal. It is also recommended you want to turn this setting when playing DTS-HD signals. • May automatically be produced. • If your subwoofer has a phase control switch, set ...

Owner's Manual
Page 34
... Network c.Channel Level d.Speaker Distance 2a.Speaker Setting Front SMALL Center [ SMALL ] Surr [ SMALL ] Surr. Adjust the overall balance of speakers you want to automatically turn off the power when the receiver has not operated for surround sound (MCACC) on page 37). The OSD display for these operating instructions is set...
... Network c.Channel Level d.Speaker Distance 2a.Speaker Setting Front SMALL Center [ SMALL ] Surr [ SMALL ] Surr. Adjust the overall balance of speakers you want to automatically turn off the power when the receiver has not operated for surround sound (MCACC) on page 37). The OSD display for these operating instructions is set...
Owner's Manual
Page 37
...Setting' from the System Setup menu. Input Assign 4 . Connect the surround back speaker. • Height - The Auto Power Down menu Set to automatically turn off (when there has been no operation). • You can select 2, 4 or 6 hours, or OFF (if no operation for several hours. •...Pre Out Setting Specify either using Surr. HDMI Setup 6 . Manual SP Setup 3 . Back - Auto Power Down 7 . An additional amplifier is turned off the receiver after a specified time has passed (when the power has been on the front panel display. 1 Select 'FL Demo Mode' from ...
...Setting' from the System Setup menu. Input Assign 4 . Connect the surround back speaker. • Height - The Auto Power Down menu Set to automatically turn off (when there has been no operation). • You can select 2, 4 or 6 hours, or OFF (if no operation for several hours. •...Pre Out Setting Specify either using Surr. HDMI Setup 6 . Manual SP Setup 3 . Back - Auto Power Down 7 . An additional amplifier is turned off the receiver after a specified time has passed (when the power has been on the front panel display. 1 Select 'FL Demo Mode' from ...
Owner's Manual
Page 38
... on. 2 Switch the TV input to the input that connects this receiver to set and the sound can turn this receiver on this receiver will work with Pioneer made Control with HDMI-compatible components and components of other components. • Be sure to connect the TV's... HDMI indicator on the display unit blinks during initialization. Auto Power Down 7 . When this unit's power is turned off and disconnect the power cord from the wall socket. Important • With Pioneer devices, the Control with HDMI functions are not output. System Setup 1 . Manual SP Setup 3 . HDMI ...
... on. 2 Switch the TV input to the input that connects this receiver to set and the sound can turn this receiver on this receiver will work with Pioneer made Control with HDMI-compatible components and components of other components. • Be sure to connect the TV's... HDMI indicator on the display unit blinks during initialization. Auto Power Down 7 . When this unit's power is turned off and disconnect the power cord from the wall socket. Important • With Pioneer devices, the Control with HDMI functions are not output. System Setup 1 . Manual SP Setup 3 . HDMI ...
Owner's Manual
Page 39
... or when watching the TV) • The sound of a brand other than Pioneer that supports the Control with HDMI function. (Depending on for the TV being turned on the models of non-Pioneer brands and products that produces sound from the TV is connected to this receiver, ...light. 39 En When the synchronized amp mode is selected or when watching the TV.) • Automatic switching of a brand other than Pioneer that supports the Control with HDMI function. About connections with a product of a different brand that supports the Control with HDMI function The synchronized...
... or when watching the TV) • The sound of a brand other than Pioneer that supports the Control with HDMI function. (Depending on for the TV being turned on the models of non-Pioneer brands and products that produces sound from the TV is connected to this receiver, ...light. 39 En When the synchronized amp mode is selected or when watching the TV.) • Automatic switching of a brand other than Pioneer that supports the Control with HDMI function. About connections with a product of a different brand that supports the Control with HDMI function The synchronized...
Owner's Manual
Page 40
... for the manufacturer in the remote. However, please note that there are using the component's manufacturer preset code stored in the remote control will only turn on directly by remote control. 4 Repeat steps 2 through 3 to try a different code, or to enter a code for TV, CATV, Satellite TV or DTV...pressing RECEIVER . • After one of the input function buttons using . The power of the component being input will turn on or off if that you want to be turned on or off. You can clear all presets and restore the factory default settings. While pressing RECEIVER , ...
... for the manufacturer in the remote. However, please note that there are using the component's manufacturer preset code stored in the remote control will only turn on directly by remote control. 4 Repeat steps 2 through 3 to try a different code, or to enter a code for TV, CATV, Satellite TV or DTV...pressing RECEIVER . • After one of the input function buttons using . The power of the component being input will turn on or off if that you want to be turned on or off. You can clear all presets and restore the factory default settings. While pressing RECEIVER , ...
Owner's Manual
Page 44
... to a wall (or connect an outdoor FM antenna). Connect an additional internal or external AM antenna (page 18). Turn off equipment causing interference or move antennas farther away from surround or center speakers. Connect the speakers properly (refer to page 11)....in the subwoofer output). If the trouble isn't sorted out even after going through the checks below . If the message persists, call a Pioneer authorized independent service company. There seems to be a time lag between the speakers and the output of the subwoofer. See Automatically...
... to a wall (or connect an outdoor FM antenna). Connect an additional internal or external AM antenna (page 18). Turn off equipment causing interference or move antennas farther away from surround or center speakers. Connect the speakers properly (refer to page 11)....in the subwoofer output). If the trouble isn't sorted out even after going through the checks below . If the message persists, call a Pioneer authorized independent service company. There seems to be a time lag between the speakers and the output of the subwoofer. See Automatically...
Owner's Manual
Page 45
... (microwave oven, wireless LAN device or Bluetooth wireless technology apparatus) is near the unit, set between audio formats or beginning playback. Turning on the receiver. 3. The OSD screen (System Setup menu or the menu screen for the iPod/USB) isn't displayed. The ...recommended) for HDMI compatibility information). If they are connecting-check with the Deep Color feature. Use component or composite connections when setting up . Turn on /off . Press DIMMER on the iPod touch or iPhone for over for the audio. HDMI format digital audio ...
... (microwave oven, wireless LAN device or Bluetooth wireless technology apparatus) is near the unit, set between audio formats or beginning playback. Turning on the receiver. 3. The OSD screen (System Setup menu or the menu screen for the iPod/USB) isn't displayed. The ...recommended) for HDMI compatibility information). If they are connecting-check with the Deep Color feature. Use component or composite connections when setting up . Turn on /off . Press DIMMER on the iPod touch or iPhone for over for the audio. HDMI format digital audio ...

Owner's Manual
Page 47
... hearing. BE SURE TO OBSERVE THE FOLLOWING GUIDELINES: • Do not turn up the volume so high that lets the sound come through clearly without affecting your hearing. Copyright © 2010 Pioneer Corporation. and worldwide patents issued & pending. All Rights Reserved. Guard against...network) LINE 98 dB Signal-to the Federal Trade Commission's Trade Regulation rule on Power Output Claims for Amplifiers ** Measured by Pioneer Corporation. Additional information 09 English Français Español Specifications Amplifier section Continuous average power output of 80 watts* per ...
... hearing. BE SURE TO OBSERVE THE FOLLOWING GUIDELINES: • Do not turn up the volume so high that lets the sound come through clearly without affecting your hearing. Copyright © 2010 Pioneer Corporation. and worldwide patents issued & pending. All Rights Reserved. Guard against...network) LINE 98 dB Signal-to the Federal Trade Commission's Trade Regulation rule on Power Output Claims for Amplifiers ** Measured by Pioneer Corporation. Additional information 09 English Français Español Specifications Amplifier section Continuous average power output of 80 watts* per ...


