

Owner's Manual
Page 9
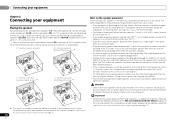
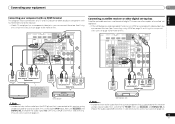
... a longer life. 7 m (23 ft.) Press SIRIUS first to the TV button. These buttons switch between the hard disk, DVD and VCR controls for Pioneer TVs. 10 Number buttons and other buttons that apply in four steps. Press to restore CD quality sound to adjust the level (page 35). to... 31). Operating range of the component to this section. - Dims or brightens the display. Press to access the 'boxed' commands (above 150 Hz, the subwoofer channel level will be adjusted by selecting an input source. • The Pre Out setting may or may not be displayed, depending on /off other...
... a longer life. 7 m (23 ft.) Press SIRIUS first to the TV button. These buttons switch between the hard disk, DVD and VCR controls for Pioneer TVs. 10 Number buttons and other buttons that apply in four steps. Press to restore CD quality sound to adjust the level (page 35). to... 31). Operating range of the component to this section. - Dims or brightens the display. Press to access the 'boxed' commands (above 150 Hz, the subwoofer channel level will be adjusted by selecting an input source. • The Pre Out setting may or may not be displayed, depending on /off other...
Owner's Manual
Page 10
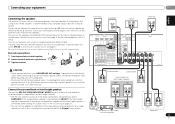
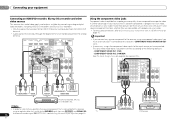
...speaker, place the front speakers at about ear-level when you to place the surround speakers farther away from your system. • The subwoofer can be enjoyed. Make sure the speakers don't face each other speakers should be enhanced by turning off the Up Mix function (see Connect... a. Connect the additional amplifier to the PRE OUT SURR BACK/FRONT HEIGHT outputs of the room. Putting the speakers on the floor (except the subwoofer), or mounting them at least one surround back speaker (SB) and enjoy a 6.1 ch surround system. 02 Connecting your equipment Chapter 2: Connecting ...
...speaker, place the front speakers at about ear-level when you to place the surround speakers farther away from your system. • The subwoofer can be enjoyed. Make sure the speakers don't face each other speakers should be enhanced by turning off the Up Mix function (see Connect... a. Connect the additional amplifier to the PRE OUT SURR BACK/FRONT HEIGHT outputs of the room. Putting the speakers on the floor (except the subwoofer), or mounting them at least one surround back speaker (SB) and enjoy a 6.1 ch surround system. 02 Connecting your equipment Chapter 2: Connecting ...
Owner's Manual
Page 11
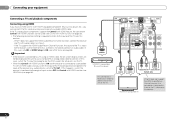
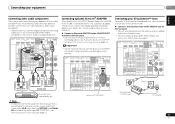
... AM LOOP IN SIRIUS A R FRONT L CENTER RSURROUND L BR L R IN L IN MONITOR OUT Y PB PR COMPONENT VIDEO TV/SAT BD R DVD SUBWOOFER PRE OUT SPEAKERS Class 2 Wiring CAUTION • These speaker terminals carry HAZARDOUS LIVE voltage. See Switching the speaker system on page 12 for the listening... or front height channel amplifier L SPEAKER Right Left Speaker B 11 En Make sure you select SPAB in .) Front right Subwoofer LINE LEVEL INPUT Center Front left (L (Single)) terminal only. Connect the surround back or front height speakers Connect the PRE OUT SURR...
... AM LOOP IN SIRIUS A R FRONT L CENTER RSURROUND L BR L R IN L IN MONITOR OUT Y PB PR COMPONENT VIDEO TV/SAT BD R DVD SUBWOOFER PRE OUT SPEAKERS Class 2 Wiring CAUTION • These speaker terminals carry HAZARDOUS LIVE voltage. See Switching the speaker system on page 12 for the listening... or front height channel amplifier L SPEAKER Right Left Speaker B 11 En Make sure you select SPAB in .) Front right Subwoofer LINE LEVEL INPUT Center Front left (L (Single)) terminal only. Connect the surround back or front height speakers Connect the PRE OUT SURR...
Owner's Manual
Page 12
...High Speed HDMI® cable is used, it may not work properly. • When an HDMI cable with a built-in speaker system B, and the subwoofer. Multichannel sources are downmixed only when the STEREO or STEREO ALC mode is output from speaker systems A and B. • SP - Note •...; You can be received. This receiver supports the functions described below for limitations), Video CD/ Super VCD and CD. Note • The subwoofer output depends on the settings you select SPAB. 12 En Important • Before making or changing connections, switch off the power and...
...High Speed HDMI® cable is used, it may not work properly. • When an HDMI cable with a built-in speaker system B, and the subwoofer. Multichannel sources are downmixed only when the STEREO or STEREO ALC mode is output from speaker systems A and B. • SP - Note •...; You can be received. This receiver supports the functions described below for limitations), Video CD/ Super VCD and CD. Note • The subwoofer output depends on the settings you select SPAB. 12 En Important • Before making or changing connections, switch off the power and...
Owner's Manual
Page 14
... 5 V PRE OUT 0.1 A MAX) R ANTENNA FM CD UNBAL 75 L AM LOOP IN SIRIUS A R FRONT L R IN L IN CENTER MONITOR OUT Y PB PR COMPONENT VIDEO TV/SAT BD R SUBWOOFER DVD PRE OUT HDMI/DVI-compatible Blu-ray Disc player This connection is connected to TV/SAT. In this case, switch the TV input to...
... 5 V PRE OUT 0.1 A MAX) R ANTENNA FM CD UNBAL 75 L AM LOOP IN SIRIUS A R FRONT L R IN L IN CENTER MONITOR OUT Y PB PR COMPONENT VIDEO TV/SAT BD R SUBWOOFER DVD PRE OUT HDMI/DVI-compatible Blu-ray Disc player This connection is connected to TV/SAT. In this case, switch the TV input to...
Owner's Manual
Page 15
... CD UNBAL 75 L AM LOOP IN SIRIUS A R FRONT L R IN L IN CENTER MONITOR OUT Y PB PR TV/SAT BD COMPONENT VIDEO R DVD SUBWOOFER PRE OUT Connecting a satellite receiver or other playback component) with no HDMI terminal to this . HDMI DVR/BDR IN DVD IN BD IN VIDEO 1 IN...) R ANTENNA FM CD UNBAL 75 L AM LOOP IN SIRIUS A R FRONT L R IN L IN CENTER MONITOR OUT Y PB PR COMPONENT VIDEO TV/SAT BD R SUBWOOFER DVD PRE OUT VIDEO IN TV OPTICAL R L DIGITAL AUDIO OUT ANALOG AUDIO OUT Select one VIDEO OUT This connection is connected to the receiver. •...
... CD UNBAL 75 L AM LOOP IN SIRIUS A R FRONT L R IN L IN CENTER MONITOR OUT Y PB PR TV/SAT BD COMPONENT VIDEO R DVD SUBWOOFER PRE OUT Connecting a satellite receiver or other playback component) with no HDMI terminal to this . HDMI DVR/BDR IN DVD IN BD IN VIDEO 1 IN...) R ANTENNA FM CD UNBAL 75 L AM LOOP IN SIRIUS A R FRONT L R IN L IN CENTER MONITOR OUT Y PB PR COMPONENT VIDEO TV/SAT BD R SUBWOOFER DVD PRE OUT VIDEO IN TV OPTICAL R L DIGITAL AUDIO OUT ANALOG AUDIO OUT Select one VIDEO OUT This connection is connected to the receiver. •...
Owner's Manual
Page 16
... FM CD UNBAL 75 L AM LOOP IN SIRIUS A R FRONT L R IN L IN CENTER MONITOR OUT Y PB PR COMPONENT VIDEO TV/SAT BD R SUBWOOFER DVD PRE OUT Using the component video jacks Component video should deliver superior picture quality when compared to Connecting your component with progressive-scan video...) (OUTPUT 5 V PRE OUT 0.1 A MAX) R ANTENNA FM CD UNBAL 75 L AM LOOP IN SIRIUS A R FRONT L R IN L IN R DVD SUBWOOFER PRE OUT CENTER R L ANALOG AUDIO IN VIDEO IN VIDEO OUT R L OPTICAL ANALOG AUDIO OUT DIGITAL AUDIO OUT Select one HDD/DVD recorder, Blu-ray Disc...
... FM CD UNBAL 75 L AM LOOP IN SIRIUS A R FRONT L R IN L IN CENTER MONITOR OUT Y PB PR COMPONENT VIDEO TV/SAT BD R SUBWOOFER DVD PRE OUT Using the component video jacks Component video should deliver superior picture quality when compared to Connecting your component with progressive-scan video...) (OUTPUT 5 V PRE OUT 0.1 A MAX) R ANTENNA FM CD UNBAL 75 L AM LOOP IN SIRIUS A R FRONT L R IN L IN R DVD SUBWOOFER PRE OUT CENTER R L ANALOG AUDIO IN VIDEO IN VIDEO OUT R L OPTICAL ANALOG AUDIO OUT DIGITAL AUDIO OUT Select one HDD/DVD recorder, Blu-ray Disc...
Owner's Manual
Page 17
... Connect a Bluetooth ADAPTER to SIRIUS Radio on page 26. Connecting optional Bluetooth® ADAPTER When the Bluetooth ADAPTER (Pioneer Model No. Follow the steps below to connect a CD-R, MD, DAT, tape recorder or other audio components The number and...ANTENNA FM CD UNBAL 75 L AM LOOP IN SIRIUS A R FRONT L R IN L IN MONITOR OUT Y PB PR COMPONENT VIDEO TV/SAT BD R SUBWOOFER DVD PRE OUT Bluetooth® ADAPTER Connecting your SiriusConnect™ Tuner To receive SIRIUS Satellite Radio broadcasts, you 're connecting. Connecting your equipment 02 Connecting...
... Connect a Bluetooth ADAPTER to SIRIUS Radio on page 26. Connecting optional Bluetooth® ADAPTER When the Bluetooth ADAPTER (Pioneer Model No. Follow the steps below to connect a CD-R, MD, DAT, tape recorder or other audio components The number and...ANTENNA FM CD UNBAL 75 L AM LOOP IN SIRIUS A R FRONT L R IN L IN MONITOR OUT Y PB PR COMPONENT VIDEO TV/SAT BD R SUBWOOFER DVD PRE OUT Bluetooth® ADAPTER Connecting your SiriusConnect™ Tuner To receive SIRIUS Satellite Radio broadcasts, you 're connecting. Connecting your equipment 02 Connecting...

Owner's Manual
Page 20
... of test tones to establish the ambient noise level. 6 Follow the instructions on-screen. • Make sure the microphone is connected. • Make sure the subwoofer is on and the volume is not operating. 03 Basic Setup Chapter 3: Basic Setup Canceling the demo display The display on the front panel shows...
... of test tones to establish the ambient noise level. 6 Follow the instructions on-screen. • Make sure the microphone is connected. • Make sure the subwoofer is on and the volume is not operating. 03 Basic Setup Chapter 3: Basic Setup Canceling the demo display The display on the front panel shows...

Owner's Manual
Page 21
... switch off the power and check the speaker connections. 9 Make sure 'OK' is happening. The configuration shown on page 34. • The subwoofer distance setting may be farther than the actual distance from the microphone) the final settings may be as quiet as shown. 1.Auto MCACC Now Analyzing...YES/NO Return • For correct speaker settings, do not adjust the volume during the test tones. 8 Confirm the speaker configuration. Back [YESx2] Subwoofer [ YES ] 10:Next OK Return • With error messages (such as possible while it is not optimal for the Auto MCACC setup (too ...
... switch off the power and check the speaker connections. 9 Make sure 'OK' is happening. The configuration shown on page 34. • The subwoofer distance setting may be farther than the actual distance from the microphone) the final settings may be as quiet as shown. 1.Auto MCACC Now Analyzing...YES/NO Return • For correct speaker settings, do not adjust the volume during the test tones. 8 Confirm the speaker configuration. Back [YESx2] Subwoofer [ YES ] 10:Next OK Return • With error messages (such as possible while it is not optimal for the Auto MCACC setup (too ...

Owner's Manual
Page 22
... TUNE BAND RETURN DTV/ TV MUTE VIDEO 2 TUNER SIRIUS VOL BASS TRE 1 Switch on your home theater system. Each press cycles through your TV and subwoofer (if you should be selected for playback (see page 7). For example, if you connected this receiver. If you're playing a Dolby Digital or DTS surround...
... TUNE BAND RETURN DTV/ TV MUTE VIDEO 2 TUNER SIRIUS VOL BASS TRE 1 Switch on your home theater system. Each press cycles through your TV and subwoofer (if you should be selected for playback (see page 7). For example, if you connected this receiver. If you're playing a Dolby Digital or DTS surround...

Owner's Manual
Page 29
... of listening modes to DOLBY PLII MUSICb DOLBY DIGITAL EX Movie/Music No - Twoa No just the front left and right speakers (and possibly your subwoofer depending on the current source, settings and status of various audio formats. Yes No stereo. DTS-ES Movie/Music Yes No The following modes provide...
... of listening modes to DOLBY PLII MUSICb DOLBY DIGITAL EX Movie/Music No - Twoa No just the front left and right speakers (and possibly your subwoofer depending on the current source, settings and status of various audio formats. Yes No stereo. DTS-ES Movie/Music Yes No The following modes provide...

Owner's Manual
Page 30
... ROCK/POP Creates a live concert sound for acoustic music sources. EXT.STEREO Gives multichannel sound to a stereo source, using just the front speakers and the subwoofer. Use to provide a rich surround sound effect directed to the center of where the front left speaker Front right speaker S.R AIR (Sound Retriever AIR) PHONES...
... ROCK/POP Creates a live concert sound for acoustic music sources. EXT.STEREO Gives multichannel sound to a stereo source, using just the front speakers and the subwoofer. Use to provide a rich surround sound effect directed to the center of where the front left speaker Front right speaker S.R AIR (Sound Retriever AIR) PHONES...

Owner's Manual
Page 31
...system with the surround back speakers so that have a maximized Phase Control effect. • The Phase Control mode cannot be done on your subwoofer, set the cutoff frequency to a higher value. • If the speaker distance is not properly set, you can actually feel when Phase...SELECT INPUT MIDNIGHT SPEAKERS LEV 7 8 9 PHASE CH S Press RECEIVER , then press PHASE to cycle the surround back channel options. Set your subwoofer has a phase control switch, set the setting to OFF even when set up as follows: • SB ON - When the PURE DIRECT mode is ...
...system with the surround back speakers so that have a maximized Phase Control effect. • The Phase Control mode cannot be done on your subwoofer, set the cutoff frequency to a higher value. • If the speaker distance is not properly set, you can actually feel when Phase...SELECT INPUT MIDNIGHT SPEAKERS LEV 7 8 9 PHASE CH S Press RECEIVER , then press PHASE to cycle the surround back channel options. Set your subwoofer has a phase control switch, set the setting to OFF even when set up as follows: • SB ON - When the PURE DIRECT mode is ...

Owner's Manual
Page 34
... settings to select the size (and number) of each of your current speaker system or add new speakers). You only need to the subwoofer (page 35). - Back [ NO ] Subwoofer: YES Return Return 3 Choose the set of your speaker system (page 35). - Use component or composite connections for surround sound (MCACC) on page...
... settings to select the size (and number) of each of your current speaker system or add new speakers). You only need to the subwoofer (page 35). - Back [ NO ] Subwoofer: YES Return Return 3 Choose the set of your speaker system (page 35). - Use component or composite connections for surround sound (MCACC) on page...
Owner's Manual
Page 35
...• Default setting: 100Hz This setting decides the cutoff between bass sounds playing back from the speakers selected as LARGE, or the subwoofer, and bass sounds playing back from those selected as the test tone moves from the Manual SP Setup menu. 2.Manual SP Setup ...Confirm your front speakers reproduce bass frequencies effectively, or if you didn't connect front height speakers choose NO. - If you didn't connect a subwoofer. Select LARGE if your surround speakers reproduce bass frequencies effectively. If you didn't connect a center speaker, choose NO (the center channel is ...
...• Default setting: 100Hz This setting decides the cutoff between bass sounds playing back from the speakers selected as LARGE, or the subwoofer, and bass sounds playing back from those selected as the test tone moves from the Manual SP Setup menu. 2.Manual SP Setup ...Confirm your front speakers reproduce bass frequencies effectively, or if you didn't connect front height speakers choose NO. - If you didn't connect a subwoofer. Select LARGE if your surround speakers reproduce bass frequencies effectively. If you didn't connect a center speaker, choose NO (the center channel is ...

Owner's Manual
Page 36
...; If you 're finished, press RETURN. FL Demo Mode Return 2 Select 'Component Input' from the System Setup menu. Back L [ Surround L [ Subwoofer [ 0dB 0dB] 0dB] 0dB 0dB] 0dB] Return Adjust the level of each speaker in 0.1 feet increments. 4 When you assign a component input to... the proper delay needed for the component video inputs. • Default settings: - System Setup 1 . You may see the video signal of a different component). Back L Surround L Subwoofer 10.0 ft [ 10.0 ft ] [ 10.0 tt ] [ 10.0 ft ] [ ---- ] [ ---- ] [ 10.0 ft ] [ 10.0 ft ] Return 3 Adjust the...
...; If you 're finished, press RETURN. FL Demo Mode Return 2 Select 'Component Input' from the System Setup menu. Back L [ Surround L [ Subwoofer [ 0dB 0dB] 0dB] 0dB 0dB] 0dB] Return Adjust the level of each speaker in 0.1 feet increments. 4 When you assign a component input to... the proper delay needed for the component video inputs. • Default settings: - System Setup 1 . You may see the video signal of a different component). Back L Surround L Subwoofer 10.0 ft [ 10.0 ft ] [ 10.0 tt ] [ 10.0 ft ] [ ---- ] [ ---- ] [ 10.0 ft ] [ 10.0 ft ] Return 3 Adjust the...
Owner's Manual
Page 44
...see page 2). Lower the volume level. After using MCACC (this will automatically turn on . If the message persists, call a Pioneer authorized independent service company. No sound from surround or center speakers. Connect the speakers properly (refer to page 11). Refer...check the speaker settings. Refer to Channel Level on your equipment on page 38). 44 En OVERHEAT shows in the subwoofer output). There seems to be able to the Control with the DVD player. 09 Additional information Chapter 9: Additional information Troubleshooting ...
...see page 2). Lower the volume level. After using MCACC (this will automatically turn on . If the message persists, call a Pioneer authorized independent service company. No sound from surround or center speakers. Connect the speakers properly (refer to page 11). Refer...check the speaker settings. Refer to Channel Level on your equipment on page 38). 44 En OVERHEAT shows in the subwoofer output). There seems to be able to the Control with the DVD player. 09 Additional information Chapter 9: Additional information Troubleshooting ...


