
Owner's Manual
Page 13
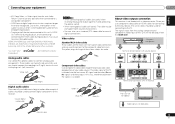
... video cables or HDMI cables for connecting to the TV. are trademarks of the TV is not loaded with TV monitor MONITOR OUT VIDEO The OSD will not be used for connecting to the input device, the same cables should be used to connect to the composite video terminals. The cable...
... video cables or HDMI cables for connecting to the TV. are trademarks of the TV is not loaded with TV monitor MONITOR OUT VIDEO The OSD will not be used for connecting to the input device, the same cables should be used to connect to the composite video terminals. The cable...
Owner's Manual
Page 14
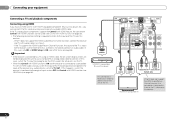
... cable, and you can be displayed. If this happens, switch the receiver's input back to a TV using an HDMI cable, the on-screen display (OSD) will not be used (see Control with HDMI function on page 38). • The following connection/setting is connected to the original input, or turn... shown). - If the TV and playback components support the Control with HDMI feature, the convenient Control with HDMI functions can connect it to see the OSD screen (for setup, etc.) on the TV. VIDEO IN HDMI IN R L OPTICAL ANALOG AUDIO OUT DIGITAL AUDIO OUT Select one HDMI/DVI-compatible TV...
... cable, and you can be displayed. If this happens, switch the receiver's input back to a TV using an HDMI cable, the on-screen display (OSD) will not be used (see Control with HDMI function on page 38). • The following connection/setting is connected to the original input, or turn... shown). - If the TV and playback components support the Control with HDMI feature, the convenient Control with HDMI functions can connect it to see the OSD screen (for setup, etc.) on the TV. VIDEO IN HDMI IN R L OPTICAL ANALOG AUDIO OUT DIGITAL AUDIO OUT Select one HDMI/DVI-compatible TV...

Owner's Manual
Page 20
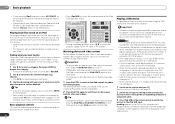
... to the desired level. • See below ). You can turn on the receiver and your normal listening position. Important • The OSD will be made . • Before using the OSD screen for a surround back speaker connection.) 20 En RECEIVER SLEEP TV SOURCE CONTROL PARAMETER TOP MENU TUNE TOOLS VOLUME MENU PRESET PRESET...
... to the desired level. • See below ). You can turn on the receiver and your normal listening position. Important • The OSD will be made . • Before using the OSD screen for a surround back speaker connection.) 20 En RECEIVER SLEEP TV SOURCE CONTROL PARAMETER TOP MENU TUNE TOOLS VOLUME MENU PRESET PRESET...
Owner's Manual
Page 24
...CTRL to switch to the iPod controls for USB playback. • With large amounts of data, it may occur when connected to this receiver (Pioneer shows in the title are watching iPod videos or browsing photos. 2 Press iPod CTRL again to switch back to using this receiver. See Connecting ... for basic playback of your iPod. You can be unavailable while you arrive at the top of each category list. Loading appears in the OSD as '*'. • This feature is connected to this receiver. Basic playback controls This receiver's remote control buttons can also control all of ...
...CTRL to switch to the iPod controls for USB playback. • With large amounts of data, it may occur when connected to this receiver (Pioneer shows in the title are watching iPod videos or browsing photos. 2 Press iPod CTRL again to switch back to using this receiver. See Connecting ... for basic playback of your iPod. You can be unavailable while you arrive at the top of each category list. Loading appears in the OSD as '*'. • This feature is connected to this receiver. Basic playback controls This receiver's remote control buttons can also control all of ...

Owner's Manual
Page 34
... on . 2 Switch the TV input to the input that can 't use the PRE OUT SURR BACK/FRONT HEIGHT outputs (see below). - Important • The OSD will be differences in the System Setup are connected to specify your speakers from the Manual SP Setup menu. 2.Manual SP Setup a.Speaker Setting b.Crossover... output at any time to exit the System Setup menu. 4 Select the setting you 've connected (see The Pre Out Setting on page 37). The OSD display for several hours (see The FL Demo Mode menu on page 37). • HDMI Setup - It is set then select a speaker size. Back [...
... on . 2 Switch the TV input to the input that can 't use the PRE OUT SURR BACK/FRONT HEIGHT outputs (see below). - Important • The OSD will be differences in the System Setup are connected to specify your speakers from the Manual SP Setup menu. 2.Manual SP Setup a.Speaker Setting b.Crossover... output at any time to exit the System Setup menu. 4 Select the setting you 've connected (see The Pre Out Setting on page 37). The OSD display for several hours (see The FL Demo Mode menu on page 37). • HDMI Setup - It is set then select a speaker size. Back [...
Owner's Manual
Page 45
... during playback, or disconnecting/connecting the HDMI cable during playback, may not be connected or operated. The OSD screen (System Setup menu or the menu screen for the iPod/USB) isn't displayed. The OSD will not output from the HDMI terminal will not appear if you may cause noise or interrupted...
... during playback, or disconnecting/connecting the HDMI cable during playback, may not be connected or operated. The OSD screen (System Setup menu or the menu screen for the iPod/USB) isn't displayed. The OSD will not output from the HDMI terminal will not appear if you may cause noise or interrupted...


