

Owner's Manual
Page 4
... 37 The Auto Power Down menu 37 The FL Demo Mode menu 37 07 Control with HDMI function Making Control with HDMI connections 38 HDMI Setup 38 Before using synchronization 39 About synchronized operations 39 About connections with a product of a different brand that supports the Control with HDMI function 39 Cautions... 28 Naming preset stations 28 05 Listening to your system Choosing the listening mode 29 Auto playback 29 Listening in a safe place for buying this Pioneer product. Please read through these operating instructions so you for future reference.
... 37 The Auto Power Down menu 37 The FL Demo Mode menu 37 07 Control with HDMI function Making Control with HDMI connections 38 HDMI Setup 38 Before using synchronization 39 About synchronized operations 39 About connections with a product of a different brand that supports the Control with HDMI function 39 Cautions... 28 Naming preset stations 28 05 Listening to your system Choosing the listening mode 29 Auto playback 29 Listening in a safe place for buying this Pioneer product. Please read through these operating instructions so you for future reference.

Owner's Manual
Page 5
...close to a device that you've received the following the procedure below to make sure to be used easily after following supplied accessories: • Setup microphone • Remote control • AAA size IEC R03 dry cell batteries (to confirm system operation) x2 • AM loop antenna &#...back channel processing (page 31) • Setting the Up Mix function (page 31) • Setting the Audio options (page 32) • Manual speaker setup (page 34) 8 Making maximum use of the steps indicate the following places: - in extremely hot or cold areas - in the receiver (page ...
...close to a device that you've received the following the procedure below to make sure to be used easily after following supplied accessories: • Setup microphone • Remote control • AAA size IEC R03 dry cell batteries (to confirm system operation) x2 • AM loop antenna &#...back channel processing (page 31) • Setting the Up Mix function (page 31) • Setting the Audio options (page 32) • Manual speaker setup (page 34) 8 Making maximum use of the steps indicate the following places: - in extremely hot or cold areas - in the receiver (page ...
Owner's Manual
Page 6
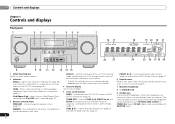
... 7 AUDIO/ VIDEO MULTI- CHANNEL RECEIVER VSX-821 HDMI iPod iPhone iPad INPUT SELECTOR STANDBY /ON SPEAKERS DIMMER DISPLAY BAND TUNER EDIT TUNE PRESET AUTO SURROUND/ ALC/ STREAM DIRECT STANDARD SURR ADVANCED SURROUND SOUND iPod iPhone iPad RETRIEVER AIR DIRECT CONTROL ENTER PHONES MCACC SETUP MIC VIDEO 2 INPUT 5V 2.1 A ... the remote control (see Operating range of this unit. Lights when Acoustic Calibration EQ (page 30) is on after the Auto MCACC setup (page 20)). Use to select preset radio stations (page 28) and to preset the channel in four steps. HDMI - DIMMER -...
... 7 AUDIO/ VIDEO MULTI- CHANNEL RECEIVER VSX-821 HDMI iPod iPhone iPad INPUT SELECTOR STANDBY /ON SPEAKERS DIMMER DISPLAY BAND TUNER EDIT TUNE PRESET AUTO SURROUND/ ALC/ STREAM DIRECT STANDARD SURR ADVANCED SURROUND SOUND iPod iPhone iPad RETRIEVER AIR DIRECT CONTROL ENTER PHONES MCACC SETUP MIC VIDEO 2 INPUT 5V 2.1 A ... the remote control (see Operating range of this unit. Lights when Acoustic Calibration EQ (page 30) is on after the Auto MCACC setup (page 20)). Use to select preset radio stations (page 28) and to preset the channel in four steps. HDMI - DIMMER -...
Owner's Manual
Page 7
... surround sound on page 29 for standard decoding and to switch between the various surround modes (page 30). 11 MCACC SETUP MIC jack Use to connect a microphone when performing Auto MCACC setup (page 20). 12 AUDIO/VIDEO input terminal See Connecting to the front panel video terminal on page 18. 13 iPod...
... surround sound on page 29 for standard decoding and to switch between the various surround modes (page 30). 11 MCACC SETUP MIC jack Use to connect a microphone when performing Auto MCACC setup (page 20). 12 AUDIO/VIDEO input terminal See Connecting to the front panel video terminal on page 18. 13 iPod...
Owner's Manual
Page 8
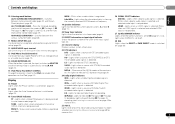
... first to control Blu-ray Disc/DVD menus/options. Use to adjust Bass or Treble. • These controls are used to access the System Setup menu (page 34). Off). Switches between the iPod controls and the receiver controls (page 24). 8 TUNE /, PRESET /),...AUTO/ ALC/ BD MENU 6 DIRECT STEREO STANDARD ADV SURR AUDIO PARAMETER TOP 7 MENU TUNER EDIT MASTER TOOLS VOLUME TUNE MENU PRESET PRESET ENTER 8 HOME MENU SETUP iPod CTRL CATEGORY TUNE BAND RETURN DTV/ TV MUTE 9 BASS TRE 10 MEMORY HDD 1 DVD 2 VCR 3 DISP S.RETRIEVER SB CH CH SELECT EQ 4...
... first to control Blu-ray Disc/DVD menus/options. Use to adjust Bass or Treble. • These controls are used to access the System Setup menu (page 34). Off). Switches between the iPod controls and the receiver controls (page 24). 8 TUNE /, PRESET /),...AUTO/ ALC/ BD MENU 6 DIRECT STEREO STANDARD ADV SURR AUDIO PARAMETER TOP 7 MENU TUNER EDIT MASTER TOOLS VOLUME TUNE MENU PRESET PRESET ENTER 8 HOME MENU SETUP iPod CTRL CATEGORY TUNE BAND RETURN DTV/ TV MUTE 9 BASS TRE 10 MEMORY HDD 1 DVD 2 VCR 3 DISP S.RETRIEVER SB CH CH SELECT EQ 4...

Owner's Manual
Page 9
...Français Español • When the front speaker is set at SMALL in the Speaker Setting (or automatically via the Auto MCACC setup) and the Crossover Network is set the listening volume. 14 MUTE Mutes/unmutes the sound. 15 DISP Switches the display of this unit. to ...select the TV input signal. Use to access: DTV/TV - Never use different batteries together. - Switches between the hard disk, DVD and VCR controls for Pioneer TVs. 10 Number buttons and other component controls Use the number buttons to the - There are dedicated to control the TV assigned to check initial...
...Français Español • When the front speaker is set at SMALL in the Speaker Setting (or automatically via the Auto MCACC setup) and the Crossover Network is set the listening volume. 14 MUTE Mutes/unmutes the sound. 15 DISP Switches the display of this unit. to ...select the TV input signal. Use to access: DTV/TV - Never use different batteries together. - Switches between the hard disk, DVD and VCR controls for Pioneer TVs. 10 Number buttons and other component controls Use the number buttons to the - There are dedicated to control the TV assigned to check initial...
Owner's Manual
Page 11
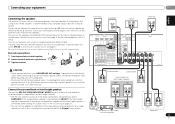
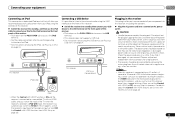
...Loosen terminal and insert exposed wire. 3 Tighten terminal. 10 mm (3/8 in the diagram) but using at least three speakers is recommended, and a complete setup is connected, either setting will work with a normal impedance between 12 Ω and 16 Ω if you connect the speaker on the right to the...on page 37). • You can use the additional amplifier on the surround back channel pre-outs for the listening options with this setup. Also make sure the positive and negative (+/-) terminals on the receiver match those on the speakers. Surround right Surround left HDMI DVR/BDR...
...Loosen terminal and insert exposed wire. 3 Tighten terminal. 10 mm (3/8 in the diagram) but using at least three speakers is recommended, and a complete setup is connected, either setting will work with a normal impedance between 12 Ω and 16 Ω if you connect the speaker on the right to the...on page 37). • You can use the additional amplifier on the surround back channel pre-outs for the listening options with this setup. Also make sure the positive and negative (+/-) terminals on the receiver match those on the speakers. Surround right Surround left HDMI DVR/BDR...
Owner's Manual
Page 14
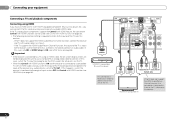
...connection is connected to a compatible TV with an HDMI cable, and you can be used (see HDMI Setup on -screen display (OSD) will not be displayed. If this case, set ARC at HDMI Setup to ON (see Control with HDMI function on page 38). • The following connection/setting is connected...-compatible TV If the TV does not support the HDMI Audio Return Channel function, this case, switch the TV input to analog to see HDMI Setup on the TV. • When the Control with audio cables (as shown). - 02 Connecting your equipment Connecting a TV and playback components Connecting using HDMI...
...connection is connected to a compatible TV with an HDMI cable, and you can be used (see HDMI Setup on -screen display (OSD) will not be displayed. If this case, set ARC at HDMI Setup to ON (see Control with HDMI function on page 38). • The following connection/setting is connected...-compatible TV If the TV does not support the HDMI Audio Return Channel function, this case, switch the TV input to analog to see HDMI Setup on the TV. • When the Control with audio cables (as shown). - 02 Connecting your equipment Connecting a TV and playback components Connecting using HDMI...
Owner's Manual
Page 18
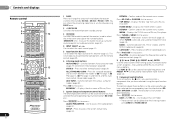
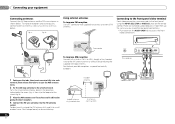
... attached stand. For best results, extend the FM antenna fully and fix to connect an external FM antenna. CONTROL ON / OFF PHONES This receiver MCACC SETUP MIC VIDEO 2 INPUT 5V 2.1 A L AUDIO R iPod iPhone USB VIDEO iPad 1 Push open the tabs, then insert one wire fully into the FM antenna socket. To...
... attached stand. For best results, extend the FM antenna fully and fix to connect an external FM antenna. CONTROL ON / OFF PHONES This receiver MCACC SETUP MIC VIDEO 2 INPUT 5V 2.1 A L AUDIO R iPod iPhone USB VIDEO iPad 1 Push open the tabs, then insert one wire fully into the FM antenna socket. To...
Owner's Manual
Page 19
...Playing an iPod on page 38). Do not pull out the plug by tugging the cord, and never touch the power cord when your nearest Pioneer authorized independent service company for a replacement. • The receiver should be routed so that will allow you find it damaged, ask your ... Plug the AC power cord into standby then connect your components to OFF, you an electric shock. CONTROL ON / OFF PHONES This receiver MCACC SETUP MIC VIDEO 2 INPUT 5V 2.1 A L AUDIO R iPod iPhone USB VIDEO iPad USB mass storage device Plugging in the receiver Only plug in any operations...
...Playing an iPod on page 38). Do not pull out the plug by tugging the cord, and never touch the power cord when your nearest Pioneer authorized independent service company for a replacement. • The receiver should be routed so that will allow you find it damaged, ask your ... Plug the AC power cord into standby then connect your components to OFF, you an electric shock. CONTROL ON / OFF PHONES This receiver MCACC SETUP MIC VIDEO 2 INPUT 5V 2.1 A L AUDIO R iPod iPhone USB VIDEO iPad USB mass storage device Plugging in the receiver Only plug in any operations...

Owner's Manual
Page 20
... sure the subwoofer is on the front panel shows various information (demo displays) when the receiver is not operating. 03 Basic Setup Chapter 3: Basic Setup Canceling the demo display The display on and the volume is turned up for surround sound (MCACC) The Auto Multi-Channel Acoustic...the speaker settings and equalization for notes regarding background noise and other possible interference. Automatically setting up . • When using the Auto MCACC setup, the iPod USB input should not be made . • Before using surround back or front height speakers, turn off the demo display...
... sure the subwoofer is on the front panel shows various information (demo displays) when the receiver is not operating. 03 Basic Setup Chapter 3: Basic Setup Canceling the demo display The display on and the volume is turned up for surround sound (MCACC) The Auto Multi-Channel Acoustic...the speaker settings and equalization for notes regarding background noise and other possible interference. Automatically setting up . • When using the Auto MCACC setup, the iPod USB input should not be made . • Before using surround back or front height speakers, turn off the demo display...

Owner's Manual
Page 21
.../ to select the speaker and / to finish. If you 're finished, go to 3 minutes. 10 The Auto MCACC setup has finished! It may interfere with the operation of around 12 cm (5 inches) will start automatically as possible while this . 1.Auto MCACC Now ...(air conditioner, fridge, fan, etc.), that may be accurate (taking delay and room characteristics into account) and generally does not need to the System Setup menu. Back [YESx2] Subwoofer [ YES ] 10:Next OK Return • With error messages (such as possible while it is displayed on -screen...
.../ to select the speaker and / to finish. If you 're finished, go to 3 minutes. 10 The Auto MCACC setup has finished! It may interfere with the operation of around 12 cm (5 inches) will start automatically as possible while this . 1.Auto MCACC Now ...(air conditioner, fridge, fan, etc.), that may be accurate (taking delay and room characteristics into account) and generally does not need to the System Setup menu. Back [YESx2] Subwoofer [ YES ] 10:Next OK Return • With error messages (such as possible while it is displayed on -screen...

Owner's Manual
Page 22
... PARAMETER TOP MENU TUNE TUNER EDIT MASTER TOOLS VOLUME MENU ENTER PRESET PRESET DVR/BDR CD CD-R CH ADAPTER iPod USB VIDEO 1 HOME MENU SETUP iPod CTRL CATEGORY TUNE BAND RETURN DTV/ TV MUTE VIDEO 2 TUNER SIRIUS VOL BASS TRE 1 Switch on your DVD player or digital satellite receiver... speaker, 2D is displayed when playing Dolby Digital signals. En If you have one), then the receiver (press RECEIVER). • Make sure the setup microphone is disconnected. 2 Switch the TV input to the input that was selected will be changed . • For the TV/SAT input, only A (...
... PARAMETER TOP MENU TUNE TUNER EDIT MASTER TOOLS VOLUME MENU ENTER PRESET PRESET DVR/BDR CD CD-R CH ADAPTER iPod USB VIDEO 1 HOME MENU SETUP iPod CTRL CATEGORY TUNE BAND RETURN DTV/ TV MUTE VIDEO 2 TUNER SIRIUS VOL BASS TRE 1 Switch on your DVD player or digital satellite receiver... speaker, 2D is displayed when playing Dolby Digital signals. En If you have one), then the receiver (press RECEIVER). • Make sure the setup microphone is disconnected. 2 Switch the TV input to the input that was selected will be changed . • For the TV/SAT input, only A (...
Owner's Manual
Page 24
...on the front of this receiver. Tip • Change the receiver's input to the iPod in the OSD instead; Important • Pioneer cannot guarantee compatibility (operation and/or bus power) with copy-protection or restricted playback). • Compatible USB devices include external magnetic hard ... VOLUME MENU BASS TRE MEMORY PRESET ENTER PRESET HDD DVD VCR 1 2 3 DISP S.RETRIEVER SB CH CH SELECT EQ 4 5 6 CH HOME MENU SETUP TUNE BAND MIDNIGHT SPEAKERS LEV 7 8 9 PHASE CH iPod CTRL CATEGORY RETURN DTV/ TV MUTE DIMMER SIGNAL SEL LEV 0 SHIFT • During Audiobook ...
...on the front of this receiver. Tip • Change the receiver's input to the iPod in the OSD instead; Important • Pioneer cannot guarantee compatibility (operation and/or bus power) with copy-protection or restricted playback). • Compatible USB devices include external magnetic hard ... VOLUME MENU BASS TRE MEMORY PRESET ENTER PRESET HDD DVD VCR 1 2 3 DISP S.RETRIEVER SB CH CH SELECT EQ 4 5 6 CH HOME MENU SETUP TUNE BAND MIDNIGHT SPEAKERS LEV 7 8 9 PHASE CH iPod CTRL CATEGORY RETURN DTV/ TV MUTE DIMMER SIGNAL SEL LEV 0 SHIFT • During Audiobook ...

Owner's Manual
Page 25
... audio files will not play, and files encoded with some versions of Windows Media® Player may not play When the Bluetooth ADAPTER (Pioneer Model No. Apple and iTunes are compatible, some irregularly encoded files may not play. This receiver plays back WMA files encoded using a commercially.../ BD MENU DIRECT STEREO STANDARD ADV SURR DTV/ TV MUTE AUDIO PARAMETER TOP MENU TUNER EDIT MASTER TOOLS VOLUME TUNE MENU PRESET ENTER HOME MENU SETUP iPod CTRL CATEGORY TUNE BAND RETURN DTV/ TV MUTE BASS TRE MEMORY HDD 1 DVD 2 VCR 3 DISP S.RETRIEVER SB CH CH SELECT EQ 4 ...
... audio files will not play, and files encoded with some versions of Windows Media® Player may not play When the Bluetooth ADAPTER (Pioneer Model No. Apple and iTunes are compatible, some irregularly encoded files may not play. This receiver plays back WMA files encoded using a commercially.../ BD MENU DIRECT STEREO STANDARD ADV SURR DTV/ TV MUTE AUDIO PARAMETER TOP MENU TUNER EDIT MASTER TOOLS VOLUME TUNE MENU PRESET ENTER HOME MENU SETUP iPod CTRL CATEGORY TUNE BAND RETURN DTV/ TV MUTE BASS TRE MEMORY HDD 1 DVD 2 VCR 3 DISP S.RETRIEVER SB CH CH SELECT EQ 4 ...
Owner's Manual
Page 26
...connected: NODEVICE appears in Bluetooth wireless technology device. When Bluetooth wireless technology device is no need to follow installation and setup instructions are registered trademarks owned by pressing SOUND RETRIEVER AIR on the Bluetooth wireless technology device. The ADAPTER input can ... receiver display. • The system can also be guaranteed for all the top professional and college sports including play by Pioneer Corporation is connected: Bluetooth wireless technology device name appears in the remote control buttons. Once you've purchased a SIRIUS tuner...
...connected: NODEVICE appears in Bluetooth wireless technology device. When Bluetooth wireless technology device is no need to follow installation and setup instructions are registered trademarks owned by pressing SOUND RETRIEVER AIR on the Bluetooth wireless technology device. The ADAPTER input can ... receiver display. • The system can also be guaranteed for all the top professional and college sports including play by Pioneer Corporation is connected: Bluetooth wireless technology device name appears in the remote control buttons. Once you've purchased a SIRIUS tuner...
Owner's Manual
Page 28
... PARAMETER TOP MENU TUNER EDIT MASTER TOOLS VOLUME TUNE MENU RECEIVER INPUT SELECT BD DVD TV INPUT DVR/BDR CD CD-R CH ENTER HOME MENU SETUP iPod CTRL CATEGORY TUNE BAND RETURN DTV/ TV MUTE ADAPTER iPod USB VIDEO 1 BASS TRE VIDEO 2 TUNER SIRIUS VOL HDD 1 DVD 2 MEMORY VCR 3...CD CD-R CH AUDIO PARAMETER TOP MENU TUNE TUNER EDIT MASTER TOOLS VOLUME MENU ADAPTER iPod USB VIDEO 1 ENTER VIDEO 2 TUNER SIRIUS VOL HOME MENU SETUP iPod CTRL CATEGORY 1 Press TUNER to a station. The receiver will need to have named a station preset, Press DISP to name. Repeat to search...
... PARAMETER TOP MENU TUNER EDIT MASTER TOOLS VOLUME TUNE MENU RECEIVER INPUT SELECT BD DVD TV INPUT DVR/BDR CD CD-R CH ENTER HOME MENU SETUP iPod CTRL CATEGORY TUNE BAND RETURN DTV/ TV MUTE ADAPTER iPod USB VIDEO 1 BASS TRE VIDEO 2 TUNER SIRIUS VOL HDD 1 DVD 2 MEMORY VCR 3...CD CD-R CH AUDIO PARAMETER TOP MENU TUNE TUNER EDIT MASTER TOOLS VOLUME MENU ADAPTER iPod USB VIDEO 1 ENTER VIDEO 2 TUNER SIRIUS VOL HOME MENU SETUP iPod CTRL CATEGORY 1 Press TUNER to a station. The receiver will need to have named a station preset, Press DISP to name. Repeat to search...

Owner's Manual
Page 29
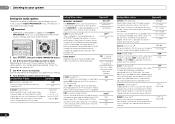
... No No - Listening to your system 05 Surround back speaker(s) Front height speakers English Français Español Chapter 5: Listening to your speaker setup and the type of source you will hear the source through Straight Decodee STEREOf No additional effects See above. Yesa No No - Yesa No No...
... No No - Listening to your system 05 Surround back speaker(s) Front height speakers English Français Español Chapter 5: Listening to your speaker setup and the type of source you will hear the source through Straight Decodee STEREOf No additional effects See above. Yesa No No - Yesa No No...

Owner's Manual
Page 30
...; The Sound Retriever is bypassed. The MCACC indicator on page 32). You will hear sources according to the number of channels in the Manual SP Setup (speaker setting, channel level, speaker distance), as well as with lots of overall surround Using Stream Direct AUTO/ DIRECT AUTO SURROUND/ STREAM DIRECT Use the...
...; The Sound Retriever is bypassed. The MCACC indicator on page 32). You will hear sources according to the number of channels in the Manual SP Setup (speaker setting, channel level, speaker distance), as well as with lots of overall surround Using Stream Direct AUTO/ DIRECT AUTO SURROUND/ STREAM DIRECT Use the...
Owner's Manual
Page 32
... SOURCE CONTROL AUDIO PARAMETER TOP MENU TUNER EDIT MASTER TOOLS VOLUME TUNE MENU PRESET PRESET RECEIVER INPUT SELECT INPUT ENTER BD DVD TV HOME MENU SETUP iPod CTRL C GO TUNE BAND RETURN 1 Press RECEIVER , then press AUDIO PARAMETER button. 2 Use / to select the setting you want to prevent the...
... SOURCE CONTROL AUDIO PARAMETER TOP MENU TUNER EDIT MASTER TOOLS VOLUME TUNE MENU PRESET PRESET RECEIVER INPUT SELECT INPUT ENTER BD DVD TV HOME MENU SETUP iPod CTRL C GO TUNE BAND RETURN 1 Press RECEIVER , then press AUDIO PARAMETER button. 2 Use / to select the setting you want to prevent the...


