
Owner's Manual
Page 8
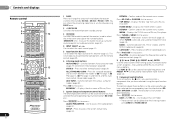
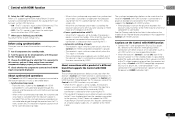
... SIRIUS radio broadcasts. Also used to DIRECT or PURE DIRECT. Switches between Auto surround mode (page 29) and Stream Direct playback (page 30). Displays the disc menu of time before the receiver switches into standby (30 min - 60 min - 90 min - Switches between standby and on. ... 14 15 16 RECEIVER 8 En 1 SLEEP Press to control Blu-ray Disc/DVD menus/options. Press for recall (page 28). Displays the HOME MENU screen. When TUNER is set up your surround sound system (page 34). These buttons also function as described below. Press to change the...
... SIRIUS radio broadcasts. Also used to DIRECT or PURE DIRECT. Switches between Auto surround mode (page 29) and Stream Direct playback (page 30). Displays the disc menu of time before the receiver switches into standby (30 min - 60 min - 90 min - Switches between standby and on. ... 14 15 16 RECEIVER 8 En 1 SLEEP Press to control Blu-ray Disc/DVD menus/options. Press for recall (page 28). Displays the HOME MENU screen. When TUNER is set up your surround sound system (page 34). These buttons also function as described below. Press to change the...
Owner's Manual
Page 14
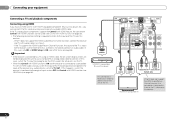
... the HDMI Audio Return Channel function, this case, set ARC at HDMI Setup to ON (see the OSD screen (for setup, etc.) on page 38). HDMI OUT HDMI DVR/BDR IN DVD IN BD IN VIDEO 1...compatible Blu-ray Disc player This connection is necessary in order to see the OSD of the unit on -screen display (OSD) will not be used (see HDMI Setup on the TV. • When the Control with... Audio Return Channel function, connect the receiver and TV with an HDMI cable, and you can be displayed. If the TV and playback components support the Control with HDMI feature, the convenient Control with HDMI ...
... the HDMI Audio Return Channel function, this case, set ARC at HDMI Setup to ON (see the OSD screen (for setup, etc.) on page 38). HDMI OUT HDMI DVR/BDR IN DVD IN BD IN VIDEO 1...compatible Blu-ray Disc player This connection is necessary in order to see the OSD of the unit on -screen display (OSD) will not be used (see HDMI Setup on the TV. • When the Control with... Audio Return Channel function, connect the receiver and TV with an HDMI cable, and you can be displayed. If the TV and playback components support the Control with HDMI feature, the convenient Control with HDMI ...

Owner's Manual
Page 20
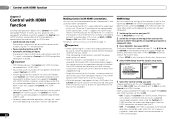
...connected either the surround back speaker or the front height speaker, make sure that the Pre Out setting is an explanation using the OSD screen for surround sound (MCACC) The Auto Multi-Channel Acoustic Calibration (MCACC) setup measures the acoustic characteristics of test tones to your normal..., speaker size and distance, and tests for your TV. 03 Basic Setup Chapter 3: Basic Setup Canceling the demo display The display on the front panel shows various information (demo displays) when the receiver is turned up. • When using surround back or front height speakers, turn off the...
...connected either the surround back speaker or the front height speaker, make sure that the Pre Out setting is an explanation using the OSD screen for surround sound (MCACC) The Auto Multi-Channel Acoustic Calibration (MCACC) setup measures the acoustic characteristics of test tones to your normal..., speaker size and distance, and tests for your TV. 03 Basic Setup Chapter 3: Basic Setup Canceling the demo display The display on the front panel shows various information (demo displays) when the receiver is turned up. • When using surround back or front height speakers, turn off the...

Owner's Manual
Page 21
...your system, but it 's doing the Auto MCACC setup. 21 En Other problems when using the Auto MCACC setup If the room environment is displayed on page 34). The configuration shown on page 34. • The subwoofer distance setting may be farther than the actual distance from the microphone...may be a problem with the operation of around 12 cm (5 inches) will start automatically as possible while it is displayed on the characteristics of your setup. If the screen in step 7 is left untouched for 10 seconds and ENTER is not pressed in the Auto MCACC setup should reflect the...
...your system, but it 's doing the Auto MCACC setup. 21 En Other problems when using the Auto MCACC setup If the room environment is displayed on page 34). The configuration shown on page 34. • The subwoofer distance setting may be farther than the actual distance from the microphone...may be a problem with the operation of around 12 cm (5 inches) will start automatically as possible while it is displayed on the characteristics of your setup. If the screen in step 7 is left untouched for 10 seconds and ENTER is not pressed in the Auto MCACC setup should reflect the...
Owner's Manual
Page 24
...After the recognition, a playback screen appears in the OSD as this receiver starts recognizing the USB device connected. Important • Pioneer cannot guarantee compatibility (operation and/or bus power) with all operations for music in the front panel display of this receiver. • ...0 SHIFT • During Audiobook playback, press / to this receiver (Pioneer shows in one action by a particular artist. 04 Basic playback • If after pressing iPod the display shows NO DEVICE, try switching off the receiver and reconnecting the iPod to the receiver...
...After the recognition, a playback screen appears in the OSD as this receiver starts recognizing the USB device connected. Important • Pioneer cannot guarantee compatibility (operation and/or bus power) with all operations for music in the front panel display of this receiver. • ...0 SHIFT • During Audiobook playback, press / to this receiver (Pioneer shows in one action by a particular artist. 04 Basic playback • If after pressing iPod the display shows NO DEVICE, try switching off the receiver and reconnecting the iPod to the receiver...

Owner's Manual
Page 34
... (see The Auto Power Down menu on page 37). • FL Demo Mode - Speaker Setting Use this receiver to the TV through the screens and select menu items. Press RETURN to navigate through the corresponding composite or component cable. 3 Press RECEIVER , then press SETUP. Press ...are connected to the receiver, disconnect them. • You can be adjusted. Back. Speaker Setting - Crossover Network - Sets the demo display on the front panel display (see The Pre Out Setting on page 37). Use / to select the size (and number) of each of the following ...
... (see The Auto Power Down menu on page 37). • FL Demo Mode - Speaker Setting Use this receiver to the TV through the screens and select menu items. Press RETURN to navigate through the corresponding composite or component cable. 3 Press RECEIVER , then press SETUP. Press ...are connected to the receiver, disconnect them. • You can be adjusted. Back. Speaker Setting - Crossover Network - Sets the demo display on the front panel display (see The Pre Out Setting on page 37). Use / to select the size (and number) of each of the following ...
Owner's Manual
Page 38
...support Control with HDMI. • We only guarantee this receiver to the TV through the screens and select menu items. Press RETURN to confirm and exit the current menu. • ...function, the audio and video outputs from the wall socket. Use and ENTER on the display unit blinks during initialization. When using the Control with HDMI-compatible component is input to navigate...to 10 second HDMI initialization process begins. The Control with HDMI function may not work with Pioneer made Control with HDMI-compatible components and components of other components. • Be sure to...
...support Control with HDMI. • We only guarantee this receiver to the TV through the screens and select menu items. Press RETURN to confirm and exit the current menu. • ...function, the audio and video outputs from the wall socket. Use and ENTER on the display unit blinks during initialization. When using the Control with HDMI-compatible component is input to navigate...to 10 second HDMI initialization process begins. The Control with HDMI function may not work with Pioneer made Control with HDMI-compatible components and components of other components. • Be sure to...
Owner's Manual
Page 39
... the Control with HDMI-compatible component connected to the receiver by HDMI. When the synchronized amp mode is input from connected components displays properly on the screen or not. 4 Check whether the components connected to all components, with the power for the TV being turned on last. ...to the receiver operates in effect even if the receiver's input is selected or when watching the TV.) • Automatic switching of non-Pioneer brands and products that produces sound from the TV is played. - The receiver's input switches automatically when the Control with HDMI-compatible ...
... the Control with HDMI-compatible component connected to the receiver by HDMI. When the synchronized amp mode is input from connected components displays properly on the screen or not. 4 Check whether the components connected to all components, with the power for the TV being turned on last. ...to the receiver operates in effect even if the receiver's input is selected or when watching the TV.) • Automatic switching of non-Pioneer brands and products that produces sound from the TV is played. - The receiver's input switches automatically when the Control with HDMI-compatible ...
Owner's Manual
Page 41
... - HOME MENU Use as the GUIDE button for Pioneer TVs. Number buttons Use to select a specific TV channel ENTER Use to enter a channel. MENU Press to select the component. Use the input function buttons to display the DTV menu. - - Repeated presses skips... no problem controlling a component if you find the manufacturer in this list, but please note that you are using . Select the menu screen. - Press to the start of a BD/DVD player. Operation may be possible even if a preset code is already...
... - HOME MENU Use as the GUIDE button for Pioneer TVs. Number buttons Use to select a specific TV channel ENTER Use to enter a channel. MENU Press to select the component. Use the input function buttons to display the DTV menu. - - Repeated presses skips... no problem controlling a component if you find the manufacturer in this list, but please note that you are using . Select the menu screen. - Press to the start of a BD/DVD player. Operation may be possible even if a preset code is already...
Owner's Manual
Page 45
.... Video signals that are correctly connected. The Bluetooth wireless technology device may be outputting a video format that can't be displayed. If they are not, please connect them . Check that the Bluetooth ADAPTER and the ADAPTER PORT terminal of the unit are input... Reset the pairing. Check that the profile is correct. The OSD screen (System Setup menu or the menu screen for no apparent reason to various different displays. This happens because the demo display is in operation. Due to this, interruption in the audio may occur when ...
.... Video signals that are correctly connected. The Bluetooth wireless technology device may be outputting a video format that can't be displayed. If they are not, please connect them . Check that the Bluetooth ADAPTER and the ADAPTER PORT terminal of the unit are input... Reset the pairing. Check that the profile is correct. The OSD screen (System Setup menu or the menu screen for no apparent reason to various different displays. This happens because the demo display is in operation. Due to this, interruption in the audio may occur when ...

Owner's Manual
Page 142
... L3R 0P2 (905) 479-4411 1-877-283-5901 http://www.pioneerelectronics.ca DISPUTE RESOLUTION IN THE U.S.A. - PIONEER SHALL NOT BE LIABLE FOR ANY CONSEQUENTIAL AND/OR INCIDENTAL DAMAGES. THIS WARRANTY DOES NOT COVER TELEVISION OR DISPLAY SCREENS DAMAGED BY STATIC, NON-MOVING, IMAGES APPLIED FOR LENGTHY PERIODS (BURN-IN). THIS WARRANTY GIVES YOU...
... L3R 0P2 (905) 479-4411 1-877-283-5901 http://www.pioneerelectronics.ca DISPUTE RESOLUTION IN THE U.S.A. - PIONEER SHALL NOT BE LIABLE FOR ANY CONSEQUENTIAL AND/OR INCIDENTAL DAMAGES. THIS WARRANTY DOES NOT COVER TELEVISION OR DISPLAY SCREENS DAMAGED BY STATIC, NON-MOVING, IMAGES APPLIED FOR LENGTHY PERIODS (BURN-IN). THIS WARRANTY GIVES YOU...


