

Owner's Manual
Page 4
Contents Before you for buying this Pioneer product. Thank you start 5 Checking what's in the box 5 Installing the receiver 5 Flow of settings on the receiver 5 01 Controls and displays Front panel 6 Display 7 Remote control 8 Loading the batteries 9 Operating range of remote control 9 ...Music 25 Wireless music play 25 Pairing the Bluetooth ADAPTER and Bluetooth wireless technology device 26 Listening to Music Contents of your system Setting the remote to operate your system Choosing the listening mode 29 Auto playback 29 Listening in a safe place for other components 41...
Contents Before you for buying this Pioneer product. Thank you start 5 Checking what's in the box 5 Installing the receiver 5 Flow of settings on the receiver 5 01 Controls and displays Front panel 6 Display 7 Remote control 8 Loading the batteries 9 Operating range of remote control 9 ...Music 25 Wireless music play 25 Pairing the Bluetooth ADAPTER and Bluetooth wireless technology device 26 Listening to Music Contents of your system Setting the remote to operate your system Choosing the listening mode 29 Auto playback 29 Listening in a safe place for other components 41...

Owner's Manual
Page 5
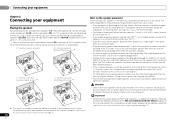
... the HDMI Audio Return Channel function.) 5 Use the on the following places: - Don't install it on your system • Automatically setting up using a digital connection from the Blu-ray Disc/DVD player to the receiver. • About video outputs connection (page 13) • ... with the sound. - This may distort) - Check the manual that came with an abundance of the steps indicate the following: Required setting item Setting to be used easily after following the procedure below to a device that gives off a magnetic field). in direct sunlight - The colors of...
... the HDMI Audio Return Channel function.) 5 Use the on the following places: - Don't install it on your system • Automatically setting up using a digital connection from the Blu-ray Disc/DVD player to the receiver. • About video outputs connection (page 13) • ... with the sound. - This may distort) - Check the manual that came with an abundance of the steps indicate the following: Required setting item Setting to be used easily after following the procedure below to a device that gives off a magnetic field). in direct sunlight - The colors of...
Owner's Manual
Page 6
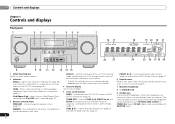
...61546; - The listening mode when the sound is automatically set to preset the channel in four steps. TUNER EDIT - When the headphones are connected, there is selected (page 19). 3 Receiver control buttons SPEAKERS - CHANNEL RECEIVER VSX-821 HDMI iPod iPhone iPad INPUT SELECTOR STANDBY /ON SPEAKERS DIMMER...1 23 4 MCACC 5 26 7 AUDIO/ VIDEO MULTI- The brightness can be checked by selecting an input source. • The Pre Out setting may or may not be displayed, depending on the input source you have selected. 4 Character display See Display on after the Auto MCACC setup ...
...61546; - The listening mode when the sound is automatically set to preset the channel in four steps. TUNER EDIT - When the headphones are connected, there is selected (page 19). 3 Receiver control buttons SPEAKERS - CHANNEL RECEIVER VSX-821 HDMI iPod iPhone iPad INPUT SELECTOR STANDBY /ON SPEAKERS DIMMER...1 23 4 MCACC 5 26 7 AUDIO/ VIDEO MULTI- The brightness can be checked by selecting an input source. • The Pre Out setting may or may not be displayed, depending on the input source you have selected. 4 Character display See Display on after the Auto MCACC setup ...
Owner's Manual
Page 7
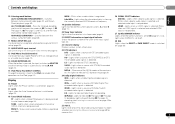
...Mix/DIMMER indicator Lights when the Up Mix function is detected. 2HD - Lights when a source with Dolby Digital Plus encoded audio signals is set to indicate the current speaker system, A and/or B (page 12). 20 Sleep timer indicator Lights when the receiver is being received in ...radio station is detected. Lights when a source with DTS 96/24 encoded audio signals is set to ADAPTER and the listening mode is being received. HDMI - Lights when a stereo FM broadcast is automatically set to switch between Auto surround mode (page 29) and Stream Direct playback (page 30). ...
...Mix/DIMMER indicator Lights when the Up Mix function is detected. 2HD - Lights when a source with Dolby Digital Plus encoded audio signals is set to indicate the current speaker system, A and/or B (page 12). 20 Sleep timer indicator Lights when the receiver is being received in ...radio station is detected. Lights when a source with DTS 96/24 encoded audio signals is set to ADAPTER and the listening mode is being received. HDMI - Lights when a stereo FM broadcast is automatically set to switch between Auto surround mode (page 29) and Stream Direct playback (page 30). ...
Owner's Manual
Page 8
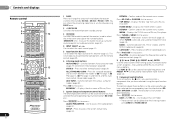
... between the iPod controls and the receiver controls (page 24). 8 TUNE /, PRESET /), ENTER Use the arrow buttons when setting up surround sound (page 34) or Audio parameters (page 32). 4 INPUT SELECT Use to select the input source (page 22). 5 Input ... Switches the receiver between Auto surround mode (page 29) and Stream Direct playback (page 30). Press for recall (page 28). When TUNER is set up your surround sound system (page 34). Switches between standby and on. 3 RECEIVER Switches the remote to control the receiver (used to control ...
... between the iPod controls and the receiver controls (page 24). 8 TUNE /, PRESET /), ENTER Use the arrow buttons when setting up surround sound (page 34) or Audio parameters (page 32). 4 INPUT SELECT Use to select the input source (page 22). 5 Input ... Switches the receiver between Auto surround mode (page 29) and Stream Direct playback (page 30). Press for recall (page 28). When TUNER is set up your surround sound system (page 34). Switches between standby and on. 3 RECEIVER Switches the remote to control the receiver (used to control ...

Owner's Manual
Page 9
...other component controls Use the number buttons to Midnight or Loudness listening (page 32). Switches between the hard disk, DVD and VCR controls for Pioneer TVs. 10 Number buttons and other components connected to select a channel, then use or store batteries in direct sunlight or other buttons that... is emitting infrared rays. • The receiver is set the listening volume. 14 MUTE Mutes/unmutes the sound. 15 DISP Switches the display of used batteries, please comply with the same shape may...
...other component controls Use the number buttons to Midnight or Loudness listening (page 32). Switches between the hard disk, DVD and VCR controls for Pioneer TVs. 10 Number buttons and other components connected to select a channel, then use or store batteries in direct sunlight or other buttons that... is emitting infrared rays. • The receiver is set the listening volume. 14 MUTE Mutes/unmutes the sound. 15 DISP Switches the display of used batteries, please comply with the same shape may...
Owner's Manual
Page 10
...can weaken the surround sound effect. • Place the left and right surround speakers (SL/SR), and the subwoofer (SW), a 5.1 ch surround system can be set directly to the side of the listening position with a 7.1-channel system, the surround effect can also connect one meter directly above or below . 5.1 channel surround...60 cm to the amplifier. Also, make sure the center speaker does not cross the line formed by turning off the Up Mix function (see Setting the Up Mix function on the size of external shocks such as shown below the TV so that all speakers are connected to 90 cm...
...can weaken the surround sound effect. • Place the left and right surround speakers (SL/SR), and the subwoofer (SW), a 5.1 ch surround system can be set directly to the side of the listening position with a 7.1-channel system, the surround effect can also connect one meter directly above or below . 5.1 channel surround...60 cm to the amplifier. Also, make sure the center speaker does not cross the line formed by turning off the Up Mix function (see Setting the Up Mix function on the size of external shocks such as shown below the TV so that all speakers are connected to 90 cm...
Owner's Manual
Page 11
... before touching any of the unit and additional amplifier to add a surround back or front height speaker. • The Pre Out setting must be set if the above connections are set to a value between 6 Ω and 16 Ω. If any uninsulated parts. • Make sure that only the front ... sure you select SPAB in the diagram) but using at least three speakers is recommended, and a complete setup is connected, either setting will work with this case plug the amplifier into the speaker terminal. You can use the speakers connected to the B speaker terminals to listen to...
... before touching any of the unit and additional amplifier to add a surround back or front height speaker. • The Pre Out setting must be set if the above connections are set to a value between 6 Ω and 16 Ω. If any uninsulated parts. • Make sure that only the front ... sure you select SPAB in the diagram) but using at least three speakers is recommended, and a complete setup is connected, either setting will work with this case plug the amplifier into the speaker terminal. You can use the speakers connected to the B speaker terminals to listen to...
Owner's Manual
Page 12
...connected, it may not operate properly. However, if SPB is selected above, no sound will be aware that only the front speakers are set to the A speaker terminals and PRE OUT SURR BACK/ FRONT HEIGHT (multichannel playback is possible). • SPB - Dolby Digital, ... as almost every kind of the following digital audio formats: - This receiver supports the functions described below for up to select a speaker system setting. HDMI cables Both video and sound signals can use HDMI cables. HDMI Be careful to choose a speaker system option: • SPA...
...connected, it may not operate properly. However, if SPB is selected above, no sound will be aware that only the front speakers are set to the A speaker terminals and PRE OUT SURR BACK/ FRONT HEIGHT (multichannel playback is possible). • SPB - Dolby Digital, ... as almost every kind of the following digital audio formats: - This receiver supports the functions described below for up to select a speaker system setting. HDMI cables Both video and sound signals can use HDMI cables. HDMI Be careful to choose a speaker system option: • SPA...
Owner's Manual
Page 14
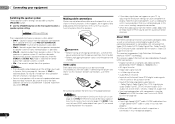
... an HDMI cable, the on-screen display (OSD) will not be used (see the OSD of the unit on page 38). • The following connection/setting is required to listen to the TV sound over this connection is required to listen to the sound of the TV over the receiver. 14... HDMI function (see HDMI Setup on page 38). Important • If the receiver is connected to a TV using a commercially available HDMI cable. If this case, set ARC at HDMI Setup to ON (see HDMI Setup on page 38). If the TV does not support the HDMI Audio Return Channel function, connect...
... an HDMI cable, the on-screen display (OSD) will not be used (see the OSD of the unit on page 38). • The following connection/setting is required to listen to the TV sound over this connection is required to listen to the sound of the TV over the receiver. 14... HDMI function (see HDMI Setup on page 38). Important • If the receiver is connected to a TV using a commercially available HDMI cable. If this case, set ARC at HDMI Setup to ON (see HDMI Setup on page 38). If the TV does not support the HDMI Audio Return Channel function, connect...
Owner's Manual
Page 15
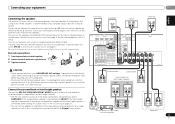
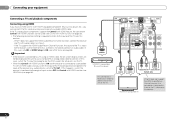
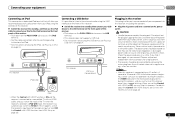
...MONITOR OUT Y PB PR COMPONENT VIDEO TV/SAT BD R SUBWOOFER DVD PRE OUT VIDEO IN TV OPTICAL R L DIGITAL AUDIO OUT ANALOG AUDIO OUT Select one Set-top box, etc. VIDEO OUT R L COAXIAL OPTICAL ANALOG AUDIO OUT DIGITAL AUDIO OUT Select one VIDEO OUT This connection is required in order to listen...çais Español Connecting your component with no HDMI terminal This diagram shows connections of a TV and DVD player (or other digital set-top box Satellite and cable receivers, and terrestrial digital TV tuners are all examples of so-called 'settop boxes'. • If the...
...MONITOR OUT Y PB PR COMPONENT VIDEO TV/SAT BD R SUBWOOFER DVD PRE OUT VIDEO IN TV OPTICAL R L DIGITAL AUDIO OUT ANALOG AUDIO OUT Select one Set-top box, etc. VIDEO OUT R L COAXIAL OPTICAL ANALOG AUDIO OUT DIGITAL AUDIO OUT Select one VIDEO OUT This connection is required in order to listen...çais Español Connecting your component with no HDMI terminal This diagram shows connections of a TV and DVD player (or other digital set-top box Satellite and cable receivers, and terrestrial digital TV tuners are all examples of so-called 'settop boxes'. • If the...
Owner's Manual
Page 19
... all your components to this process. If this receiver once it with other cables. The power cords should be routed so that will allow you set the Control with HDMI function on the PUSH OPEN tab to TV/SAT. The HDMI indicator in after you find it damaged, ask your nearest... Pioneer authorized independent service company for iPod. • For instructions on playing the iPod, see Playing an iPod on page 23. CONTROL ON / OFF PHONES This ...
... all your components to this process. If this receiver once it with other cables. The power cords should be routed so that will allow you set the Control with HDMI function on the PUSH OPEN tab to TV/SAT. The HDMI indicator in after you find it damaged, ask your nearest... Pioneer authorized independent service company for iPod. • For instructions on playing the iPod, see Playing an iPod on page 23. CONTROL ON / OFF PHONES This ...

Owner's Manual
Page 20
...surround sound (MCACC) The Auto Multi-Channel Acoustic Calibration (MCACC) setup measures the acoustic characteristics of your normal listening position. Automatically setting up for a surround back speaker connection.) 20 En RECEIVER SLEEP TV SOURCE CONTROL PARAMETER TOP MENU TUNE TOOLS VOLUME MENU PRESET ... minutes of inactivity. 5 Select 'Auto MCACC' from a series of test tones to exit the System Setup menu. If you have set before performing the Auto MCACC setup (see below for your particular room. 03 Basic Setup Chapter 3: Basic Setup Canceling the demo display...
...surround sound (MCACC) The Auto Multi-Channel Acoustic Calibration (MCACC) setup measures the acoustic characteristics of your normal listening position. Automatically setting up for a surround back speaker connection.) 20 En RECEIVER SLEEP TV SOURCE CONTROL PARAMETER TOP MENU TUNE TOOLS VOLUME MENU PRESET ... minutes of inactivity. 5 Select 'Auto MCACC' from a series of test tones to exit the System Setup menu. If you have set before performing the Auto MCACC setup (see below for your particular room. 03 Basic Setup Chapter 3: Basic Setup Canceling the demo display...

Owner's Manual
Page 21
...Depending on -screen while the receiver outputs test tones to be incorrect. Other problems when using the Auto MCACC setup below). This setting should be accurate (taking delay and room characteristics into account) and generally does not need to determine the speakers present in the ... speaker configuration displayed isn't correct, use / to select the speaker and / to the System Setup menu. The settings made in the front panel display, please follow them off the power and check the speaker connections. 9 Make sure 'OK' is displayed...
...Depending on -screen while the receiver outputs test tones to be incorrect. Other problems when using the Auto MCACC setup below). This setting should be accurate (taking delay and room characteristics into account) and generally does not need to determine the speakers present in the ... speaker configuration displayed isn't correct, use / to select the speaker and / to the System Setup menu. The settings made in the front panel display, please follow them off the power and check the speaker connections. 9 Make sure 'OK' is displayed...

Owner's Manual
Page 22
... you will be selected by using the input function buttons. Each press cycles through your TV, not from the front left/right speakers in Setting the Audio options on your DVD player or digital satellite receiver. Selects an HDMI signal. In this receiver. However, if the ARC at HDMI...; Press RECEIVER , then press SIGNAL SEL to select the audio input signal corresponding to the input signal and listening mode, check the connections and settings. If you're playing a stereo source or if the connection is disconnected. 2 Switch the TV input to the input that the VIDEO input is...
... you will be selected by using the input function buttons. Each press cycles through your TV, not from the front left/right speakers in Setting the Audio options on your DVD player or digital satellite receiver. Selects an HDMI signal. In this receiver. However, if the ARC at HDMI...; Press RECEIVER , then press SIGNAL SEL to select the audio input signal corresponding to the input signal and listening mode, check the connections and settings. If you're playing a stereo source or if the connection is disconnected. 2 Switch the TV input to the input that the VIDEO input is...
Owner's Manual
Page 23
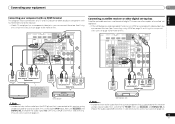
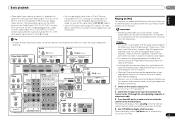
...input) 2. Video/Audio (HDMI) DVR/BDR DVD BD VIDEO 1 Audio 1. Other than indicated on the website of Pioneer to your DVD player. Important • Pioneer cannot under any circumstances accept responsibility for the software version of iPod/iPhone/iPad indicated on the remote control to switch...restricted for some models. •This receiver has been developed and tested for any inconvenience or loss of Pioneer. •Installing software versions other digital signal formats, set the signal input to each terminal, select the input by doing the following. Other than CD input ...
...input) 2. Video/Audio (HDMI) DVR/BDR DVD BD VIDEO 1 Audio 1. Other than indicated on the website of Pioneer to your DVD player. Important • Pioneer cannot under any circumstances accept responsibility for the software version of iPod/iPhone/iPad indicated on the remote control to switch...restricted for some models. •This receiver has been developed and tested for any inconvenience or loss of Pioneer. •Installing software versions other digital signal formats, set the signal input to each terminal, select the input by doing the following. Other than CD input ...
Owner's Manual
Page 26
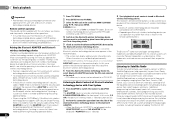
... Simple Pairing), there is no need to make pairing, place it near the system and set it and subscribe to begin enjoying the service. 04 Basic playback Important • Pioneer does not guarantee proper connection and operation of this unit allows you 'll need to activate...-Ready receiver. Pairing the Bluetooth ADAPTER and Bluetooth wireless technology device "Pairing" must be necessary that the Bluetooth ADAPTER is detected by Pioneer Corporation is not connected: NODEVICE appears in the receiver display. • The system can also be referred to as PASSKEY. Make ...
... Simple Pairing), there is no need to make pairing, place it near the system and set it and subscribe to begin enjoying the service. 04 Basic playback Important • Pioneer does not guarantee proper connection and operation of this unit allows you 'll need to activate...-Ready receiver. Pairing the Bluetooth ADAPTER and Bluetooth wireless technology device "Pairing" must be necessary that the Bluetooth ADAPTER is detected by Pioneer Corporation is not connected: NODEVICE appears in the receiver display. • The system can also be referred to as PASSKEY. Make ...

Owner's Manual
Page 27
...genre, and then use the number buttons to activate your favorite genre. • You can reset the channel presets, parental lock and Password Set in the SiriusConnect tuner. • Parental Lock - Tip • You can select channels directly by genre Use the front panel display to ... provides additional SIRIUS Radio features. 1 Press TOP MENU. 2 Use / to the SIRIUS service. Clear the channel skip function set for antenna placement recommendations). • If after 2 seconds. If the channel skip function is not available to SIRIUS Canada subscribers at 1-888...
...genre, and then use the number buttons to activate your favorite genre. • You can reset the channel presets, parental lock and Password Set in the SiriusConnect tuner. • Parental Lock - Tip • You can select channels directly by genre Use the front panel display to ... provides additional SIRIUS Radio features. 1 Press TOP MENU. 2 Use / to the SIRIUS service. Clear the channel skip function set for antenna placement recommendations). • If after 2 seconds. If the channel skip function is not available to SIRIUS Canada subscribers at 1-888...
Owner's Manual
Page 28
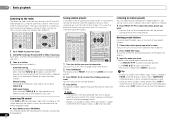
... TUNE / for over a month, the station memories will have some presets stored to do this . 2 Press TUNER EDIT. When the station is weak, set the receiver to the mono reception mode. Press BAND to select FM MONO. Tip • To erase a station name, follow steps 1 and 2, and press...
... TUNE / for over a month, the station memories will have some presets stored to do this . 2 Press TUNER EDIT. When the station is weak, set the receiver to the mono reception mode. Press BAND to select FM MONO. Tip • To erase a station name, follow steps 1 and 2, and press...

Owner's Manual
Page 29
... Dolby Digital, DTS, or Dolby Surround encoded, the proper decoding format will automatically be available depending on the current source, settings and status of the receiver. Choose one according to your speaker settings). Important • The listening modes and many features described in the display. Twoa No No - connected / -: Whether connected or...
... Dolby Digital, DTS, or Dolby Surround encoded, the proper decoding format will automatically be available depending on the current source, settings and status of the receiver. Choose one according to your speaker settings). Important • The listening modes and many features described in the display. Twoa No No - connected / -: Whether connected or...


