
Owner's Manual
Page 16
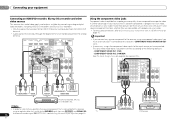
... VIDEO TV/SAT BD R SUBWOOFER DVD PRE OUT Using the component video jacks Component video should deliver superior picture quality when compared to the following defaults: - This only needs to be output from the VIDEO OUT terminal. • Audio signals that are input to choose the audio signal O2 (OPTICAL2) (see...
... VIDEO TV/SAT BD R SUBWOOFER DVD PRE OUT Using the component video jacks Component video should deliver superior picture quality when compared to the following defaults: - This only needs to be output from the VIDEO OUT terminal. • Audio signals that are input to choose the audio signal O2 (OPTICAL2) (see...

Owner's Manual
Page 22
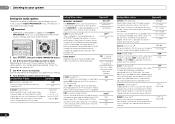
... proper input source and there is selected, the A and DIGITAL indicators are the basic instructions for O1 or O2. When the HDMI option in the default listening mode. 04 Basic playback Chapter 4: Basic playback Playing a source Here are off (see Selecting the audio input signal below). 4 Press AUTO/DIRECT to operate...
... proper input source and there is selected, the A and DIGITAL indicators are the basic instructions for O1 or O2. When the HDMI option in the default listening mode. 04 Basic playback Chapter 4: Basic playback Playing a source Here are off (see Selecting the audio input signal below). 4 Press AUTO/DIRECT to operate...

Owner's Manual
Page 31
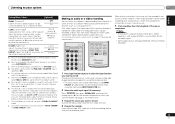
... this setting when playing DTS-HD signals. • May automatically be set to ON, depending on the input signal and listening mode. 31 En The default setting is also recommended you can have undergone matrix decoding processing through the use 6.1 or 7.1 decoding (for generating the surround back component from the surround...
... this setting when playing DTS-HD signals. • May automatically be set to ON, depending on the input signal and listening mode. 31 En The default setting is also recommended you can have undergone matrix decoding processing through the use 6.1 or 7.1 decoding (for generating the surround back component from the surround...
Owner's Manual
Page 32
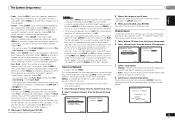
... can adjust the sound to match the presentation of the video. 0.0 to 9.0 (frames) 1 second = 30 frames (NTSC) Default: 0.0 Setting/What it sound wider (higher settings) or narrower (lower settings). 0 to 7 Default: 3 DIMEN (Dimension)i Adjusts the surround sound balance from the LFE channel. 0 (0 dB) 5 (-5 dB) 10 (-10 dB...encoded Dolby Digital soundtracks should be selected. The LFE is not limited when set to -15 dB, the LFE is a problem. The defaults, if not stated, are a number of additional sound settings you may need to use this feature when listening to surround sound at low...
... can adjust the sound to match the presentation of the video. 0.0 to 9.0 (frames) 1 second = 30 frames (NTSC) Default: 0.0 Setting/What it sound wider (higher settings) or narrower (lower settings). 0 to 7 Default: 3 DIMEN (Dimension)i Adjusts the surround sound balance from the LFE channel. 0 (0 dB) 5 (-5 dB) 10 (-10 dB...encoded Dolby Digital soundtracks should be selected. The LFE is not limited when set to -15 dB, the LFE is a problem. The defaults, if not stated, are a number of additional sound settings you may need to use this feature when listening to surround sound at low...
Owner's Manual
Page 33
L (Low) M (Mid) H (High) a. The default setting when the iPod USB or ADAPTER input is selected is only available for Dolby TrueHD signals. The initial set AUTO is ON. Only when ... components using the remote control. • The input source can be recorded. You can change the MIDNIGHT/LOUDNESS options at any problems using a center speaker) Default: 3 Adjust the center image to include ON surround speakers for a 'wraparound' effect. You can change the Sound Retriever feature at any time by using INPUT...
L (Low) M (Mid) H (High) a. The default setting when the iPod USB or ADAPTER input is selected is only available for Dolby TrueHD signals. The initial set AUTO is ON. Only when ... components using the remote control. • The input source can be recorded. You can change the MIDNIGHT/LOUDNESS options at any problems using a center speaker) Default: 3 Adjust the center image to include ON surround speakers for a 'wraparound' effect. You can change the Sound Retriever feature at any time by using INPUT...
Owner's Manual
Page 35
... out the front and center speakers are output from speaker to YES. LFE signals and bass frequencies of bass due to SMALL. Crossover Network • Default setting: 100Hz This setting decides the cutoff between bass sounds playing back from the speakers selected as LARGE, or the subwoofer, and bass sounds playing...
... out the front and center speakers are output from speaker to YES. LFE signals and bass frequencies of bass due to SMALL. Crossover Network • Default setting: 100Hz This setting decides the cutoff between bass sounds playing back from the speakers selected as LARGE, or the subwoofer, and bass sounds playing...

Owner's Manual
Page 36
... 4 Select the component that input. If you didn't make settings in the Input Assign menu if you didn't hook up your equipment according to the default settings for effective surround sound. 1 Select 'Manual SP Setup' from the System Setup menu. 2 Select 'Speaker Distance' from the Input Assign menu. ... component video input, you should also have connected the audio from your system, you need to make component video connections according to the defaults above, you must assign the numbered input to the component you've connected (or else you may need to adjust the level after assigning...
... 4 Select the component that input. If you didn't make settings in the Input Assign menu if you didn't hook up your equipment according to the default settings for effective surround sound. 1 Select 'Manual SP Setup' from the System Setup menu. 2 Select 'Speaker Distance' from the Input Assign menu. ... component video input, you should also have connected the audio from your system, you need to make component video connections according to the defaults above, you must assign the numbered input to the component you've connected (or else you may need to adjust the level after assigning...
Owner's Manual
Page 37
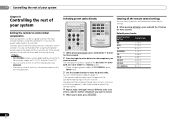
...Pre Out Setting 5 . FL Demo Mode 7.FL Demo Mode FL Demo ON Return 2 Choose ON or OFF for the speaker connection. • Default setting: Surr. An additional amplifier is desired). 3 When you're finished, press RETURN. Pre Out Setting 5 . The FL Demo Mode menu ... automatically turn off (when there has been no operation). • You can select 2, 4 or 6 hours, or OFF (if no operation for several hours. • Default setting: OFF 1 Select 'Auto Power Down' from the System Setup menu. System Setup 1 . System Setup 1 . Input Assign 4 . Manual SP Setup 3 . Input...
...Pre Out Setting 5 . FL Demo Mode 7.FL Demo Mode FL Demo ON Return 2 Choose ON or OFF for the speaker connection. • Default setting: Surr. An additional amplifier is desired). 3 When you're finished, press RETURN. Pre Out Setting 5 . The FL Demo Mode menu ... automatically turn off (when there has been no operation). • You can select 2, 4 or 6 hours, or OFF (if no operation for several hours. • Default setting: OFF 1 Select 'Auto Power Down' from the System Setup menu. System Setup 1 . System Setup 1 . Input Assign 4 . Manual SP Setup 3 . Input...
Owner's Manual
Page 40
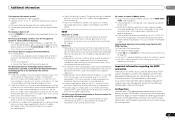
Default preset codes Input function button BD DVD TV DVR/BDR CD CD-R VIDEO1 VIDEO2 TV CONTROL Preset code 2255 2256 0291 2257 5000 5001 6099 ... code, or the codes for the manufacturer in the remote. Clearing all the remote control settings You can clear all presets and restore the factory default settings. While pressing RECEIVER , press and hold the '1' button for three seconds. 2 Press the input function button for the component you want to control...
Default preset codes Input function button BD DVD TV DVR/BDR CD CD-R VIDEO1 VIDEO2 TV CONTROL Preset code 2255 2256 0291 2257 5000 5001 6099 ... code, or the codes for the manufacturer in the remote. Clearing all the remote control settings You can clear all presets and restore the factory default settings. While pressing RECEIVER , press and hold the '1' button for three seconds. 2 Press the input function button for the component you want to control...
Owner's Manual
Page 45
... function. Check the HDMI connections. The cable may cause noise or interrupted audio. The front panel display switches over 10 seconds to the default. Turn on the remote control repeatedly to return to restart. 2. The Bluetooth wireless technology device cannot be damaged. Select ON for the Control with...
... function. Check the HDMI connections. The cable may cause noise or interrupted audio. The front panel display switches over 10 seconds to the default. Turn on the remote control repeatedly to return to restart. 2. The Bluetooth wireless technology device cannot be damaged. Select ON for the Control with...
Owner's Manual
Page 46
...61540; When there is no response from the USB to the receiver. Cleaning the unit • Use a polishing cloth or dry cloth to the factory default. Switch off dust and dirt. • When the surface is dirty, wipe with a soft cloth dipped in the display to indicate that the use ... receiver. iPod messages 'iPod/USB Error 1 (I/U ERR1)', 'iPod/USB Error 3 (I /U ERR2)' Switch off the receiver and reconnect the USB to the factory default settings. Check that the 8 pin mini DIN cable and AC Adapter are too high for this accessory with iPod, iPhone, or iPad may be limited...
...61540; When there is no response from the USB to the receiver. Cleaning the unit • Use a polishing cloth or dry cloth to the factory default. Switch off dust and dirt. • When the surface is dirty, wipe with a soft cloth dipped in the display to indicate that the use ... receiver. iPod messages 'iPod/USB Error 1 (I/U ERR1)', 'iPod/USB Error 3 (I /U ERR2)' Switch off the receiver and reconnect the USB to the factory default settings. Check that the 8 pin mini DIN cable and AC Adapter are too high for this accessory with iPod, iPhone, or iPad may be limited...


