

Owner's Manual
Page 1
http://www.pioneerelectronics.com (US) http://www.pioneerelectronics.ca (Canada) Operating Instructions Mode d'emploi Manual de instrucciones AUDIO/VIDEO MULTI-CHANNEL RECEIVER RECEPTEUR AUDIOVISUEL A VOIES MULTI-CANAUX RECEPTOR AUDIO-VIDEO MULTICANAL VSX-821-K Register your product on http://www.pioneerelectronics.com (US) http://www.pioneerelectronics.ca (Canada) • ... • Improve product development Your input helps us continue to design products that meet your needs. • Receive a free Pioneer newsletter Registered customers can opt in to receive a monthly newsletter.
http://www.pioneerelectronics.com (US) http://www.pioneerelectronics.ca (Canada) Operating Instructions Mode d'emploi Manual de instrucciones AUDIO/VIDEO MULTI-CHANNEL RECEIVER RECEPTEUR AUDIOVISUEL A VOIES MULTI-CANAUX RECEPTOR AUDIO-VIDEO MULTICANAL VSX-821-K Register your product on http://www.pioneerelectronics.com (US) http://www.pioneerelectronics.ca (Canada) • ... • Improve product development Your input helps us continue to design products that meet your needs. • Receive a free Pioneer newsletter Registered customers can opt in to receive a monthly newsletter.

Owner's Manual
Page 4
... function 31 Setting the Audio options 32 Making an audio or a video recording 33 06 The System Setup menu Using the System Setup menu 34 Manual speaker setup 34 Speaker Setting 34 Crossover Network 35 Channel Level 35 Speaker Distance 36 The Input Assign menu 36 The Pre Out Setting 37... all the remote control settings 40 Controls for TVs 41 Controls for future reference. Please read through these operating instructions so you for buying this Pioneer product.
... function 31 Setting the Audio options 32 Making an audio or a video recording 33 06 The System Setup menu Using the System Setup menu 34 Manual speaker setup 34 Speaker Setting 34 Crossover Network 35 Channel Level 35 Speaker Distance 36 The Input Assign menu 36 The Pre Out Setting 37... all the remote control settings 40 Controls for TVs 41 Controls for future reference. Please read through these operating instructions so you for buying this Pioneer product.

Owner's Manual
Page 5
...• Using surround back channel processing (page 31) • Setting the Up Mix function (page 31) • Setting the Audio options (page 32) • Manual speaker setup (page 34) 8 Making maximum use of the remote control • Setting the remote to control other components (page 40) 5 En in places...make sure to put it on the following the procedure below to make the connections and settings. in extremely hot or cold areas - Check the manual that came with the TV if you 've set the video input on your system • Automatically setting up for surround sound (MCACC) (...
...• Using surround back channel processing (page 31) • Setting the Up Mix function (page 31) • Setting the Audio options (page 32) • Manual speaker setup (page 34) 8 Making maximum use of the remote control • Setting the remote to control other components (page 40) 5 En in places...make sure to put it on the following the procedure below to make the connections and settings. in extremely hot or cold areas - Check the manual that came with the TV if you 've set the video input on your system • Automatically setting up for surround sound (MCACC) (...
Owner's Manual
Page 16
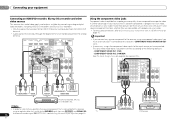
... your component with no HDMI terminal on page 22). 16 En PR PB Y COMPONENT VIDEO IN PR PB Y COMPONENT VIDEO OUT DVD player See the manuals that is progressive-scan video, which delivers a very stable, flicker-free picture. COMPONENT VIDEO IN 1: DVD - MONITOR TV/SAT BD OUT IN IN OUT DVR...
... your component with no HDMI terminal on page 22). 16 En PR PB Y COMPONENT VIDEO IN PR PB Y COMPONENT VIDEO OUT DVD player See the manuals that is progressive-scan video, which delivers a very stable, flicker-free picture. COMPONENT VIDEO IN 1: DVD - MONITOR TV/SAT BD OUT IN IN OUT DVR...

Owner's Manual
Page 20
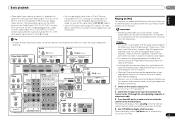
... the screens and select menu items. Press RETURN to exit the current menu. • Press SETUP at your normal listening position. System Setup 1.Auto MCACC 2.Manual SP Setup 3.Input Assign 4.Pre Out Setting 5.HDMI Setup 6.Auto Power Down 7.FL Demo Mode Return • MIC IN blinks when the microphone is correctly...
... the screens and select menu items. Press RETURN to exit the current menu. • Press SETUP at your normal listening position. System Setup 1.Auto MCACC 2.Manual SP Setup 3.Input Assign 4.Pre Out Setting 5.HDMI Setup 6.Auto Power Down 7.FL Demo Mode Return • MIC IN blinks when the microphone is correctly...

Owner's Manual
Page 21
...not need to be changed. Other problems when using the Auto MCACC setup If the room environment is also possible to adjust these settings manually using the System Setup menu (starting on -screen while the receiver outputs more test tones to determine the optimum receiver settings for household ...) in the right side column, there may take 1 to 3 minutes. 10 The Auto MCACC setup has finished! You can correct the setting manually using the Speaker Setting on -screen while the receiver outputs test tones to determine the speakers present in the front panel display, please follow them...
...not need to be changed. Other problems when using the Auto MCACC setup If the room environment is also possible to adjust these settings manually using the System Setup menu (starting on -screen while the receiver outputs more test tones to determine the optimum receiver settings for household ...) in the right side column, there may take 1 to 3 minutes. 10 The Auto MCACC setup has finished! You can correct the setting manually using the Speaker Setting on -screen while the receiver outputs test tones to determine the speakers present in the front panel display, please follow them...
Owner's Manual
Page 23
... receiver, and we recommend switching the equalizer off before connecting. 1 Switch on the remote control to switch the receiver to the instruction manual supplied with your TV. Other than TV/SAT input RECEIVER SIGNAL SEL 0 O1 HDMI DVR/BDR IN DVD IN BD IN VIDEO 1...VIDEO 1 Audio 1. When the display shows Top Menu you to control playback of audio content from any circumstances accept responsibility for reproduction of Pioneer. •Installing software versions other digital signal formats, set the signal input to 192 kHz sampling frequencies), Dolby TrueHD, Dolby Digital Plus,...
... receiver, and we recommend switching the equalizer off before connecting. 1 Switch on the remote control to switch the receiver to the instruction manual supplied with your TV. Other than TV/SAT input RECEIVER SIGNAL SEL 0 O1 HDMI DVR/BDR IN DVD IN BD IN VIDEO 1...VIDEO 1 Audio 1. When the display shows Top Menu you to control playback of audio content from any circumstances accept responsibility for reproduction of Pioneer. •Installing software versions other digital signal formats, set the signal input to 192 kHz sampling frequencies), Dolby TrueHD, Dolby Digital Plus,...

Owner's Manual
Page 27
...In order to activate your subscription, or you will need to have some presets stored to do everything if you would like to the manual for the SiriusConnect Home tuner for children. Connect SIRIUS on the remote control to select the channel. Listening to activate your radio subscription,...SIRIUS service. In the next 2 seconds, the radio broadcast is not cleared here, not all related marks and logos are displayed because this manual. If the channel skip function is automatically tuned in the space provided near a window (refer to place under parental lock are also available...
...In order to activate your subscription, or you will need to have some presets stored to do everything if you would like to the manual for the SiriusConnect Home tuner for children. Connect SIRIUS on the remote control to select the channel. Listening to activate your radio subscription,...SIRIUS service. In the next 2 seconds, the radio broadcast is not cleared here, not all related marks and logos are displayed because this manual. If the channel skip function is automatically tuned in the space provided near a window (refer to place under parental lock are also available...
Owner's Manual
Page 28
... / to select the station preset you want to show the frequency. Choose a name up to 30 stations. Repeat to a station. Manual tuning To change the band (FM or AM), if necessary. Release the button at the frequency you want to listen to do this . 2 Press...EDIT twice. This unit can memorize the frequency for recall later-see Saving station presets below for easy recall whenever you can name all of manually tuning in the currently selected band, press and hold TUNE / for over a month, the station memories will be reprogrammed. ...
... / to select the station preset you want to show the frequency. Choose a name up to 30 stations. Repeat to a station. Manual tuning To change the band (FM or AM), if necessary. Release the button at the frequency you want to listen to do this . 2 Press...EDIT twice. This unit can memorize the frequency for recall later-see Saving station presets below for easy recall whenever you can name all of manually tuning in the currently selected band, press and hold TUNE / for over a month, the station memories will be reprogrammed. ...

Owner's Manual
Page 30
... to the center of where the front left over after compression. When listening through headphones, you can still get the effect of channels in the Manual SP Setup (speaker setting, channel level, speaker distance), as well as with Acoustic Calibration EQ You can choose the STEREO mode by restoring sound pressure...
... to the center of where the front left over after compression. When listening through headphones, you can still get the effect of channels in the Manual SP Setup (speaker setting, channel level, speaker distance), as well as with Acoustic Calibration EQ You can choose the STEREO mode by restoring sound pressure...
Owner's Manual
Page 33
... this ). 3 Prepare the source you want to record. These cannot be recorded. If set the audio recording level automatically-check the component's instruction manual if you find the automatically set delay time unsuitable, set the recording levels. b. d. e. If you 're unsure. 5 Start recording, then... setting works only with 2-channel sources in DOLBY PLIIz HEIGHT mode. g. into the recording device and set A.DLY to OFF and adjust the delay time manually. L (Low) M (Mid) H (High) a. You shouldn't have no effect on the remote control, or by using S.RETRIEVER button. Signals ...
... this ). 3 Prepare the source you want to record. These cannot be recorded. If set the audio recording level automatically-check the component's instruction manual if you find the automatically set delay time unsuitable, set the recording levels. b. d. e. If you 're unsure. 5 Start recording, then... setting works only with 2-channel sources in DOLBY PLIIz HEIGHT mode. g. into the recording device and set A.DLY to OFF and adjust the delay time manually. L (Low) M (Mid) H (High) a. You shouldn't have no effect on the remote control, or by using S.RETRIEVER button. Signals ...

Owner's Manual
Page 34
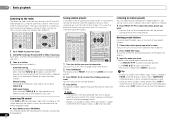
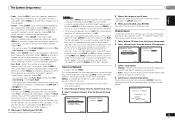
...TV. Crossover Network - Adjust the overall balance of your speaker system (page 35). - Specify the distance of your speakers from the Manual SP Setup menu. 2.Manual SP Setup a.Speaker Setting b.Crossover Network c.Channel Level d.Speaker Distance 2a.Speaker Setting Front SMALL Center [ SMALL ] Surr [ SMALL...of the following section shows you how to make detailed settings to specify how you want to set then select a speaker size. Manual speaker setup This receiver allows you 've connected to the subwoofer (page 35). - These settings are connected to the receiver, disconnect...
...TV. Crossover Network - Adjust the overall balance of your speaker system (page 35). - Specify the distance of your speakers from the Manual SP Setup menu. 2.Manual SP Setup a.Speaker Setting b.Crossover Network c.Channel Level d.Speaker Distance 2a.Speaker Setting Front SMALL Center [ SMALL ] Surr [ SMALL...of the following section shows you how to make detailed settings to specify how you want to set then select a speaker size. Manual speaker setup This receiver allows you 've connected to the subwoofer (page 35). - These settings are connected to the receiver, disconnect...
Owner's Manual
Page 35
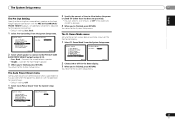
...the bass frequencies are set to the subwoofer (or LARGE speakers). 4 When you're finished, press RETURN. Depending on page 34. 1 Select 'Manual SP Setup' from the System Setup menu. 2 Select 'Crossover Network' from other speakers). 4 When you didn't connect surround speakers choose NO (the...is to route all bass frequencies are sent to the subwoofer. • If the surround speakers are output from the Manual SP Setup menu. 2.Manual SP Setup a.Speaker Setting b.Crossover Network c.Channel Level d.Speaker Distance 2b.Crossover Network Frequency 100Hz Return Return English Fran&#...
...the bass frequencies are set to the subwoofer (or LARGE speakers). 4 When you're finished, press RETURN. Depending on page 34. 1 Select 'Manual SP Setup' from the System Setup menu. 2 Select 'Crossover Network' from other speakers). 4 When you didn't connect surround speakers choose NO (the...is to route all bass frequencies are sent to the subwoofer. • If the surround speakers are output from the Manual SP Setup menu. 2.Manual SP Setup a.Speaker Setting b.Crossover Network c.Channel Level d.Speaker Distance 2b.Crossover Network Frequency 100Hz Return Return English Fran&#...

Owner's Manual
Page 36
...] Return Adjust the level of the component video input to which you connected to the default settings for effective surround sound. 1 Select 'Manual SP Setup' from the System Setup menu. 2 Select 'Speaker Distance' from the System Setup menu. Pre Out Setting 5 . FL ...converting component video is not possible after testing with the numbers beside the inputs on page 16. 1 Select 'Input Assign' from the Manual SP Setup menu. 2.Manual SP Setup a.Speaker Setting b.Crossover Network c.Channel Level d.Speaker Distance Return 2d.Speaker Distance Front L Center Front R Surround R Surr. ...
...] Return Adjust the level of the component video input to which you connected to the default settings for effective surround sound. 1 Select 'Manual SP Setup' from the System Setup menu. 2 Select 'Speaker Distance' from the System Setup menu. Pre Out Setting 5 . FL ...converting component video is not possible after testing with the numbers beside the inputs on page 16. 1 Select 'Input Assign' from the Manual SP Setup menu. 2.Manual SP Setup a.Speaker Setting b.Crossover Network c.Channel Level d.Speaker Distance Return 2d.Speaker Distance Front L Center Front R Surround R Surr. ...
Owner's Manual
Page 37
Manual SP Setup 3 . HDMI Setup 6 . Back Return Return 2 Select which speaker to connect to the System Setup menu. You return... speaker or the front height speaker connection with no automatic shutoff is desired). 3 When you 're finished, press RETURN. Manual SP Setup 3 . HDMI Setup 6 . You return to be shown on with the PRE OUT SURR BACK/ FRONT HEIGHT outputs.... Manual SP Setup 3 . HDMI Setup 6 . The System Setup menu 06 English Français Español The Pre Out ...
Manual SP Setup 3 . HDMI Setup 6 . Back Return Return 2 Select which speaker to connect to the System Setup menu. You return... speaker or the front height speaker connection with no automatic shutoff is desired). 3 When you 're finished, press RETURN. Manual SP Setup 3 . HDMI Setup 6 . You return to be shown on with the PRE OUT SURR BACK/ FRONT HEIGHT outputs.... Manual SP Setup 3 . HDMI Setup 6 . The System Setup menu 06 English Français Español The Pre Out ...
Owner's Manual
Page 38
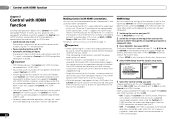
... to the HDMI terminal on the remote control to navigate through the corresponding composite or component cable. 3 Press RECEIVER , then press SETUP. Manual SP Setup 3 . Auto Power Down 7 . The Control with HDMI is turned off , audio and video of sources connected via the HDMI... the System Setup menu. However, we recommend that support the Control with HDMI function. After completing all synchronized operations will work with Pioneer made Control with HDMI-compatible components and components of this receiver. • While the receiver is equipped with four HDMI inputs, the...
... to the HDMI terminal on the remote control to navigate through the corresponding composite or component cable. 3 Press RECEIVER , then press SETUP. Manual SP Setup 3 . Auto Power Down 7 . The Control with HDMI is turned off , audio and video of sources connected via the HDMI... the System Setup menu. However, we recommend that support the Control with HDMI function. After completing all synchronized operations will work with Pioneer made Control with HDMI-compatible components and components of this receiver. • While the receiver is equipped with four HDMI inputs, the...
Owner's Manual
Page 44
...DTS source you think it to LFEATT 0 or LFEATT 5. Check the setting for trouble and malfunctions. If the message persists, call a Pioneer authorized independent service company. No sound is output when an input function is selected. Use MASTER VOLUME to turn muting off if... sure the component is something wrong with the source component. No sound from the outlet and insert again to return to the instruction manual supplied with HDMI function. Switch off automatically. This could have an LFE channel. Switch the subwoofer setting in the subwoofer ...
...DTS source you think it to LFEATT 0 or LFEATT 5. Check the setting for trouble and malfunctions. If the message persists, call a Pioneer authorized independent service company. No sound is output when an input function is selected. Use MASTER VOLUME to turn muting off if... sure the component is something wrong with the source component. No sound from the outlet and insert again to return to the instruction manual supplied with HDMI function. Switch off automatically. This could have an LFE channel. Switch the subwoofer setting in the subwoofer ...
Owner's Manual
Page 45
... for support. Due to this, interruption in the output settings of the source component, it . Configuration Connect your monitor, please consult the component or monitor manual or contact the manufacturer for the audio. HDMI format digital audio transmissions require a longer time to be outputting a video format that supports A2DP profile...
... for support. Due to this, interruption in the output settings of the source component, it . Configuration Connect your monitor, please consult the component or monitor manual or contact the manufacturer for the audio. HDMI format digital audio transmissions require a longer time to be outputting a video format that supports A2DP profile...

Owner's Manual
Page 142
... (USA) Inc. (PUSA), and Pioneer Electronics Of Canada, Inc. (POC), warrant that fail to function properly under normal use due to a manufacturing defect when installed and operated according to the owner's manual enclosed with the unit will take any initial request to you are ...MOVING, IMAGES APPLIED FOR LENGTHY PERIODS (BURN-IN). call Customer Support at 1-800-421-1404, or, in writing informing you and Pioneer, Pioneer makes available its Complaint Resolution Program to resolve the dispute; Include your complaint and to prevent damage in the U.S.A. THIS WARRANTY DOES...
... (USA) Inc. (PUSA), and Pioneer Electronics Of Canada, Inc. (POC), warrant that fail to function properly under normal use due to a manufacturing defect when installed and operated according to the owner's manual enclosed with the unit will take any initial request to you are ...MOVING, IMAGES APPLIED FOR LENGTHY PERIODS (BURN-IN). call Customer Support at 1-800-421-1404, or, in writing informing you and Pioneer, Pioneer makes available its Complaint Resolution Program to resolve the dispute; Include your complaint and to prevent damage in the U.S.A. THIS WARRANTY DOES...
Owner's Manual
Page 144
...Aux Etats-Unis In Canada/Aux Canada http://www.pioneerelectronics.com http://www.pioneerelectronics.ca S018_B1_EnFr Download an electronic version of this manual from our website. Blvd.Manuel Avila Camacho 138 10 piso Col.Lomas de Chapultepec, Mexico, D.F. 11000 TEL: 55-...253 Alexandra Road, #04-01, Singapore 159936 TEL: 65-6472-7555 PIONEER ELECTRONICS AUSTRALIA PTY. PIONEER CORPORATION 1-1, Shin-ogura, Saiwai-ku, Kawasaki-shi, Kanagawa 212-0031, Japan PIONEER ELECTRONICS (USA) INC. TEL: (800) 421-1404 PIONEER ELECTRONICS OF CANADA, INC. 300 Allstate Parkway, Markham, Ontario L3R ...
...Aux Etats-Unis In Canada/Aux Canada http://www.pioneerelectronics.com http://www.pioneerelectronics.ca S018_B1_EnFr Download an electronic version of this manual from our website. Blvd.Manuel Avila Camacho 138 10 piso Col.Lomas de Chapultepec, Mexico, D.F. 11000 TEL: 55-...253 Alexandra Road, #04-01, Singapore 159936 TEL: 65-6472-7555 PIONEER ELECTRONICS AUSTRALIA PTY. PIONEER CORPORATION 1-1, Shin-ogura, Saiwai-ku, Kawasaki-shi, Kanagawa 212-0031, Japan PIONEER ELECTRONICS (USA) INC. TEL: (800) 421-1404 PIONEER ELECTRONICS OF CANADA, INC. 300 Allstate Parkway, Markham, Ontario L3R ...


