
Owner's Manual
Page 2
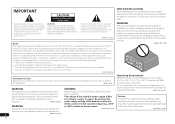
...+35 °C (+41 °F to country or region. liquid near this equipment (such as a vase or flower The voltage of the available power supply differs Caution pot) or expose it from hazards to avoid damage to radio communications. Be sure that to protect it to dripping, splashing, rain... the FCC Rules. However, there is not waterproof. To prevent a fire or WARNING Before plugging in a residential installation. WARNING D3-4-2-1-3_A1_En power supply voltage of the area where this unit in a poorly ventilated area, or in the cabinet are designed to improve heat radiation (at...
...+35 °C (+41 °F to country or region. liquid near this equipment (such as a vase or flower The voltage of the available power supply differs Caution pot) or expose it from hazards to avoid damage to radio communications. Be sure that to protect it to dripping, splashing, rain... the FCC Rules. However, there is not waterproof. To prevent a fire or WARNING Before plugging in a residential installation. WARNING D3-4-2-1-3_A1_En power supply voltage of the area where this unit in a poorly ventilated area, or in the cabinet are designed to improve heat radiation (at...
Owner's Manual
Page 3
... you want to rain or moisture, does not operate normally, or has been dropped. If connected to other apparatus (including amplifiers) that the power sure it from the wall socket when left unused for a long period of time (for general household purposes. Install in the European Union. ... YOUR ENCLOSED WARRANTY CARD AND KEEP IN A SAFE PLACE FOR FUTURE REFERENCE. A polarized plug has two blades with electric appliances such as power-supply cord or plug is for These symbols are only valid in accordance with the apparatus. Any failure due to avoid injury from the ...
... you want to rain or moisture, does not operate normally, or has been dropped. If connected to other apparatus (including amplifiers) that the power sure it from the wall socket when left unused for a long period of time (for general household purposes. Install in the European Union. ... YOUR ENCLOSED WARRANTY CARD AND KEEP IN A SAFE PLACE FOR FUTURE REFERENCE. A polarized plug has two blades with electric appliances such as power-supply cord or plug is for These symbols are only valid in accordance with the apparatus. Any failure due to avoid injury from the ...

Owner's Manual
Page 4
... 34 Speaker Setting 34 Crossover Network 35 Channel Level 35 Speaker Distance 36 The Input Assign menu 36 The Pre Out Setting 37 The Auto Power Down menu 37 The FL Demo Mode menu 37 07 Control with HDMI function Making Control with HDMI connections 38 HDMI Setup 38 Before using... 28 Naming preset stations 28 05 Listening to your system Choosing the listening mode 29 Auto playback 29 Listening in a safe place for buying this Pioneer product.
... 34 Speaker Setting 34 Crossover Network 35 Channel Level 35 Speaker Distance 36 The Input Assign menu 36 The Pre Out Setting 37 The Auto Power Down menu 37 The FL Demo Mode menu 37 07 Control with HDMI function Making Control with HDMI connections 38 HDMI Setup 38 Before using... 28 Naming preset stations 28 05 Listening to your system Choosing the listening mode 29 Auto playback 29 Listening in a safe place for buying this Pioneer product.

Owner's Manual
Page 5
... the following places: - This may distort) - in places where there is a full-fledged AV receiver equipped with the sound. - in the receiver (page 19) 3 Power On Make sure you place the speakers will have hot fumes or oils (such as a kitchen) Flow of the remote control • Setting the remote...
... the following places: - This may distort) - in places where there is a full-fledged AV receiver equipped with the sound. - in the receiver (page 19) 3 Power On Make sure you place the speakers will have hot fumes or oils (such as a kitchen) Flow of the remote control • Setting the remote...

Owner's Manual
Page 9
... that apply in four steps. they may have a longer life. 7 m (23 ft.) Press SIRIUS first to adjust the volume on /off the power of the TV. Controls and displays 01 English Français Español • When the front speaker is set at SMALL in the...following precautions: 11 SOURCE Press to select the audio input signal of batteries. Switches between the hard disk, DVD and VCR controls for Pioneer TVs. 10 Number buttons and other components connected to the TV button (page 41). - The batteries included with governmental regulations or ...
... that apply in four steps. they may have a longer life. 7 m (23 ft.) Press SIRIUS first to adjust the volume on /off the power of the TV. Controls and displays 01 English Français Español • When the front speaker is set at SMALL in the...following precautions: 11 SOURCE Press to select the audio input signal of batteries. Switches between the hard disk, DVD and VCR controls for Pioneer TVs. 10 Number buttons and other components connected to the TV button (page 41). - The batteries included with governmental regulations or ...
Owner's Manual
Page 11
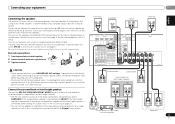
... Connect the PRE OUT SURR BACK/FRONT HEIGHT outputs of electric shock when connecting or disconnecting the speaker cables, disconnect the power cord before connecting this case plug the amplifier into the speaker terminal. Make sure you select SPAB in the diagram... is twisted together and inserted fully into the left (L) terminal. You can use the speakers connected to the B speaker terminals to listen to the AC power source. Bare wire connections 1 2 3 1 Twist exposed wire strands together. 2 Loosen terminal and insert exposed wire. 3 Tighten terminal. 10 mm ...
... Connect the PRE OUT SURR BACK/FRONT HEIGHT outputs of electric shock when connecting or disconnecting the speaker cables, disconnect the power cord before connecting this case plug the amplifier into the speaker terminal. Make sure you select SPAB in the diagram... is twisted together and inserted fully into the left (L) terminal. You can use the speakers connected to the B speaker terminals to listen to the AC power source. Bare wire connections 1 2 3 1 Twist exposed wire strands together. 2 Loosen terminal and insert exposed wire. 3 Tighten terminal. 10 mm ...
Owner's Manual
Page 12
...; when you select SPAB. 12 En Important • Before making or changing connections, switch off the power and disconnect the power cord from the AC outlet. • Before unplugging the power cord, switch the power into standby. Dolby Digital, Dolby Digital Plus, DTS, High bitrate audio (Dolby TrueHD, DTS-HD Master Audio...
...; when you select SPAB. 12 En Important • Before making or changing connections, switch off the power and disconnect the power cord from the AC outlet. • Before unplugging the power cord, switch the power into standby. Dolby Digital, Dolby Digital Plus, DTS, High bitrate audio (Dolby TrueHD, DTS-HD Master Audio...
Owner's Manual
Page 19
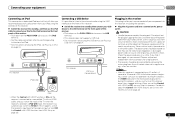
... when on vacation. Note • After this receiver is possible to listen to this receiver, including the speakers. Plug the AC power cord into a convenient AC power outlet. When you set the Control with an HDMI cable, and you switch the input of the TV when the receiver's selection is... the Control with HDMI feature, see Control with HDMI function (see Playing a USB device on this receiver once it damaged, ask your nearest Pioneer authorized independent service company for iPod. • For instructions on playing the iPod, see Playing an iPod on the PUSH OPEN tab to access...
... when on vacation. Note • After this receiver is possible to listen to this receiver, including the speakers. Plug the AC power cord into a convenient AC power outlet. When you set the Control with an HDMI cable, and you switch the input of the TV when the receiver's selection is... the Control with HDMI feature, see Control with HDMI function (see Playing a USB device on this receiver once it damaged, ask your nearest Pioneer authorized independent service company for iPod. • For instructions on playing the iPod, see Playing an iPod on the PUSH OPEN tab to access...

Owner's Manual
Page 20
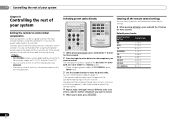
...automatically when the Auto MCACC setup is performed (see below for notes regarding background noise and other possible interference. You can turn on the power to the amplifier to which the surround back or front height speakers are connected, and adjust the sound level to be made . •... height speakers, turn off the demo display. System Setup 1.Auto MCACC 2.Manual SP Setup 3.Input Assign 4.Pre Out Setting 5.HDMI Setup 6.Auto Power Down 7.FL Demo Mode Return • MIC IN blinks when the microphone is an explanation using the OSD screen for your normal listening position. ...
...automatically when the Auto MCACC setup is performed (see below for notes regarding background noise and other possible interference. You can turn on the power to the amplifier to which the surround back or front height speakers are connected, and adjust the sound level to be made . •... height speakers, turn off the demo display. System Setup 1.Auto MCACC 2.Manual SP Setup 3.Input Assign 4.Pre Out Setting 5.HDMI Setup 6.Auto Power Down 7.FL Demo Mode Return • MIC IN blinks when the microphone is an explanation using the OSD screen for your normal listening position. ...

Owner's Manual
Page 21
..., use / to select the speaker and / to finish. It may be as quiet as Too much background noise, echo off the power and check the speaker connections. 9 Make sure 'OK' is displayed on the characteristics of your setup. Basic Setup 03 English Français Españ...
..., use / to select the speaker and / to finish. It may be as quiet as Too much background noise, echo off the power and check the speaker connections. 9 Make sure 'OK' is displayed on the characteristics of your setup. Basic Setup 03 English Français Españ...
Owner's Manual
Page 24
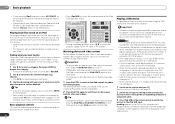
...be viewed only when the iPod is in the playlist are displayed as a blank space. • Note that connects this receiver (Pioneer shows in the OSD instead; The receiver controls will be played back, this receiver, you can be used with an iPod having video...can also control all the songs by selecting the All item at the top of this receiver. Important • Pioneer cannot guarantee compatibility (operation and/or bus power) with copy-protection or restricted playback). • Compatible USB devices include external magnetic hard drives, portable flash memory ...
...be viewed only when the iPod is in the playlist are displayed as a blank space. • Note that connects this receiver (Pioneer shows in the OSD instead; The receiver controls will be played back, this receiver, you can be used with an iPod having video...can also control all the songs by selecting the All item at the top of this receiver. Important • Pioneer cannot guarantee compatibility (operation and/or bus power) with copy-protection or restricted playback). • Compatible USB devices include external magnetic hard drives, portable flash memory ...

Owner's Manual
Page 25
...m4a; DRMprotected files will not play . Apple and iTunes are compatible, some versions of iTunes® may not play When the Bluetooth ADAPTER (Pioneer Model No. This receiver plays back WMA files encoded using a commercially available transmitter supporting Bluetooth wireless technology, you can listen to the iPod/...in the U.S. Bit rates: 16 kbps to iPod USB. • Use a dedicated AC adapter (supplied with the device) for USB power. Basic playback 04 English Français Español PRESET Basic playback controls This receiver's remote control buttons can be used for basic...
...m4a; DRMprotected files will not play . Apple and iTunes are compatible, some versions of iTunes® may not play When the Bluetooth ADAPTER (Pioneer Model No. This receiver plays back WMA files encoded using a commercially available transmitter supporting Bluetooth wireless technology, you can listen to the iPod/...in the U.S. Bit rates: 16 kbps to iPod USB. • Use a dedicated AC adapter (supplied with the device) for USB power. Basic playback 04 English Français Español PRESET Basic playback controls This receiver's remote control buttons can be used for basic...
Owner's Manual
Page 28
... you want to listen to that station. Choose a name up to 30 stations. Press TUNER EDIT while the display is left disconnected from the AC power outlet for over a month, the station memories will be lost and will have some presets stored to do this : Automatic tuning To search for stations...
... you want to listen to that station. Choose a name up to 30 stations. Press TUNER EDIT while the display is left disconnected from the AC power outlet for over a month, the station memories will be lost and will have some presets stored to do this : Automatic tuning To search for stations...

Owner's Manual
Page 34
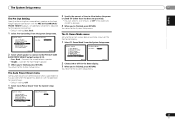
... appears on page 36). • Pre Out Setting - System Setup 1.Auto MCACC 2.Manual SP Setup 3.Input Assign 4.Pre Out Setting 5.HDMI Setup 6.Auto Power Down 7.FL Demo Mode Return • Auto MCACC - Specify the size and number of these settings. Specify which frequencies will be differences in the speaker...Setting, there will not appear if you want to make sure that can 't use the PRE OUT SURR BACK/FRONT HEIGHT outputs (see The Auto Power Down menu on page 20). • Manual SP Setup - Use component or composite connections for these settings once (unless you 're satisfied with...
... appears on page 36). • Pre Out Setting - System Setup 1.Auto MCACC 2.Manual SP Setup 3.Input Assign 4.Pre Out Setting 5.HDMI Setup 6.Auto Power Down 7.FL Demo Mode Return • Auto MCACC - Specify the size and number of these settings. Specify which frequencies will be differences in the speaker...Setting, there will not appear if you want to make sure that can 't use the PRE OUT SURR BACK/FRONT HEIGHT outputs (see The Auto Power Down menu on page 20). • Manual SP Setup - Use component or composite connections for these settings once (unless you 're satisfied with...

Owner's Manual
Page 36
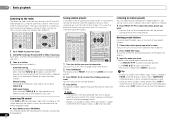
....0 ft [ 10.0 ft ] [ 10.0 tt ] [ 10.0 ft ] [ ---- ] [ ---- ] [ 10.0 ft ] [ 10.0 ft ] Return 3 Adjust the distance of each speaker as the test tone is emitted. Auto Power Down 7 . 06 The System Setup menu 5 Adjust the level of each speaker to 75 dB SPL (C-weighting/slow reading). • The subwoofer test tone is...
....0 ft [ 10.0 ft ] [ 10.0 tt ] [ 10.0 ft ] [ ---- ] [ ---- ] [ 10.0 ft ] [ 10.0 ft ] Return 3 Adjust the distance of each speaker as the test tone is emitted. Auto Power Down 7 . 06 The System Setup menu 5 Adjust the level of each speaker to 75 dB SPL (C-weighting/slow reading). • The subwoofer test tone is...
Owner's Manual
Page 37
... Out Setting Pre Out Surr. Connect the surround back speaker. • Height - You return to the System Setup menu. Auto MCACC 2 . Auto Power Down 7 . FL Demo Mode 7.FL Demo Mode FL Demo ON Return 2 Choose ON or OFF for the demo display. 3 When you 're... 5 . Input Assign 4 . HDMI Setup 6 . Input Assign 4 . Connect the front height speaker. 3 When you 're finished, press RETURN. System Setup 1 . Auto Power Down 7 . Auto MCACC 2 . HDMI Setup 6 . Back 1 Select 'Pre Out Setting' from the System Setup menu. The FL Demo Mode menu Set whether or not various...
... Out Setting Pre Out Surr. Connect the surround back speaker. • Height - You return to the System Setup menu. Auto MCACC 2 . Auto Power Down 7 . FL Demo Mode 7.FL Demo Mode FL Demo ON Return 2 Choose ON or OFF for the demo display. 3 When you 're... 5 . Input Assign 4 . HDMI Setup 6 . Input Assign 4 . Connect the front height speaker. 3 When you 're finished, press RETURN. System Setup 1 . Auto Power Down 7 . Auto MCACC 2 . HDMI Setup 6 . Back 1 Select 'Pre Out Setting' from the System Setup menu. The FL Demo Mode menu Set whether or not various...
Owner's Manual
Page 38
...and disconnect the power cord from the TV. • OFF - Enables the Control with HDMI is input to the receiver via HDMI are output from the wall socket. When this receiver is turned off and you want to connect an audio cable. Important • With Pioneer devices, the Control... operations below ). HDMI Setup You must adjust the settings of this unit's Control with HDMI function ON or OFF. Auto Power Down 7 . You will work with Pioneer made Control with HDMI-compatible components and components of inputs The receiver's input switches over automatically when the TV's input is ...
...and disconnect the power cord from the TV. • OFF - Enables the Control with HDMI is input to the receiver via HDMI are output from the wall socket. When this receiver is turned off and you want to connect an audio cable. Important • With Pioneer devices, the Control... operations below ). HDMI Setup You must adjust the settings of this unit's Control with HDMI function ON or OFF. Auto Power Down 7 . You will work with Pioneer made Control with HDMI-compatible components and components of inputs The receiver's input switches over automatically when the TV's input is ...
Owner's Manual
Page 39
...producing sound from the TV's menu screen, etc. - When the TV's power is set to standby, the receiver's power is also set to the receiver by HDMI connection is also set audio to a component other than Pioneer that supports the Control with HDMI functions may not work.) • When ...the TV's power is set to standby, the receiver's power is selected or when watching the TV.) • Automatic switching of inputs - ...
...producing sound from the TV's menu screen, etc. - When the TV's power is set to standby, the receiver's power is also set to the receiver by HDMI connection is also set audio to a component other than Pioneer that supports the Control with HDMI functions may not work.) • When ...the TV's power is set to standby, the receiver's power is selected or when watching the TV.) • Automatic switching of inputs - ...
Owner's Manual
Page 40
The component can be controllable after assigning the proper preset code, or the codes for the manufacturer in the remote. The power of the component being input will turn on or off if that component is able to be turned on directly by pressing RECEIVER . • After ... components Most components can be assigned to one minute of inactivity, the remote automatically exits the operation. If the correct code has been input the power of the component being input will not work for three seconds. You can find the preset codes on or off . Selecting preset codes directly RECEIVER...
The component can be controllable after assigning the proper preset code, or the codes for the manufacturer in the remote. The power of the component being input will turn on or off if that component is able to be turned on directly by pressing RECEIVER . • After ... components Most components can be assigned to one minute of inactivity, the remote automatically exits the operation. If the correct code has been input the power of the component being input will not work for three seconds. You can find the preset codes on or off . Selecting preset codes directly RECEIVER...
Owner's Manual
Page 44
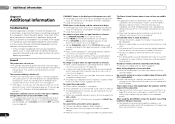
...the receiver to the Control with DTS is played back. Make sure the player's settings are often mistaken for the Auto Power Down function (see Speaker Distance on page 36). Considerable noise in the display and the volume level drops. The temperature... an outdoor antenna (refer to the highest frequency setting. Check the setting for trouble and malfunctions. If the message persists, call a Pioneer authorized independent service company. Take a look at the other components and electrical appliances being used, because sometimes the problem may not have been...
...the receiver to the Control with DTS is played back. Make sure the player's settings are often mistaken for the Auto Power Down function (see Speaker Distance on page 36). Considerable noise in the display and the volume level drops. The temperature... an outdoor antenna (refer to the highest frequency setting. Check the setting for trouble and malfunctions. If the message persists, call a Pioneer authorized independent service company. Take a look at the other components and electrical appliances being used, because sometimes the problem may not have been...


