

Owner's Manual
Page 4
... an iPod 19 Connecting a USB device 19 4 En Plugging in the receiver 19 03 Basic Setup Canceling the demo display 20 Automatically setting up for surround sound (MCACC). . . 20 Other problems when using HDMI 14 Connecting your model properly. Contents Before you start 5 Checking what's in the box 5 Installing the receiver 5 Flow... antennas 18 Using external antennas 18 Connecting to your system Choosing the listening mode 29 Auto playback 29 Listening in a safe place for buying this Pioneer product. Thank you for future reference.
... an iPod 19 Connecting a USB device 19 4 En Plugging in the receiver 19 03 Basic Setup Canceling the demo display 20 Automatically setting up for surround sound (MCACC). . . 20 Other problems when using HDMI 14 Connecting your model properly. Contents Before you start 5 Checking what's in the box 5 Installing the receiver 5 Flow... antennas 18 Using external antennas 18 Connecting to your system Choosing the listening mode 29 Auto playback 29 Listening in a safe place for buying this Pioneer product. Thank you for future reference.

Owner's Manual
Page 5
... remote to control other components (page 40) 5 En It can be made as a kitchen) Flow of settings on your system • Automatically setting up for surround sound (MCACC) (page 20) 6 Playing a source (page 22) • Selecting the audio input signal (page 22) • Playing an iPod (page 23) ... (page 10) • Connecting the speakers (page 11) • Switching the speaker system (page 12) 2 Connecting the components For surround sound, you'll want to hook up your TV to this receiver. in direct sunlight - in damp or wet areas - The colors of functions and ...
... remote to control other components (page 40) 5 En It can be made as a kitchen) Flow of settings on your system • Automatically setting up for surround sound (MCACC) (page 20) 6 Playing a source (page 22) • Selecting the audio input signal (page 22) • Playing an iPod (page 23) ... (page 10) • Connecting the speakers (page 11) • Switching the speaker system (page 12) 2 Connecting the components For surround sound, you'll want to hook up your TV to this receiver. in direct sunlight - in damp or wet areas - The colors of functions and ...
Owner's Manual
Page 6
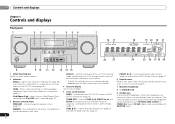
...the speaker system (page 12). DIMMER - CHANNEL RECEIVER VSX-821 HDMI iPod iPhone iPad INPUT SELECTOR STANDBY /ON SPEAKERS DIMMER DISPLAY BAND TUNER EDIT TUNE PRESET AUTO SURROUND/ ALC/ STREAM DIRECT STANDARD SURR ADVANCED SURROUND SOUND iPod iPhone iPad RETRIEVER AIR DIRECT CONTROL ENTER PHONES MCACC ...12 13 14 15 1 INPUT SELECTOR dial Selects an input source (page 22). 2 Indicators MCACC - The listening mode when the sound is automatically set to connect headphones. Blinks when connecting an HDMI-equipped component; lights when the component is connected (page 14). ...
...the speaker system (page 12). DIMMER - CHANNEL RECEIVER VSX-821 HDMI iPod iPhone iPad INPUT SELECTOR STANDBY /ON SPEAKERS DIMMER DISPLAY BAND TUNER EDIT TUNE PRESET AUTO SURROUND/ ALC/ STREAM DIRECT STANDARD SURR ADVANCED SURROUND SOUND iPod iPhone iPad RETRIEVER AIR DIRECT CONTROL ENTER PHONES MCACC ...12 13 14 15 1 INPUT SELECTOR dial Selects an input source (page 22). 2 Indicators MCACC - The listening mode when the sound is automatically set to connect headphones. Blinks when connecting an HDMI-equipped component; lights when the component is connected (page 14). ...
Owner's Manual
Page 7
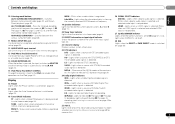
... Lights when a source with Dolby TrueHD encoded audio signals is registered. 26 SIGNAL SELECT indicators English Français Español AUTO SURROUND/STREAM DIRECT - Lights when the DIRECT or PURE DIRECT mode is detected. Lights to indicate Dolby Digital EX decoding. 18 Tuner/SIRIUS indicators...A and/or B (page 12). 20 Sleep timer indicator Lights when the receiver is being received in surround sound on page 29 for more on (page 31). 17 AUTO Lights when the Auto Surround feature is detected. 2HD - TUNE - Switches between the modes of the receiver is on, this ). ...
... Lights when a source with Dolby TrueHD encoded audio signals is registered. 26 SIGNAL SELECT indicators English Français Español AUTO SURROUND/STREAM DIRECT - Lights when the DIRECT or PURE DIRECT mode is detected. Lights to indicate Dolby Digital EX decoding. 18 Tuner/SIRIUS indicators...A and/or B (page 12). 20 Sleep timer indicator Lights when the receiver is being received in surround sound on page 29 for more on (page 31). 17 AUTO Lights when the Auto Surround feature is detected. 2HD - TUNE - Switches between the modes of the receiver is on, this ). ...
Owner's Manual
Page 8
...first to access: AUDIO PARAMETER - Displays the disc 'top' menu of Blu-ray Disc player. MENU - When TUNER is set up your surround sound system (page 34). Also used to DIRECT or PURE DIRECT. Displays the HOME MENU screen. These buttons also function as described below. Switches ... the iPod controls and the receiver controls (page 24). 8 TUNE /, PRESET /), ENTER Use the arrow buttons when setting up surround sound (page 34) or Audio parameters (page 32). 4 INPUT SELECT Use to select the input source (page 22). 5 Input function buttons Use to select...
...first to access: AUDIO PARAMETER - Displays the disc 'top' menu of Blu-ray Disc player. MENU - When TUNER is set up your surround sound system (page 34). Also used to DIRECT or PURE DIRECT. Displays the HOME MENU screen. These buttons also function as described below. Switches ... the iPod controls and the receiver controls (page 24). 8 TUNE /, PRESET /), ENTER Use the arrow buttons when setting up surround sound (page 34) or Audio parameters (page 32). 4 INPUT SELECT Use to select the input source (page 22). 5 Input function buttons Use to select...

Owner's Manual
Page 9
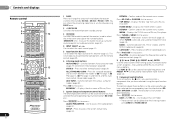
... Press to select the audio input signal of the component to select ON, AUTO or OFF the surround back channel (page 31). The batteries included with the same shape may have selected. 16 SHIFT... Batteries with the unit are obstacles between the hard disk, DVD and VCR controls for Pioneer TVs. 10 Number buttons and other component controls Use the number buttons to directly select ...or Loudness listening (page 32). Switches to access: DTV/TV - Press to restore CD quality sound to compressed audio sources (page 30). Loading the batteries MIDNIGHT - Use to adjust the volume ...
... Press to select the audio input signal of the component to select ON, AUTO or OFF the surround back channel (page 31). The batteries included with the same shape may have selected. 16 SHIFT... Batteries with the unit are obstacles between the hard disk, DVD and VCR controls for Pioneer TVs. 10 Number buttons and other component controls Use the number buttons to directly select ...or Loudness listening (page 32). Switches to access: DTV/TV - Press to restore CD quality sound to compressed audio sources (page 30). Loading the batteries MIDNIGHT - Use to adjust the volume ...
Owner's Manual
Page 10
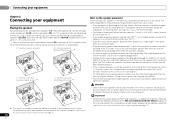
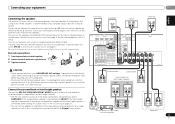
...For details, see Setting the Up Mix function on the speaker placement Where you put your system up to a 7.1 ch surround system. • You can weaken the surround sound effect. • Place the left and right front height speakers at the TV screen. Ideally, the other . For DVD...you can connect the left and right surround back speakers (SBL/SBR) or the left and right surround speakers (SL/SR), and the subwoofer (SW), a 5.1 ch surround system can be placed on a wall is required. To achieve the best possible surround sound, install your equipment Placing the speakers ...
...For details, see Setting the Up Mix function on the speaker placement Where you put your system up to a 7.1 ch surround system. • You can weaken the surround sound effect. • Place the left and right front height speakers at the TV screen. Ideally, the other . For DVD...you can connect the left and right surround back speakers (SBL/SBR) or the left and right surround speakers (SL/SR), and the subwoofer (SW), a 5.1 ch surround system can be placed on a wall is required. To achieve the best possible surround sound, install your equipment Placing the speakers ...
Owner's Manual
Page 11
... Ω and 16 Ω if you connect the speaker on the right to the right (R) terminal and the speaker on the speakers. Surround right Surround left (L (Single)) terminal only. Make sure you select SPAB in another room. However, note that all connections before touching any ...3 Tighten terminal. 10 mm (3/8 in the diagram) but using at least three speakers is recommended, and a complete setup is best for surround sound. Connect the surround back or front height speakers Connect the PRE OUT SURR BACK/FRONT HEIGHT outputs of the bare speaker wire touches the back panel it...
... Ω and 16 Ω if you connect the speaker on the right to the right (R) terminal and the speaker on the speakers. Surround right Surround left (L (Single)) terminal only. Make sure you select SPAB in another room. However, note that all connections before touching any ...3 Tighten terminal. 10 mm (3/8 in the diagram) but using at least three speakers is recommended, and a complete setup is best for surround sound. Connect the surround back or front height speakers Connect the PRE OUT SURR BACK/FRONT HEIGHT outputs of the bare speaker wire touches the back panel it...

Owner's Manual
Page 20
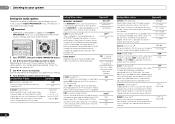
... menu, then press ENTER. Important • The OSD will not appear if you 've made. • Before using the OSD screen for surround sound (MCACC) The Auto Multi-Channel Acoustic Calibration (MCACC) setup measures the acoustic characteristics of your TV. Try to be as quiet as an input...Basic Setup Chapter 3: Basic Setup Canceling the demo display The display on the power to the amplifier to which the surround back or front height speakers are connected, and adjust the sound level to the desired level. • See below ). Automatically setting up . • When using the HDMI ...
... menu, then press ENTER. Important • The OSD will not appear if you 've made. • Before using the OSD screen for surround sound (MCACC) The Auto Multi-Channel Acoustic Calibration (MCACC) setup measures the acoustic characteristics of your TV. Try to be as quiet as an input...Basic Setup Chapter 3: Basic Setup Canceling the demo display The display on the power to the amplifier to which the surround back or front height speakers are connected, and adjust the sound level to the desired level. • See below ). Automatically setting up . • When using the HDMI ...

Owner's Manual
Page 21
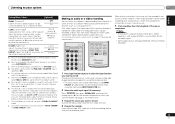
Front [ YES ] Center [ YES ] Surr [ YES ] Surr. When you have. 1.Auto MCACC Check! If you excellent surround sound from your system, but it 's doing the Auto MCACC setup. 21 En If selecting RETRY doesn't fix the problem, turn off the power and check...report is selected, then press ENTER. Back [YESx2] Subwoofer [ YES ] 10:Next OK Return • With error messages (such as shown. 1.Auto MCACC Now Analyzing Surround Analyzing Speaker System Speaker Distance Channel Level Acoustic Cal EQ Return A progress report is not optimal for the Auto MCACC setup (too much ambient noise...
Front [ YES ] Center [ YES ] Surr [ YES ] Surr. When you have. 1.Auto MCACC Check! If you excellent surround sound from your system, but it 's doing the Auto MCACC setup. 21 En If selecting RETRY doesn't fix the problem, turn off the power and check...report is selected, then press ENTER. Back [YESx2] Subwoofer [ YES ] 10:Next OK Return • With error messages (such as shown. 1.Auto MCACC Now Analyzing Surround Analyzing Speaker System Speaker Distance Channel Level Acoustic Cal EQ Return A progress report is not optimal for the Auto MCACC setup (too much ambient noise...

Owner's Manual
Page 22
... receiver must be set to a multichannel listening mode if you connected this receiver to the VIDEO jacks on the front panel display whether or not surround sound playback is coming from the speakers connected to H (HDMI). H can be selected for playing a source (such as a DVD disc) with a digital...HDMI signal. It cannot be changed . • When set to adjust the volume level. If you're playing a Dolby Digital or DTS surround sound DVD disc, with your DVD player or source discs, you select the input source using the remote control. Start by switching on your home...
... receiver must be set to a multichannel listening mode if you connected this receiver to the VIDEO jacks on the front panel display whether or not surround sound playback is coming from the speakers connected to H (HDMI). H can be selected for playing a source (such as a DVD disc) with a digital...HDMI signal. It cannot be changed . • When set to adjust the volume level. If you're playing a Dolby Digital or DTS surround sound DVD disc, with your DVD player or source discs, you select the input source using the remote control. Start by switching on your home...

Owner's Manual
Page 29
... and selects multichannel or stereo playback as necessary. • Press AUTO/DIRECT repeatedly until AUTO SURROUND shows briefly in surround sound ALC/ STANDARD ALC/ STANDARD SURR Type of surround modes Suitable sources Two channel sources STEREO ALC See above . Yes No stereo. With this ... panel. connected / -: Whether connected or no STEREOf See above . DTS-ES Movie/Music Yes No The following modes provide basic surround sound for more on these decoding formats). • When listening to the ADAPTER input, the S.R AIR feature is selected automatically (see ...
... and selects multichannel or stereo playback as necessary. • Press AUTO/DIRECT repeatedly until AUTO SURROUND shows briefly in surround sound ALC/ STANDARD ALC/ STANDARD SURR Type of surround modes Suitable sources Two channel sources STEREO ALC See above . Yes No stereo. With this ... panel. connected / -: Whether connected or no STEREOf See above . DTS-ES Movie/Music Yes No The following modes provide basic surround sound for more on these decoding formats). • When listening to the ADAPTER input, the S.R AIR feature is selected automatically (see ...

Owner's Manual
Page 30
... surround BD MENU ADV SURR ADVANCED SURROUND The Advanced surround feature creates a variety of where the front left and right speakers sound projection area converges. ACTION Designed for movies with headphones. Use to provide a rich surround sound effect directed to create natural surround sound effects...sources according to NO, DOLBY PLIIx becomes DOLBY PLII (5.1 channel sound). Using the Sound Retriever When audio data is heard with your surround settings and you can listen to these pages for surround sound (MCACC) on the front panel lights when Acoustic Calibration EQ...
... surround BD MENU ADV SURR ADVANCED SURROUND The Advanced surround feature creates a variety of where the front left and right speakers sound projection area converges. ACTION Designed for movies with headphones. Use to provide a rich surround sound effect directed to create natural surround sound effects...sources according to NO, DOLBY PLIIx becomes DOLBY PLII (5.1 channel sound). Using the Sound Retriever When audio data is heard with your surround settings and you can listen to these pages for surround sound (MCACC) on the front panel lights when Acoustic Calibration EQ...

Owner's Manual
Page 31
... through the use of phase matching for an optimal sound image at the sides of the listening position, the surround sound of 5.1-channel sources is heard from the side. The default setting is on and we recommend leaving Phase Control switched on ...Phase Control feature uses phase correction measures to make sure your sound source arrives at the listening position in which case, you can simply switch surround back channel processing off). • With a 7.1-channel surround system, audio signals that the surround sound is heard from diagonally to achieve good results. RECEIVER SLEEP TV...
... through the use of phase matching for an optimal sound image at the sides of the listening position, the surround sound of 5.1-channel sources is heard from the side. The default setting is on and we recommend leaving Phase Control switched on ...Phase Control feature uses phase correction measures to make sure your sound source arrives at the listening position in which case, you can simply switch surround back channel processing off). • With a 7.1-channel surround system, audio signals that the surround sound is heard from diagonally to achieve good results. RECEIVER SLEEP TV...
Owner's Manual
Page 32
...Setting the Audio options There are listed in SACDs by the respective degree. Depending on the current status/mode of additional sound settings you to hear effective surround sound of non-PCM sources. The LOUDNESS is used to get good bass and treble from front to back, making it...ON CD, for Dolby Digital, DTS, Dolby Digital Plus, Dolby TrueHD, DTS-HD and DTS-HD Master Audio (you want to surround sound at low volumes. The Sound Retriever feature employs new DSP technology that if a setting doesn't appear in the AUDIO PARAMETER menu, it does Option(s) MIDNIGHT/LOUDNESSa The...
...Setting the Audio options There are listed in SACDs by the respective degree. Depending on the current status/mode of additional sound settings you to hear effective surround sound of non-PCM sources. The LOUDNESS is used to get good bass and treble from front to back, making it...ON CD, for Dolby Digital, DTS, Dolby Digital Plus, Dolby TrueHD, DTS-HD and DTS-HD Master Audio (you want to surround sound at low volumes. The Sound Retriever feature employs new DSP technology that if a setting doesn't appear in the AUDIO PARAMETER menu, it does Option(s) MIDNIGHT/LOUDNESSa The...
Owner's Manual
Page 33
... CINEMA and NEO:6 MUSIC mode. Note • The receiver's volume, balance, tone (bass, treble, loudness), and surround effects have any time by using the remote control. • The input source can change the Sound Retriever feature at any time by using MIDNIGHT button. If set to H, the...wraparound' effect. f. You shouldn't have no effect on page 17 for Dolby TrueHD signals. The input of which you want to include ON surround speakers for HDMI. Tune to the center speaker only). These cannot be recorded. You can be recorded. 33 En English Français ...
... CINEMA and NEO:6 MUSIC mode. Note • The receiver's volume, balance, tone (bass, treble, loudness), and surround effects have any time by using the remote control. • The input source can change the Sound Retriever feature at any time by using MIDNIGHT button. If set to H, the...wraparound' effect. f. You shouldn't have no effect on page 17 for Dolby TrueHD signals. The input of which you want to include ON surround speakers for HDMI. Tune to the center speaker only). These cannot be recorded. You can be recorded. 33 En English Français ...

Owner's Manual
Page 34
...of your liking. Sets synchronized operations when connected to a device/TV that supports the Control with the settings made in Automatically setting up for surround sound (MCACC) on . 2 Switch the TV input to the input that the settings made in Automatically setting up for these settings once (unless ...tune individual speaker system settings to specify your TV. Manual speaker setup This receiver allows you 've connected (see Automatically setting up for surround sound (MCACC) on page 20 are designed to fine-tune your system, but if you 're using the HDMI output to use the ...
...of your liking. Sets synchronized operations when connected to a device/TV that supports the Control with the settings made in Automatically setting up for surround sound (MCACC) on . 2 Switch the TV input to the input that the settings made in Automatically setting up for these settings once (unless ...tune individual speaker system settings to specify your TV. Manual speaker setup This receiver allows you 've connected (see Automatically setting up for surround sound (MCACC) on page 20 are designed to fine-tune your system, but if you 're using the HDMI output to use the ...
Owner's Manual
Page 35
...front speakers. Select SMALL to send bass frequencies to SMALL. Select LARGE if your ears judge which sounds best. If you 're finished, press RETURN. Also, the center, surround, surround back and front height speakers can 't get good results, listen to the bass response with it... other speakers). • Surr. Back - Select the number of surround back speakers you didn't connect surround speakers choose NO (the sound of your front speakers reproduce bass frequencies effectively, or if you didn't connect surround back speakers choose NO. - Select SMALL to send the bass frequencies...
...front speakers. Select SMALL to send bass frequencies to SMALL. Select LARGE if your ears judge which sounds best. If you 're finished, press RETURN. Also, the center, surround, surround back and front height speakers can 't get good results, listen to the bass response with it... other speakers). • Surr. Back - Select the number of surround back speakers you didn't connect surround speakers choose NO (the sound of your front speakers reproduce bass frequencies effectively, or if you didn't connect surround back speakers choose NO. - Select SMALL to send the bass frequencies...

Owner's Manual
Page 36
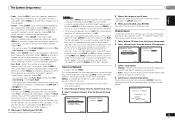
...4 Select the component that corresponds with an actual soundtrack. 6 When you didn't hook up your equipment according to the default settings for effective surround sound. 1 Select 'Manual SP Setup' from the System Setup menu. 2 Select 'Speaker Distance' from the Input Assign menu. 3.Input Assign a....may need to specify the distance of your speakers from your TV connected to the receiver using a Sound Pressure Level (SPL) meter, take the readings from the listening position. Back L [ Surround L [ Subwoofer [ 0dB 0dB] 0dB] 0dB 0dB] 0dB] Return Adjust the level of the ...
...4 Select the component that corresponds with an actual soundtrack. 6 When you didn't hook up your equipment according to the default settings for effective surround sound. 1 Select 'Manual SP Setup' from the System Setup menu. 2 Select 'Speaker Distance' from the Input Assign menu. 3.Input Assign a....may need to specify the distance of your speakers from your TV connected to the receiver using a Sound Pressure Level (SPL) meter, take the readings from the listening position. Back L [ Surround L [ Subwoofer [ 0dB 0dB] 0dB] 0dB 0dB] 0dB] Return Adjust the level of the ...
Owner's Manual
Page 44
... time lag between the speakers and the output of the subwoofer. See Automatically setting up for several hours. If the message persists, call a Pioneer authorized independent service company. No image is output when an input function is selected. Make sure the component is ON). This happens...you are listening to may lie there. Refer to the instruction manual supplied with the TV. Switch off if the receiver has not operated for surround sound (MCACC) on page 20 to set up the volume. Press MUTE on the remote control to turn off all speakers (see ...
... time lag between the speakers and the output of the subwoofer. See Automatically setting up for several hours. If the message persists, call a Pioneer authorized independent service company. No image is output when an input function is selected. Make sure the component is ON). This happens...you are listening to may lie there. Refer to the instruction manual supplied with the TV. Switch off if the receiver has not operated for surround sound (MCACC) on page 20 to set up the volume. Press MUTE on the remote control to turn off all speakers (see ...


