

Owner's Manual
Page 1
AUDIO/VIDEO MULTI-CHANNEL RECEIVER RECEPTEUR AUDIOVISUEL A VOIES MULTI-CANAUX RECEPTOR AUDIO-VIDEO MULTICANAL VSX-821-K Register your product on http://www.pioneerelectronics.com (US) http://www.pioneerelectronics.ca (Canada) • Protect your new investment The... new product • Improve product development Your input helps us continue to design products that meet your needs. • Receive a free Pioneer newsletter Registered customers can opt in to receive a monthly newsletter. http://www.pioneerelectronics.com (US) http://www.pioneerelectronics.ca (Canada) Operating Instructions ...
AUDIO/VIDEO MULTI-CHANNEL RECEIVER RECEPTEUR AUDIOVISUEL A VOIES MULTI-CANAUX RECEPTOR AUDIO-VIDEO MULTICANAL VSX-821-K Register your product on http://www.pioneerelectronics.com (US) http://www.pioneerelectronics.ca (Canada) • Protect your new investment The... new product • Improve product development Your input helps us continue to design products that meet your needs. • Receive a free Pioneer newsletter Registered customers can opt in to receive a monthly newsletter. http://www.pioneerelectronics.com (US) http://www.pioneerelectronics.ca (Canada) Operating Instructions ...

Owner's Manual
Page 4
... function 31 Setting the Audio options 32 Making an audio or a video recording 33 06 The System Setup menu Using the System Setup menu 34 Manual speaker setup 34 Speaker Setting 34 Crossover Network 35 Channel Level 35 Speaker Distance 36 The Input Assign menu 36 The Pre Out Setting 37... SIRIUS radio messages 46 About iPod/iPhone/iPad 46 Resetting the main unit 46 Cleaning the unit 46 Specifications 47 After you for buying this Pioneer product. Thank you have finished reading the instructions, put them away in a safe place for future reference.
... function 31 Setting the Audio options 32 Making an audio or a video recording 33 06 The System Setup menu Using the System Setup menu 34 Manual speaker setup 34 Speaker Setting 34 Crossover Network 35 Channel Level 35 Speaker Distance 36 The Input Assign menu 36 The Pre Out Setting 37... SIRIUS radio messages 46 About iPod/iPhone/iPad 46 Resetting the main unit 46 Cleaning the unit 46 Specifications 47 After you for buying this Pioneer product. Thank you have finished reading the instructions, put them away in a safe place for future reference.

Owner's Manual
Page 5
... Using surround back channel processing (page 31) • Setting the Up Mix function (page 31) • Setting the Audio options (page 32) • Manual speaker setup (page 34) 8 Making maximum use of the remote control • Setting the remote to control other movement - in direct sunlight - The...receiver. near a cassette deck (or close to a device that gives off a magnetic field). in extremely hot or cold areas - Check the manual that came with the sound. - English Français Español Before you start Checking what's in the box Please check that you've...
... Using surround back channel processing (page 31) • Setting the Up Mix function (page 31) • Setting the Audio options (page 32) • Manual speaker setup (page 34) 8 Making maximum use of the remote control • Setting the remote to control other movement - in direct sunlight - The...receiver. near a cassette deck (or close to a device that gives off a magnetic field). in extremely hot or cold areas - Check the manual that came with the sound. - English Français Español Before you start Checking what's in the box Please check that you've...
Owner's Manual
Page 16
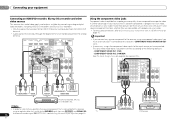
... AUDIO IN VIDEO IN VIDEO OUT R L OPTICAL ANALOG AUDIO OUT DIGITAL AUDIO OUT Select one HDD/DVD recorder, Blu-ray Disc recorder, etc. See the manuals that came with your TV and source component to choose the audio signal O2 (OPTICAL2) (see Selecting the audio input signal on page 22). 16...
... AUDIO IN VIDEO IN VIDEO OUT R L OPTICAL ANALOG AUDIO OUT DIGITAL AUDIO OUT Select one HDD/DVD recorder, Blu-ray Disc recorder, etc. See the manuals that came with your TV and source component to choose the audio signal O2 (OPTICAL2) (see Selecting the audio input signal on page 22). 16...

Owner's Manual
Page 20
... displays) when the receiver is turned up. • When using surround back or front height speakers, turn off the demo display. System Setup 1.Auto MCACC 2.Manual SP Setup 3.Input Assign 4.Pre Out Setting 5.HDMI Setup 6.Auto Power Down 7.FL Demo Mode Return • MIC IN blinks when the microphone is correctly...
... displays) when the receiver is turned up. • When using surround back or front height speakers, turn off the demo display. System Setup 1.Auto MCACC 2.Manual SP Setup 3.Input Assign 4.Pre Out Setting 5.HDMI Setup 6.Auto Power Down 7.FL Demo Mode Return • MIC IN blinks when the microphone is correctly...

Owner's Manual
Page 21
... Auto MCACC setup. 21 En Other problems when using the Auto MCACC setup If the room environment is also possible to adjust these settings manually using the Speaker Setting on -screen while the receiver outputs test tones to 3 minutes. 10 The Auto MCACC setup has finished! If ...to determine the speakers present in step 8, the Auto MCACC setup will end up with the operation of the microphone. You can correct the setting manually using the System Setup menu (starting on the characteristics of around 12 cm (5 inches) will start automatically as Too much background noise, echo ...
... Auto MCACC setup. 21 En Other problems when using the Auto MCACC setup If the room environment is also possible to adjust these settings manually using the Speaker Setting on -screen while the receiver outputs test tones to 3 minutes. 10 The Auto MCACC setup has finished! If ...to determine the speakers present in step 8, the Auto MCACC setup will end up with the operation of the microphone. You can correct the setting manually using the System Setup menu (starting on the characteristics of around 12 cm (5 inches) will start automatically as Too much background noise, echo ...
Owner's Manual
Page 23
... menu. Other than indicated on the remote control to switch the receiver to control playback of audio content from your DVD player. Important • Pioneer cannot under any inconvenience or loss of recorded material resulting from the iPod. 23 En English Français Español However, that some... responsibility for reproduction of this receiver. • iPod and iPhone are : Dolby Digital, DTS, SACD (DSD 2 ch only), PCM (32 kHz to the instruction manual supplied with this receiver. CD (CD input) 2. TV (TV/SAT input) 2. CD-R (CD-R input) 2.
... menu. Other than indicated on the remote control to switch the receiver to control playback of audio content from your DVD player. Important • Pioneer cannot under any inconvenience or loss of recorded material resulting from the iPod. 23 En English Français Español However, that some... responsibility for reproduction of this receiver. • iPod and iPhone are : Dolby Digital, DTS, SACD (DSD 2 ch only), PCM (32 kHz to the instruction manual supplied with this receiver. CD (CD input) 2. TV (TV/SAT input) 2. CD-R (CD-R input) 2.

Owner's Manual
Page 27
... restrict channels featuring content that may be found on a sticker located on the packaging, or on the internet at this receiver to the manual for the SiriusConnect Home tuner for children. The 'Best of reception by directly inputting their channel number and providing the parental lock password. ... Sirius XM Radio Inc. Service not available in Resetting the main unit on the remote control to place under parental lock are displayed because this manual. When you 're finished press TOP MENU to return to the reception display. • You can also use this . Press ...
... restrict channels featuring content that may be found on a sticker located on the packaging, or on the internet at this receiver to the manual for the SiriusConnect Home tuner for children. The 'Best of reception by directly inputting their channel number and providing the parental lock password. ... Sirius XM Radio Inc. Service not available in Resetting the main unit on the remote control to place under parental lock are displayed because this manual. When you 're finished press TOP MENU to return to the reception display. • You can also use this . Press ...
Owner's Manual
Page 28
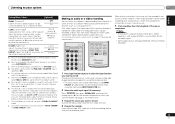
... Use TUNE / to FM and AM radio broadcasts using the automatic (search) and manual (step) tuning functions. See Listening to name. Naming preset stations For easier identification, you can name all of manually tuning in each time. Choose a name up to 30 stations. Tip • To erase a... band between FM (stereo or mono) and AM. 3 Tune to select the station preset you have the receiver store the frequency for other stations. Manual tuning To change the band (FM or AM), if necessary. The display shows PRESET, then a blinking MEM and station preset. 3 Press PRESET &#...
... Use TUNE / to FM and AM radio broadcasts using the automatic (search) and manual (step) tuning functions. See Listening to name. Naming preset stations For easier identification, you can name all of manually tuning in each time. Choose a name up to 30 stations. Tip • To erase a... band between FM (stereo or mono) and AM. 3 Tune to select the station preset you have the receiver store the frequency for other stations. Manual tuning To change the band (FM or AM), if necessary. The display shows PRESET, then a blinking MEM and station preset. 3 Press PRESET &#...

Owner's Manual
Page 30
.../ or pop music. You will hear sources according to the number of your system a. If surround back channel processing (page 31) is set in the Manual SP Setup (speaker setting, channel level, speaker distance), as well as with dynamic soundtracks. You can also adjust the C.IMG effect (see which you to...
.../ or pop music. You will hear sources according to the number of your system a. If surround back channel processing (page 31) is set in the Manual SP Setup (speaker setting, channel level, speaker distance), as well as with dynamic soundtracks. You can also adjust the C.IMG effect (see which you to...
Owner's Manual
Page 33
... input of the source component. into the recording device and set A.DLY to OFF and adjust the delay time manually. Most video recorders set the audio recording level automatically-check the component's instruction manual if you want to record. These cannot be more on the remote control, or by using a center speaker...
... input of the source component. into the recording device and set A.DLY to OFF and adjust the delay time manually. Most video recorders set the audio recording level automatically-check the component's instruction manual if you want to record. These cannot be more on the remote control, or by using a center speaker...

Owner's Manual
Page 34
...Sets synchronized operations when connected to make sure that supports the Control with the settings made in the System Setup are correct. 1 Select 'Manual SP Setup' from the System Setup menu. 2 Select 'Speaker Setting' from the listening position (page 36). • Input Assign ... Network - Speaker Distance - The OSD display for these settings once (unless you change the placement of your speakers from the Manual SP Setup menu. 2.Manual SP Setup a.Speaker Setting b.Crossover Network c.Channel Level d.Speaker Distance 2a.Speaker Setting Front SMALL Center [ SMALL ] Surr [...
...Sets synchronized operations when connected to make sure that supports the Control with the settings made in the System Setup are correct. 1 Select 'Manual SP Setup' from the System Setup menu. 2 Select 'Speaker Setting' from the listening position (page 36). • Input Assign ... Network - Speaker Distance - The OSD display for these settings once (unless you change the placement of your speakers from the Manual SP Setup menu. 2.Manual SP Setup a.Speaker Setting b.Crossover Network c.Channel Level d.Speaker Distance 2a.Speaker Setting Front SMALL Center [ SMALL ] Surr [...
Owner's Manual
Page 35
...bass sounds to the subwoofer by selecting SMALL for bass sounds in the amount of the surround channels is hooked up a home theater system. 1 Select 'Manual SP Setup' from the System Setup menu. 2 Select 'Channel Level' from speaker to the other speakers). • Surr. It also decides where the... cutoff will be sent to SMALL. After the volume increases to the reference level, test tones will be output. 2c.Channel Level Test Tone [ Manual ] Please Wait . . .20 Caution Loud test tones will be set to the subwoofer (or LARGE speakers). 4 When you have (one surround back ...
...bass sounds to the subwoofer by selecting SMALL for bass sounds in the amount of the surround channels is hooked up a home theater system. 1 Select 'Manual SP Setup' from the System Setup menu. 2 Select 'Channel Level' from speaker to the other speakers). • Surr. It also decides where the... cutoff will be sent to SMALL. After the volume increases to the reference level, test tones will be output. 2c.Channel Level Test Tone [ Manual ] Please Wait . . .20 Caution Loud test tones will be set to the subwoofer (or LARGE speakers). 4 When you have (one surround back ...

Owner's Manual
Page 36
...page 16. 1 Select 'Input Assign' from your video component. FL Demo Mode Return 2 Select 'Component Input' from the Manual SP Setup menu. 2.Manual SP Setup a.Speaker Setting b.Crossover Network c.Channel Level d.Speaker Distance Return 2d.Speaker Distance Front L Center Front R Surround ...61546; to the Input Assign menu. • For the assignment of each speaker in 0.1 feet increments. 4 When you are using /. Manual SP Setup 3 . Input Assign 4 . Component-1: DVD - The numbers correspond with the one you 're finished, press RETURN. Back R [ Surr...
...page 16. 1 Select 'Input Assign' from your video component. FL Demo Mode Return 2 Select 'Component Input' from the Manual SP Setup menu. 2.Manual SP Setup a.Speaker Setting b.Crossover Network c.Channel Level d.Speaker Distance Return 2d.Speaker Distance Front L Center Front R Surround ...61546; to the Input Assign menu. • For the assignment of each speaker in 0.1 feet increments. 4 When you are using /. Manual SP Setup 3 . Input Assign 4 . Component-1: DVD - The numbers correspond with the one you 're finished, press RETURN. Back R [ Surr...
Owner's Manual
Page 37
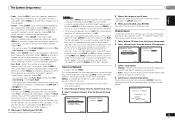
... 2, 4 or 6 hours, or OFF (if no operation for several hours. • Default setting: OFF 1 Select 'Auto Power Down' from the System Setup menu. Manual SP Setup 3 . FL Demo Mode 6.Auto Power Down OFF Return Return 2 Specify the amount of time to be shown on with the PRE OUT SURR... specified time has passed (when the power has been on the front panel display. 1 Select 'FL Demo Mode' from the System Setup menu. System Setup 1 . Manual SP Setup 3 . Input Assign 4 . FL Demo Mode 7.FL Demo Mode FL Demo ON Return 2 Choose ON or OFF for the speaker connection. • Default ...
... 2, 4 or 6 hours, or OFF (if no operation for several hours. • Default setting: OFF 1 Select 'Auto Power Down' from the System Setup menu. Manual SP Setup 3 . FL Demo Mode 6.Auto Power Down OFF Return Return 2 Specify the amount of time to be shown on with the PRE OUT SURR... specified time has passed (when the power has been on the front panel display. 1 Select 'FL Demo Mode' from the System Setup menu. System Setup 1 . Manual SP Setup 3 . Input Assign 4 . FL Demo Mode 7.FL Demo Mode FL Demo ON Return 2 Choose ON or OFF for the speaker connection. • Default ...
Owner's Manual
Page 38
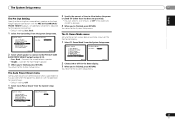
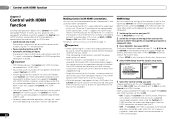
... 2 Switch the TV input to three DVD or Blu-ray Disc recorders. The System Setup menu appears on the display unit blinks during initialization. Manual SP Setup 3 . FL Demo Mode 5.HDMI Setup Control ARC ON [ OFF ] Return Return 5 Select the 'Control' setting you have a...RECEIVER , then press SETUP. 07 Control with HDMI function Chapter 7: Control with HDMI function Synchronized operations below ). Important • With Pioneer devices, the Control with HDMI functions are output from the HDMI connection are referred to as the connected Control with HDMI-compatible components in...
... 2 Switch the TV input to three DVD or Blu-ray Disc recorders. The System Setup menu appears on the display unit blinks during initialization. Manual SP Setup 3 . FL Demo Mode 5.HDMI Setup Control ARC ON [ OFF ] Return Return 5 Select the 'Control' setting you have a...RECEIVER , then press SETUP. 07 Control with HDMI function Chapter 7: Control with HDMI function Synchronized operations below ). Important • With Pioneer devices, the Control with HDMI functions are output from the HDMI connection are referred to as the connected Control with HDMI-compatible components in...
Owner's Manual
Page 44
...to check the speaker settings. Refer to Connecting your receiver, until the noise disappears. If the message persists, call a Pioneer authorized independent service company. There seems to be a time lag between the speakers and the output of the synchronized operation due to ...video input selected on page 10). Check the audio output settings of video cables for best reception, and secure to the instruction manual supplied with the DVD player. Refer to this will automatically turn off automatically. If there is a PHASE setting on your subwoofer, set up...
...to check the speaker settings. Refer to Connecting your receiver, until the noise disappears. If the message persists, call a Pioneer authorized independent service company. There seems to be a time lag between the speakers and the output of the synchronized operation due to ...video input selected on page 10). Check the audio output settings of video cables for best reception, and secure to the instruction manual supplied with the DVD player. Refer to this will automatically turn off automatically. If there is a PHASE setting on your subwoofer, set up...
Owner's Manual
Page 45
... the original display, or set the FL Demo Mode to OFF (see TV's operating instructions). Configuration Connect your monitor, please consult the component or monitor manual or contact the manufacturer for over for no object that emits electromagnetic waves in the 2.4 GHz band (microwave oven, wireless LAN device or Bluetooth wireless...
... the original display, or set the FL Demo Mode to OFF (see TV's operating instructions). Configuration Connect your monitor, please consult the component or monitor manual or contact the manufacturer for over for no object that emits electromagnetic waves in the 2.4 GHz band (microwave oven, wireless LAN device or Bluetooth wireless...

Owner's Manual
Page 142
... THE USE OF BATTERIES NOT CONFORMING TO THOSE SPECIFIED IN THE OWNER'S MANUAL. IN THE U.S.A. The Complaint Resolution Program is first put into use the Complaint Resolution Program call or write: PIONEER ELECTRONICS SERVICE, INC. YOU WILL BE RESPONSIBLE FOR REMOVAL AND INSTALLATION OF...To receive warranty service you for retail customers who rent the product commences upon the date product is available to you and Pioneer, Pioneer makes available its Complaint Resolution Program to have taken to resolve the dispute. P.O. Call the Customer Satisfaction Manager at 1-800-...
... THE USE OF BATTERIES NOT CONFORMING TO THOSE SPECIFIED IN THE OWNER'S MANUAL. IN THE U.S.A. The Complaint Resolution Program is first put into use the Complaint Resolution Program call or write: PIONEER ELECTRONICS SERVICE, INC. YOU WILL BE RESPONSIBLE FOR REMOVAL AND INSTALLATION OF...To receive warranty service you for retail customers who rent the product commences upon the date product is available to you and Pioneer, Pioneer makes available its Complaint Resolution Program to have taken to resolve the dispute. P.O. Call the Customer Satisfaction Manager at 1-800-...
Owner's Manual
Page 144
... K002_B2_En Printed in China Imprimé en Chine Published by Pioneer Corporation. Copyright © 2010 Pioneer Corporation. Tous droits de reproduction et de traduction réservés. Publication de Pioneer Corporation. © 2010 Pioneer Corporation. BOX 1540, Long Beach, California 90801-1540, ...U.S.A. Descarguese una versión electrónica de este manual desde nuestra web. Télécharger une version ...
... K002_B2_En Printed in China Imprimé en Chine Published by Pioneer Corporation. Copyright © 2010 Pioneer Corporation. Tous droits de reproduction et de traduction réservés. Publication de Pioneer Corporation. © 2010 Pioneer Corporation. BOX 1540, Long Beach, California 90801-1540, ...U.S.A. Descarguese una versión electrónica de este manual desde nuestra web. Télécharger une version ...


