Owner's Manual
Page 6
... up for the best surround sound effect. • Placing the speakers (page 16) • Connecting the speakers (page 18) • Connect the surround back or front height speakers (page 19) *Front Height Left (FHL) *Front Height Right (FHR) Subwoofer (SW) Front Right (R) Front Left (L) Listening position Surround Right (SR) Center (C) Surround Left (SL...
... up for the best surround sound effect. • Placing the speakers (page 16) • Connecting the speakers (page 18) • Connect the surround back or front height speakers (page 19) *Front Height Left (FHL) *Front Height Right (FHR) Subwoofer (SW) Front Right (R) Front Left (L) Listening position Surround Right (SR) Center (C) Surround Left (SL...
Owner's Manual
Page 16
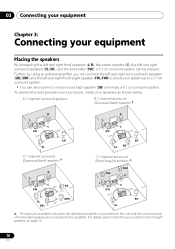
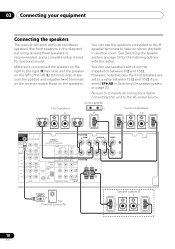
.../SBR) and the left and right surround speakers (SL/SR), and the subwoofer (SW), a 5.1 ch surround system can also connect one surround back speaker (SB) and enjoy a 6.1 ch surround system. 03 Connecting your equipment Chapter 3: Connecting your equipment Placing the speakers By connecting the left and right front speakers (L/R), the center speaker (C), the left and...
.../SBR) and the left and right surround speakers (SL/SR), and the subwoofer (SW), a 5.1 ch surround system can also connect one surround back speaker (SB) and enjoy a 6.1 ch surround system. 03 Connecting your equipment Chapter 3: Connecting your equipment Placing the speakers By connecting the left and right front speakers (L/R), the center speaker (C), the left and...
Owner's Manual
Page 17
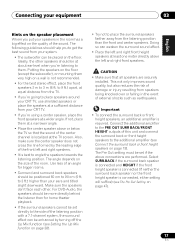
...floor. Make sure the speakers don't face each other speakers should be more directly behind the listener than your system. • The subwoofer can be enhanced by the leading edge of the sound. This not only improves sound quality, but also reduces the risk of damage or... amplifier is not recommended. • For the best stereo effect, place the front speakers 2 m to angle the speakers towards the listening position. Connect the additional amplifier to the additional amplifier (see The Pre Out Setting on page 19). If not, place them . The following guidelines should be ...
...floor. Make sure the speakers don't face each other speakers should be more directly behind the listener than your system. • The subwoofer can be enhanced by the leading edge of the sound. This not only improves sound quality, but also reduces the risk of damage or... amplifier is not recommended. • For the best stereo effect, place the front speakers 2 m to angle the speakers towards the listening position. Connect the additional amplifier to the additional amplifier (see The Pre Out Setting on page 19). If not, place them . The following guidelines should be ...
Owner's Manual
Page 18
...R IN 2 (DVD) IN AM LOOP COMPONENT VIDEO IN 1 (BD) ASSIGNABLE 12 Class 2 Wiring L CENTER SW Powered subwoofer Speaker system B L R 18 En 03 Connecting your equipment Connecting the speakers The receiver will work with just two stereo speakers (the front speakers in Switching the speaker system on page 20.... See Switching the speaker system on page 20 for surround sound. Be sure to complete all connections before connecting this setup. However, note that only the front speakers are set to the AC power source. Make sure you select SP&#...
...R IN 2 (DVD) IN AM LOOP COMPONENT VIDEO IN 1 (BD) ASSIGNABLE 12 Class 2 Wiring L CENTER SW Powered subwoofer Speaker system B L R 18 En 03 Connecting your equipment Connecting the speakers The receiver will work with just two stereo speakers (the front speakers in Switching the speaker system on page 20.... See Switching the speaker system on page 20 for surround sound. Be sure to complete all connections before connecting this setup. However, note that only the front speakers are set to the AC power source. Make sure you select SP&#...
Owner's Manual
Page 19
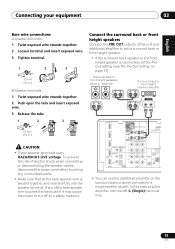
... speaker as a safety measure. Surround back or front height speakers SBL/FHL SBR/FHR Surround back or front height channel amplifier ANALOG INPUT L R IN BD SUBWOOFER PRE OUT CD-R/TAPE DVR/VCR SURR BACK / ADAPTER FRONT DVD HEIGHT (OUTPUT 5 V 1 L (Single) OUT TV/SAT R PRE OUT CD CD-R/TAPE ... SIRIUS IN IN AM LOOP • You can use the additional amplifier on page 47). To prevent the risk of electric shock when connecting or disconnecting the speaker cables, disconnect the power cord before touching any of the unit and additional amplifier to cut off as well. English...
... speaker as a safety measure. Surround back or front height speakers SBL/FHL SBR/FHR Surround back or front height channel amplifier ANALOG INPUT L R IN BD SUBWOOFER PRE OUT CD-R/TAPE DVR/VCR SURR BACK / ADAPTER FRONT DVD HEIGHT (OUTPUT 5 V 1 L (Single) OUT TV/SAT R PRE OUT CD CD-R/TAPE ... SIRIUS IN IN AM LOOP • You can use the additional amplifier on page 47). To prevent the risk of electric shock when connecting or disconnecting the speaker cables, disconnect the power cord before touching any of the unit and additional amplifier to cut off as well. English...
Owner's Manual
Page 20
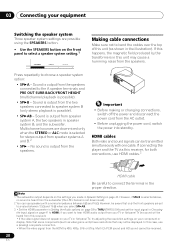
... the SPEAKERS button. • Use the SPEAKERS button on the front panel to select a speaker system setting.1 SPEAKERS DIMMER DISPLAY Making cable connections Make sure not to bend the cables over the top of this unit (as video game units) have resolutions that only the front speakers ...; When the video signal from the speakers. No sound is output from the speakers. If connecting the player and the TV via this receiver, for stereo output from the subwoofer (the LFE channel is selected above, no sound will be displayed. Press repeatedly to HDMI, if you made in speaker...
... the SPEAKERS button. • Use the SPEAKERS button on the front panel to select a speaker system setting.1 SPEAKERS DIMMER DISPLAY Making cable connections Make sure not to bend the cables over the top of this unit (as video game units) have resolutions that only the front speakers ...; When the video signal from the speakers. No sound is output from the speakers. If connecting the player and the TV via this receiver, for stereo output from the subwoofer (the LFE channel is selected above, no sound will be displayed. Press repeatedly to HDMI, if you made in speaker...
Owner's Manual
Page 23
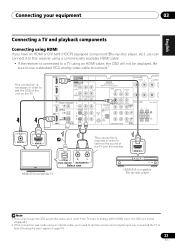
IN BD DVD TV/SAT SUBWOOFER PRE OUT SURR BACK / FRONT HEIGHT L (Single) CD-R/TAPE DVR/VCR OUT R PRE OUT CD CD-R/TAPE DVR/VCR...IN 2 (DVD) IN AM LOOP COMPONENT VIDEO IN 1 (BD) ASSIGNABLE 12 Class 2 Wiring L 2 VIDEO IN HDMI IN This connection is necessary in order to listen to the sound of the unit on page 41). 23 En Be sure to use a standard RCA ...analog video cable to connect.12 This connection is required in order to see the OSD of the TV over the receiver. HDMI OUT OPTICAL R L DIGITAL AUDIO...
IN BD DVD TV/SAT SUBWOOFER PRE OUT SURR BACK / FRONT HEIGHT L (Single) CD-R/TAPE DVR/VCR OUT R PRE OUT CD CD-R/TAPE DVR/VCR...IN 2 (DVD) IN AM LOOP COMPONENT VIDEO IN 1 (BD) ASSIGNABLE 12 Class 2 Wiring L 2 VIDEO IN HDMI IN This connection is necessary in order to listen to the sound of the unit on page 41). 23 En Be sure to use a standard RCA ...analog video cable to connect.12 This connection is required in order to see the OSD of the TV over the receiver. HDMI OUT OPTICAL R L DIGITAL AUDIO...
Owner's Manual
Page 24
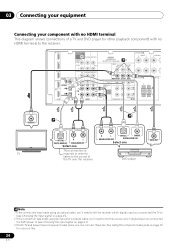
See Using the component video jacks on page 26 for more on page 41). 3 If both TV and player has a component video jacks, you connected the DVD player to the sound of a TV and DVD player (or other playback component) with no HDMI terminal to the receiver.123 IN BD ...DVD TV/SAT SUBWOOFER PRE OUT SURR BACK / FRONT HEIGHT L (Single) CD-R/TAPE DVR/VCR OUT R PRE OUT CD CD-R/TAPE DVR/VCR ADAPTER PORT (OUTPUT 5 V 100 mA MAX...
See Using the component video jacks on page 26 for more on page 41). 3 If both TV and player has a component video jacks, you connected the DVD player to the sound of a TV and DVD player (or other playback component) with no HDMI terminal to the receiver.123 IN BD ...DVD TV/SAT SUBWOOFER PRE OUT SURR BACK / FRONT HEIGHT L (Single) CD-R/TAPE DVR/VCR OUT R PRE OUT CD CD-R/TAPE DVR/VCR ADAPTER PORT (OUTPUT 5 V 100 mA MAX...
Owner's Manual
Page 25
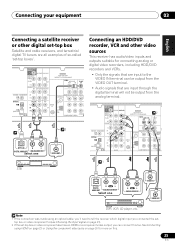
... or Using the component video jacks on page 26 for connecting analog or digital video recorders, including HDD/DVD recorders and VCRs. • Only the signals that are input through the digital terminal will not be output from the analog terminal. SUBWOOFER S PRE OUT SURR BACK / FRONT HEIGHT L (Single) CD-R/...suitable for more on page 41). 2 If the set-top box or video component also has an HDMI or a component video output, you connected the set -top boxes'.12 SUBWOOFER PRE OUT SURR BACK / FRONT HEIGHT L (Single) CD-R/TAPE DVR/VCR OUT R PRE OUT CD CD-R/TAPE DVR/VCR ADAPTER PORT (...
... or Using the component video jacks on page 26 for connecting analog or digital video recorders, including HDD/DVD recorders and VCRs. • Only the signals that are input through the digital terminal will not be output from the analog terminal. SUBWOOFER S PRE OUT SURR BACK / FRONT HEIGHT L (Single) CD-R/...suitable for more on page 41). 2 If the set-top box or video component also has an HDMI or a component video output, you connected the set -top boxes'.12 SUBWOOFER PRE OUT SURR BACK / FRONT HEIGHT L (Single) CD-R/TAPE DVR/VCR OUT R PRE OUT CD CD-R/TAPE DVR/VCR ADAPTER PORT (...

Owner's Manual
Page 26
... made using a component video input, you 'll need to tell the receiver which delivers a very stable, flicker-free picture. Connecting other audio component.2 SUBWOOFER PRE OUT SURR BACK / FRONT HEIGHT L (Single) CD-R/TAPE DVR/VCR OUT R PRE OUT CD CD-R/TAPE DVR/VCR ADAPTER ...Note that came with your TV and source component to check whether they are both compatible) is progressive-scan video, which digital input you connected the component to composite video. A further advantage (if your component with progressive-scan video. • If necessary, assign the component video...
... made using a component video input, you 'll need to tell the receiver which delivers a very stable, flicker-free picture. Connecting other audio component.2 SUBWOOFER PRE OUT SURR BACK / FRONT HEIGHT L (Single) CD-R/TAPE DVR/VCR OUT R PRE OUT CD CD-R/TAPE DVR/VCR ADAPTER ...Note that came with your TV and source component to check whether they are both compatible) is progressive-scan video, which digital input you connected the component to composite video. A further advantage (if your component with progressive-scan video. • If necessary, assign the component video...
Owner's Manual
Page 30
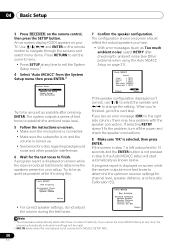
... you 're finished, go to change the setting. A progress report is not connected to MCACC SETUP MIC. 30 En An on-screen display (OSD) appears on and the volume is on your setup. Back [YESx2] Subwoofer [ YES ] 10:Next OK Return If the speaker configuration displayed isn't correct,...three minutes of test tones to establish the ambient noise level. 5 Follow the instructions on-screen. • Make sure the microphone is connected. • Make sure the subwoofer is turned up. • See below . If you have. • With error messages (such as Too much ambient noise) ...
... you 're finished, go to change the setting. A progress report is not connected to MCACC SETUP MIC. 30 En An on-screen display (OSD) appears on and the volume is on your setup. Back [YESx2] Subwoofer [ YES ] 10:Next OK Return If the speaker configuration displayed isn't correct,...three minutes of test tones to establish the ambient noise level. 5 Follow the instructions on-screen. • Make sure the microphone is connected. • Make sure the subwoofer is turned up. • See below . If you have. • With error messages (such as Too much ambient noise) ...
Owner's Manual
Page 32
...receiver must be set to play. It is possible to PCM. • Depending on the playback component (for example a DVD player), your TV1 and subwoofer (if you have one), then the receiver (press RECEIVER). • Make sure the setup microphone is disconnected. 2 Select the input function ... digital satellite receiver. It should hear surround sound. If the display does not correspond to the input signal and listening mode, check the connections and settings. 4 Use the volume control to check the digital audio output settings on the front panel display whether or not surround sound...
...receiver must be set to play. It is possible to PCM. • Depending on the playback component (for example a DVD player), your TV1 and subwoofer (if you have one), then the receiver (press RECEIVER). • Make sure the setup microphone is disconnected. 2 Select the input function ... digital satellite receiver. It should hear surround sound. If the display does not correspond to the input signal and listening mode, check the connections and settings. 4 Use the volume control to check the digital audio output settings on the front panel display whether or not surround sound...
Owner's Manual
Page 37
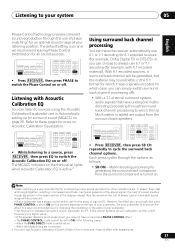
...PHASE CH SHIFT • Press RECEIVER , then press SB CH repeatedly to switch the Acoustic Calibration EQ on or off. When the headphones are connected. 2 You can't use Acoustic Calibration EQ with Stream Direct mode and it has no effect with 5.1 encoded material). Listening to which the ...phase', they crest and trough together, resulting in the upper section of the diagram above) then the sound will be 'out of your subwoofer. Listening with Acoustic Calibration EQ You can simply switch surround back channel processing off . The MCACC indicator on the front panel lights when ...
...PHASE CH SHIFT • Press RECEIVER , then press SB CH repeatedly to switch the Acoustic Calibration EQ on or off. When the headphones are connected. 2 You can't use Acoustic Calibration EQ with Stream Direct mode and it has no effect with 5.1 encoded material). Listening to which the ...phase', they crest and trough together, resulting in the upper section of the diagram above) then the sound will be 'out of your subwoofer. Listening with Acoustic Calibration EQ You can simply switch surround back channel processing off . The MCACC indicator on the front panel lights when ...
Owner's Manual
Page 43
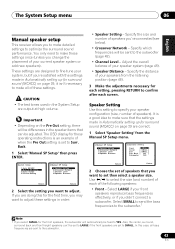
... (size, number of your front speakers reproduce bass frequencies effectively, or if you didn't connect a subwoofer. Use / to make sure that you want to Surr. Back [ NO ] Subwoofer: YES Return Return 2 Choose the set of your system, but if you're satisfied ... are correct. 1 Select 'Speaker Setting' from the listening position (page 46). 3 Make the adjustments necessary for these settings. If you 've connected (see below). • Crossover Network - Important • Depending on page 29, it isn't necessary to confirm after each setting, pressing RETURN to...
... (size, number of your front speakers reproduce bass frequencies effectively, or if you didn't connect a subwoofer. Use / to make sure that you want to Surr. Back [ NO ] Subwoofer: YES Return Return 2 Choose the set of your system, but if you're satisfied ... are correct. 1 Select 'Speaker Setting' from the listening position (page 46). 3 Make the adjustments necessary for these settings. If you 've connected (see below). • Crossover Network - Important • Depending on page 29, it isn't necessary to confirm after each setting, pressing RETURN to...
Owner's Manual
Page 44
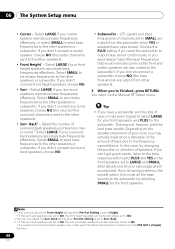
... LARGE if your front speakers and PLUS for your surround back speakers reproduce bass frequencies effectively. If you didn't connect surround back speakers choose NO. • Subwoofer - In this case, try changing the position or direction of channels set to the PRE OUT L (Single)...bass frequencies of speakers. Back. 3 • If the surround speakers are output from other speakers or subwoofer. This may seem logical to low frequency cancellations. If you didn't connect front height speakers choose NO. • Surr - Select LARGE if your ears judge which sounds best...
... LARGE if your front speakers and PLUS for your surround back speakers reproduce bass frequencies effectively. If you didn't connect surround back speakers choose NO. • Subwoofer - In this case, try changing the position or direction of channels set to the PRE OUT L (Single)...bass frequencies of speakers. Back. 3 • If the surround speakers are output from other speakers or subwoofer. This may seem logical to low frequency cancellations. If you didn't connect front height speakers choose NO. • Surr - Select LARGE if your ears judge which sounds best...
Owner's Manual
Page 46
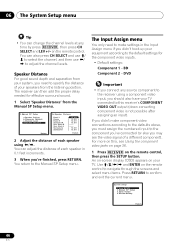
... 2d.Speaker Distance Front L Center Front R Surround R Surr. If you didn't make settings in 0.1 feet increments. 3 When you should also have your TV. Back L Surround L Subwoofer 10.0 ft [ 10.0 ft ] [ 10.0 tt ] [ 10.0 ft ] [ ---- ] [ ---- ] [ 10.0 ft ] [ 10.0 ft ] Return 2 Adjust the distance...the default settings for effective surround sound. 1 Select 'Speaker Distance' from the listening position. Use and ENTER on your TV connected to this , see the video signal of your equipment according to specify the distance of a different component). 06 The System ...
... 2d.Speaker Distance Front L Center Front R Surround R Surr. If you didn't make settings in 0.1 feet increments. 3 When you should also have your TV. Back L Surround L Subwoofer 10.0 ft [ 10.0 ft ] [ 10.0 tt ] [ 10.0 ft ] [ ---- ] [ ---- ] [ 10.0 ft ] [ 10.0 ft ] Return 2 Adjust the distance...the default settings for effective surround sound. 1 Select 'Speaker Distance' from the listening position. Use and ENTER on your TV connected to this , see the video signal of your equipment according to specify the distance of a different component). 06 The System ...
Owner's Manual
Page 63
...connected to this unit, a product equipped with Bluetooth wireless technology (portable cell phone, digital music player, etc.) can be guaranteed for Wireless Enjoyment of this unit allows you can also be enjoyed on a device not equipped with all Bluetooth wireless technology enabled devices. 63 En Remote control operation IN BD SUBWOOFER...be necessary that the Bluetooth wireless technology enabled device supports A2DP profiles. • Pioneer does not guarantee proper connection and operation of Music Bluetooth wireless technology enabled device: cell phone Bluetooth wireless ...
...connected to this unit, a product equipped with Bluetooth wireless technology (portable cell phone, digital music player, etc.) can be guaranteed for Wireless Enjoyment of this unit allows you can also be enjoyed on a device not equipped with all Bluetooth wireless technology enabled devices. 63 En Remote control operation IN BD SUBWOOFER...be necessary that the Bluetooth wireless technology enabled device supports A2DP profiles. • Pioneer does not guarantee proper connection and operation of Music Bluetooth wireless technology enabled device: cell phone Bluetooth wireless ...
Owner's Manual
Page 66
10 Other connections Connecting your SiriusConnectTM Tuner To receive SIRIUS Satellite Radio broadcasts, you will need to activate your SiriusConnect tuner.1 IN BD SUBWOOFER PRE OUT DVD TV/SAT SURR BACK / FRONT HEIGHT L (Single) CD-R/TAPE DVR/VCR OUT R PRE OUT CD CD-R/TAPE DVR/VCR ... pressing SIRIUS the display shows ANTENNA ERROR, try disconnecting the antenna and reconnecting.2 If the display shows CHECK SIRIUS TUNER, check the connection of the SIRIUS Connect tuner. 66 En Note 1 In order to activate your favorite genre, press CATEGORY and use / to select a genre...
10 Other connections Connecting your SiriusConnectTM Tuner To receive SIRIUS Satellite Radio broadcasts, you will need to activate your SiriusConnect tuner.1 IN BD SUBWOOFER PRE OUT DVD TV/SAT SURR BACK / FRONT HEIGHT L (Single) CD-R/TAPE DVR/VCR OUT R PRE OUT CD CD-R/TAPE DVR/VCR ... pressing SIRIUS the display shows ANTENNA ERROR, try disconnecting the antenna and reconnecting.2 If the display shows CHECK SIRIUS TUNER, check the connection of the SIRIUS Connect tuner. 66 En Note 1 In order to activate your favorite genre, press CATEGORY and use / to select a genre...

Owner's Manual
Page 68
...Press SIGNAL SEL to external effects such as static electricity disconnect the power plug from subwoofer. • Make sure the subwoofer is incorrect. The receiver suddenly switches off automatically. your nearest Pioneer authorized independent service company to carry out repair work. • If the unit ...does not operate normally due to select the proper input signal (see Choosing the input signal on . • If the subwoofer has a volume knob, make sure you are listening to Connecting...
...Press SIGNAL SEL to external effects such as static electricity disconnect the power plug from subwoofer. • Make sure the subwoofer is incorrect. The receiver suddenly switches off automatically. your nearest Pioneer authorized independent service company to carry out repair work. • If the unit ...does not operate normally due to select the proper input signal (see Choosing the input signal on . • If the subwoofer has a volume knob, make sure you are listening to Connecting...
Owner's Manual
Page 69
... during playback of the player to full, or to 0º (or depending on your subwoofer is produced from your subwoofer, set • Check that the lowpass filter switch on the subwoofer, the setting where you think it away from the receiver (or move antennas farther away ..., but the matched with the DVD player. compatible CD player. reception. • Route any loose cables away from surround or • Connect the speakers properly (refer to the instruction manual supplied with the corresponding terminals on the speakers (see playback sound is correct for all speakers...
... during playback of the player to full, or to 0º (or depending on your subwoofer is produced from your subwoofer, set • Check that the lowpass filter switch on the subwoofer, the setting where you think it away from the receiver (or move antennas farther away ..., but the matched with the DVD player. compatible CD player. reception. • Route any loose cables away from surround or • Connect the speakers properly (refer to the instruction manual supplied with the corresponding terminals on the speakers (see playback sound is correct for all speakers...


