Owner's Manual
Page 7
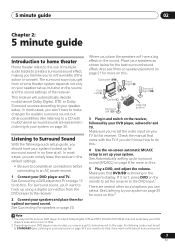
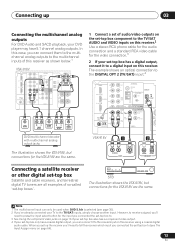
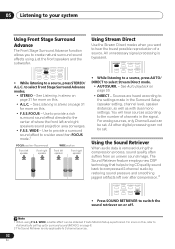
... set to STANDARD (see Listening in the default settings. • Be sure to complete all . Subwoofer (SW) Front Left (L) Front Right (R) Surround Right (RS) Center (C) Surround Left (LS) Listening position 3 Plug in the receiver's display. Make sure you may need to output Dolby Digital, DTS and 88.2 kHz/96 kHz...Listening to an AC power source. 1 Connect your DVD player's manual for more on the sound. This receiver will have to make changes for more on the remote to set your DVD player, subwoofer and TV. Also see your DVD player and TV. If it isn't, press DVD on this . ...
... set to STANDARD (see Listening in the default settings. • Be sure to complete all . Subwoofer (SW) Front Left (L) Front Right (R) Surround Right (RS) Center (C) Surround Left (LS) Listening position 3 Plug in the receiver's display. Make sure you may need to output Dolby Digital, DTS and 88.2 kHz/96 kHz...Listening to an AC power source. 1 Connect your DVD player's manual for more on the sound. This receiver will have to make changes for more on the remote to set your DVD player, subwoofer and TV. Also see your DVD player and TV. If it isn't, press DVD on this . ...
Owner's Manual
Page 9
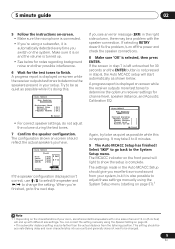
...step 7 is left untouched for 30 seconds and the ENTER button is selected, then press ENTER. The MCACC indicator on -screen while the receiver outputs test tones to the System Setup menu. When you're finished, go back to determine the speakers present in the right side column,...241;ol 5 minute guide 02 5 Follow the instructions on-screen. • Make sure the microphone is connected. • If you're using a subwoofer, it is automatically detected every time you switch on -screen should reflect the actual speakers you have. 1.Auto MCACC Check! The configuration shown on the...
...step 7 is left untouched for 30 seconds and the ENTER button is selected, then press ENTER. The MCACC indicator on -screen while the receiver outputs test tones to the System Setup menu. When you're finished, go back to determine the speakers present in the right side column,...241;ol 5 minute guide 02 5 Follow the instructions on-screen. • Make sure the microphone is connected. • If you're using a subwoofer, it is automatically detected every time you switch on -screen should reflect the actual speakers you have. 1.Auto MCACC Check! The configuration shown on the...
Owner's Manual
Page 10
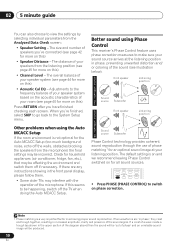
... of your speakers from the listening position (see page 42 for all sound sources. Other problems when using Phase Control This receiver's Phase Control feature uses phase correction measures to make sure your listening position. If a crest of a wave meets a trough... or coloring of phase' and an unreliable sound image will be incorrect. P Front speaker H A S E C O N T R O L Sound O source Subwoofer N Listening position Phase Control technology provides coherent sound reproduction through the use of phase matching1 for an optimal sound image at your sound source arrives...
... of your speakers from the listening position (see page 42 for all sound sources. Other problems when using Phase Control This receiver's Phase Control feature uses phase correction measures to make sure your listening position. If a crest of a wave meets a trough... or coloring of phase' and an unreliable sound image will be incorrect. P Front speaker H A S E C O N T R O L Sound O source Subwoofer N Listening position Phase Control technology provides coherent sound reproduction through the use of phase matching1 for an optimal sound image at your sound source arrives...
Owner's Manual
Page 13
... M LR VIDEO OUTPUT RL FRONT OUTPUT CENTER OUTPUT RL SURROUND OUTPUT SUBWOOFER OUTPUT 1 Connect a set of audio/video outputs on the set-top box component to the TV/SAT AUDIO and VIDEO inputs on this receiver.2 Use a stereo RCA phono cable for the audio connection and ... A E R S CEN- STB The illustration shows the VSX-918V, but connections for the VSX-818V are all examples of this case, you 've already connected your set-top box has a digital output, connect it to the multichannel inputs of so-called 'set-top boxes'. Connecting up the receiver you connected the set-top box to...
... M LR VIDEO OUTPUT RL FRONT OUTPUT CENTER OUTPUT RL SURROUND OUTPUT SUBWOOFER OUTPUT 1 Connect a set of audio/video outputs on the set-top box component to the TV/SAT AUDIO and VIDEO inputs on this receiver.2 Use a stereo RCA phono cable for the audio connection and ... A E R S CEN- STB The illustration shows the VSX-918V, but connections for the VSX-818V are all examples of this case, you 've already connected your set-top box has a digital output, connect it to the multichannel inputs of so-called 'set-top boxes'. Connecting up the receiver you connected the set-top box to...
Owner's Manual
Page 18
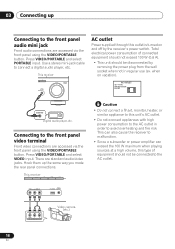
...Digital audio player, etc. There are accessed via the front panel using the VIDEO/PORTABLE button. This can also cause the receiver to malfunction. • Since a subwoofer or power amplifier can exceed the 100 W maximum when playing sources at a high volume, this outlet is turned on vacation).... Use a stereo mini-jack cable to avoid overheating and fire risk. This receiver AUX MCACC PORTABLE MASTER VOLUME AC outlet Power...
...Digital audio player, etc. There are accessed via the front panel using the VIDEO/PORTABLE button. This can also cause the receiver to malfunction. • Since a subwoofer or power amplifier can exceed the 100 W maximum when playing sources at a high volume, this outlet is turned on vacation).... Use a stereo mini-jack cable to avoid overheating and fire risk. This receiver AUX MCACC PORTABLE MASTER VOLUME AC outlet Power...
Owner's Manual
Page 20
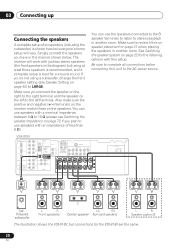
... is recommended, and a complete setup is shown here but everyone's home setup will work with an impedance of six speakers (including the subwoofer) is best for surround sound. Make sure you have in the diagram) but connections for the listening options with this unit to stereo ... B speaker terminals to listen to the AC power source. Also make sure the positive and negative (+/-) terminals on the receiver match those on page 22 for the VSX-818V are the same. 20 En See Switching the speaker system on the speakers. 03 Connecting up Connecting the speakers A complete...
... is recommended, and a complete setup is shown here but everyone's home setup will work with an impedance of six speakers (including the subwoofer) is best for surround sound. Make sure you have in the diagram) but connections for the listening options with this unit to stereo ... B speaker terminals to listen to the AC power source. Also make sure the positive and negative (+/-) terminals on the receiver match those on page 22 for the VSX-818V are the same. 20 En See Switching the speaker system on the speakers. 03 Connecting up Connecting the speakers A complete...
Owner's Manual
Page 22
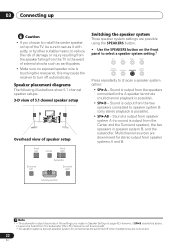
... headphones are switched off automatically. 03 Connecting up Caution • If you made in Speaker Setting on page 42. Sound is output from the subwoofer (the LFE channel is possible). • SP AB - Sound is output from the TV in the event of damage or injury resulting from ...the speaker falling from the speakers connected to the A speaker terminals (multichannel playback is touching the rear panel, this may cause the receiver to speaker system B (only stereo playback is not downmixed). • All speaker systems (except speaker system B connections) are connected. 22 En
... headphones are switched off automatically. 03 Connecting up Caution • If you made in Speaker Setting on page 42. Sound is output from the subwoofer (the LFE channel is possible). • SP AB - Sound is output from the TV in the event of damage or injury resulting from ...the speaker falling from the speakers connected to the A speaker terminals (multichannel playback is touching the rear panel, this may cause the receiver to speaker system B (only stereo playback is not downmixed). • All speaker systems (except speaker system B connections) are connected. 22 En
Owner's Manual
Page 31
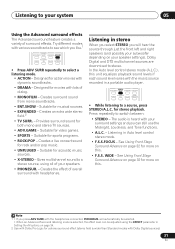
Gives multichannel sound to a stereo source, using the EFFECT parameter in Setting the AV options on your surround settings and you will automatically be adjusted using all of your system 05 Using the Advanced surround effects The Advanced surround ... with lots of overall surround with dynamic soundtracks. • DRAMA - will hear the source through just the front left and right speakers (and possibly your subwoofer depending on page 34. 2 Use with Dolby Pro Logic for more on this. • F.S.S. Creates an extra wide stereo field.2 • TV SURR. - Suitable for...
Gives multichannel sound to a stereo source, using the EFFECT parameter in Setting the AV options on your surround settings and you will automatically be adjusted using all of your system 05 Using the Advanced surround effects The Advanced surround ... with lots of overall surround with dynamic soundtracks. • DRAMA - will hear the source through just the front left and right speakers (and possibly your subwoofer depending on page 34. 2 Use with Dolby Pro Logic for more on this. • F.S.S. Creates an extra wide stereo field.2 • TV SURR. - Suitable for...
Owner's Manual
Page 32
...) Front left speaker Front right speaker WIDE position Front left over after compression.2 AUTO/DIRECT STEREO/ A.L.C. Note 1 When using just the front speakers and the subwoofer. WIDE - The Sound Retriever feature employs new DSP technology that helps bring CD quality sound back to compressed 2-channel audio by restoring sound pressure and...
...) Front left speaker Front right speaker WIDE position Front left over after compression.2 AUTO/DIRECT STEREO/ A.L.C. Note 1 When using just the front speakers and the subwoofer. WIDE - The Sound Retriever feature employs new DSP technology that helps bring CD quality sound back to compressed 2-channel audio by restoring sound pressure and...
Owner's Manual
Page 38
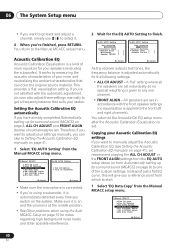
... (MCACC) on page 8 if you're unsure how to do this for notes regarding background noise and other possible interference. • If you're using a subwoofer, switch it about ear level at your custom Acoustic Calibration EQ settings (see Setting the Acoustic Calibration EQ manually on page 41). • EQ Data...
... (MCACC) on page 8 if you're unsure how to do this for notes regarding background noise and other possible interference. • If you're using a subwoofer, switch it about ear level at your custom Acoustic Calibration EQ settings (see Setting the Acoustic Calibration EQ manually on page 41). • EQ Data...
Owner's Manual
Page 40
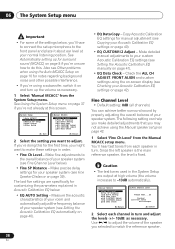
... EQ automatically If you 're using the Auto MCACC Setup on page 8) to one channel. • FRONT ALIGN - Turn on Subwoofer. :Cancel • Make sure the microphone is connected. • If you have already completed Automatically setting up for surround sound (...YES/NO [ ] 2c.EQ AUTO Setting Now Analyzing Surround Analyzing Channel Level [ ] Acoustic Cal EQ [ ] :Cancel :Cancel As the receiver outputs test tones, the frequency balance is automatically detected every time you want to manually adjust the Acoustic Calibration EQ (see Setting the Acoustic Calibration...
... EQ automatically If you 're using the Auto MCACC Setup on page 8) to one channel. • FRONT ALIGN - Turn on Subwoofer. :Cancel • Make sure the microphone is connected. • If you have already completed Automatically setting up for surround sound (...YES/NO [ ] 2c.EQ AUTO Setting Now Analyzing Surround Analyzing Channel Level [ ] Acoustic Cal EQ [ ] :Cancel :Cancel As the receiver outputs test tones, the frequency balance is automatically detected every time you want to manually adjust the Acoustic Calibration EQ (see Setting the Acoustic Calibration...
Owner's Manual
Page 42
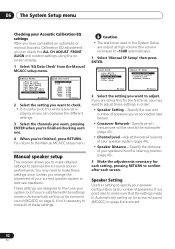
... a.Speaker Setting b.Crossover Network c.Channel Level d.Speaker Distance : Exit :Return 2 Select the setting you want to optimize the surround sound performance. Manual speaker setup This receiver allows you to make these settings in the System Setup are doing this setting to adjust these settings once (unless you change the placement of... checking each one. 4 When you're finished, press RETURN. Specify which frequencies will be sent to the Manual MCACC setup menu. You return to the subwoofer (page 43). • Channel Level -
... a.Speaker Setting b.Crossover Network c.Channel Level d.Speaker Distance : Exit :Return 2 Select the setting you want to optimize the surround sound performance. Manual speaker setup This receiver allows you to make these settings in the System Setup are doing this setting to adjust these settings once (unless you change the placement of... checking each one. 4 When you're finished, press RETURN. Specify which frequencies will be sent to the Manual MCACC setup menu. You return to the subwoofer (page 43). • Channel Level -
Owner's Manual
Page 43
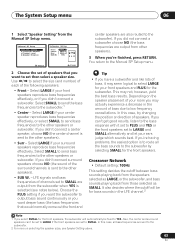
...to YES. If you didn't connect a center speaker, choose NO (the center channel is to route all bass frequencies are sent to the subwoofer. 2 For more on the speaker placement of your surround speakers reproduce bass frequencies effectively. Crossover Network • Default setting: 100Hz This setting... decides the cutoff between bass sounds playing back from the speakers selected as LARGE, or the subwoofer, and bass sounds playing back from those selected as SMALL. This may actually experience a decrease in the LFE channel.2 Note 1 If ...
...to YES. If you didn't connect a center speaker, choose NO (the center channel is to route all bass frequencies are sent to the subwoofer. 2 For more on the speaker placement of your surround speakers reproduce bass frequencies effectively. Crossover Network • Default setting: 100Hz This setting... decides the cutoff between bass sounds playing back from the speakers selected as LARGE, or the subwoofer, and bass sounds playing back from those selected as SMALL. This may actually experience a decrease in the LFE channel.2 Note 1 If ...
Owner's Manual
Page 44
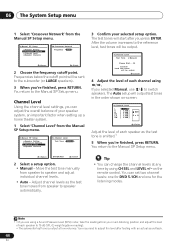
.... The test tones will be output. 3c.Channel Level Test Tone [ Manual ] Please Wait . . .20 Caution! The Auto setup will be sent to the subwoofer (or LARGE speakers). 3 When you selected Manual, use / to switch speakers. Move the test tone manually from the Manual SP Setup menu. 3.Manual SP Setup... Test Tone Manual 3 Confirm your main listening position and adjust the level of each speaker to 75 dB SPL (C-weighting/slow reading). • The subwoofer test tone is emitted.1 5 When you can set two channel levels: one for DVD 5.1CH and one for the listening modes. Loud test tones ...
.... The test tones will be output. 3c.Channel Level Test Tone [ Manual ] Please Wait . . .20 Caution! The Auto setup will be sent to the subwoofer (or LARGE speakers). 3 When you selected Manual, use / to switch speakers. Move the test tone manually from the Manual SP Setup menu. 3.Manual SP Setup... Test Tone Manual 3 Confirm your main listening position and adjust the level of each speaker to 75 dB SPL (C-weighting/slow reading). • The subwoofer test tone is emitted.1 5 When you can set two channel levels: one for DVD 5.1CH and one for the listening modes. Loud test tones ...
Owner's Manual
Page 67
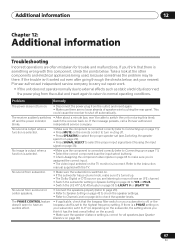
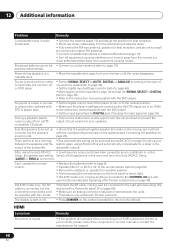
... sure the component is correct for trouble and malfunctions. If the message persists, call a Pioneer authorized blinks. Problem Remedy The power does not turn muting off and the power indicator switch the receiver back on . • If the subwoofer has a volume knob, make sure you think it to the highest frequency setting. If...
... sure the component is correct for trouble and malfunctions. If the message persists, call a Pioneer authorized blinks. Problem Remedy The power does not turn muting off and the power indicator switch the receiver back on . • If the subwoofer has a volume knob, make sure you think it to the highest frequency setting. If...
Owner's Manual
Page 68
... HDMI component directly to your speakers. The display is incorrect. After using MCACC (this receiver with a Pioneer flat panel TV on page 62). • Make sure an analog connection has been ...when software with DTS is played back. • Set the digital volume level of the subwoofer. subwoofer output). Setup, the speaker size setting Switch off all appliances in the output of the... terminals on the speakers (see Using this will automatically compensate for support. 68 En VSX-918V model only: The SR cable is odd. selected automatically. HDMI Symptom No picture...
... HDMI component directly to your speakers. The display is incorrect. After using MCACC (this receiver with a Pioneer flat panel TV on page 62). • Make sure an analog connection has been ...when software with DTS is played back. • Set the digital volume level of the subwoofer. subwoofer output). Setup, the speaker size setting Switch off all appliances in the output of the... terminals on the speakers (see Using this will automatically compensate for support. 68 En VSX-918V model only: The SR cable is odd. selected automatically. HDMI Symptom No picture...


