Owner's Manual
Page 2
... cause cancer and birth defect or other equipment. The equipment should be disconnected by qualified service personnel. Reorient or relocate the receiving antenna. - Cet appareil numérique de la Classe B est conforme à la norme NMB-003 du Canada. ...an AC outlet, the cut-off and on the rear panel. Product Name: AUDIO/VIDEO MULTI-CHANNEL RECEIVER Model Number: VSX-918V-K, VSX-918V-S, VSX-818V-K, VSX-818V-S Responsible Party Name: PIONEER ELECTRONICS SERVICE INC. THE SERIAL NUMBER FOR THIS EQUIPMENT IS LOCATED IN THE REAR. The voltage of the...
... cause cancer and birth defect or other equipment. The equipment should be disconnected by qualified service personnel. Reorient or relocate the receiving antenna. - Cet appareil numérique de la Classe B est conforme à la norme NMB-003 du Canada. ...an AC outlet, the cut-off and on the rear panel. Product Name: AUDIO/VIDEO MULTI-CHANNEL RECEIVER Model Number: VSX-918V-K, VSX-918V-S, VSX-818V-K, VSX-818V-S Responsible Party Name: PIONEER ELECTRONICS SERVICE INC. THE SERIAL NUMBER FOR THIS EQUIPMENT IS LOCATED IN THE REAR. The voltage of the...
Owner's Manual
Page 4
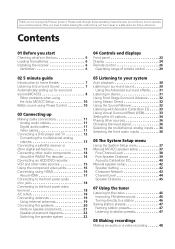
...these operating instructions so you for buying this Pioneer product. Contents 01 Before you have finished...Acoustic Calibration EQ . . . . . 33 Using Virtual Surround Back (VSB 33 Setting the AV options 34 Playing other video sources 15 Using the component video jacks 16 Connecting using Phase Control... place for future reference. After you start Checking what's in the box 6 Loading the batteries 6 Installing the receiver 6 Ventilation 6 04 Controls and displays Front panel 23 Display 24 Remote control 26 Operating range of remote control ... Listening to your model properly.
...these operating instructions so you for buying this Pioneer product. Contents 01 Before you have finished...Acoustic Calibration EQ . . . . . 33 Using Virtual Surround Back (VSB 33 Setting the AV options 34 Playing other video sources 15 Using the component video jacks 16 Connecting using Phase Control... place for future reference. After you start Checking what's in the box 6 Loading the batteries 6 Installing the receiver 6 Ventilation 6 04 Controls and displays Front panel 23 Display 24 Remote control 26 Operating range of remote control ... Listening to your model properly.
Owner's Manual
Page 5
... SIRIUS Connect Tuner . . . 60 Listening to SIRIUS Radio 61 Saving channel presets 61 Using the SIRIUS Menu 62 Using this receiver with a Pioneer flat panel TV 62 Using the SR+ mode with a Pioneer flat panel TV 63 11 Other Settings The Input Assign menu 64 The Other Setup menu 66 SR+ Setup for.... "DTS" is a trademark of DTS, Inc. 09 Controlling the rest of Dolby Laboratories. and "DTS 96/24" is a registered trademark of DTS, Inc. and Australia Model C67-7-3_En English Italiano Français Deutsch Nederlands Español
... SIRIUS Connect Tuner . . . 60 Listening to SIRIUS Radio 61 Saving channel presets 61 Using the SIRIUS Menu 62 Using this receiver with a Pioneer flat panel TV 62 Using the SR+ mode with a Pioneer flat panel TV 63 11 Other Settings The Input Assign menu 64 The Other Setup menu 66 SR+ Setup for.... "DTS" is a trademark of DTS, Inc. 09 Controlling the rest of Dolby Laboratories. and "DTS 96/24" is a registered trademark of DTS, Inc. and Australia Model C67-7-3_En English Italiano Français Deutsch Nederlands Español
Owner's Manual
Page 16
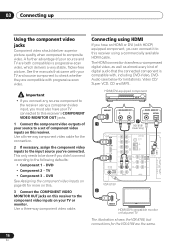
... is progressive-scan video, which delivers a very stable, flicker-free picture. Important • If you connect any source component to the receiver using a component video input, you must also have an HDMI or DVI (with progressive-scan video. Use a three-way component video cable...can connect it to the following defaults: • Component 1 - HDMI/DVI-equipped component HDMI OUT 1 ANALOG AUDIO OUT R L DIGITAL AUDIO OUT COAXIAL OPTICAL 3 (VSX-818V model only) HDMI IN R IN AUX L CD ANTENNA FM UNBAL DIGITAL IN (DVD / BD) IN 1 IN (ASSIGNABLE) OUT (TV / SAT) IN 2 IN ...
... is progressive-scan video, which delivers a very stable, flicker-free picture. Important • If you connect any source component to the receiver using a component video input, you must also have an HDMI or DVI (with progressive-scan video. Use a three-way component video cable...can connect it to the following defaults: • Component 1 - HDMI/DVI-equipped component HDMI OUT 1 ANALOG AUDIO OUT R L DIGITAL AUDIO OUT COAXIAL OPTICAL 3 (VSX-818V model only) HDMI IN R IN AUX L CD ANTENNA FM UNBAL DIGITAL IN (DVD / BD) IN 1 IN (ASSIGNABLE) OUT (TV / SAT) IN 2 IN ...
Owner's Manual
Page 17
... make analog and/or digital connections as shown in one connector (instead of several cables and connectors), and communication between the AV source and AV devices such as video game units) have resolutions that some components (such as DTVs. About HDMI HDMI (High Definition Multimedia ...an HDMI cable to connect the HDMI OUT interconnect on this receiver to multi-channel surround-sound audio. Connecting up to protect digital content transmitted and received by DVI-compliant displays. Note that may not be output from the HDMI OUT. 3 VSX-818V model only: To hear audio from this...
... make analog and/or digital connections as shown in one connector (instead of several cables and connectors), and communication between the AV source and AV devices such as video game units) have resolutions that some components (such as DTVs. About HDMI HDMI (High Definition Multimedia ...an HDMI cable to connect the HDMI OUT interconnect on this receiver to multi-channel surround-sound audio. Connecting up to protect digital content transmitted and received by DVI-compliant displays. Note that may not be output from the HDMI OUT. 3 VSX-818V model only: To hear audio from this...
Owner's Manual
Page 23
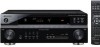
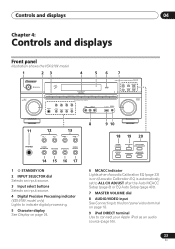
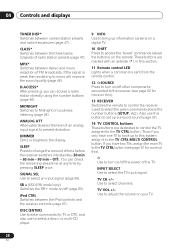
...STANDBY/ON 2 INPUT SELECTOR dial Selects an input source. 3 Input select buttons Selects an input source. 4 Digital Precision Processing indicator (VSX-918V model only) Lights to indicate digital processing. 5 Character display See Display on page 18. 9 iPod DIRECT terminal Use to the front ...ais Italiano Nederlands Español Chapter 4: Controls and displays Front panel Illustration shows the VSX-918V model 1 23 4 56 7 INPUT SELECTOR STANDBY/ON AUDIO/VIDEO MULTI-CHANNEL RECEIVER VSX-918V PHASE CONTROL DVD DIGITAL PRECISION PROCESSING TV DVR VIDEO/PORTABLE CD/CD-R iPod FM...
...STANDBY/ON 2 INPUT SELECTOR dial Selects an input source. 3 Input select buttons Selects an input source. 4 Digital Precision Processing indicator (VSX-918V model only) Lights to indicate digital processing. 5 Character display See Display on page 18. 9 iPod DIRECT terminal Use to the front ...ais Italiano Nederlands Español Chapter 4: Controls and displays Front panel Illustration shows the VSX-918V model 1 23 4 56 7 INPUT SELECTOR STANDBY/ON AUDIO/VIDEO MULTI-CHANNEL RECEIVER VSX-918V PHASE CONTROL DVD DIGITAL PRECISION PROCESSING TV DVR VIDEO/PORTABLE CD/CD-R iPod FM...
Owner's Manual
Page 26
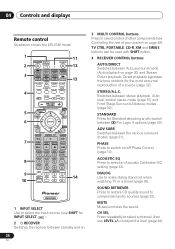
STANDARD ADV SURR ACOUSTIC SOUND PHASE EQ DIALOG RETRIEVER 4 CH SEL LEVEL MUTE MASTER VOLUME RECEIVER CONTROL ONE TOUCH CH+ 5 COPY AV PARAMETER TOP MENU TUNE T.EDIT MENU ST ST 6 ENTER GUIDE CATEGORY TUNE CH- STEREO/A.L.C. DIALOG Use to select an Acoustic Calibration EQ setting (page... of your system on /off Phase Control (page 10). MUTE Mutes/unmutes the sound. 04 Controls and displays Remote control Illustration shows the VSX-918V model 1 RECEIVER 2 INPUT SELECT 11 SOURCE 12 MULTI CONTROL TV CTRL PORTABLE DVD TV DVR iPod 3 CD-R XM SIRIUS CD FM AM...
STANDARD ADV SURR ACOUSTIC SOUND PHASE EQ DIALOG RETRIEVER 4 CH SEL LEVEL MUTE MASTER VOLUME RECEIVER CONTROL ONE TOUCH CH+ 5 COPY AV PARAMETER TOP MENU TUNE T.EDIT MENU ST ST 6 ENTER GUIDE CATEGORY TUNE CH- STEREO/A.L.C. DIALOG Use to select an Acoustic Calibration EQ setting (page... of your system on /off Phase Control (page 10). MUTE Mutes/unmutes the sound. 04 Controls and displays Remote control Illustration shows the VSX-918V model 1 RECEIVER 2 INPUT SELECT 11 SOURCE 12 MULTI CONTROL TV CTRL PORTABLE DVD TV DVR iPod 3 CD-R XM SIRIUS CD FM AM...
Owner's Manual
Page 28
... between stereo and mono reception of an analog input signal to access the 'boxed' commands (above the number buttons (SETUP, etc)). SLEEP Press to the receiver (see page 51 for TV or DTV, and also use this section. 11 Remote control LED Lights when a command is weak then switching to the..., assign the main TV to the TV CTRL button (see page 52 for more on the remote. DIMMER Dims or brightens the display. SR + (VSX-918V model only) Switches the SR+ mode on your TV. 28 En INPUT SELECT Use to Midnight or Loudness listening (page 34). Use to the TV CTRL...
... between stereo and mono reception of an analog input signal to access the 'boxed' commands (above the number buttons (SETUP, etc)). SLEEP Press to the receiver (see page 51 for TV or DTV, and also use this section. 11 Remote control LED Lights when a command is weak then switching to the..., assign the main TV to the TV CTRL button (see page 52 for more on the remote. DIMMER Dims or brightens the display. SR + (VSX-918V model only) Switches the SR+ mode on your TV. 28 En INPUT SELECT Use to Midnight or Loudness listening (page 34). Use to the TV CTRL...
Owner's Manual
Page 35
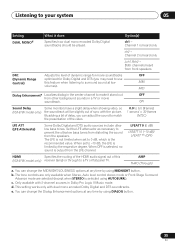
... channels heard from the speakers. b. Channel 1 is output from other background sounds in a TV or movie soundtrack. ON Sound Delay (VSX-918V model only) Some monitors have a slight delay when showing video, so the soundtrack will be played. d. You can change the MIDNIGHT/LOUDNESS options... ** (OFF) HDMI Specifies the routing of the HDMI audio signal out of delay, you may need to use Control) this (VSX-918V model only) receiver (amp) or through to make it does Option(s) DUAL MONOd Specifies how dual mono encoded Dolby Digital soundtracks should be slightly out...
... channels heard from the speakers. b. Channel 1 is output from other background sounds in a TV or movie soundtrack. ON Sound Delay (VSX-918V model only) Some monitors have a slight delay when showing video, so the soundtrack will be played. d. You can change the MIDNIGHT/LOUDNESS options... ** (OFF) HDMI Specifies the routing of the HDMI audio signal out of delay, you may need to use Control) this (VSX-918V model only) receiver (amp) or through to make it does Option(s) DUAL MONOd Specifies how dual mono encoded Dolby Digital soundtracks should be slightly out...
Owner's Manual
Page 36
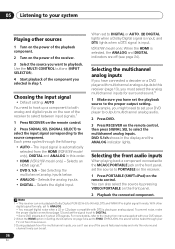
...output multichannel analog audio. 2 Press DVD. 3 Press RECEIVER on the power of the receiver. Each press cycles through your TV, not from this receiver. 3 During playback from the HDMI (VSX-918V model only), DIGITAL and ANALOG in Setting the AV options on the front panel. 2 Playback the connected ...for surround sound.3 1 Make sure you have connected a decoder or a DVD player with multichannel analog outputs to this order. • HDMI (VSX-918V model only) - See Selecting the multichannel analog inputs below. • ANALOG - DVD 5.1ch shows in step 1. For example, you selected in...
...output multichannel analog audio. 2 Press DVD. 3 Press RECEIVER on the power of the receiver. Each press cycles through your TV, not from this receiver. 3 During playback from the HDMI (VSX-918V model only), DIGITAL and ANALOG in Setting the AV options on the front panel. 2 Playback the connected ...for surround sound.3 1 Make sure you have connected a decoder or a DVD player with multichannel analog outputs to this order. • HDMI (VSX-918V model only) - See Selecting the multichannel analog inputs below. • ANALOG - DVD 5.1ch shows in step 1. For example, you selected in...
Owner's Manual
Page 37
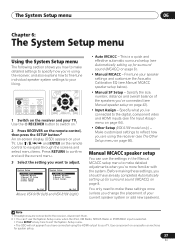
...Setup 1.Auto MCACC 2.Manual MCACC 3.Manual SP Setup 4.Input Assign : Exit : Exit Above: VSX-918V (left) and VSX-818V (right) • Auto MCACC - Specify what you've connected to your TV. The ...and HDMI inputs (see The Input Assign menu on page 64). • Other Setup (VSX-918V model only) - Specify the size, number, distance and overall balance of your speaker settings ...8226; Manual MCACC - RECEIVER INPUT SELECT SOURCE MULTI CONTROL TV CTRL DVD TV DVR CD-R XM SIRIUS CD FM AM PORTABLE iPod RECEIVER RECEIVER CONTROL ONE TOUCH COPY CH+ AV PARAMETER TOP MENU ST TUNE...
...Setup 1.Auto MCACC 2.Manual MCACC 3.Manual SP Setup 4.Input Assign : Exit : Exit Above: VSX-918V (left) and VSX-818V (right) • Auto MCACC - Specify what you've connected to your TV. The ...and HDMI inputs (see The Input Assign menu on page 64). • Other Setup (VSX-918V model only) - Specify the size, number, distance and overall balance of your speaker settings ...8226; Manual MCACC - RECEIVER INPUT SELECT SOURCE MULTI CONTROL TV CTRL DVD TV DVR CD-R XM SIRIUS CD FM AM PORTABLE iPod RECEIVER RECEIVER CONTROL ONE TOUCH COPY CH+ AV PARAMETER TOP MENU ST TUNE...
Owner's Manual
Page 49
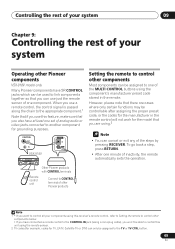
...set of one component. Other Pioneer products with CONTROL terminals Remote control unit Connect to CONTROL terminal of other Pioneer products Note 1 • If you want to control all your system Operating other Pioneer components VSX-918V model only Many Pioneer components have connected a remote ...control to the CONTROL IN jack (using a mini-plug cable), you won't be able to control other components Most components can cancel or exit any of the steps by pressing RECEIVER. When...
...set of one component. Other Pioneer products with CONTROL terminals Remote control unit Connect to CONTROL terminal of other Pioneer products Note 1 • If you want to control all your system Operating other Pioneer components VSX-918V model only Many Pioneer components have connected a remote ...control to the CONTROL IN jack (using a mini-plug cable), you won't be able to control other components Most components can cancel or exit any of the steps by pressing RECEIVER. When...
Owner's Manual
Page 51
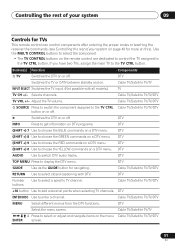
...off . Components DTV Switches the TV or CATV between standby and on a DTV menu. DTV TOP MENU Press to select closed captioning with all models.) TV TV CH +/- Cable TV/Satellite TV/TV/DTV RETURN Use to display the DTV menu. Cable TV/Satellite TV/TV/DTV MENU Select ...Français Italiano Nederlands Español Controls for TVs This remote control can control components after entering the proper codes or teaching the receiver the commands (see Controlling the rest of your system on page 49 for navigating. Selects channels. DTV GUIDE Use as the GUIDE button ...
...off . Components DTV Switches the TV or CATV between standby and on a DTV menu. DTV TOP MENU Press to select closed captioning with all models.) TV TV CH +/- Cable TV/Satellite TV/TV/DTV RETURN Use to display the DTV menu. Cable TV/Satellite TV/TV/DTV MENU Select ...Français Italiano Nederlands Español Controls for TVs This remote control can control components after entering the proper codes or teaching the receiver the commands (see Controlling the rest of your system on page 49 for navigating. Selects channels. DTV GUIDE Use as the GUIDE button ...
Owner's Manual
Page 52
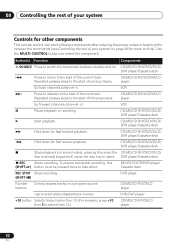
... Controlling the rest of your system Controls for other components This remote control can control these components after entering the proper codes or teaching the receiver the commands (see Controlling the rest of your system on page 49 for more on this (SHIFT+ ) button must be pressed twice to take effect... playback. CD/MD/CD-R/VCR/DVD/LD/ DVR player/Cassette deck CD/MD/CD-R/VCR/DVD/LD/ DVR player/Cassette deck Stops playback (on some models, pressing this when the CD/MD/CD-R/VCR/DVD/LD/ disc is already stopped will cause the disc tray to the start of following tracks...
... Controlling the rest of your system Controls for other components This remote control can control these components after entering the proper codes or teaching the receiver the commands (see Controlling the rest of your system on page 49 for more on this (SHIFT+ ) button must be pressed twice to take effect... playback. CD/MD/CD-R/VCR/DVD/LD/ DVR player/Cassette deck CD/MD/CD-R/VCR/DVD/LD/ DVR player/Cassette deck Stops playback (on some models, pressing this when the CD/MD/CD-R/VCR/DVD/LD/ disc is already stopped will cause the disc tray to the start of following tracks...
Owner's Manual
Page 54
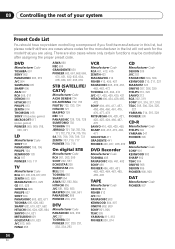
... that there are cases where codes for the manufacturer in the list will not work for the model that you are also cases where only certain functions may be controllable after assigning the proper preset ..., 664 SANYO 614, 621 MITSUBISHI 609 GOLDSTAR 610, 623 JVC 613, 665 FUNAI 658 AIWA 660 NEC 659 GRANDIENTE 630 PIONEER 600, 667, 668, 669, 670, 631, 632, 633, 634, 635, 636, 637, 638, 639 STB (SATELLITE... 802 PANASONIC 803 KENWOOD 804, 807 ONKYO 808, 809 SONY 801, 806 TEAC 805 YAMAHA 811, 812 PIONEER 800, 814 CD Manufacturer Code DENON 309 JVC 303 PANASONIC 304, 326 KENWOOD 310, 311, 321 MARANTZ ...
... that there are cases where codes for the manufacturer in the list will not work for the model that you are also cases where only certain functions may be controllable after assigning the proper preset ..., 664 SANYO 614, 621 MITSUBISHI 609 GOLDSTAR 610, 623 JVC 613, 665 FUNAI 658 AIWA 660 NEC 659 GRANDIENTE 630 PIONEER 600, 667, 668, 669, 670, 631, 632, 633, 634, 635, 636, 637, 638, 639 STB (SATELLITE... 802 PANASONIC 803 KENWOOD 804, 807 ONKYO 808, 809 SONY 801, 806 TEAC 805 YAMAHA 811, 812 PIONEER 800, 814 CD Manufacturer Code DENON 309 JVC 303 PANASONIC 304, 326 KENWOOD 310, 311, 321 MARANTZ ...
Owner's Manual
Page 55
...Connection, try switching off the power and disconnect the power cord from the iPod. 3 Use the TOP MENU button to this receiver (Pioneer shows in components should be restricted for any direct or indirect loss arising from any contact between 6 Ω to 16 &#... receiver. Connecting an iPod This receiver has a dedicated iPod terminal that some models. For the cable connection, refer to also the operating instructions for iPod. 2 Switch the receiver on the software version of this receiver, and we recommend switching the equalizer off before connecting. • Pioneer...
...Connection, try switching off the power and disconnect the power cord from the iPod. 3 Use the TOP MENU button to this receiver (Pioneer shows in components should be restricted for any direct or indirect loss arising from any contact between 6 Ω to 16 &#... receiver. Connecting an iPod This receiver has a dedicated iPod terminal that some models. For the cable connection, refer to also the operating instructions for iPod. 2 Switch the receiver on the software version of this receiver, and we recommend switching the equalizer off before connecting. • Pioneer...
Owner's Manual
Page 62
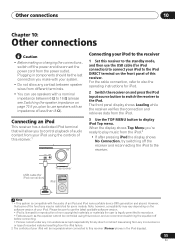
... is changed. Set the parental lock password. 3 When you want. • You can also use an SR+ cable to connect it to this receiver with all Pioneer flat panel TVs from /to the channel guide. • Parental Lock - Press repeatedly to cycle through classes A, B and C. 2 Press / ... and Password Set in which the channel is compatible with a Pioneer flat panel TV (VSX-918V model only) If you have a Pioneer flat panel TV1, you would like to remove/restore from 2003 onward. 62 En Note 1 This receiver is stored. CONTROL OUT Pioneer flat panel TV HDMI IN R IN (DVD / BD) ...
... is changed. Set the parental lock password. 3 When you want. • You can also use an SR+ cable to connect it to this receiver with all Pioneer flat panel TVs from /to the channel guide. • Parental Lock - Press repeatedly to cycle through classes A, B and C. 2 Press / ... and Password Set in which the channel is compatible with a Pioneer flat panel TV (VSX-918V model only) If you have a Pioneer flat panel TV1, you would like to remove/restore from 2003 onward. 62 En Note 1 This receiver is stored. CONTROL OUT Pioneer flat panel TV HDMI IN R IN (DVD / BD) ...
Owner's Manual
Page 65
.... • Use / and ENTER to do this. • If you have used HDMI to that function will automatically be switched off • VSX-818V model only: To hear audio from the Input Assign menu. 4. TV If you used , so that function will automatically be switched off . • ...component to the corresponding inputs on page 16. • If you 've connected your video component. DVD Component 2 - For more on this receiver's component video MONITOR output (down converting component video is , or else you may see Connecting using a component video input, you should also have...
.... • Use / and ENTER to do this. • If you have used HDMI to that function will automatically be switched off • VSX-818V model only: To hear audio from the Input Assign menu. 4. TV If you used , so that function will automatically be switched off . • ...component to the corresponding inputs on page 16. • If you 've connected your video component. DVD Component 2 - For more on this receiver's component video MONITOR output (down converting component video is , or else you may see Connecting using a component video input, you should also have...
Owner's Manual
Page 66
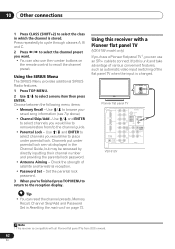
... return to the Other Setup menu. : Exit 3 Make sure 'SR+ Setup' is heard. 66 En 11 Other Settings The Other Setup menu (VSX-918V model only) SR+ Setup for Pioneer flat panel TVs Make the following settings if you have connected your DVD video output to video input 2 on the flat panel TV... Connect [ OFF ] :Finish 6 When you're finished, press RETURN. An on-screen display (OSD) appears on the remote control, then press the SETUP button. The receiver does not control the volume of the inputs that use the flat panel TV (DVD/BD, or another function below), the volume on the flat...
... return to the Other Setup menu. : Exit 3 Make sure 'SR+ Setup' is heard. 66 En 11 Other Settings The Other Setup menu (VSX-918V model only) SR+ Setup for Pioneer flat panel TVs Make the following settings if you have connected your DVD video output to video input 2 on the flat panel TV... Connect [ OFF ] :Finish 6 When you're finished, press RETURN. An on-screen display (OSD) appears on the remote control, then press the SETUP button. The receiver does not control the volume of the inputs that use the flat panel TV (DVD/BD, or another function below), the volume on the flat...
Owner's Manual
Page 68
... in the room and rerun the Auto MCACC Setup. (LARGE or SMALL) is connected, but be operated with the DVD player. After using MCACC (this receiver with a Pioneer flat panel TV on page 62). • Make sure an analog connection has been made (refer to page 36). • Set the digital input... page 29). • Remove the obstacle or operate from another position. • Avoid exposing the remote sensor on the front panel to direct light. • VSX-918V model only: Unplug anything connected to the right jack (see Using this will automatically compensate for surround sound (MCACC) on...
... in the room and rerun the Auto MCACC Setup. (LARGE or SMALL) is connected, but be operated with the DVD player. After using MCACC (this receiver with a Pioneer flat panel TV on page 62). • Make sure an analog connection has been made (refer to page 36). • Set the digital input... page 29). • Remove the obstacle or operate from another position. • Avoid exposing the remote sensor on the front panel to direct light. • VSX-918V model only: Unplug anything connected to the right jack (see Using this will automatically compensate for surround sound (MCACC) on...


