
Operating Instructions
Page 4
... 18 Using external antennas 18 Connecting the speakers 19 Hints on speaker placement 20 05 Controls and displays Front panel 22 Display 23 Remote control 25 Operating range of remote control 27 06 Listening to your system Auto playback 28 Listening in surround sound 28 Using the Advanced surround effects . . . . 29 Setting...
... 18 Using external antennas 18 Connecting the speakers 19 Hints on speaker placement 20 05 Controls and displays Front panel 22 Display 23 Remote control 25 Operating range of remote control 27 06 Listening to your system Auto playback 28 Listening in surround sound 28 Using the Advanced surround effects . . . . 29 Setting...
Operating Instructions
Page 5
...10 Making recordings Making an audio or a video recording . . . . . 47 11 Controlling the rest of your system Operating other Pioneer components . . . . . 48 Setting the remote to control other components 48 Selecting preset codes directly 49 Erasing all of Digital Theater Systems, Inc. "Dolby", "Pro Logic", "Surround ... 58 The Other Setup menu 59 Dynamic Range Control Setup 59 Dual Mono Setup 60 LFE Attenuator Setup 60 SR+ Setup for Pioneer plasma displays . . 60 14 Additional information Troubleshooting 61 Resetting the main unit 63 Switching the speaker impedance 63 Changing the TV...
...10 Making recordings Making an audio or a video recording . . . . . 47 11 Controlling the rest of your system Operating other Pioneer components . . . . . 48 Setting the remote to control other components 48 Selecting preset codes directly 49 Erasing all of Digital Theater Systems, Inc. "Dolby", "Pro Logic", "Surround ... 58 The Other Setup menu 59 Dynamic Range Control Setup 59 Dual Mono Setup 60 LFE Attenuator Setup 60 SR+ Setup for Pioneer plasma displays . . 60 14 Additional information Troubleshooting 61 Resetting the main unit 63 Switching the speaker impedance 63 Changing the TV...
Operating Instructions
Page 6
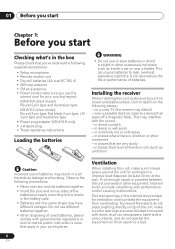
... 1: Before you start Checking what's in the box Please check that you've received the following supplied accessories: • Setup microphone • Remote control unit • Dry cell batteries (AA size IEC R6) x2 • AM loop antenna • FM wire antenna • Power cords...plus and minus sides of the batteries properly according to a device that gives off a magnetic field). in your country/region): VSX-816-K (black model) Round 2-pin type and Australian type VSX-816-S (silver model) Round 2-pin type, flat blade 2-pin type, UK 3-pin type and Australian type • Power plug...
... 1: Before you start Checking what's in the box Please check that you've received the following supplied accessories: • Setup microphone • Remote control unit • Dry cell batteries (AA size IEC R6) x2 • AM loop antenna • FM wire antenna • Power cords...plus and minus sides of the batteries properly according to a device that gives off a magnetic field). in your country/region): VSX-816-K (black model) Round 2-pin type and Australian type VSX-816-S (silver model) Round 2-pin type, flat blade 2-pin type, UK 3-pin type and Australian type • Power plug...
Operating Instructions
Page 7
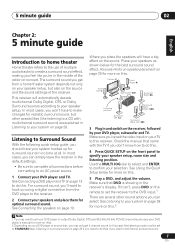
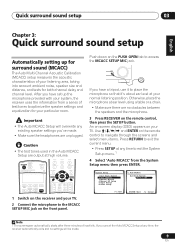
.... Use the MULTI JOG dial to select and ENTER to do this . 5 Play a DVD, and adjust the volume. If it isn't, press DVD on the remote to set the receiver to the DVD input.1 There are explained in Listening to your DVD player and TV. In most cases, you can select...
.... Use the MULTI JOG dial to select and ENTER to do this . 5 Play a DVD, and adjust the volume. If it isn't, press DVD on the remote to set the receiver to the DVD input.1 There are explained in Listening to your DVD player and TV. In most cases, you can select...
Operating Instructions
Page 9
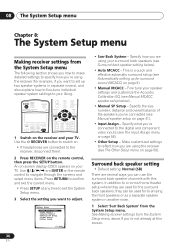
...MIC jack. System Setup 1.Surr Back System 2.Auto MCACC 3.Manual MCACC 4.Manual SP Setup 5.Input Assign 6.Other Setup 2. Push down on the remote control to navigate through the screens and select menu items. Press RETURN to exit the current menu. • Press SETUP at any time, ...the receiver automatically exits and no obstacles between the speakers and the microphone. 3 Press RECEIVER on the remote control, then press the SETUP button. Otherwise, place the microphone at any time to exit the System Setup menu.1 4 Select 'Auto MCACC' from...
...MIC jack. System Setup 1.Surr Back System 2.Auto MCACC 3.Manual MCACC 4.Manual SP Setup 5.Input Assign 6.Other Setup 2. Push down on the remote control to navigate through the screens and select menu items. Press RETURN to exit the current menu. • Press SETUP at any time, ...the receiver automatically exits and no obstacles between the speakers and the microphone. 3 Press RECEIVER on the remote control, then press the SETUP button. Otherwise, place the microphone at any time to exit the System Setup menu.1 4 Select 'Auto MCACC' from...
Operating Instructions
Page 24
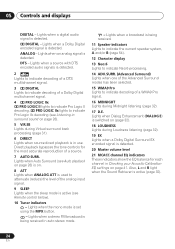
... to attenuate (reduce) the level of a source. 7 AUTO SURR. Lights when a broadcast is in surround sound on page 41. ANALOG - Lights when Auto Surround (see Remote control below). 10 Tuner indicators - Lights when a stereo FM broadcast is active (see Auto playback on page 28) is on (page 32). 18 LOUDNESS Lights...
... to attenuate (reduce) the level of a source. 7 AUTO SURR. Lights when a broadcast is in surround sound on page 41. ANALOG - Lights when Auto Surround (see Remote control below). 10 Tuner indicators - Lights when a stereo FM broadcast is active (see Auto playback on page 28) is on (page 32). 18 LOUDNESS Lights...
Operating Instructions
Page 25
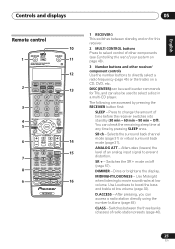
... bass and treble at low volume. English Deutsch Français Italiano Nederlands Español Controls and displays 05 Remote control 10 RECEIVER INPUT SELECT 1 SOURCE 11 AUDIO/VIDEO PRE-PROGRAMMED REMOTE CONTROL UNIT 12 DVD TV DVR TVCTRL 2 CD-R/TAPE USB CD FM AM RECEIVER 13 SLEEP SB ch ANALOG...
... bass and treble at low volume. English Deutsch Français Italiano Nederlands Español Controls and displays 05 Remote control 10 RECEIVER INPUT SELECT 1 SOURCE 11 AUDIO/VIDEO PRE-PROGRAMMED REMOTE CONTROL UNIT 12 DVD TV DVR TVCTRL 2 CD-R/TAPE USB CD FM AM RECEIVER 13 SLEEP SB ch ANALOG...
Operating Instructions
Page 27
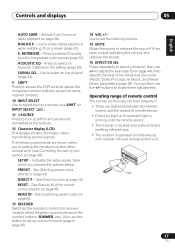
...been muted (adjusting the volume also restores the sound). 16 EFFECT/CH SEL Press repeatedly to adjust the level (see Controlling the rest of remote control The remote control may not work properly if: • There are shown when you choose the options below. Also use SHIFT for INPUT SELECT )....Press to make these adjustments. See Direct function on page 48): SETUP - to select a channel, then use the +/- Also adjusts the level of the remote control presets on page 44). Operating range of your system on page 49. Use to set up surround sound (page 9, page 36). 14 VOL +/- ...
...been muted (adjusting the volume also restores the sound). 16 EFFECT/CH SEL Press repeatedly to adjust the level (see Controlling the rest of remote control The remote control may not work properly if: • There are shown when you choose the options below. Also use SHIFT for INPUT SELECT )....Press to make these adjustments. See Direct function on page 48): SETUP - to select a channel, then use the +/- Also adjusts the level of the remote control presets on page 44). Operating range of your system on page 49. Use to set up surround sound (page 9, page 36). 14 VOL +/- ...
Operating Instructions
Page 34
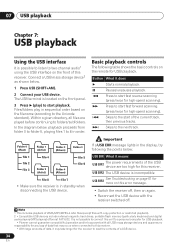
... Files/folders play ) to start of the USB USB ERR1 device are played before continuing to a personal computer for USB playback. • Pioneer cannot guarantee compatibility (operation and/or bus power) with copy-protection or restricted playback). 2 • Compatible USB devices include external magnetic hard ... 2 Connect your USB device. Important If a USB ERR message lights in the display, try following table shows the basic controls on the remote for the receiver to 8 in sequential order based on page 61 for high-speed scanning). It is located on the front panel. 3 Press...
... Files/folders play ) to start of the USB USB ERR1 device are played before continuing to a personal computer for USB playback. • Pioneer cannot guarantee compatibility (operation and/or bus power) with copy-protection or restricted playback). 2 • Compatible USB devices include external magnetic hard ... 2 Connect your USB device. Important If a USB ERR message lights in the display, try following table shows the basic controls on the remote for the receiver to 8 in sequential order based on page 61 for high-speed scanning). It is located on the front panel. 3 Press...
Operating Instructions
Page 36
... balance of the speakers you are several ways you 've connected to the digital and component video inputs (see Manual speaker setup on the remote control to navigate through the screens and select menu items. Press RETURN to the receiver, disconnect them. 2 Press RECEIVER on the...System 2.Auto MCACC 3.Manual MCACC 4.Manual SP Setup 5.Input Assign 6.Other Setup : Exit • Surr Back System - RECEIVER INPUT SELECT SOURCE AUDIO/VIDEO PRE-PROGRAMMED REMOTE CONTROL UNIT DVD CD TV CD-R/TAPE FM DVR TVCTRL USB AM RECEIVER D.ACCESS +10 CLASS DISC ENTER TOP MENU TUNE DTV MENU ST SETUP...
... balance of the speakers you are several ways you 've connected to the digital and component video inputs (see Manual speaker setup on the remote control to navigate through the screens and select menu items. Press RETURN to the receiver, disconnect them. 2 Press RECEIVER on the...System 2.Auto MCACC 3.Manual MCACC 4.Manual SP Setup 5.Input Assign 6.Other Setup : Exit • Surr Back System - RECEIVER INPUT SELECT SOURCE AUDIO/VIDEO PRE-PROGRAMMED REMOTE CONTROL UNIT DVD CD TV CD-R/TAPE FM DVR TVCTRL USB AM RECEIVER D.ACCESS +10 CLASS DISC ENTER TOP MENU TUNE DTV MENU ST SETUP...
Operating Instructions
Page 44
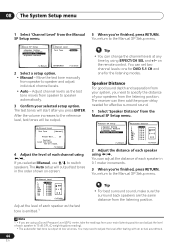
... :Return ENTER:Next :Cancel 2 Select a setup option. • Manual - You may need to specify the distance of each speaker in the order shown on the remote control. After the volume increases to switch speakers. If you need to adjust the level after you 're finished, press RETURN. Speaker Distance For good...
... :Return ENTER:Next :Cancel 2 Select a setup option. • Manual - You may need to specify the distance of each speaker in the order shown on the remote control. After the volume increases to switch speakers. If you need to adjust the level after you 're finished, press RETURN. Speaker Distance For good...
Operating Instructions
Page 45
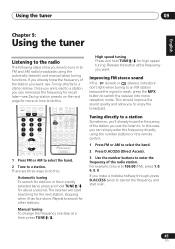
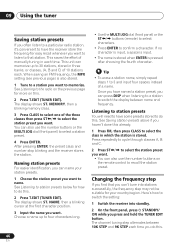
High speed tuning Press and hold TUNE / for more on the remote control. 1 Press FM or AM to select the band. 2 Press D.ACCESS (Direct Access). 3 Use the number buttons to enter the frequency of the station you ...
High speed tuning Press and hold TUNE / for more on the remote control. 1 Press FM or AM to select the band. 2 Press D.ACCESS (Direct Access). 3 Use the number buttons to enter the frequency of the station you ...
Operating Instructions
Page 46
... of manually tuning in three banks, or classes, (A, B and C) of 10 stations each. This unit can also use the number buttons on the remote control to recall the station preset. You can memorize up to four characters long. • Use the MULTI JOG dial (front panel) or the ST... / buttons (remote) to select characters. • Press ENTER to confirm a character. NAME, then a blinking cursor at the first character position. 3 Input the name you want . •...
... of manually tuning in three banks, or classes, (A, B and C) of 10 stations each. This unit can also use the number buttons on the remote control to recall the station preset. You can memorize up to four characters long. • Use the MULTI JOG dial (front panel) or the ST... / buttons (remote) to select characters. • Press ENTER to confirm a character. NAME, then a blinking cursor at the first character position. 3 Input the name you want . •...
Operating Instructions
Page 47
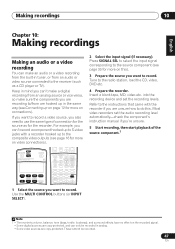
... on video connections). Most video recorders set the recording levels. TV VOL INPUT SELECT TV CH VOL RECEIVER INPUT SELECT SOURCE AUDIO/VIDEO PRE-PROGRAMMED REMOTE CONTROL UNIT DTV ON/OFF MPX REC DTV INFO MUTE REC STOP JUKEBOX AUDIO SUBTITLE HDD DVD DISP CH CH STANDARD ADV.SURR STEREO AUTO...
... on video connections). Most video recorders set the recording levels. TV VOL INPUT SELECT TV CH VOL RECEIVER INPUT SELECT SOURCE AUDIO/VIDEO PRE-PROGRAMMED REMOTE CONTROL UNIT DTV ON/OFF MPX REC DTV INFO MUTE REC STOP JUKEBOX AUDIO SUBTITLE HDD DVD DISP CH CH STANDARD ADV.SURR STEREO AUTO...

Operating Instructions
Page 48
...the component's manufacturer preset code stored in tuner. 48 En OUT CONTROL IN Receiver CONTROL IN OUT Setting the remote to control other Pioneer components Many Pioneer components have to reset the receiver to the default settings (see Erasing all your components using this receiver's ...built-in the remote. To go back a step, press RETURN. • After one component. Remote control unit Other Pioneer products with CONTROL terminals Connect to CONTROL IN terminal of other Pioneer products Note 1 • If you want to control ...
...the component's manufacturer preset code stored in tuner. 48 En OUT CONTROL IN Receiver CONTROL IN OUT Setting the remote to control other Pioneer components Many Pioneer components have to reset the receiver to the default settings (see Erasing all your components using this receiver's ...built-in the remote. To go back a step, press RETURN. • After one component. Remote control unit Other Pioneer products with CONTROL terminals Connect to CONTROL IN terminal of other Pioneer products Note 1 • If you want to control ...
Operating Instructions
Page 49
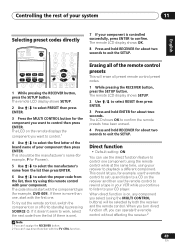
...009). When you turn direct function off (into standby) by both the receiver and the remote control. The remote LCD display shows SETUP. 2 Use / to select PRESET then press ENTER. 3 Press the MULTI CONTROL button for Pioneer). 5 Use / to select the manufacturer's name from the list then press ENTER. ...11 English Deutsch Français Italiano Nederlands Español Selecting preset codes directly RECEIVER INPUT SELECT SOURCE AUDIO/VIDEO PRE-PROGRAMMED REMOTE CONTROL UNIT SR+ DIMMER MIDNIGHT/ LOUDNESS DVD CD TV CD-R/TAPE FM SLEEP DVR TVCTRL USB AM RECEIVER SB ch ANALOG ATT...
...009). When you turn direct function off (into standby) by both the receiver and the remote control. The remote LCD display shows SETUP. 2 Use / to select PRESET then press ENTER. 3 Press the MULTI CONTROL button for Pioneer). 5 Use / to select the manufacturer's name from the list then press ENTER. ...11 English Deutsch Français Italiano Nederlands Español Selecting preset codes directly RECEIVER INPUT SELECT SOURCE AUDIO/VIDEO PRE-PROGRAMMED REMOTE CONTROL UNIT SR+ DIMMER MIDNIGHT/ LOUDNESS DVD CD TV CD-R/TAPE FM SLEEP DVR TVCTRL USB AM RECEIVER SB ch ANALOG ATT...
Operating Instructions
Page 50
... select DIRECT F then press ENTER. 3 Press the MULTI CONTROL button for which preset code is assigned to check the preset code then press ENTER. The remote LCD display shows SETUP. 2 Use / to select READ ID then press ENTER. 3 Press the MULTI CONTROL button of your system 1 While pressing the RECEIVER ... can control components after entering the proper codes or teaching the receiver the commands (see Operating other Pioneer components on the remote displays the component you have two TVs, assign the main TV to control then press ENTER. DTV Switches the DTV on or off . If you ...
... select DIRECT F then press ENTER. 3 Press the MULTI CONTROL button for which preset code is assigned to check the preset code then press ENTER. The remote LCD display shows SETUP. 2 Use / to select READ ID then press ENTER. 3 Press the MULTI CONTROL button of your system 1 While pressing the RECEIVER ... can control components after entering the proper codes or teaching the receiver the commands (see Operating other Pioneer components on the remote displays the component you have two TVs, assign the main TV to control then press ENTER. DTV Switches the DTV on or off . If you ...
Operating Instructions
Page 52
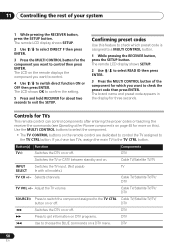
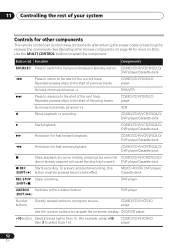
... start of following tracks. 11 Controlling the rest of your system Controls for other components This remote control can control these components after entering the proper codes or teaching the receiver the commands (see Operating other Pioneer components on page 48 for fast forward playback. CD/MD/CD-R/VCR/LD player Use...
... start of following tracks. 11 Controlling the rest of your system Controls for other components This remote control can control these components after entering the proper codes or teaching the receiver the commands (see Operating other Pioneer components on page 48 for fast forward playback. CD/MD/CD-R/VCR/LD player Use...
Operating Instructions
Page 57
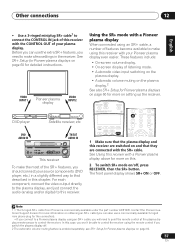
...SR+ cable, a number of features become available to make using the remote control if you need to point the remote control at the plasma display remote sensor to control the receiver. See Using this receiver with a Pioneer plasma display above for more on this case, you won't be able... setting up the receiver. VIDEO INPUT 1 Pioneer plasma display VIDEO INPUT 2 DVD player Satellite receiver, etc DVD AUDIO IN TV/SAT AUDIO IN ADVANCED ST/DIRECT/ STANDARD SURR AUTO SURR LISTENING MODE STANDBY/ON PHONES AUDIO/VIDEO MULTI-CHANNEL RECEIVER VSX-816 ENTER MULTI JOG DVD / LD TV ...
...SR+ cable, a number of features become available to make using the remote control if you need to point the remote control at the plasma display remote sensor to control the receiver. See Using this receiver with a Pioneer plasma display above for more on this case, you won't be able... setting up the receiver. VIDEO INPUT 1 Pioneer plasma display VIDEO INPUT 2 DVD player Satellite receiver, etc DVD AUDIO IN TV/SAT AUDIO IN ADVANCED ST/DIRECT/ STANDARD SURR AUTO SURR LISTENING MODE STANDBY/ON PHONES AUDIO/VIDEO MULTI-CHANNEL RECEIVER VSX-816 ENTER MULTI JOG DVD / LD TV ...
Operating Instructions
Page 58
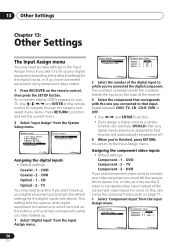
... DVR ] :Return :Finish 58 En This setting tells the receiver what you have connected equipment using component video cables. 1 Press RECEIVER on the remote control, then press the SETUP button. You return to the default settings for the digital inputs, or if you 've connected the digital component. Assigning...component video signal. The numbers correspond with the one you 're finished, press RETURN. Use / / / and ENTER on the remote control to navigate through the screens and select menu items. Press RETURN to that corresponds with the numbers beside the inputs on your ...
... DVR ] :Return :Finish 58 En This setting tells the receiver what you have connected equipment using component video cables. 1 Press RECEIVER on the remote control, then press the SETUP button. You return to the default settings for the digital inputs, or if you 've connected the digital component. Assigning...component video signal. The numbers correspond with the one you 're finished, press RETURN. Use / / / and ENTER on the remote control to navigate through the screens and select menu items. Press RETURN to that corresponds with the numbers beside the inputs on your ...


