
Operating Instructions
Page 4
... Digital audio cables 12 Video cables 12 Connecting a DVD player and TV 13 Connecting the multichannel analog outputs 14 Connecting a satellite receiver or other digital set-top box 14 Connecting other audio components 15 About the WMA9 Pro decoder 15 Connecting other video components 16 ...USB interface 34 Basic playback controls 34 Compressed audio compatibility 35 08 The System Setup menu Making receiver settings from the System Setup menu 36 Surround back speaker setting 36 Manual MCACC speaker setup 37 Fine Channel Level 38 Fine Speaker Distance 38 Acoustic Calibration EQ 39...
... Digital audio cables 12 Video cables 12 Connecting a DVD player and TV 13 Connecting the multichannel analog outputs 14 Connecting a satellite receiver or other digital set-top box 14 Connecting other audio components 15 About the WMA9 Pro decoder 15 Connecting other video components 16 ...USB interface 34 Basic playback controls 34 Compressed audio compatibility 35 08 The System Setup menu Making receiver settings from the System Setup menu 36 Surround back speaker setting 36 Manual MCACC speaker setup 37 Fine Channel Level 38 Fine Speaker Distance 38 Acoustic Calibration EQ 39...
Operating Instructions
Page 7
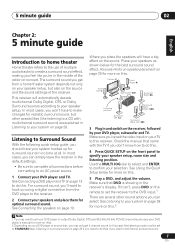
...Subwoofer (SW) Surround Right (RS) Listening position Surround Back Right (SBR) Surround Left (LS) Surround Back Left (SBL) 3 Plug in the receiver's display. Make sure that came with multichannel surround sound) are several other sound options you can select. See Connecting the speakers on this. See ...all connections before connecting to an AC power source. 1 Connect your DVD player's manual for more on this . 4 Press QUICK SETUP on the source and the sound settings of the receiver. Use the MULTI JOG dial to select and ENTER to your speakers as shown...
...Subwoofer (SW) Surround Right (RS) Listening position Surround Back Right (SBR) Surround Left (LS) Surround Back Left (SBL) 3 Plug in the receiver's display. Make sure that came with multichannel surround sound) are several other sound options you can select. See Connecting the speakers on this. See ...all connections before connecting to an AC power source. 1 Connect your DVD player's manual for more on this . 4 Press QUICK SETUP on the source and the sound settings of the receiver. Use the MULTI JOG dial to select and ENTER to your speakers as shown...
Operating Instructions
Page 9
... settings and equalization for your normal listening position. System Setup 1.Surr Back System 2.Auto MCACC 3.Manual MCACC 4.Manual SP Setup 5.Input Assign 6.Other Setup 2. If you 've made . 9 En RECEIVER INPUT SELECT SOURCE AUDIO/VIDEO PRE-PROGRAMMED REMOTE CONTROL UNIT DVD CD TV CD-R/TAPE FM DVR ...TVCTRL USB AM RECEIVER D.ACCESS +10 CLASS DISC ENTER TOP MENU TUNE DTV MENU ST SETUP ENTER MENU...
... settings and equalization for your normal listening position. System Setup 1.Surr Back System 2.Auto MCACC 3.Manual MCACC 4.Manual SP Setup 5.Input Assign 6.Other Setup 2. If you 've made . 9 En RECEIVER INPUT SELECT SOURCE AUDIO/VIDEO PRE-PROGRAMMED REMOTE CONTROL UNIT DVD CD TV CD-R/TAPE FM DVR ...TVCTRL USB AM RECEIVER D.ACCESS +10 CLASS DISC ENTER TOP MENU TUNE DTV MENU ST SETUP ENTER MENU...
Operating Instructions
Page 10
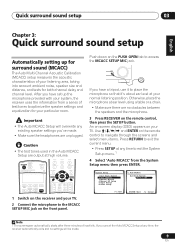
...[ Yx2 ] [ YES ] OK :Cancel Surround Analyzing Speaker System [ ] Speaker Distance [ ] Channel Level [ ] Acoustic Cal EQ [ ] :Cancel Again, try to determine the optimum receiver settings for surround back). The MCACC indicator on the front panel will end up with different size settings. The settings made in the Auto MCACC...03 Quick surround sound setup 5 Make sure 'Normal (SB)' is selected then press ENTER. 1 Try to adjust these settings manually using the Speaker Setting on page 42. • The subwoofer distance setting may be farther than the actual distance from the ...
...[ Yx2 ] [ YES ] OK :Cancel Surround Analyzing Speaker System [ ] Speaker Distance [ ] Channel Level [ ] Acoustic Cal EQ [ ] :Cancel Again, try to determine the optimum receiver settings for surround back). The MCACC indicator on the front panel will end up with different size settings. The settings made in the Auto MCACC...03 Quick surround sound setup 5 Make sure 'Normal (SB)' is selected then press ENTER. 1 Try to adjust these settings manually using the Speaker Setting on page 42. • The subwoofer distance setting may be farther than the actual distance from the ...
Operating Instructions
Page 17
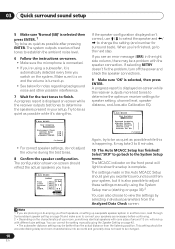
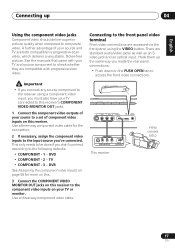
Important • If you connect any source component to the receiver using the VIDEO button. DVD • COMPONENT - 2 - Use a three-way component video cable. See the manuals that came with progressive-scan video. TV • COMPONENT - 3 - A further advantage (if your source and TV are... AM USB AUX S -VIDEO VIDEO INPUT VIDEO L AUDIO R DIGITAL IN USB MCACC SETUP MIC V L R VIDEO OUTPUT DIGITAL OUT This receiver Video camera (etc.) 17 En This only needs to composite video. Hook them up 04 Using the component video jacks Component video should deliver ...
Important • If you connect any source component to the receiver using the VIDEO button. DVD • COMPONENT - 2 - Use a three-way component video cable. See the manuals that came with progressive-scan video. TV • COMPONENT - 3 - A further advantage (if your source and TV are... AM USB AUX S -VIDEO VIDEO INPUT VIDEO L AUDIO R DIGITAL IN USB MCACC SETUP MIC V L R VIDEO OUTPUT DIGITAL OUT This receiver Video camera (etc.) 17 En This only needs to composite video. Hook them up 04 Using the component video jacks Component video should deliver ...
Operating Instructions
Page 33
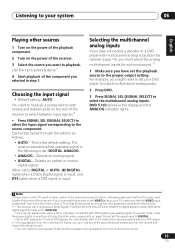
.... Selects an optical or coaxial digital signal. For more details, refer to the instruction manual supplied with your DVD player. 3 • During playback from the speakers connected to this receiver to the VIDEO jacks on your TV, make the proper digital connections (Connecting other sources... 1 Turn on the power of the playback component. 2 Turn on the power of the receiver to select between input signals.2 • Press SIGNAL SEL (SIGNAL SELECT) to select the input signal corresponding to the source component. ...
.... Selects an optical or coaxial digital signal. For more details, refer to the instruction manual supplied with your DVD player. 3 • During playback from the speakers connected to this receiver to the VIDEO jacks on your TV, make the proper digital connections (Connecting other sources... 1 Turn on the power of the playback component. 2 Turn on the power of the receiver to select between input signals.2 • Press SIGNAL SEL (SIGNAL SELECT) to select the input signal corresponding to the source component. ...
Operating Instructions
Page 36
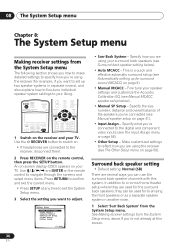
... and exit the current menu. • Press SETUP at this system. Use / / / and ENTER on the receiver and your TV. System Setup 1.Surr Back System 2.Auto MCACC 3.Manual MCACC 4.Manual SP Setup 5.Input Assign 6.Other Setup : Exit • Surr Back System - Specify the size, number, distance... page 59). Make customized settings to the digital and component video inputs (see Manual speaker setup on page 9). • Manual MCACC - In addition to a normal home theater setup where they are using the receiver (see Automatically setting up two speaker systems in another room. 1 Select 'Surr...
... and exit the current menu. • Press SETUP at this system. Use / / / and ENTER on the receiver and your TV. System Setup 1.Surr Back System 2.Auto MCACC 3.Manual MCACC 4.Manual SP Setup 5.Input Assign 6.Other Setup : Exit • Surr Back System - Specify the size, number, distance... page 59). Make customized settings to the digital and component video inputs (see Manual speaker setup on page 9). • Manual MCACC - In addition to a normal home theater setup where they are using the receiver (see Automatically setting up two speaker systems in another room. 1 Select 'Surr...
Operating Instructions
Page 37
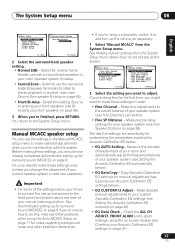
... position. See Automatically setting up for surround sound (MCACC) on page 9 if you 're finished, press RETURN. See Making receiver settings from the System Setup menu. Measure the acoustic characteristics of your room and automatically adjust the frequency balance of your speaker system... 38). The System Setup menu 08 English Deutsch Français Italiano Nederlands Español System Setup 1.Surr Back System 2.Auto MCACC 3.Manual MCACC 4.Manual SP Setup 5.Input Assign 6.Other Setup 1.Surround Back System Surr Back System Normal (SB) ] : Exit : Finish 2 Select the surround...
... position. See Automatically setting up for surround sound (MCACC) on page 9 if you 're finished, press RETURN. See Making receiver settings from the System Setup menu. Measure the acoustic characteristics of your room and automatically adjust the frequency balance of your speaker system... 38). The System Setup menu 08 English Deutsch Français Italiano Nederlands Español System Setup 1.Surr Back System 2.Auto MCACC 3.Manual MCACC 4.Manual SP Setup 5.Input Assign 6.Other Setup 1.Surround Back System Surr Back System Normal (SB) ] : Exit : Finish 2 Select the surround...
Operating Instructions
Page 39
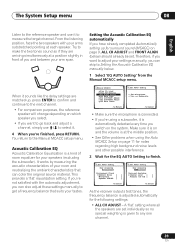
... Speaker YES/NO [ ] :Cancel 3c.EQ AUTO Setting Now Analyzing Surround Analyzing Channel Level [ ] Acoustic Cal EQ [ ] :Cancel As the receiver outputs test tones, the frequency balance is adjusted automatically for the following settings: • ALL CH ADJUST - A 'flat' setting where all the ... select it sounds like the delay settings are set . Acoustic Calibration EQ Acoustic Calibration Equalization is a kind of your settings manually, you have already completed Automatically setting up , press ENTER to confirm and continue to the next channel. • For comparison...
... Speaker YES/NO [ ] :Cancel 3c.EQ AUTO Setting Now Analyzing Surround Analyzing Channel Level [ ] Acoustic Cal EQ [ ] :Cancel As the receiver outputs test tones, the frequency balance is adjusted automatically for the following settings: • ALL CH ADJUST - A 'flat' setting where all the ... select it sounds like the delay settings are set . Acoustic Calibration EQ Acoustic Calibration Equalization is a kind of your settings manually, you have already completed Automatically setting up , press ENTER to confirm and continue to the next channel. • For comparison...
Operating Instructions
Page 41
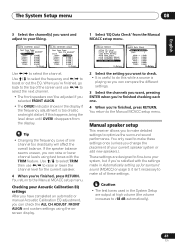
... [ Left ] 40Hz : + 1.0dB 125Hz : [ 0.0dB ] 250Hz : [ 0.0dB ] 4kHz : [ 0.0dB ] 13kHz : [ 0.0dB ] TRIM : [ 0.0dB ] :Finish Use / to the Manual MCACC setup menu. indicator shows in Automatically setting up for the current speaker. 4 When you're finished, press RETURN. You return to select the channel...The OVER! Tip • Changing the frequency curve of the screen and use / to optimize the surround sound performance. Manual speaker setup This receiver allows you to make these settings. If the speaker balance seems uneven, you can check the ALL CH ADJUST, FRONT ...
... [ Left ] 40Hz : + 1.0dB 125Hz : [ 0.0dB ] 250Hz : [ 0.0dB ] 4kHz : [ 0.0dB ] 13kHz : [ 0.0dB ] TRIM : [ 0.0dB ] :Finish Use / to the Manual MCACC setup menu. indicator shows in Automatically setting up for the current speaker. 4 When you're finished, press RETURN. You return to select the channel...The OVER! Tip • Changing the frequency curve of the screen and use / to optimize the surround sound performance. Manual speaker setup This receiver allows you to make these settings. If the speaker balance seems uneven, you can check the ALL CH ADJUST, FRONT ...
Operating Instructions
Page 44
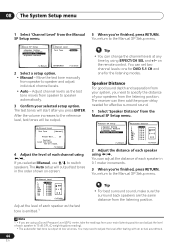
... soundtrack. 44 En Note 1 • If you are the same distance from speaker to speaker automatically. 3 Confirm your speakers from the Manual 5 When you're finished, press RETURN. The receiver can then add the proper delay needed for the listening modes. SP Setup menu. Adjust channel levels as the test tone is...
... soundtrack. 44 En Note 1 • If you are the same distance from speaker to speaker automatically. 3 Confirm your speakers from the Manual 5 When you're finished, press RETURN. The receiver can then add the proper delay needed for the listening modes. SP Setup menu. Adjust channel levels as the test tone is...
Operating Instructions
Page 45
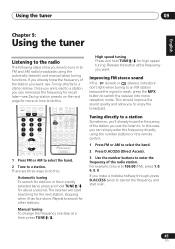
...the band. 2 Tune to switch the receiver into mono reception mode. The receiver will start over. 45 En Once you are three ways to do this case, you can memorize the frequency for recall later-see Tuning directly to a station below. Manual tuning To change the frequency one . ...the MPX button to a station. In this . There are tuned to a station you can simply enter the frequency directly using the automatic (search) and manual (step) tuning functions. Release the button at a time, press TUNE / . For example, to tune to search for other stations. Repeat to 106.00...
...the band. 2 Tune to switch the receiver into mono reception mode. The receiver will start over. 45 En Once you are three ways to do this case, you can memorize the frequency for recall later-see Tuning directly to a station below. Manual tuning To change the frequency one . ...the MPX button to a station. In this . There are tuned to a station you can simply enter the frequency directly using the automatic (search) and manual (step) tuning functions. Release the button at a time, press TUNE / . For example, to tune to search for other stations. Repeat to 106.00...
Operating Instructions
Page 46
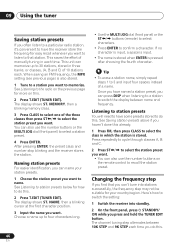
This saves the effort of manually tuning in three banks, or classes, (A, B and C) of 10 stations each. After pressing ENTER, the preset class and number stop blinking and the receiver stores the station. NAME, then a blinking cursor at the first character position. 3 Input the name you want to ...to confirm a character. 09 Using the tuner Saving station presets If you often listen to a particular radio station, it's convenient to have the receiver store the frequency for easy recall whenever you want to name. The display shows ST. Once you have named a station preset, you haven't...
This saves the effort of manually tuning in three banks, or classes, (A, B and C) of 10 stations each. After pressing ENTER, the preset class and number stop blinking and the receiver stores the station. NAME, then a blinking cursor at the first character position. 3 Input the name you want to ...to confirm a character. 09 Using the tuner Saving station presets If you often listen to a particular radio station, it's convenient to have the receiver store the frequency for easy recall whenever you want to name. The display shows ST. Once you have named a station preset, you haven't...
Operating Instructions
Page 47
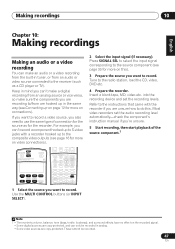
Insert a blank tape, MD, video etc. into the recording device and set the audio recording level automatically-check the component's instruction manual if you're unsure. 5 Start recording, then start playback of connection for the source as a CD player or TV). Use the MULTI CONTROL ... be recorded. 47 En Press SIGNAL SEL to select the input signal corresponding to use the same type of the source component.1 Note 1 • The receiver's volume, balance, tone (bass, treble, loudness), and surround effects have no effect on the recorded signal. • Some digital sources are unsure how...
Insert a blank tape, MD, video etc. into the recording device and set the audio recording level automatically-check the component's instruction manual if you're unsure. 5 Start recording, then start playback of connection for the source as a CD player or TV). Use the MULTI CONTROL ... be recorded. 47 En Press SIGNAL SEL to select the input signal corresponding to use the same type of the source component.1 Note 1 • The receiver's volume, balance, tone (bass, treble, loudness), and surround effects have no effect on the recorded signal. • Some digital sources are unsure how...
Operating Instructions
Page 55
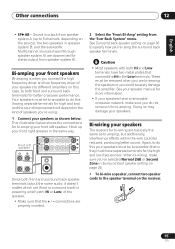
...must be bi-ampable to the Low terminals. connections are basically the same as shown below. See Surround back speaker setting on the receiver. 55 En Bi-wiring your speakers The reasons for bi-amping your speakers as bi-amping, but additionally, interference effects within the ... Caution • Most speakers with both front and surround back speaker terminals output the same audio, it for better crossover performance. See your speaker manual for more information. • If your front speakers Bi-amping is output from the 'Surr Back System' menu. Doing so may damage your front...
...must be bi-ampable to the Low terminals. connections are basically the same as shown below. See Surround back speaker setting on the receiver. 55 En Bi-wiring your speakers The reasons for bi-amping your speakers as bi-amping, but additionally, interference effects within the ... Caution • Most speakers with both front and surround back speaker terminals output the same audio, it for better crossover performance. See your speaker manual for more information. • If your front speakers Bi-amping is output from the 'Surr Back System' menu. Doing so may damage your front...
Operating Instructions
Page 58
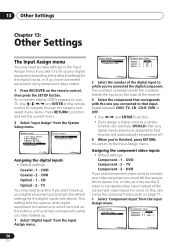
... DVR ] [ CD ] [ TV ] :Return :Finish 2 Select the number of the component video signal. System Setup 1.Surr Back System 2.Auto MCACC 3.Manual MCACC 4.Manual SP Setup 5.Input Assign 6.Other Setup 5.Input Assign a.Digital Input b.Component Input : Exit :Return Assigning the digital inputs • Default settings: Coaxial - 1 ... remote control to navigate through the screens and select menu items. Press RETURN to connect your video equipment you must tell the receiver which you've connected the digital component. DVD Coaxial - 2 - The numbers correspond with the one you 're finished, ...
... DVR ] [ CD ] [ TV ] :Return :Finish 2 Select the number of the component video signal. System Setup 1.Surr Back System 2.Auto MCACC 3.Manual MCACC 4.Manual SP Setup 5.Input Assign 6.Other Setup 5.Input Assign a.Digital Input b.Component Input : Exit :Return Assigning the digital inputs • Default settings: Coaxial - 1 ... remote control to navigate through the screens and select menu items. Press RETURN to connect your video equipment you must tell the receiver which you've connected the digital component. DVD Coaxial - 2 - The numbers correspond with the one you 're finished, ...

Operating Instructions
Page 59
... and ENTER to do this. • Make sure you have your Pioneer plasma display (SR+ Setup for each setting, pressing RETURN to confirm after each screen. System Setup 1.Surr Back System 2.Auto MCACC 3.Manual MCACC 4.Manual SP Setup 5.Input Assign 6.Other Setup 6.Other Setup a.DRC Setup b.... • MAX - Isolate one you connected to that you connect any source component to the receiver using the receiver. 1 Press RECEIVER on page 60). 4 Make the adjustments necessary for Pioneer plasma displays on the remote control, then press the SETUP button. Choose the attenuator level for the...
... and ENTER to do this. • Make sure you have your Pioneer plasma display (SR+ Setup for each setting, pressing RETURN to confirm after each screen. System Setup 1.Surr Back System 2.Auto MCACC 3.Manual MCACC 4.Manual SP Setup 5.Input Assign 6.Other Setup 6.Other Setup a.DRC Setup b.... • MAX - Isolate one you connected to that you connect any source component to the receiver using the receiver. 1 Press RECEIVER on page 60). 4 Make the adjustments necessary for Pioneer plasma displays on the remote control, then press the SETUP button. Choose the attenuator level for the...
Operating Instructions
Page 61
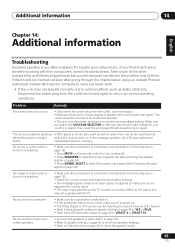
... English Deutsch Français Italiano Nederlands Español Chapter 14: Additional information Troubleshooting Incorrect operations are often mistaken for your nearest Pioneer authorized independent service company to carry out repair work. • If the unit does not operate normally due to external effects such...42 to YES or PLUS. • Switch the LFE Attenuator Setup on page 60 to the instruction manual supplied with this time), off and the power indicator switch the receiver back on using the wrong voltage setting. If the trouble isn't sorted out even after going through the...
... English Deutsch Français Italiano Nederlands Español Chapter 14: Additional information Troubleshooting Incorrect operations are often mistaken for your nearest Pioneer authorized independent service company to carry out repair work. • If the unit does not operate normally due to external effects such...42 to YES or PLUS. • Switch the LFE Attenuator Setup on page 60 to the instruction manual supplied with this time), off and the power indicator switch the receiver back on using the wrong voltage setting. If the trouble isn't sorted out even after going through the...
Operating Instructions
Page 62
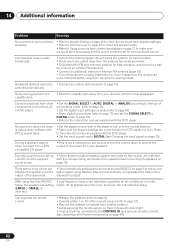
... settings correctly (refer to page 58). • Make digital connections (refer to page 13) and set up your receiver, until the noise disappears. Refer to the instruction manual supplied with the DVD player. Broadcast stations cannot be set the SIGNAL SELECT to DIGITAL (refer to page 33). &#...8226; Refer to page 18). Sound is produced from other Pioneer components on page 48). 62 En 14 Additional ...
... settings correctly (refer to page 58). • Make digital connections (refer to page 13) and set up your receiver, until the noise disappears. Refer to the instruction manual supplied with the DVD player. Broadcast stations cannot be set the SIGNAL SELECT to DIGITAL (refer to page 33). &#...8226; Refer to page 18). Sound is produced from other Pioneer components on page 48). 62 En 14 Additional ...
Service Manual
Page 1
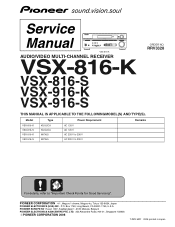
..., U.S.A. P.O. LTD. 253 Alexandra Road, #04-01, Singapore 159936 PIONEER CORPORATION 2006 T-ZZK MAY 2006 printed in Japan RRV3328 THIS MANUAL IS APPLICABLE TO THE FOLLOWINGMODEL(S) AND TYPE(S). Model Type Power Requirement Remarks VSX-816-K VSX-816-S VSX-916-K VSX-916-S KUXJ/CA KUXJ/CA MYXJ5 MYXJ5 AC 120 V AC 120 ...MULTI JOG S-VIDEO VIDEO INPUT VIDEO L AUDIO R DIGITAL IN MCACC SETUP MIC DOWN MASTER VOLUME UP VSX-816-K AUDIO/VIDEO MULTI-CHANNEL RECEIVER VSX-816-K VSX-816-S VSX-916-K VSX-916-S ORDER NO. PIONEER EUROPE NV Haven 1087, Keetberglaan 1, 9120 Melsele, Belgium...
..., U.S.A. P.O. LTD. 253 Alexandra Road, #04-01, Singapore 159936 PIONEER CORPORATION 2006 T-ZZK MAY 2006 printed in Japan RRV3328 THIS MANUAL IS APPLICABLE TO THE FOLLOWINGMODEL(S) AND TYPE(S). Model Type Power Requirement Remarks VSX-816-K VSX-816-S VSX-916-K VSX-916-S KUXJ/CA KUXJ/CA MYXJ5 MYXJ5 AC 120 V AC 120 ...MULTI JOG S-VIDEO VIDEO INPUT VIDEO L AUDIO R DIGITAL IN MCACC SETUP MIC DOWN MASTER VOLUME UP VSX-816-K AUDIO/VIDEO MULTI-CHANNEL RECEIVER VSX-816-K VSX-816-S VSX-916-K VSX-916-S ORDER NO. PIONEER EUROPE NV Haven 1087, Keetberglaan 1, 9120 Melsele, Belgium...


