
Owner's Manual
Page 4
...the Multi Channel Analog Inputs (DVD-Audio or Super Audio CD (SACD) compatible player 21 Connecting Digital Audio Components 22 Digital Input Default Settings 23 Connecting the Radio Antennas 24 Using outdoor antennas 24 Connecting Speakers 25 Speaker impedance 26 Bi-wiring your speakers 26 Placing Your Speakers 27 Speaker placement 27 Power Connections (AC OUTLETS 27 Displays and Controls 28 Front Panel 28 Remote Control 30 Display 33 Back Panel 34 Setting Up for Surround Sound ........ 36 Surround Back System 37 NORMAL Setup 38 Speaker Setting 39 Channel Level 41 Speaker...
...the Multi Channel Analog Inputs (DVD-Audio or Super Audio CD (SACD) compatible player 21 Connecting Digital Audio Components 22 Digital Input Default Settings 23 Connecting the Radio Antennas 24 Using outdoor antennas 24 Connecting Speakers 25 Speaker impedance 26 Bi-wiring your speakers 26 Placing Your Speakers 27 Speaker placement 27 Power Connections (AC OUTLETS 27 Displays and Controls 28 Front Panel 28 Remote Control 30 Display 33 Back Panel 34 Setting Up for Surround Sound ........ 36 Surround Back System 37 NORMAL Setup 38 Speaker Setting 39 Channel Level 41 Speaker...

Owner's Manual
Page 5
... Assigning the Component Video Inputs 82 Function Rename 83 12V TRIGGER function 84 Expert System Settings 85 EXPERT Setup 85 Crossover Network 86 Fine Channel Level 87 Fine Channel Delay 88 Acoustic Calibration EQ 89 Bass Peak Level 94 Dynamic Range Control 95 Techno Tidbits and Problem-solving 96 Dolby 96 Dolby Digital 96 Dolby Pro Logic II 96 Dolby Digital Surround EX 96 DTS 96 DTS 96 DTS-ES 97 DTS Neo:6 97 DTS 96/24 97 THX 97 Troubleshooting 98 Preset Code...
... Assigning the Component Video Inputs 82 Function Rename 83 12V TRIGGER function 84 Expert System Settings 85 EXPERT Setup 85 Crossover Network 86 Fine Channel Level 87 Fine Channel Delay 88 Acoustic Calibration EQ 89 Bass Peak Level 94 Dynamic Range Control 95 Techno Tidbits and Problem-solving 96 Dolby 96 Dolby Digital 96 Dolby Pro Logic II 96 Dolby Digital Surround EX 96 DTS 96 DTS 96 DTS-ES 97 DTS Neo:6 97 DTS 96/24 97 THX 97 Troubleshooting 98 Preset Code...
Owner's Manual
Page 6
... home theater sound with minimum effort. On the video side, the component video output is switched on. and TM. Used under authorization. *Manufactured under license from the receiver makes trouble-free setup a snap. Its high compatibility offers a variety of inputs to decode all existing audio formats, including the recently developed Dolby Pro Logic II and DTS-ES Extended Surround formats on automatically when the VSX-53TX is fully compatible with surround back speakers...
... home theater sound with minimum effort. On the video side, the component video output is switched on. and TM. Used under authorization. *Manufactured under license from the receiver makes trouble-free setup a snap. Its high compatibility offers a variety of inputs to decode all existing audio formats, including the recently developed Dolby Pro Logic II and DTS-ES Extended Surround formats on automatically when the VSX-53TX is fully compatible with surround back speakers...

Owner's Manual
Page 11
...Front speaker (Left) Powered subwoofer TV/monitor Front speaker (Right) Center speaker Surround speaker (Left) Surround speaker (Right) Surround back speaker (Left) Surround back speaker (Right) Memo: • We recommend speakers with fewer speakers. The diagram below in order to hook up a subwoofer which provides realistic bass sounds. Follow the diagram below also explains how to hook up all the sound channels on the left and right; For the subwoofer use surround back speakers. center; EASY SETUP GUIDE Easy Setup Guide Part 1 2 Speaker Connections Home theater...
...Front speaker (Left) Powered subwoofer TV/monitor Front speaker (Right) Center speaker Surround speaker (Left) Surround speaker (Right) Surround back speaker (Left) Surround back speaker (Right) Memo: • We recommend speakers with fewer speakers. The diagram below in order to hook up a subwoofer which provides realistic bass sounds. Follow the diagram below also explains how to hook up all the sound channels on the left and right; For the subwoofer use surround back speakers. center; EASY SETUP GUIDE Easy Setup Guide Part 1 2 Speaker Connections Home theater...

Owner's Manual
Page 13
... SETUP MIC jack on your TV to follow these instructions. Front Speaker (L) Listening Position Subwoofer 3 Surround Speaker (R) Surround Back Speaker (R) 4 Surround Speaker (L) 5 Surround Back Speaker (L) Switch on your TV. 7 The arrow should be an involved task you only need to use the on-screen display (OSD) that the receiver can affix the mic stand to it. You'll need to hook up your surround sound below. Press the RECEIVER button on the remote control. 6 Press the SYSTEM SETUP button...
... SETUP MIC jack on your TV to follow these instructions. Front Speaker (L) Listening Position Subwoofer 3 Surround Speaker (R) Surround Back Speaker (R) 4 Surround Speaker (L) 5 Surround Back Speaker (L) Switch on your TV. 7 The arrow should be an involved task you only need to use the on-screen display (OSD) that the receiver can affix the mic stand to it. You'll need to hook up your surround sound below. Press the RECEIVER button on the remote control. 6 Press the SYSTEM SETUP button...

Owner's Manual
Page 15
...; buttons to select the size of test tones to do this check the DVD initial setup in "EXPERT Setup" on the receiver. 3 Play a DVD then adjust the MASTER VOLUME. The system will light and the surround sound settings are complete. 2 Playing a DVD with the operation of the soundtrack. Memo: To get a more refined sound, make the sound settings in the manual that came with your DVD player are not correct. If you're having trouble getting 5.1 channel playback...
...; buttons to select the size of test tones to do this check the DVD initial setup in "EXPERT Setup" on the receiver. 3 Play a DVD then adjust the MASTER VOLUME. The system will light and the surround sound settings are complete. 2 Playing a DVD with the operation of the soundtrack. Memo: To get a more refined sound, make the sound settings in the manual that came with your DVD player are not correct. If you're having trouble getting 5.1 channel playback...
Owner's Manual
Page 22
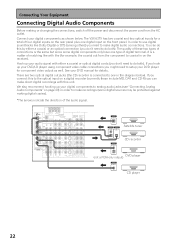
... some digital sources may be protected against making or changing the connections, switch off the power and disconnect the power cord from the component to coaxial in the diagram below . DIGITAL OUTPUT DIGITAL OUTPUT (PLAY) DIGITAL INPUT (REC) Satellite tuner DIGITAL OUTPUT CD recorder (not a PCM-only output) DVD player DIGITAL OUTPUT CD player 22 Connecting Your Equipment Connecting Digital Audio Components Before making digital copies). *The arrows indicate the direction of the audio signal. Hook up your audio signal with either a coaxial or optical digital cords (you...
... some digital sources may be protected against making or changing the connections, switch off the power and disconnect the power cord from the component to coaxial in the diagram below . DIGITAL OUTPUT DIGITAL OUTPUT (PLAY) DIGITAL INPUT (REC) Satellite tuner DIGITAL OUTPUT CD recorder (not a PCM-only output) DVD player DIGITAL OUTPUT CD player 22 Connecting Your Equipment Connecting Digital Audio Components Before making digital copies). *The arrows indicate the direction of the audio signal. Hook up your audio signal with either a coaxial or optical digital cords (you...

Owner's Manual
Page 28
... set on the lower third of SURROUND modes: MOVIE: Press to put the receiver into STEREO mode if it to switch the receiver ON or into MOVIE mode (see page 47). To open the front panel push gently on and this display will light.) 9 MULTI CH IN button Use this dial for example, a DVD-Audio player). 28 select a function or a listening mode or do TUNER EDIT functions (in a different sound mode or toggles between DIRECT and STEREO mode...
... set on the lower third of SURROUND modes: MOVIE: Press to put the receiver into STEREO mode if it to switch the receiver ON or into MOVIE mode (see page 47). To open the front panel push gently on and this display will light.) 9 MULTI CH IN button Use this dial for example, a DVD-Audio player). 28 select a function or a listening mode or do TUNER EDIT functions (in a different sound mode or toggles between DIRECT and STEREO mode...

Owner's Manual
Page 31
... must input the preset code in order to use the + and - PREPARATION Displays and Controls BASS/TREBLE buttons (see page 51) Use to select whether the bass or treble will cycle through all the possible sources. To select an optical or coaxial digital signal. TV button This is sent from the remote control to toggle between ON/OFF/AUTO. EFFECT/CH SEL button Switches between the different channels so you have hooked up to turn on or...
... must input the preset code in order to use the + and - PREPARATION Displays and Controls BASS/TREBLE buttons (see page 51) Use to select whether the bass or treble will cycle through all the possible sources. To select an optical or coaxial digital signal. TV button This is sent from the remote control to toggle between ON/OFF/AUTO. EFFECT/CH SEL button Switches between the different channels so you have hooked up to turn on or...

Owner's Manual
Page 36
... connected and set to select it isn't use the buttons to the video input the receiver is set up the receiver. If it . NORMAL (page 38) Use this setup. In each mode, the current settings are the same (and take precedence over) the settings you made at that it more personalized. 36 AUTO SETTING (page 13) See the Easy Setup Guide Part 2 for surround sound see page 13. 1 Turn on your surround...
... connected and set to select it isn't use the buttons to the video input the receiver is set up the receiver. If it . NORMAL (page 38) Use this setup. In each mode, the current settings are the same (and take precedence over) the settings you made at that it more personalized. 36 AUTO SETTING (page 13) See the Easy Setup Guide Part 2 for surround sound see page 13. 1 Turn on your surround...

Owner's Manual
Page 48
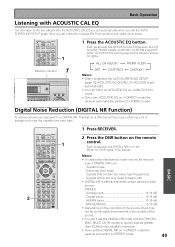
... center speaker, only as a "phantom" channel or in the receiver's display. PANORAMA: This gives the music a wraparound surround feel. These settings are : CLASSICAL, CHAMBER, JAZZ, ROCK, DANCE, 5/7CH STEREO. 1 Press RECEIVER. 2 Press the EFFECT/CH SEL button repeatedly until you want . If you can heard only from which adjust the spatial feeling of the surround sound. Basic Operation Adjusting the Effect of a Listening Mode The DSP (Digital Signal Processing) listening modes...
... center speaker, only as a "phantom" channel or in the receiver's display. PANORAMA: This gives the music a wraparound surround feel. These settings are : CLASSICAL, CHAMBER, JAZZ, ROCK, DANCE, 5/7CH STEREO. 1 Press RECEIVER. 2 Press the EFFECT/CH SEL button repeatedly until you want . If you can heard only from which adjust the spatial feeling of the surround sound. Basic Operation Adjusting the Effect of a Listening Mode The DSP (Digital Signal Processing) listening modes...
Owner's Manual
Page 49
... switch on the remote control. EMA, MULTI CH IN modes or source signals greater than 88.2kHz over a digital connection. • If you set automatically. • You can't turn on ACOUSTIC EQ on in MULTI CH IN mode. • If you set manually on in DIRECT mode, the receiver automatically switches to STEREO mode. Each press switches DIGITAL NR on , DNR lights in the display. When ACOUSTIC EQ is effective with sources containing a lot of the sound...
... switch on the remote control. EMA, MULTI CH IN modes or source signals greater than 88.2kHz over a digital connection. • If you set automatically. • You can't turn on ACOUSTIC EQ on in MULTI CH IN mode. • If you set manually on in DIRECT mode, the receiver automatically switches to STEREO mode. Each press switches DIGITAL NR on , DNR lights in the display. When ACOUSTIC EQ is effective with sources containing a lot of the sound...

Owner's Manual
Page 74
...component. Receiver RECEIVER MULTI SYSTEM SOURCE OPERATION OFF MULTI CONTROL DVD/LD TV / SAT VCR/DVR TV CONT VCR 2 CD TUNER MOVIE MUSIC ACOUSTIC EQ RECEIVER INPUT SURROUND MODE SB CH MULTI CH MODE INPUT STEREO/ DIRECT ENTER MIDNIGHT MUTE MASTER VOLUME MENU TUNER EDIT TOP MENU SYSTEM SETUP ST TUNE GUIDE ST ENTER AUDIO TUNE RETURN - + CHANNEL DTV ON/OFF BAND CHANNEL RF ATT D.ACCESS MPX CLASS DIMMER LOUDNESS TONE EFFECT/CH SEL ENTER SIGNAL SEL DNR BASS/TREBLE DISC VIDEO SEL HI-BIT +- +10 TV CONTROL SUB TITLE INPUT SELECT CHANNEL VOLUME REMOTE SETUP RECEIVER...
...component. Receiver RECEIVER MULTI SYSTEM SOURCE OPERATION OFF MULTI CONTROL DVD/LD TV / SAT VCR/DVR TV CONT VCR 2 CD TUNER MOVIE MUSIC ACOUSTIC EQ RECEIVER INPUT SURROUND MODE SB CH MULTI CH MODE INPUT STEREO/ DIRECT ENTER MIDNIGHT MUTE MASTER VOLUME MENU TUNER EDIT TOP MENU SYSTEM SETUP ST TUNE GUIDE ST ENTER AUDIO TUNE RETURN - + CHANNEL DTV ON/OFF BAND CHANNEL RF ATT D.ACCESS MPX CLASS DIMMER LOUDNESS TONE EFFECT/CH SEL ENTER SIGNAL SEL DNR BASS/TREBLE DISC VIDEO SEL HI-BIT +- +10 TV CONTROL SUB TITLE INPUT SELECT CHANNEL VOLUME REMOTE SETUP RECEIVER...

Owner's Manual
Page 85
... menus. BASS PEAK LEVEL (page 94) Dolby Digital and DTS audio sources include ultra-low bass tones. These settings are not absolutely necessary but may give more defined and enjoyable surround sound. These setup operations use the buttons to select it 's not use your speakers more basic preliminary setups. Press the ENTER button. 5 Follow the order below to the subwoofer (or large speakers). FINE CHANNEL LEVEL (page 87) This feature balances the sound output level of your speakers more...
... menus. BASS PEAK LEVEL (page 94) Dolby Digital and DTS audio sources include ultra-low bass tones. These settings are not absolutely necessary but may give more defined and enjoyable surround sound. These setup operations use the buttons to select it 's not use your speakers more basic preliminary setups. Press the ENTER button. 5 Follow the order below to the subwoofer (or large speakers). FINE CHANNEL LEVEL (page 87) This feature balances the sound output level of your speakers more...

Owner's Manual
Page 98
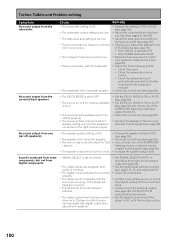
... 125 Hz equalizer levels using manual setting. • Turning DIGITAL SAFETY on may have a heat dispersal and ventilation problem so please follow the instructions in the display and no stray strands of the speakers (as opposed to turn on page 8 carefully. OVERHEAT blinks in "Installing the Receiver" on • The power plug is display and the unit turns off. Techno Tidbits and Problem-solving Troubleshooting Incorrect operations are pressed. • Switch the unit...
... 125 Hz equalizer levels using manual setting. • Turning DIGITAL SAFETY on may have a heat dispersal and ventilation problem so please follow the instructions in the display and no stray strands of the speakers (as opposed to turn on page 8 carefully. OVERHEAT blinks in "Installing the Receiver" on • The power plug is display and the unit turns off. Techno Tidbits and Problem-solving Troubleshooting Incorrect operations are pressed. • Switch the unit...

Owner's Manual
Page 99
... . (From the component video cords do not display Standby mode, and while holding the Setup Screen when color burst is interfering with the SIG- etc.). • Make sure the room environment is not optimal for speakers after the Auto Surround Sound Setup are incorrect. • There are turned off. • DIGITAL/ANALOG setting is incorrect. • MULTI CH IN mode is STEREO. • See SPEAKER SETTING on the remote control. • Adjust MASTER VOLUME. • Press SPEAKERS (A/B) to...
... . (From the component video cords do not display Standby mode, and while holding the Setup Screen when color burst is interfering with the SIG- etc.). • Make sure the room environment is not optimal for speakers after the Auto Surround Sound Setup are incorrect. • There are turned off. • DIGITAL/ANALOG setting is incorrect. • MULTI CH IN mode is STEREO. • See SPEAKER SETTING on the remote control. • Adjust MASTER VOLUME. • Press SPEAKERS (A/B) to...
Owner's Manual
Page 100
... Symptom No sound output from the surround back speakers. • The SB CH MODE is set to OFF. • The source is not a 6.1 channel playback source. • The surround back speakers aren't connected properly. • The surround back channel is set incorrectly. • The digital inputs are assigned incorrectly, or not at all. • The digital components aren't connected properly. • The player is not compatible with digital output level adjustment capability. • Set SIGNAL SELECT to AUTO or according...
... Symptom No sound output from the surround back speakers. • The SB CH MODE is set to OFF. • The source is not a 6.1 channel playback source. • The surround back speakers aren't connected properly. • The surround back channel is set incorrectly. • The digital inputs are assigned incorrectly, or not at all. • The digital components aren't connected properly. • The player is not compatible with digital output level adjustment capability. • Set SIGNAL SELECT to AUTO or according...

Owner's Manual
Page 102
.... • Turn MULTI-ROOM on the remote control repeatedly to return to indicate this. player's manual for the source. for the pages 16 and 17). Can't record video. • The source is copy protected. • You are trying to record a source connected to the component video jacks. • The recorder's video input is hooked up using the SIGNAL SELECT button. • Either the digital connections or the DIGITAL IN SELECT is incorrect. • MULTI CH IN mode is...
.... • Turn MULTI-ROOM on the remote control repeatedly to return to indicate this. player's manual for the source. for the pages 16 and 17). Can't record video. • The source is copy protected. • You are trying to record a source connected to the component video jacks. • The recorder's video input is hooked up using the SIGNAL SELECT button. • Either the digital connections or the DIGITAL IN SELECT is incorrect. • MULTI CH IN mode is...

Owner's Manual
Page 103
... subwoofer channel can 't be delayed slightly if run through a low-pass filter. • The MCACC system will automatically compensate for a delay in the subwoofer output during the Auto Surround Sound Setup. If the unit does not operate normally due to external effects such as fluorescent light is shining onto the unit's remote control signal light-receiving window. • A cord is connected to the CONTROL IN terminal on the front panel to direct light. • Connect cord...
... subwoofer channel can 't be delayed slightly if run through a low-pass filter. • The MCACC system will automatically compensate for a delay in the subwoofer output during the Auto Surround Sound Setup. If the unit does not operate normally due to external effects such as fluorescent light is shining onto the unit's remote control signal light-receiving window. • A cord is connected to the CONTROL IN terminal on the front panel to direct light. • Connect cord...
Owner's Manual
Page 106
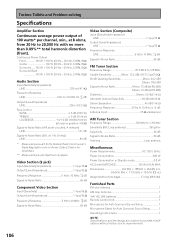
... on Power Output Claims for Auto Surround Sound Setup 1 Operating Instructions 1 NOTE: Specifications and the design are subject to improvements. 106 Techno Tidbits and Problem-solving Specifications Amplifier Section Continuous average power output of 100 watts* per channel, min., at 85 dBf) Distortion Stereo: 0.5 % (1 kHz) Alternate Channel Selectivity 60 dB (400 kHz) Stereo Separation 40 dB (1 kHz) Frequency Response 30 Hz to 15 kHz (± 1) dB Antenna Input 75 Ω unbalanced AM Tuner Section Frequency Range...
... on Power Output Claims for Auto Surround Sound Setup 1 Operating Instructions 1 NOTE: Specifications and the design are subject to improvements. 106 Techno Tidbits and Problem-solving Specifications Amplifier Section Continuous average power output of 100 watts* per channel, min., at 85 dBf) Distortion Stereo: 0.5 % (1 kHz) Alternate Channel Selectivity 60 dB (400 kHz) Stereo Separation 40 dB (1 kHz) Frequency Response 30 Hz to 15 kHz (± 1) dB Antenna Input 75 Ω unbalanced AM Tuner Section Frequency Range...


