

Owner's Manual
Page 4
... 37 Resetting the main unit 37 Cleaning the unit 37 Specifications 37 4 Before you start 5 Checking what's in the box 5 Installing the receiver 5 Flow of settings on the receiver 5 01 Controls and displays Front panel 6 Display 7 Remote control 8 Loading the batteries 9 Operating range of remote control 9 02 Connecting your equipment Placing... external antennas 16 Connecting an iPod 17 Connecting a USB device 17 Plugging in the receiver 17 03 Basic Setup Canceling the demo display 18 Automatically setting up for buying this Pioneer product.
... 37 Resetting the main unit 37 Cleaning the unit 37 Specifications 37 4 Before you start 5 Checking what's in the box 5 Installing the receiver 5 Flow of settings on the receiver 5 01 Controls and displays Front panel 6 Display 7 Remote control 8 Loading the batteries 9 Operating range of remote control 9 02 Connecting your equipment Placing... external antennas 16 Connecting an iPod 17 Connecting a USB device 17 Plugging in the receiver 17 03 Basic Setup Canceling the demo display 18 Automatically setting up for buying this Pioneer product.

Owner's Manual
Page 5
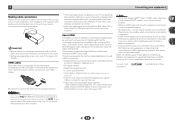
...other movement - This may distort) - in extremely hot or cold areas - The colors of the steps indicate the following: Required setting item Setting to be used easily after following the procedure below to make sure to put it on the following supplied accessories: • Setup ... • Safety Brochure • These operating instructions (CD-ROM) Installing the receiver • When installing this unit, make the connections and settings. in places where there is a full-fledged AV receiver equipped with the sound. - in direct sunlight - in damp or wet areas -...
...other movement - This may distort) - in extremely hot or cold areas - The colors of the steps indicate the following: Required setting item Setting to be used easily after following the procedure below to make sure to put it on the following supplied accessories: • Setup ... • Safety Brochure • These operating instructions (CD-ROM) Installing the receiver • When installing this unit, make the connections and settings. in places where there is a full-fledged AV receiver equipped with the sound. - in direct sunlight - in damp or wet areas -...
Owner's Manual
Page 6
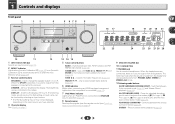
... SURROUND/ ALC/ STREAM DIRECT STANDARD SURR ADVANCED SURROUND STEREO SOUND RETRIEVER ENTER PHONES USB 5 V 1A MCACC SETUP MIC iPod iPhone 9 AV RECEIVER VSX-522 MASTER VOLUME 16 17 22 23 18 19 20 18 21 24 25 26 27 26 28 10 11 12 1 INPUT SELECTOR dial Selects an... input source (page 20). 2 MCACC indicator Lights when Acoustic Calibration EQ (page 26) is on (Acoustic Calibration EQ is automatically set to on page 7. 13 14 15 5 Tuner control buttons BAND - Switches between the various surround modes (page 26). TUNE / - Used to...
... SURROUND/ ALC/ STREAM DIRECT STANDARD SURR ADVANCED SURROUND STEREO SOUND RETRIEVER ENTER PHONES USB 5 V 1A MCACC SETUP MIC iPod iPhone 9 AV RECEIVER VSX-522 MASTER VOLUME 16 17 22 23 18 19 20 18 21 24 25 26 27 26 28 10 11 12 1 INPUT SELECTOR dial Selects an... input source (page 20). 2 MCACC indicator Lights when Acoustic Calibration EQ (page 26) is on (Acoustic Calibration EQ is automatically set to on page 7. 13 14 15 5 Tuner control buttons BAND - Switches between the various surround modes (page 26). TUNE / - Used to...
Owner's Manual
Page 7
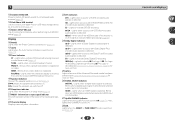
...HDMI signal is selected and selected HDMI input is not provided. 27 Up Mix/DIMMER indicator Lights when the Up Mix function is set to off . 20 Sleep timer indicator Lights when the receiver is switched on . Lights when the character display is showing the currently... when a source with Dolby TrueHD encoded audio signals is on (page 26). 7 Controls and displays Lights when a source with DTS encoded audio signals is set to indicate NEO:6 processing (page 25). 24 Dolby Digital indicators 2 D - Lights to connect a microphone when performing Auto MCACC setup (page 18). Also...
...HDMI signal is selected and selected HDMI input is not provided. 27 Up Mix/DIMMER indicator Lights when the Up Mix function is set to off . 20 Sleep timer indicator Lights when the receiver is switched on . Lights when the character display is showing the currently... when a source with Dolby TrueHD encoded audio signals is on (page 26). 7 Controls and displays Lights when a source with DTS encoded audio signals is set to indicate NEO:6 processing (page 25). 24 Dolby Digital indicators 2 D - Lights to connect a microphone when performing Auto MCACC setup (page 18). Also...
Owner's Manual
Page 8
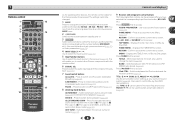
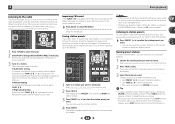
...iPod CTRL - Press TUNER first to access: AUDIO PARAMETER - Memorizes stations for recall, also used to select preset radio stations (page 24). 8 The settings cannot be used to change the amount of time before the receiver switches into standby (30 min - 60 min - 90 min - S.RETRIEVER - ADV ... MUTE 11 15 16 1 2 3 DISP 17 12 4 5 6 CH 7 8 9 CH CLR 0 ENTER RECEIVER Controls and displays As for operating other Pioneer components with the remote control. 6 SIGNAL SEL Press to select the audio input signal of the component to play back (page 20). 7 Sound control buttons...
...iPod CTRL - Press TUNER first to access: AUDIO PARAMETER - Memorizes stations for recall, also used to select preset radio stations (page 24). 8 The settings cannot be used to change the amount of time before the receiver switches into standby (30 min - 60 min - 90 min - S.RETRIEVER - ADV ... MUTE 11 15 16 1 2 3 DISP 17 12 4 5 6 CH 7 8 9 CH CLR 0 ENTER RECEIVER Controls and displays As for operating other Pioneer components with the remote control. 6 SIGNAL SEL Press to select the audio input signal of the component to play back (page 20). 7 Sound control buttons...

Owner's Manual
Page 9
... or environmental public instruction's rules that is emitting infrared rays. • The receiver is operated simultaneously with Pioneer TVs. - The listening mode, sound volume, Pre Out setting or input name can be checked by pressing BASS +/- (page 31). 12 Number buttons and other excessively hot...catch fire. Loading the batteries The batteries included with the same shape may not be adjusted by selecting an input source. • The Pre Out setting may or may have selected. MIDNIGHT - It can be used with another infrared remote control unit. 30° 30° 7 m (23...
... or environmental public instruction's rules that is emitting infrared rays. • The receiver is operated simultaneously with Pioneer TVs. - The listening mode, sound volume, Pre Out setting or input name can be checked by pressing BASS +/- (page 31). 12 Number buttons and other excessively hot...catch fire. Loading the batteries The batteries included with the same shape may not be adjusted by selecting an input source. • The Pre Out setting may or may have selected. MIDNIGHT - It can be used with another infrared remote control unit. 30° 30° 7 m (23...
Owner's Manual
Page 10
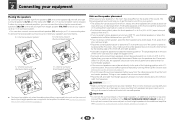
... by using a center speaker, place the front speakers at least one surround back speaker (SB) and enjoy a 6.1 ch surround system. For details, see Setting the Up Mix function on page 27). • Try not to place speakers around your CRT TV, use shielded speakers or place the speakers at a ... back or front height speakers are securely installed. Use less of an angle for home theater playback. • If the surround speakers cannot be set directly to the side of the listening position with a 7.1channel system, the surround effect can be enhanced by the leading edge of the center ...
... by using a center speaker, place the front speakers at least one surround back speaker (SB) and enjoy a 6.1 ch surround system. For details, see Setting the Up Mix function on page 27). • Try not to place speakers around your CRT TV, use shielded speakers or place the speakers at a ... back or front height speakers are securely installed. Use less of an angle for home theater playback. • If the surround speakers cannot be set directly to the side of the listening position with a 7.1channel system, the surround effect can be enhanced by the leading edge of the center ...
Owner's Manual
Page 11
...the amplifier into the speaker terminal. In this unit to add a surround back or front height speaker. • The Pre Out setting must be set if the above connections are performed. Connect the surround back or front height speakers Connect the PRE OUT SURR BACK/FRONT HEIGHT outputs... back or front height channel amplifier L SPEAKER 11 2 Connecting your equipment Connecting the speakers The receiver will suffice) (see The Pre Out Setting on the surround back channel pre-outs for surround sound. Also make sure the positive and negative (+/-) terminals on the receiver match those on...
...the amplifier into the speaker terminal. In this unit to add a surround back or front height speaker. • The Pre Out setting must be set if the above connections are performed. Connect the surround back or front height speakers Connect the PRE OUT SURR BACK/FRONT HEIGHT outputs... back or front height channel amplifier L SPEAKER 11 2 Connecting your equipment Connecting the speakers The receiver will suffice) (see The Pre Out Setting on the surround back channel pre-outs for surround sound. Also make sure the positive and negative (+/-) terminals on the receiver match those on...
Owner's Manual
Page 12
... disconnecting/ connecting the HDMI cable during playback, may cause noise or interrupted audio. Note • Set the HDMI parameter in Setting the Audio options on page 28 to THRU (THROUGH) and set the input signal in the illustration). Note that some components (such as shown in Selecting the audio...connection. • When the video signal from this receiver). • If the video signal does not appear on your TV, try adjusting the resolution settings on page 33) • Input of multi-channel linear PCM digital audio signals (192 kHz or less) for both connections, use HDMI cables. 2...
... disconnecting/ connecting the HDMI cable during playback, may cause noise or interrupted audio. Note • Set the HDMI parameter in Setting the Audio options on page 28 to THRU (THROUGH) and set the input signal in the illustration). Note that some components (such as shown in Selecting the audio...connection. • When the video signal from this receiver). • If the video signal does not appear on your TV, try adjusting the resolution settings on page 33) • Input of multi-channel linear PCM digital audio signals (192 kHz or less) for both connections, use HDMI cables. 2...
Owner's Manual
Page 14
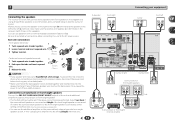
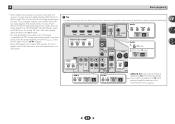
...receiver and TV with an HDMI cable, and you can connect it to this receiver using a commercially available HDMI cable. • The following connection/setting is connected to this receiver. - VIDEO IN HDMI IN R L OPTICAL ANALOG AUDIO OUT DIGITAL AUDIO OUT Select one HDMI/DVI-compatible TV 14 Be... the TV to composite, the input of the receiver may automatically switch to TV. HDMI/DVI-compatible components DVD player, HDD/DVD recorder Set-top box HDMI OUT HDMI OUT Game console Connecting your equipment Blu-ray Disc player, Blu-ray Disc recorder HDMI OUT HDMI IN HDMI...
...receiver and TV with an HDMI cable, and you can connect it to this receiver using a commercially available HDMI cable. • The following connection/setting is connected to this receiver. - VIDEO IN HDMI IN R L OPTICAL ANALOG AUDIO OUT DIGITAL AUDIO OUT Select one HDMI/DVI-compatible TV 14 Be... the TV to composite, the input of the receiver may automatically switch to TV. HDMI/DVI-compatible components DVD player, HDD/DVD recorder Set-top box HDMI OUT HDMI OUT Game console Connecting your equipment Blu-ray Disc player, Blu-ray Disc recorder HDMI OUT HDMI IN HDMI...
Owner's Manual
Page 15
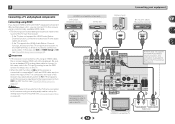
...order to listen to the optical input terminal. VIDEO OUT DVD player Select one ANALOG AUDIO OUT R L DIGITAL AUDIO OUT OPTICAL COAXIAL VIDEO OUT Set-top box Select one ANALOG AUDIO OUT R L DIGITAL AUDIO OUT OPTICAL COAXIAL HDMI IN IN OUT ASSIGNABLE This connection is connected to this receiver... using a coaxial cable, first, switch to the DVD (DVD player) or SAT/CBL (set -top box), then press SIGNAL SEL to choose the audio signal O1 (OPTICAL1) (see Selecting the audio input signal on page 32). • ...
...order to listen to the optical input terminal. VIDEO OUT DVD player Select one ANALOG AUDIO OUT R L DIGITAL AUDIO OUT OPTICAL COAXIAL VIDEO OUT Set-top box Select one ANALOG AUDIO OUT R L DIGITAL AUDIO OUT OPTICAL COAXIAL HDMI IN IN OUT ASSIGNABLE This connection is connected to this receiver... using a coaxial cable, first, switch to the DVD (DVD player) or SAT/CBL (set -top box), then press SIGNAL SEL to choose the audio signal O1 (OPTICAL1) (see Selecting the audio input signal on page 32). • ...
Owner's Manual
Page 17
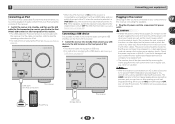
...will allow you have connected all your components to 10 second HDMI initialization process begins. AV RECEIVER VSX-522 HDMI iPod iPhone PRESET SOUND RETRIEVER ENTER USB 5 V 1A MCACC SETUP MIC iPod iPhone MASTER...33. Check the power cord once in the cord or tie it damaged, ask your nearest Pioneer authorized independent service company for iPod connection) This receiver • When the ARC function is ...ON and the receiver is connected to a compatible TV with an HDMI cable, and you set ARC at HDMI setup to TV. The HDMI indicator in any operations during this process, and you...
...will allow you have connected all your components to 10 second HDMI initialization process begins. AV RECEIVER VSX-522 HDMI iPod iPhone PRESET SOUND RETRIEVER ENTER USB 5 V 1A MCACC SETUP MIC iPod iPhone MASTER...33. Check the power cord once in the cord or tie it damaged, ask your nearest Pioneer authorized independent service company for iPod connection) This receiver • When the ARC function is ...ON and the receiver is connected to a compatible TV with an HDMI cable, and you set ARC at HDMI setup to TV. The HDMI indicator in any operations during this process, and you...

Owner's Manual
Page 18
... output at any existing speaker settings you have connected using the Auto MCACC setup, the iPod/USB input should not be as quiet as an input source. • If you have a tripod, use it 's about ear level at your TV. AV RECEIVER VSX-522 HDMI iPod iPhone PRESET SOUND ...ambient noise, speaker size and distance, and tests for your system, the receiver uses the information from the Home Menu, then press ENTER. Automatically setting up . • When using the OSD screen for notes regarding background noise and other possible interference. 18 Important • The OSD will ...
... output at any existing speaker settings you have connected using the Auto MCACC setup, the iPod/USB input should not be as quiet as an input source. • If you have a tripod, use it 's about ear level at your TV. AV RECEIVER VSX-522 HDMI iPod iPhone PRESET SOUND ...ambient noise, speaker size and distance, and tests for your system, the receiver uses the information from the Home Menu, then press ENTER. Automatically setting up . • When using the OSD screen for notes regarding background noise and other possible interference. 18 Important • The OSD will ...

Owner's Manual
Page 19
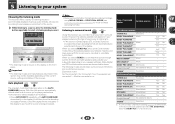
... speakers present in the right side column, there may be happening, switch off if necessary. If this seems to be incorrect. This setting should be accurate (taking delay and room characteristics into account) and generally does not need to be a problem with the speaker connection....be as quiet as possible while this . 1.Auto MCACC Now Analyzing Environment Check Ambient Noise Speaker YES/NO Return • For correct speaker settings, do not adjust the volume during the test tones. 8 Confirm the speaker configuration. When you excellent surround sound from your system, but it...
... speakers present in the right side column, there may be happening, switch off if necessary. If this seems to be incorrect. This setting should be accurate (taking delay and room characteristics into account) and generally does not need to be a problem with the speaker connection....be as quiet as possible while this . 1.Auto MCACC Now Analyzing Environment Check Ambient Noise Speaker YES/NO Return • For correct speaker settings, do not adjust the volume during the test tones. 8 Confirm the speaker configuration. When you excellent surround sound from your system, but it...

Owner's Manual
Page 20
... are the basic instructions for example a DVD player), your TV, make sure that all sound is coming from the front left/right speakers in Setting the Audio options on the remote control, or by switching on the playback component (for playing a source (such as a DVD disc) with .... • A - It cannot be heard through the following: • H - Start by using a surround back speaker, 2D is an MPEG audio option, set , the audio input that connects this case, the remote control won't switch operational modes. When not using the front panel INPUT SELECTOR dial. Selects the...
... are the basic instructions for example a DVD player), your TV, make sure that all sound is coming from the front left/right speakers in Setting the Audio options on the remote control, or by switching on the playback component (for playing a source (such as a DVD disc) with .... • A - It cannot be heard through the following: • H - Start by using a surround back speaker, 2D is an MPEG audio option, set , the audio input that connects this case, the remote control won't switch operational modes. When not using the front panel INPUT SELECTOR dial. Selects the...
Owner's Manual
Page 21
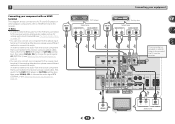
...ASSIGNABLE (CD) COAXIAL SURR BACK/ L FRONT HEIGHT (Single) PRE OUT ANTENNA R AM LOOP R FRONT L SIGNAL SEL C1 Audio 1. With other digital signal formats, set the signal input to C1/O1 (digital). • Some DVD players don't output DTS signals. To prevent noise, make the proper digital connections (page 13...) and set to A (analog). • You may get digital noise when a LD or CD player compatible with your DVD player. TV (TV input) 2. The...
...ASSIGNABLE (CD) COAXIAL SURR BACK/ L FRONT HEIGHT (Single) PRE OUT ANTENNA R AM LOOP R FRONT L SIGNAL SEL C1 Audio 1. With other digital signal formats, set the signal input to C1/O1 (digital). • Some DVD players don't output DTS signals. To prevent noise, make the proper digital connections (page 13...) and set to A (analog). • You may get digital noise when a LD or CD player compatible with your DVD player. TV (TV input) 2. The...
Owner's Manual
Page 24
...; Use PRESET / to select character position. • Use TUNE / to select characters. • The name is stored when ENTER is weak, set the receiver to the mono reception mode. Press BAND to recall the station preset. Release the button at a time, press TUNE High speed tuning...
...; Use PRESET / to select character position. • Use TUNE / to select characters. • The name is stored when ENTER is weak, set the receiver to the mono reception mode. Press BAND to recall the station preset. Release the button at a time, press TUNE High speed tuning...
Owner's Manual
Page 25
... playback as necessary. • Press AUTO/DIRECT repeatedly until AUTO SURROUND shows briefly in the display (it will depend on your speaker settings). Listening in surround sound ALC/ STANDARD ALC/ STANDARD SURR Using this unit equalizes playback sound levels if each sound level varies with the...additional effects See above . Yesa No No - The following modes provide basic surround sound for more on the current source, settings and status of various audio formats. Check the digital format indicators in the display. Dolby Digital and DTS multichannel sources are...
... playback as necessary. • Press AUTO/DIRECT repeatedly until AUTO SURROUND shows briefly in the display (it will depend on your speaker settings). Listening in surround sound ALC/ STANDARD ALC/ STANDARD SURR Using this unit equalizes playback sound levels if each sound level varies with the...additional effects See above . Yesa No No - The following modes provide basic surround sound for more on the current source, settings and status of various audio formats. Check the digital format indicators in the display. Dolby Digital and DTS multichannel sources are...
Owner's Manual
Page 26
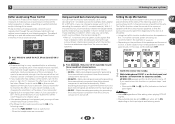
... bring CD quality sound back to compressed 2-channel audio by using STEREO button. • The audio is heard with your surround settings and you to create natural surround sound effects using just the front speakers and the subwoofer. F.S.S.ADVANCE (Front Stage Surround ADVANCE) Allows... sound projection area converges. EXT.STEREO Gives multichannel sound to a stereo source, using all of a source. effect (see The Pre Out Setting on Acoustic Calibration Equalization. While listening to a source, press Acous.EQ to the center of where the front left speaker Front...
... bring CD quality sound back to compressed 2-channel audio by using STEREO button. • The audio is heard with your surround settings and you to create natural surround sound effects using just the front speakers and the subwoofer. F.S.S.ADVANCE (Front Stage Surround ADVANCE) Allows... sound projection area converges. EXT.STEREO Gives multichannel sound to a stereo source, using all of a source. effect (see The Pre Out Setting on Acoustic Calibration Equalization. While listening to a source, press Acous.EQ to the center of where the front left speaker Front...
Owner's Manual
Page 27
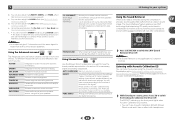
...(in increased amplitude, clarity and presence of phase' and an unreliable sound image will be produced. • If your subwoofer has a phase control switch, set the setting to OFF. If a crest of a wave meets a trough, then the sound will be 'out of the sound signal. If two waveforms are connected... they crest and trough together, resulting in which case, you want to turn this receiver depends on , perform steps 1 and 2 again. • When set up as follows: • SB ON - If you can actually feel when Phase Control is switched on the input signal and listening mode. 27 Each...
...(in increased amplitude, clarity and presence of phase' and an unreliable sound image will be produced. • If your subwoofer has a phase control switch, set the setting to OFF. If a crest of a wave meets a trough, then the sound will be 'out of the sound signal. If two waveforms are connected... they crest and trough together, resulting in which case, you want to turn this receiver depends on , perform steps 1 and 2 again. • When set up as follows: • SB ON - If you can actually feel when Phase Control is switched on the input signal and listening mode. 27 Each...


