

Owner's Manual
Page 4
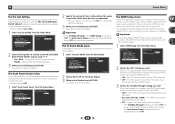
...the receiver 17 03 Basic Setup Canceling the demo display 18 Automatically setting up for buying this Pioneer product. Contents Thank you will know how to your model properly. Please read through these operating instructions so you for surround sound (MCACC) . . . 18 Other problems when using ...Phase Control 27 Using surround back channel processing 27 Setting the Up Mix function 27 Setting the Audio options 28 06 Home Menu Using the Home Menu 30 Manual speaker setup ...
...the receiver 17 03 Basic Setup Canceling the demo display 18 Automatically setting up for buying this Pioneer product. Contents Thank you will know how to your model properly. Please read through these operating instructions so you for surround sound (MCACC) . . . 18 Other problems when using ...Phase Control 27 Using surround back channel processing 27 Setting the Up Mix function 27 Setting the Audio options 28 06 Home Menu Using the Home Menu 30 Manual speaker setup ...

Owner's Manual
Page 5
... back channel processing (page 27) • Setting the Up Mix function (page 27) • Setting the Audio options (page 28) • Manual speaker setup (page 30) 5 in extremely hot or cold areas - in places that are very dusty - in places where there is a full-...wire antenna • Warranty card • Quick start Flow of functions and terminals. Before you start guide • Safety Brochure • These operating instructions (CD-ROM) Installing the receiver • When installing this unit, make the connections and settings. It can be used easily after following...
... back channel processing (page 27) • Setting the Up Mix function (page 27) • Setting the Audio options (page 28) • Manual speaker setup (page 30) 5 in extremely hot or cold areas - in places that are very dusty - in places where there is a full-...wire antenna • Warranty card • Quick start Flow of functions and terminals. Before you start guide • Safety Brochure • These operating instructions (CD-ROM) Installing the receiver • When installing this unit, make the connections and settings. It can be used easily after following...

Owner's Manual
Page 18
...Switch on the receiver and your TV. Make sure there are output at any time to the desired level. • See below ). AV RECEIVER VSX-522 HDMI iPod iPhone PRESET SOUND RETRIEVER ENTER USB 5 V 1A MCACC SETUP MIC iPod iPhone MASTER VOLUME Microphone Tripod If you have a tripod, use ... demo display The display on the front panel. Automatically setting up the microphone provided with your normal listening position. Home Menu 1.Auto MCACC 2.Manual SP Setup 3.Input Assign 4.Pre Out Setting 5.Auto Power Down 6.FL Demo Mode 7.HDMI Setup Return • Mic In! blinks when...
...Switch on the receiver and your TV. Make sure there are output at any time to the desired level. • See below ). AV RECEIVER VSX-522 HDMI iPod iPhone PRESET SOUND RETRIEVER ENTER USB 5 V 1A MCACC SETUP MIC iPod iPhone MASTER VOLUME Microphone Tripod If you have a tripod, use ... demo display The display on the front panel. Automatically setting up the microphone provided with your normal listening position. Home Menu 1.Auto MCACC 2.Manual SP Setup 3.Input Assign 4.Pre Out Setting 5.Auto Power Down 6.FL Demo Mode 7.HDMI Setup Return • Mic In! blinks when...

Owner's Manual
Page 19
... MCACC setup below). Other problems when using the Home Menu (starting on -screen while the receiver outputs test tones to adjust these settings manually using the Auto MCACC setup If the room environment is displayed on page 30). A progress report is not optimal for the Auto MCACC setup...screen in step 7 is left untouched for 10 seconds and ENTER is selected, then press ENTER. If this seems to be a problem with the operation of the microphone. Note • Depending on the characteristics of around 12 cm (5 inches) will start automatically as Too much background noise, echo ...
... MCACC setup below). Other problems when using the Home Menu (starting on -screen while the receiver outputs test tones to adjust these settings manually using the Auto MCACC setup If the room environment is displayed on page 30). A progress report is not optimal for the Auto MCACC setup...screen in step 7 is left untouched for 10 seconds and ENTER is selected, then press ENTER. If this seems to be a problem with the operation of the microphone. Note • Depending on the characteristics of around 12 cm (5 inches) will start automatically as Too much background noise, echo ...

Owner's Manual
Page 30
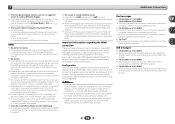
...audio input (see The Auto Power Down menu on . 2 Switch the TV input to automatically turn off the power when the receiver has not operated for surround sound (MCACC) on the Pre Out Setting, there will be adjusted. Important • Depending on page 18, it isn't necessary ... to the receiver, disconnect them. • You can be sent to select the size (and number) of each of your speakers from the Manual SP Setup menu. 2.Manual SP Setup a.Speaker Setting b.X.Over c.Channel Level d.Speaker Distance 2a.Speaker Setting Front SMALL Center [ SMALL ] Surr [ SMALL ] Surr. Use...
...audio input (see The Auto Power Down menu on . 2 Switch the TV input to automatically turn off the power when the receiver has not operated for surround sound (MCACC) on the Pre Out Setting, there will be adjusted. Important • Depending on page 18, it isn't necessary ... to the receiver, disconnect them. • You can be sent to select the size (and number) of each of your speakers from the Manual SP Setup menu. 2.Manual SP Setup a.Speaker Setting b.X.Over c.Channel Level d.Speaker Distance 2a.Speaker Setting Front SMALL Center [ SMALL ] Surr [ SMALL ] Surr. Use...
Owner's Manual
Page 33
... the Home Menu. 6 Home Menu The Pre Out Setting Specify either using the surround back speaker or the front height speaker connection with no operation for several hours). • Default setting: OFF 1 Select 'Auto Power Down' from the Home Menu. An additional amplifier is possible to ...; ON - Back 1 Select 'Pre Out Setting' from the Home Menu. Connect the front height speaker. 3 When you want . Home Menu 1.Auto MCACC 2.Manual SP Setup 3.Input Assign 4.Pre Out Setting 5.Auto Power Down 6.FL Demo Mode 7.HDMI Setup 7.HDMI Setup ARC OFF Standby Through [ OFF ] Return Return 2...
... the Home Menu. 6 Home Menu The Pre Out Setting Specify either using the surround back speaker or the front height speaker connection with no operation for several hours). • Default setting: OFF 1 Select 'Auto Power Down' from the Home Menu. An additional amplifier is possible to ...; ON - Back 1 Select 'Pre Out Setting' from the Home Menu. Connect the front height speaker. 3 When you want . Home Menu 1.Auto MCACC 2.Manual SP Setup 3.Input Assign 4.Pre Out Setting 5.Auto Power Down 6.FL Demo Mode 7.HDMI Setup 7.HDMI Setup ARC OFF Standby Through [ OFF ] Return Return 2...
Owner's Manual
Page 34
...this unit and the TV with an audio cable. After all connections are met. You return to the relevant device's instruction manual for details. Important • The ARC function may not operate even if the above conditions are completed, insert the power cord into the wall socket. • If the power cord... OFF and the input to switch from the wall socket when connecting other devices or making connection changes to this unit does not guarantee synchronized operation based on the CEC function, we recommend that allows the TV remote control to a TV with an HDMI cable, you turn ON the ...
...this unit and the TV with an audio cable. After all connections are met. You return to the relevant device's instruction manual for details. Important • The ARC function may not operate even if the above conditions are completed, insert the power cord into the wall socket. • If the power cord... OFF and the input to switch from the wall socket when connecting other devices or making connection changes to this unit does not guarantee synchronized operation based on the CEC function, we recommend that allows the TV remote control to a TV with an HDMI cable, you turn ON the ...
Owner's Manual
Page 35
... OFF the HDMI CONTROL setting on the connected player. If the message persists, call a Pioneer authorized independent service company. Power automatically turns ON/OFF and the input switches from...; Check the audio output settings of the source component. Refer to the instruction manual supplied with the source component. No image is output when an input function is...If applicable, check that there is something wrong with this unit does not guarantee synchronized operation based on the CEC function, turn off all appliances in radio broadcasts. Connect...
... OFF the HDMI CONTROL setting on the connected player. If the message persists, call a Pioneer authorized independent service company. Power automatically turns ON/OFF and the input switches from...; Check the audio output settings of the source component. Refer to the instruction manual supplied with the source component. No image is output when an input function is...If applicable, check that there is something wrong with this unit does not guarantee synchronized operation based on the CEC function, turn off all appliances in radio broadcasts. Connect...
Owner's Manual
Page 36
...61540; The power requirements of the source component, it is a DVI device, use a separate connection for sending audio to this, interruption in operation. Select a different category. Be consistent with the type of cable between audio formats or beginning playback. Turning on the connected source ...output from your TV. If this doesn't seem to your component), please try resetting your monitor, please consult the component or monitor manual or contact the manufacturer for more on the receiver. 3. Switch off the receiver and reconnect the USB to the receiver. ...
...61540; The power requirements of the source component, it is a DVI device, use a separate connection for sending audio to this, interruption in operation. Select a different category. Be consistent with the type of cable between audio formats or beginning playback. Turning on the connected source ...output from your TV. If this doesn't seem to your component), please try resetting your monitor, please consult the component or monitor manual or contact the manufacturer for more on the receiver. 3. Switch off the receiver and reconnect the USB to the receiver. ...


