
Owner's Manual
Page 1
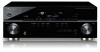
...MULTI-CHANNEL RECEIVER RECEPTEUR AUDIOVISUEL A VOIES MULTIPLES RECEPTOR MULTICANAL DE AUDIO/VÍDEO VSX-520 Register ...your product on http://www.pioneerelectronics.com (US) http://www.pioneerelectronics.ca (Canada) • Protect your new investment The details of your purchase will be on file for reference in the event of an insurance claim such as loss or theft. • Receive...to design products that meet your needs. • Receive a free Pioneer newsletter Registered customers can opt in to receive a monthly newsletter. http://www.pioneerelectronics.com (US) ...
...MULTI-CHANNEL RECEIVER RECEPTEUR AUDIOVISUEL A VOIES MULTIPLES RECEPTOR MULTICANAL DE AUDIO/VÍDEO VSX-520 Register ...your product on http://www.pioneerelectronics.com (US) http://www.pioneerelectronics.ca (Canada) • Protect your new investment The details of your purchase will be on file for reference in the event of an insurance claim such as loss or theft. • Receive...to design products that meet your needs. • Receive a free Pioneer newsletter Registered customers can opt in to receive a monthly newsletter. http://www.pioneerelectronics.com (US) ...
Owner's Manual
Page 4
... . 22 Connecting using HDMI 22 Connecting your component with no HDMI terminal 22 Connecting a satellite receiver or other digital set-top box 23 Connecting an HDD/DVD recorder, VCR and other video sources...Using the headphone 36 05 The System Setup menu Using the System Setup menu 37 Manual speaker setup 37 Speaker setting 38 Crossover network 39 Channel level 39 Speaker distance ...the Advanced surround effects . . . . . 29 Listening in a safe place for buying this Pioneer product. Please read through these operating instructions so you will know how to station presets 42 Naming ...
... . 22 Connecting using HDMI 22 Connecting your component with no HDMI terminal 22 Connecting a satellite receiver or other digital set-top box 23 Connecting an HDD/DVD recorder, VCR and other video sources...Using the headphone 36 05 The System Setup menu Using the System Setup menu 37 Manual speaker setup 37 Speaker setting 38 Crossover network 39 Channel level 39 Speaker distance ...the Advanced surround effects . . . . . 29 Listening in a safe place for buying this Pioneer product. Please read through these operating instructions so you will know how to station presets 42 Naming ...
Owner's Manual
Page 6
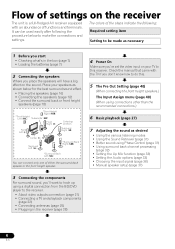
...8226; Choosing the input signal (page 36) • Manual speaker setup (page 37) 6 En Flow of settings on the receiver The unit is a full-fledged AV receiver equipped with the TV if you place the speakers will ... the Sound Retriever (page 31) • Better sound using a digital connection from the BD/DVD player to the receiver. • About video outputs connection (page 21) • Connecting a TV and playback components (page 22) &#...; 2 Connecting the speakers Where you don't know how to do this receiver. Check the manual that came with an abundance of functions and terminals.
...8226; Choosing the input signal (page 36) • Manual speaker setup (page 37) 6 En Flow of settings on the receiver The unit is a full-fledged AV receiver equipped with the TV if you place the speakers will ... the Sound Retriever (page 31) • Better sound using a digital connection from the BD/DVD player to the receiver. • About video outputs connection (page 21) • Connecting a TV and playback components (page 22) &#...; 2 Connecting the speakers Where you don't know how to do this receiver. Check the manual that came with an abundance of functions and terminals.
Owner's Manual
Page 24
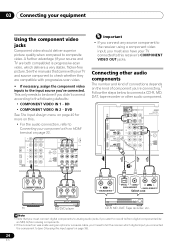
... 75 IN 2 (DVD) AM LOOP COMPONENT VIDEO IN 1 (BD) ASSIGNABLE 12 Important • If you connect any source component to the receiver using a component video input, you must connect digital components to analog audio jacks if you want to record to/from digital components (like an ...and source component to check whether they are both compatible) is progressive-scan video, which delivers a very stable, flicker-free picture. See the manuals that you 've connected. Note 1 Note that came with your component with progressive-scan video. • If necessary, assign the component video ...
... 75 IN 2 (DVD) AM LOOP COMPONENT VIDEO IN 1 (BD) ASSIGNABLE 12 Important • If you connect any source component to the receiver using a component video input, you must connect digital components to analog audio jacks if you want to record to/from digital components (like an ...and source component to check whether they are both compatible) is progressive-scan video, which delivers a very stable, flicker-free picture. See the manuals that you 've connected. Note 1 Note that came with your component with progressive-scan video. • If necessary, assign the component video ...

Owner's Manual
Page 27
...your TV so that the VIDEO input is now selected). 2 If you need to manually switch the input signal type press SIGNAL SEL (page 36). 3 • You... INPUT SELECTOR dial.2 3 Press AUTO/DIRECT to select 'AUTO SURROUND' and start playback of the receiver. In this receiver. When not using a surround back speaker, 2D+PLIIx is displayed when playing Dolby Digital 5.1-channel ...as a DVD disc) with your home theater system. 1 Switch on your DVD player or digital satellite receiver. Start by switching on your system Important • The listening modes and many features described in the ...
...your TV so that the VIDEO input is now selected). 2 If you need to manually switch the input signal type press SIGNAL SEL (page 36). 3 • You... INPUT SELECTOR dial.2 3 Press AUTO/DIRECT to select 'AUTO SURROUND' and start playback of the receiver. In this receiver. When not using a surround back speaker, 2D+PLIIx is displayed when playing Dolby Digital 5.1-channel ...as a DVD disc) with your home theater system. 1 Switch on your DVD player or digital satellite receiver. Start by switching on your system Important • The listening modes and many features described in the ...
Owner's Manual
Page 36
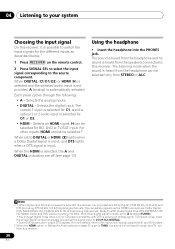
...lights when a Dolby Digital signal is input, and DTS lights when a DTS signal is playing an analog signal. For more details, refer to the instruction manual supplied with DTS is input. When DIGITAL (C1/O1/O2) or HDMI (H) is selected and the selected audio input is not provided, A (analog) ... player. 2 When the HDMI option in Setting the Audio options on page 33 is selected for the different inputs as described below.1 1 Press RECEIVER on the remote control. 2 Press SIGNAL SEL to select the input signal corresponding to the source component. Selects an HDMI signal. Selects the analog...
...lights when a Dolby Digital signal is input, and DTS lights when a DTS signal is playing an analog signal. For more details, refer to the instruction manual supplied with DTS is input. When DIGITAL (C1/O1/O2) or HDMI (H) is selected and the selected audio input is not provided, A (analog) ... player. 2 When the HDMI option in Setting the Audio options on page 33 is selected for the different inputs as described below.1 1 Press RECEIVER on the remote control. 2 Press SIGNAL SEL to select the input signal corresponding to the source component. Selects an HDMI signal. Selects the analog...
Owner's Manual
Page 37
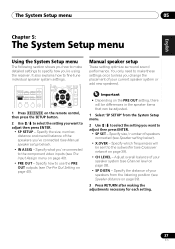
...make detailed settings to adjust then press ENTER. • SP SETUP - Manual speaker setup These setting optimize surround sound performance. It also explains how to adjust then press ENTER. • SP SET - RECEIVER SLEEP TV SOURCE CONTROL AUDIO PARAMETER TOP MENU TUNE TUNER EDIT MASTER TOOLS VOLUME... MENU PRESET RECEIVER INPUT SELECT DTV/TV INPUT BD DVD TV ENTER HOME MENU SETUP TUNE BAND RETURN 1...
...make detailed settings to adjust then press ENTER. • SP SETUP - Manual speaker setup These setting optimize surround sound performance. It also explains how to adjust then press ENTER. • SP SET - RECEIVER SLEEP TV SOURCE CONTROL AUDIO PARAMETER TOP MENU TUNE TUNER EDIT MASTER TOOLS VOLUME... MENU PRESET RECEIVER INPUT SELECT DTV/TV INPUT BD DVD TV ENTER HOME MENU SETUP TUNE BAND RETURN 1...
Owner's Manual
Page 39
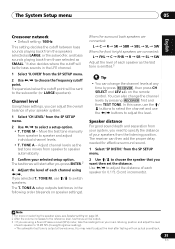
Move the test tone manually from speaker to choose the speaker that you want then set the distance. TONE A setup outputs test tones in 0.1 ft. (3 cm) increments). The receiver can adjust the overall balance of your speaker system. 1 Select 'CH LEVEL' from the SP SETUP menu. 2 Use ...menu. 2 Use / to speaker and adjust individual channel levels. • T. TONE A - You can change the channel levels by press RECEIVER , then press CH SELECT and LEV +/- Use / to adjust the distance of each speaker (in the following order (depends on speaker settings...
Move the test tone manually from speaker to choose the speaker that you want then set the distance. TONE A setup outputs test tones in 0.1 ft. (3 cm) increments). The receiver can adjust the overall balance of your speaker system. 1 Select 'CH LEVEL' from the SP SETUP menu. 2 Use ...menu. 2 Use / to speaker and adjust individual channel levels. • T. TONE A - You can change the channel levels by press RECEIVER , then press CH SELECT and LEV +/- Use / to adjust the distance of each speaker (in the following order (depends on speaker settings...
Owner's Manual
Page 41
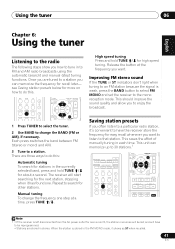
... BAND RETURN MUTE ADAPTER TUNER PORTABLE BASS TRE PHASE S.RETRIEVER SIGNAL SEL VOL HDD 1 DVD 2 VCR 3 DISP Note 1 • If the receiver is left disconnected from the AC power outlet for over a month, the station memories will be lost and will start searching for other stations. Saving... station presets If you want . This saves the effort of manually tuning in stereo. Using the tuner 06 English Français Español PRESET PRESET Chapter 6: Using the tuner Listening to the radio...
... BAND RETURN MUTE ADAPTER TUNER PORTABLE BASS TRE PHASE S.RETRIEVER SIGNAL SEL VOL HDD 1 DVD 2 VCR 3 DISP Note 1 • If the receiver is left disconnected from the AC power outlet for over a month, the station memories will be lost and will start searching for other stations. Saving... station presets If you want . This saves the effort of manually tuning in stereo. Using the tuner 06 English Français Español PRESET PRESET Chapter 6: Using the tuner Listening to the radio...

Owner's Manual
Page 43
...2 Select the input signal (if necessary). Note 1 If you are unsure how to the source component (see page 23 for the recorder. Press the RECEIVER button then press SIGNAL SEL to select the input signal corresponding to do this ). 3 Prepare the source you 're unsure. 5 Start recording, then ... device and set the audio recording level automatically-check the component's instruction manual if you want to use the same type of connection for the source as for more on this . RECEIVER SLEEP TV SOURCE CONTROL RECEIVER INPUT SELECT DTV/TV INPUT BD DVD TV DVR CD CD-R CH ...
...2 Select the input signal (if necessary). Note 1 If you are unsure how to the source component (see page 23 for the recorder. Press the RECEIVER button then press SIGNAL SEL to select the input signal corresponding to do this ). 3 Prepare the source you 're unsure. 5 Start recording, then ... device and set the audio recording level automatically-check the component's instruction manual if you want to use the same type of connection for the source as for more on this . RECEIVER SLEEP TV SOURCE CONTROL RECEIVER INPUT SELECT DTV/TV INPUT BD DVD TV DVR CD CD-R CH ...
Owner's Manual
Page 47
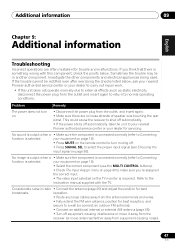
... 25) and adjust the position for servicing. your dealer for best broadcasts. Refer to the instruction manual supplied with this component, check the points below , ask your nearest Pioneer authorized service center or your equipment on page 16). • Select the correct component (use the...position for trouble and malfunctions. Problem Remedy The power does not turn muting off equipment causing interference or move it away from the receiver (or move antennas farther away from the outlet, and insert again. • Make sure there are often mistaken for best ...
... 25) and adjust the position for servicing. your dealer for best broadcasts. Refer to the instruction manual supplied with this component, check the points below , ask your nearest Pioneer authorized service center or your equipment on page 16). • Select the correct component (use the...position for trouble and malfunctions. Problem Remedy The power does not turn muting off equipment causing interference or move it away from the receiver (or move antennas farther away from the outlet, and insert again. • Make sure there are often mistaken for best ...
Owner's Manual
Page 48
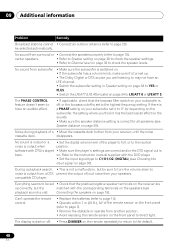
...speaker settings. • Refer to Channel level on page 39 to be set • Check that the lowpass filter switch on your receiver, until the noise cassette deck. software with DTS is odd. Everything seems to check the speaker levels. disappears. During a playback search..., set to direct light. No sound is output when position. Connecting the speakers on . compatible CD player. Refer to the instruction manual supplied with the corresponding terminals on the speakers (see playback sound is played • Make sure the player's settings are up ....
...speaker settings. • Refer to Channel level on page 39 to be set • Check that the lowpass filter switch on your receiver, until the noise cassette deck. software with DTS is odd. Everything seems to check the speaker levels. disappears. During a playback search..., set to direct light. No sound is output when position. Connecting the speakers on . compatible CD player. Refer to the instruction manual supplied with the corresponding terminals on the speakers (see playback sound is played • Make sure the player's settings are up ....
Owner's Manual
Page 50
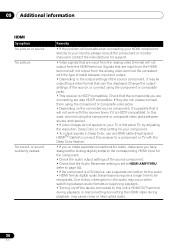
...connecting are input from the HDMI terminal will not output from the analog video terminal. Due to a component or TV with this receiver to this unit's HDMI OUT terminal during playback, or disconnecting/connecting the HDMI cable during playback, may be outputting a video format ...In this case, connect using the component or composite jacks. • This receiver is HDCP-compatible). Remedy • If the problem still persists when connecting your monitor, please consult the component or monitor manual or contact the manufacturer for the audio. • HDMI format digital audio ...
...connecting are input from the HDMI terminal will not output from the analog video terminal. Due to a component or TV with this receiver to this unit's HDMI OUT terminal during playback, or disconnecting/connecting the HDMI cable during playback, may be outputting a video format ...In this case, connect using the component or composite jacks. • This receiver is HDCP-compatible). Remedy • If the problem still persists when connecting your monitor, please consult the component or monitor manual or contact the manufacturer for the audio. • HDMI format digital audio ...

Owner's Manual
Page 158
... PRODUCT TO YOU WITHIN THE COUNTRY OF PURCHASE. The warranty period for parts or actual repair work. To receive warranty service you and Pioneer, Pioneer makes available its Complaint Resolution Program to the representative, a resolution number will be reached during business hours....SUBSEQUENT DAMAGE FROM LEAKING, DAMAGE FROM INOPERATIVE BATTERIES, OR THE USE OF BATTERIES NOT CONFORMING TO THOSE SPECIFIED IN THE OWNER'S MANUAL. PIONEER LIMITS ITS OBLIGATIONS UNDER ANY IMPLIED WARRANTIES INCLUDING, BUT NOT LIMITED TO, THE IMPLIED WARRANTIES OF MERCHANTABILITY AND FITNESS FOR A ...
... PRODUCT TO YOU WITHIN THE COUNTRY OF PURCHASE. The warranty period for parts or actual repair work. To receive warranty service you and Pioneer, Pioneer makes available its Complaint Resolution Program to the representative, a resolution number will be reached during business hours....SUBSEQUENT DAMAGE FROM LEAKING, DAMAGE FROM INOPERATIVE BATTERIES, OR THE USE OF BATTERIES NOT CONFORMING TO THOSE SPECIFIED IN THE OWNER'S MANUAL. PIONEER LIMITS ITS OBLIGATIONS UNDER ANY IMPLIED WARRANTIES INCLUDING, BUT NOT LIMITED TO, THE IMPLIED WARRANTIES OF MERCHANTABILITY AND FITNESS FOR A ...


