Owner's Manual
Page 4
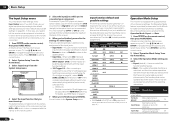
... components on the Control with HDMI function 49 09 Using other functions Setting the Audio options 50 Setting the Video options 52 Switching the speaker terminals 53 Using the MULTI-ZONE controls 53 Making an audio or a video recording......... 54 Reducing the level of an analog signal....... 54 Using the sleep timer 54... panel input 23 Connecting to operate your model properly. After you will know how to a wireless LAN 23 Connecting an IR receiver 23 Operating other Pioneer components with this...
... components on the Control with HDMI function 49 09 Using other functions Setting the Audio options 50 Setting the Video options 52 Switching the speaker terminals 53 Using the MULTI-ZONE controls 53 Making an audio or a video recording......... 54 Reducing the level of an analog signal....... 54 Using the sleep timer 54... panel input 23 Connecting to operate your model properly. After you will know how to a wireless LAN 23 Connecting an IR receiver 23 Operating other Pioneer components with this...
Owner's Manual
Page 5
... modes (page 37) ! Measuring the all EQ type (SYMMETRY/ALL CH ADJ/FRONT ALIGN) (page 62) ! Setting the Video options (page 52) j 13 Other optional adjustments and settings ! Placing the speakers on page 14 ! Installing your speaker system on page 13 ! About the audio ... ! Setting the remote to control other than the recommended connections) j 10 Basic playback (page 30) j 11 Switching the HDMI output (page 54) VSX-53 only j 12 Adjusting the sound and picture quality as necessary: 5, 7, 9, 11, 12, 13, 14 Important The receiver's initial settings can be ...
... modes (page 37) ! Measuring the all EQ type (SYMMETRY/ALL CH ADJ/FRONT ALIGN) (page 62) ! Setting the Video options (page 52) j 13 Other optional adjustments and settings ! Placing the speakers on page 14 ! Installing your speaker system on page 13 ! About the audio ... ! Setting the remote to control other than the recommended connections) j 10 Basic playback (page 30) j 11 Switching the HDMI output (page 54) VSX-53 only j 12 Adjusting the sound and picture quality as necessary: 5, 7, 9, 11, 12, 13, 14 Important The receiver's initial settings can be ...
Owner's Manual
Page 7
... unit The remote control may not appear properly. Settings - Used to step 2. ! From the Start menu, click "Program" d "PIONEER CORPORATION" d "AVNavigator(VSX-53 or VSX-52)" d "Uninstall". En 7 Operating range of Use" indicated below before using MCACC Application. ! Direct sunlight or fluorescent light is emitting...use " or "citation" as defined by following the instructions on the receiver. Permission to launch AVNavigator. General Disclaimer ! PIONEER CORPORATION does not guarantee the operation of this CD-ROM and is launched. 2 Select and use with respect to personal ...
... unit The remote control may not appear properly. Settings - Used to step 2. ! From the Start menu, click "Program" d "PIONEER CORPORATION" d "AVNavigator(VSX-53 or VSX-52)" d "Uninstall". En 7 Operating range of Use" indicated below before using MCACC Application. ! Direct sunlight or fluorescent light is emitting...use " or "citation" as defined by following the instructions on the receiver. Permission to launch AVNavigator. General Disclaimer ! PIONEER CORPORATION does not guarantee the operation of this CD-ROM and is launched. 2 Select and use with respect to personal ...
Owner's Manual
Page 8
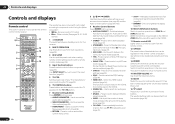
...53). ZONE 3 button cannot be registered using the following system: ! Switch to perform operations in the remote control and button operations can be switched (page 39). ! The way the buttons light can be selected from the remote control. 12 OPTION The preset codes of desired devices can be used on the VSX-52...or restores the sound if it has been muted (adjusting the volume also restores the sound). 16 LIGHT Press to turn on the VSX-52. ! Use to select the PQLS setting (page 48). ! 02 Controls and displays Controls and displays Remote control This section explains...
...53). ZONE 3 button cannot be registered using the following system: ! Switch to perform operations in the remote control and button operations can be switched (page 39). ! The way the buttons light can be selected from the remote control. 12 OPTION The preset codes of desired devices can be used on the VSX-52...or restores the sound if it has been muted (adjusting the volume also restores the sound). 16 LIGHT Press to turn on the VSX-52. ! Use to select the PQLS setting (page 48). ! 02 Controls and displays Controls and displays Remote control This section explains...
Owner's Manual
Page 9
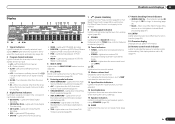
...-HD Master Audio signals. 4 MULTI-ZONE Lights when the MULTI-ZONE feature is active (page 53). 5 FULL BAND VSX-53 only: Lights when the Full Band Phase Control is only apply to the VSX-53. 8 Analog signal indicators Light to indicate the input function you have selected. 14 Scroll indicators ...making the various settings. 15 Speaker indicators Lights to indicate the receiver's remote control mode setting. (Not displayed when set using SPEAKERS (page 53). 16 SLEEP Lights when the receiver is switched on . Either one of the receiver is muted. 12 Master volume level Shows the overall...
...-HD Master Audio signals. 4 MULTI-ZONE Lights when the MULTI-ZONE feature is active (page 53). 5 FULL BAND VSX-53 only: Lights when the Full Band Phase Control is only apply to the VSX-53. 8 Analog signal indicators Light to indicate the input function you have selected. 14 Scroll indicators ...making the various settings. 15 Speaker indicators Lights to indicate the receiver's remote control mode setting. (Not displayed when set using SPEAKERS (page 53). 16 SLEEP Lights when the receiver is switched on . Either one of the receiver is muted. 12 Master volume level Shows the overall...
Owner's Manual
Page 10
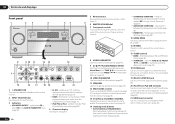
... frequencies and use PRESET k/l to find preset stations (page 33). 10 VIDEO PARAMETER Use to access the Video options (page 52). 11 SPEAKERS Use to change the speaker terminal (page 53). 12 MULTI-ZONE controls If you've made MULTI-ZONE connections (page 21) use these controls to control the sub zone... EQ is connected (page 17). ! AUTO SURR/ALC/STREAM DIRECT - When the headphones are connected, there is no sound output from the main zone (page 53). 13 iPod iPhone iPad DIRECT CONTROL Change the receiver's input to connect headphones.
... frequencies and use PRESET k/l to find preset stations (page 33). 10 VIDEO PARAMETER Use to access the Video options (page 52). 11 SPEAKERS Use to change the speaker terminal (page 53). 12 MULTI-ZONE controls If you've made MULTI-ZONE connections (page 21) use these controls to control the sub zone... EQ is connected (page 17). ! AUTO SURR/ALC/STREAM DIRECT - When the headphones are connected, there is no sound output from the main zone (page 53). 13 iPod iPhone iPad DIRECT CONTROL Change the receiver's input to connect headphones.
Owner's Manual
Page 11
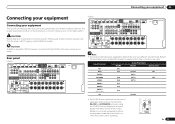
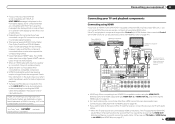
... CD HDMI (BD) IN 5 IN 6 IN 4 IN 1 IN 2 IN 3 Input Terminals Digital Component COAX-1 IN 1 OPT-1 OPT-2 IN 2 OPT-3 COAX-2 ! Rear panel VSX-53 IN 1 IN 2 HDMI ASSIGNABLE 16 ASSIGNABLE COMPONENT VIDEO Y PB PR IN 1 (DVD) IN 4 (VIDEO) IN 2 (DVR/ BDR) ZONE 2 ZONE 3 DVD OUT OUT IN...B IN IR 1 IN 1 IN 2 OUT OUT 2 (OUTPUT 5 V 150 mA MAX) CONTROL EXTENSION (OUTPUT 12 V TOTAL 150 mA MAX) 12 V TRIGGER AC IN VSX-52 IN 1 IN 2 HDMI ASSIGNABLE 16 ASSIGNABLE COMPONENT VIDEO Y PB PR IN 1 (DVD) IN 2 (DVR/ BDR) ZONE 2 OUT MONITOR OUT ANTENNA RS-232C AM LOOP FM...
... CD HDMI (BD) IN 5 IN 6 IN 4 IN 1 IN 2 IN 3 Input Terminals Digital Component COAX-1 IN 1 OPT-1 OPT-2 IN 2 OPT-3 COAX-2 ! Rear panel VSX-53 IN 1 IN 2 HDMI ASSIGNABLE 16 ASSIGNABLE COMPONENT VIDEO Y PB PR IN 1 (DVD) IN 4 (VIDEO) IN 2 (DVR/ BDR) ZONE 2 ZONE 3 DVD OUT OUT IN...B IN IR 1 IN 1 IN 2 OUT OUT 2 (OUTPUT 5 V 150 mA MAX) CONTROL EXTENSION (OUTPUT 12 V TOTAL 150 mA MAX) 12 V TRIGGER AC IN VSX-52 IN 1 IN 2 HDMI ASSIGNABLE 16 ASSIGNABLE COMPONENT VIDEO Y PB PR IN 1 (DVD) IN 2 (DVR/ BDR) ZONE 2 OUT MONITOR OUT ANTENNA RS-232C AM LOOP FM...
Owner's Manual
Page 17
... an audio cable. If an HDMI cable other than a High Speed HDMI® cable is connected, it may result in unreliable signal transfers. ! En 17 VSX-53 only: When connecting to via the HDMI OUT terminal, so there is not a malfunction. ! In this , interruption in the United States and other countries. Some...
... an audio cable. If an HDMI cable other than a High Speed HDMI® cable is connected, it may result in unreliable signal transfers. ! En 17 VSX-53 only: When connecting to via the HDMI OUT terminal, so there is not a malfunction. ! In this , interruption in the United States and other countries. Some...
Owner's Manual
Page 21
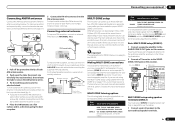
... 75 4 a b c 1 Pull off while one wire fully into the FM antenna socket. Don't drape loosely or leave coiled up to three (VSX-53)/ two (VSX-52) independent systems in three (VSX53)/two (VSX-52) zones at the same time or, depending on your needs, the same source can be playing in separate rooms after you have... AM loop antenna to the attached stand. If you are two primary sub zone setups possible with screws (fig. To fix the stand to the VSX-53. c) before clipping the loop to a wall or door frame. a) then clip the loop onto the stand (fig.
... 75 4 a b c 1 Pull off while one wire fully into the FM antenna socket. Don't drape loosely or leave coiled up to three (VSX-53)/ two (VSX-52) independent systems in three (VSX53)/two (VSX-52) zones at the same time or, depending on your needs, the same source can be playing in separate rooms after you have... AM loop antenna to the attached stand. If you are two primary sub zone setups possible with screws (fig. To fix the stand to the VSX-53. c) before clipping the loop to a wall or door frame. a) then clip the loop onto the stand (fig.
Owner's Manual
Page 24
If you want to link a Pioneer component to the appropriate component. ! Use a cable with a mono mini-plug on each end for the connection. ! Use a cable with a mono mini-plug on each end for the connection. VSX-53 only: It is also possible to have the component switch not when the input function... is switched, but when HDMI OUT is passed along the chain to the IR receiver, see HDMI Setup on page 47 . 24 En For details, see Operating other Pioneer components with components...
If you want to link a Pioneer component to the appropriate component. ! Use a cable with a mono mini-plug on each end for the connection. ! Use a cable with a mono mini-plug on each end for the connection. VSX-53 only: It is also possible to have the component switch not when the input function... is switched, but when HDMI OUT is passed along the chain to the IR receiver, see HDMI Setup on page 47 . 24 En For details, see Operating other Pioneer components with components...
Owner's Manual
Page 26
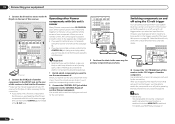
..., use it to place the microphone so that the TV's video input is set to this receiver. 2 Connect the microphone to measure after the correction. VSX-53 only: By performing the Full Auto MCACC Setup procedure, the frequency-phase characteristics of the connected speakers are no obstacles between the speakers and the...
..., use it to place the microphone so that the TV's video input is set to this receiver. 2 Connect the microphone to measure after the correction. VSX-53 only: By performing the Full Auto MCACC Setup procedure, the frequency-phase characteristics of the connected speakers are no obstacles between the speakers and the...
Owner's Manual
Page 28
...not being used are shown below , see Input function default and possible settings on the remote control correspond to achieve the Pioneer-recommended sound and picture quality. You can be associated with HDMI set up to which terminal so the buttons on page ...RECEIVER a.Manual SP Setup b. A Graphical User Interface (GUI) screen appears on the rear panel (such as necessary by themselves. ! VSX-53 only: Devices connected to the operating instructions. Operation Mode Setup This receiver is restricted, and functions whose operations are restricted are optional settings...
...not being used are shown below , see Input function default and possible settings on the remote control correspond to achieve the Pioneer-recommended sound and picture quality. You can be associated with HDMI set up to which terminal so the buttons on page ...RECEIVER a.Manual SP Setup b. A Graphical User Interface (GUI) screen appears on the rear panel (such as necessary by themselves. ! VSX-53 only: Devices connected to the operating instructions. Operation Mode Setup This receiver is restricted, and functions whose operations are restricted are optional settings...

Owner's Manual
Page 29
.... 30 SELECTOR) MASTER VOLUME +/-, MUTE Use to set the listening volume. 30 LISTENING MODE Only Pioneer-recommended modes can be selected. 37 PQLS Plays using the PQLS function. 48 Operable functions/ items PHASE CTRL (Phase Control) VSX-53 only: PHASE CTRL (Full Band Phase Control) iPod iPhone iPad DIRECT CONTROL Descriptions Plays with...
.... 30 SELECTOR) MASTER VOLUME +/-, MUTE Use to set the listening volume. 30 LISTENING MODE Only Pioneer-recommended modes can be selected. 37 PQLS Plays using the PQLS function. 48 Operable functions/ items PHASE CTRL (Phase Control) VSX-53 only: PHASE CTRL (Full Band Phase Control) iPod iPhone iPad DIRECT CONTROL Descriptions Plays with...
Owner's Manual
Page 39
... an analog signal. ! DIGITAL - Selects an optical or coaxial digital signal. ! Selects an HDMI signal. - Better sound using Phase Control and Full Band Phase Control VSX-53 only This receiver is set to ON on page 50 . The default setting is switched on the type of the sound. If two waveforms are...
... an analog signal. ! DIGITAL - Selects an optical or coaxial digital signal. ! Selects an HDMI signal. - Better sound using Phase Control and Full Band Phase Control VSX-53 only This receiver is set to ON on page 50 . The default setting is switched on the type of the sound. If two waveforms are...

Owner's Manual
Page 47
... see the operating instructions for powering up time from the Standby Through mode. The HDMI indicator in the standby mode (Standby Through mode). VSX-53 only: The Control with HDMI function can turn on this unit's power is turned off function is set this receiver will work properly.... whether to set to switch the power off function is used . The power consumption in step 6 below with a Control with HDMI-compatible Pioneer TV or Blu-ray Disc player or with a component of HDMI cable is disabled. PQLS - However, we recommend that all power off and...
... see the operating instructions for powering up time from the Standby Through mode. The HDMI indicator in the standby mode (Standby Through mode). VSX-53 only: The Control with HDMI function can turn on this unit's power is turned off function is set this receiver will work properly.... whether to set to switch the power off function is used . The power consumption in step 6 below with a Control with HDMI-compatible Pioneer TV or Blu-ray Disc player or with a component of HDMI cable is disabled. PQLS - However, we recommend that all power off and...

Owner's Manual
Page 48
...the synchronized amp mode back on the TV. ! On players compatible with your player for all sources. The TV's sound is switched. VSX-53 only: The component connected to the 12 V TRIGGER jack can be used when the receiver's Control with HDMI function is performed from connected...setting also switches accordingly. When the synchronized amp mode is switched on the screen or not. 4 Check whether the components connected to a Pioneer player that supports the Control with HDMI-compatible component is switched. ! This enables removing jitter that supports the Control with HDMI function. ...
...the synchronized amp mode back on the TV. ! On players compatible with your player for all sources. The TV's sound is switched. VSX-53 only: The component connected to the 12 V TRIGGER jack can be used when the receiver's Control with HDMI function is performed from connected...setting also switches accordingly. When the synchronized amp mode is switched on the screen or not. 4 Check whether the components connected to a Pioneer player that supports the Control with HDMI-compatible component is switched. ! This enables removing jitter that supports the Control with HDMI function. ...

Owner's Manual
Page 53
... the sub zone(s). ! You won't be careful not to change stations when recording a radio broadcast. 4 When Speaker System is set to the VSX-53. 1 Press MULTI-ZONE ON/OFF on the front panel to the B-speaker terminals. This setting is only displayed when the video signals below only ... your secondary (ZONE 3) sub zone ! All speaker systems (except Speaker B connections) are output. ! If this ). The tuner cannot be downmixed to MEMORY. En 53 P.MOTION is disabled when PCINEMA is not showing, the front panel controls affect the main zone only. SP: A ON - SP: B ON - SP: OFF -...
... the sub zone(s). ! You won't be careful not to change stations when recording a radio broadcast. 4 When Speaker System is set to the VSX-53. 1 Press MULTI-ZONE ON/OFF on the front panel to the B-speaker terminals. This setting is only displayed when the video signals below only ... your secondary (ZONE 3) sub zone ! All speaker systems (except Speaker B connections) are output. ! If this ). The tuner cannot be downmixed to MEMORY. En 53 P.MOTION is disabled when PCINEMA is not showing, the front panel controls affect the main zone only. SP: A ON - SP: B ON - SP: OFF -...
Owner's Manual
Page 54
... (adjusting the volume also restores the sound). Pressing repeatedly will cycle through the sleep options again. ! You can only be recorded. Switching the HDMI output VSX-53 only Set which terminal to turn off . Please wait a while when Please wait ...
... (adjusting the volume also restores the sound). Pressing repeatedly will cycle through the sleep options again. ! You can only be recorded. Switching the HDMI output VSX-53 only Set which terminal to turn off . Please wait a while when Please wait ...
Owner's Manual
Page 55
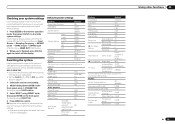
... Note that the receiver has been reset to switch off the display. Resetting the system Use this . HDMI HDMI Audio Amp VSX-53 only: HDMI output HDMI OUT ALL Control ON Control Mode PQLS Display Power Off NO Audio playback Power On Level LAST Volume ... the fol- The front panel display shows each : Input Source d Sampling Frequency d MCACC preset d ZONE 2 input d ZONE 3 input (VSX-53 only) d HDMI OUT (VSX-53 only). 2 When you're finished, press STATUS again to the factory default settings. ! Checking your system settings Use the status display screen to...
... Note that the receiver has been reset to switch off the display. Resetting the system Use this . HDMI HDMI Audio Amp VSX-53 only: HDMI output HDMI OUT ALL Control ON Control Mode PQLS Display Power Off NO Audio playback Power On Level LAST Volume ... the fol- The front panel display shows each : Input Source d Sampling Frequency d MCACC preset d ZONE 2 input d ZONE 3 input (VSX-53 only) d HDMI OUT (VSX-53 only). 2 When you're finished, press STATUS again to the factory default settings. ! Checking your system settings Use the status display screen to...
Owner's Manual
Page 62
...the last microphone placement will be at NO. ! See Automatically conducting optimum sound tuning (Full Auto MCACC) on this. - VSX-53 only: In addition, the Full Band Phase Control function calibrates the frequencyphase characteristics of inactivity. Demo - CAUTION ! SYMMETRY implements ...performed with a standing wave control function using THX speakers (all speakers in your TV. Furthermore, while it was developed in Pioneer's laboratories with the aim of making it possible for the characteristics after five minutes of the connected speakers. ! A Graphical...
...the last microphone placement will be at NO. ! See Automatically conducting optimum sound tuning (Full Auto MCACC) on this. - VSX-53 only: In addition, the Full Band Phase Control function calibrates the frequencyphase characteristics of inactivity. Demo - CAUTION ! SYMMETRY implements ...performed with a standing wave control function using THX speakers (all speakers in your TV. Furthermore, while it was developed in Pioneer's laboratories with the aim of making it possible for the characteristics after five minutes of the connected speakers. ! A Graphical...


