Owner's Manual
Page 2
After you for buying this Pioneer product. If connected to an AC outlet, the cut-off and on the power supply cord of Dolby Laboratories. TO PREVENT FIRE OR SHOCK HAZARD, DO NOT EXPOSE THIS APPLIANCE TO RAIN OR MOISTURE. D1-4-2-1_En CAUTION - RECEPTACLE OR ...
After you for buying this Pioneer product. If connected to an AC outlet, the cut-off and on the power supply cord of Dolby Laboratories. TO PREVENT FIRE OR SHOCK HAZARD, DO NOT EXPOSE THIS APPLIANCE TO RAIN OR MOISTURE. D1-4-2-1_En CAUTION - RECEPTACLE OR ...
Owner's Manual
Page 3
... The product should be retained for service. A ANTENNA DISCHARGE UNIT (NEC SECTION 810-20) GROUNDING CONDUCTORS (NEC SECTION 810-21) GROUND CLAMPS POWER SERVICE GROUNDING ELECTRODE SYSTEM (NEC ART 250, PART H) NEC - CLEANING - Do not use a mounting accessory recommended by the manufacturer, or sold... against them might be fatal. For added protection for ventilation and to ensure reliable operation of the product and to lightning and power-line surges. An outside antenna system, extreme care should be located in a wet basement; Adjust only those controls that produce ...
... The product should be retained for service. A ANTENNA DISCHARGE UNIT (NEC SECTION 810-20) GROUNDING CONDUCTORS (NEC SECTION 810-21) GROUND CLAMPS POWER SERVICE GROUNDING ELECTRODE SYSTEM (NEC ART 250, PART H) NEC - CLEANING - Do not use a mounting accessory recommended by the manufacturer, or sold... against them might be fatal. For added protection for ventilation and to ensure reliable operation of the product and to lightning and power-line surges. An outside antenna system, extreme care should be located in a wet basement; Adjust only those controls that produce ...
Owner's Manual
Page 4
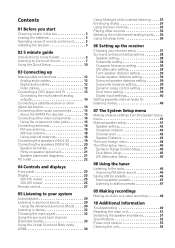
...18 FM wire antenna 18 AM loop antenna 18 Using external antennas 18 Connecting the speakers (VSX-415 19 Connecting the speakers (VSX-515 20 Speaker terminals 21 Hints on speaker placement 21 Speaker placement diagrams 21 AC outlet 22... 04 Controls and displays Front panel 23 Display 25 VSX-515 model 25 VSX-415 model 25 Remote control 27 05 Listening to your system Auto playback 29 Listening in surround ...49 Resetting the main unit 51 Switching the speaker impedance 51 Specifications 52 Power cord caution 53 Cleaning the unit 53
...18 FM wire antenna 18 AM loop antenna 18 Using external antennas 18 Connecting the speakers (VSX-415 19 Connecting the speakers (VSX-515 20 Speaker terminals 21 Hints on speaker placement 21 Speaker placement diagrams 21 AC outlet 22... 04 Controls and displays Front panel 23 Display 25 VSX-515 model 25 VSX-415 model 25 Remote control 27 05 Listening to your system Auto playback 29 Listening in surround ...49 Resetting the main unit 51 Switching the speaker impedance 51 Specifications 52 Power cord caution 53 Cleaning the unit 53
Owner's Manual
Page 7
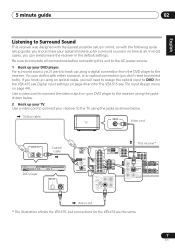
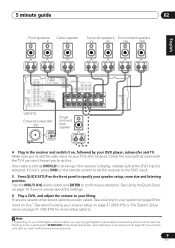
In most cases, you can do this unit to the AC power source. 1 Hook up your DVD player. For surround sound, you'll want to hook up using the jacks as shown below . 2 Hook up your receiver ... L CENTER (T V / SAT)IN ø R SURROUND BACK L OUT SINGLE SEE INSTRUCTION MONITOR MANUAL OUT SUB WOOFER PREOUT R SURROUND L Video cord * The illustration shows the VSX-515, but connections for the VSX-415 are the same. 7 En Use a video cord to connect the video output on page 44). 5 minute guide 02 English Deutsch Franç...
In most cases, you can do this unit to the AC power source. 1 Hook up your DVD player. For surround sound, you'll want to hook up using the jacks as shown below . 2 Hook up your receiver ... L CENTER (T V / SAT)IN ø R SURROUND BACK L OUT SINGLE SEE INSTRUCTION MONITOR MANUAL OUT SUB WOOFER PREOUT R SURROUND L Video cord * The illustration shows the VSX-515, but connections for the VSX-415 are the same. 7 En Use a video cord to connect the video output on page 44). 5 minute guide 02 English Deutsch Franç...

Owner's Manual
Page 8
... using only one surround back speaker, connect the positive wire to the right channel (+) terminal, and the negative wire to large. • VSX-515 only - Also make sure the positive and negative (+/-) terminals on the receiver match those on page 38) to the left terminal. Front speakers... WOOFER PREOUT CENTER SUB WOOFER R L SURROUND DVD 5.1CH INPUT FRONT SPEAKER RL CENTER SPEAKER SURROUND SPEAKERS RL L R SURROUND PREOUT Powered subwoofer SW INPUT AC OUTLET VSX-415 Note 1 • If you have as shown. 8 En 02 5 minute guide 3 Connect your speakers. Make sure you...
... using only one surround back speaker, connect the positive wire to the right channel (+) terminal, and the negative wire to large. • VSX-515 only - Also make sure the positive and negative (+/-) terminals on the receiver match those on page 38) to the left terminal. Front speakers... WOOFER PREOUT CENTER SUB WOOFER R L SURROUND DVD 5.1CH INPUT FRONT SPEAKER RL CENTER SPEAKER SURROUND SPEAKERS RL L R SURROUND PREOUT Powered subwoofer SW INPUT AC OUTLET VSX-415 Note 1 • If you have as shown. 8 En 02 5 minute guide 3 Connect your speakers. Make sure you...
Owner's Manual
Page 9
...know how to this case, the listening mode must be set the video input on page 41 (VSX-515) for more on this.1 See also Choosing your receiver setup on page 37 (VSX-415) or The System Setup menu on your selection. Note 1 Depending on page 29 if you.../ LD) IN ¥ Y PB PR Y PB PR MONITOR OUT (T V / SAT)IN ø S R FRONT L CENTER R SURROUND BACK L R SURROUND L P E A SINGLE K SEE INSTRUCTION MANUAL E R S VSX-515 Powered subwoofer SW INPUT Single surround back speaker AC OUTLET 4 Plug in the receiver's display, indicating that came with the TV if you 've set to...
...know how to this case, the listening mode must be set the video input on page 41 (VSX-515) for more on this.1 See also Choosing your receiver setup on page 37 (VSX-415) or The System Setup menu on your selection. Note 1 Depending on page 29 if you.../ LD) IN ¥ Y PB PR Y PB PR MONITOR OUT (T V / SAT)IN ø S R FRONT L CENTER R SURROUND BACK L R SURROUND L P E A SINGLE K SEE INSTRUCTION MANUAL E R S VSX-515 Powered subwoofer SW INPUT Single surround back speaker AC OUTLET 4 Plug in the receiver's display, indicating that came with the TV if you 've set to...
Owner's Manual
Page 10
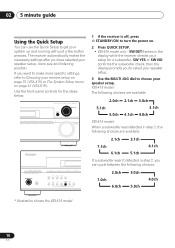
... If the receiver is off, press STANDBY/ON to choose your speaker setup. 3 Use the MULTI JOG dial to turn the power on page 41 (VSX-515). If you to select your speaker setup. SW DET flashes in step 2, you have selected your setup for the steps below. ...subwoofer wasn't detected in the display while the receiver checks your speaker setup, room size and listening position. VSX-415 model: The following choices are available: 2.0ch 2.1ch 3.0ch 5.1ch 3.1ch 5.0ch 4.1ch 4.0ch VSX-515 model: When a subwoofer was detected in step 2, the following choices: 7.0ch 2.0ch 6.0ch 3.0ch...
... If the receiver is off, press STANDBY/ON to choose your speaker setup. 3 Use the MULTI JOG dial to turn the power on page 41 (VSX-515). If you to select your speaker setup. SW DET flashes in step 2, you have selected your setup for the steps below. ...subwoofer wasn't detected in the display while the receiver checks your speaker setup, room size and listening position. VSX-415 model: The following choices are available: 2.0ch 2.1ch 3.0ch 5.1ch 3.1ch 5.0ch 4.1ch 4.0ch VSX-515 model: When a subwoofer was detected in step 2, the following choices: 7.0ch 2.0ch 6.0ch 3.0ch...

Owner's Manual
Page 12
...noise from the AC outlet. In this receiver.1 Important • Before making or changing any connections, switch off the power and disconnect the power cord from the speakers. Analog audio cables Coaxial digital audio cable Optical cable Video cables Standard RCA video cables These cables...reproduction of video connection and should be used to connect to connect analog audio components. Standard RCA video cable Component video cables (VSX-515 only) Use component video cables to damage the shutter protecting the optical socket. • When storing optical cable, coil loosely. ...
...noise from the AC outlet. In this receiver.1 Important • Before making or changing any connections, switch off the power and disconnect the power cord from the speakers. Analog audio cables Coaxial digital audio cable Optical cable Video cables Standard RCA video cables These cables...reproduction of video connection and should be used to connect to connect analog audio components. Standard RCA video cable Component video cables (VSX-515 only) Use component video cables to damage the shutter protecting the optical socket. • When storing optical cable, coil loosely. ...
Owner's Manual
Page 19
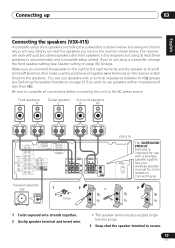
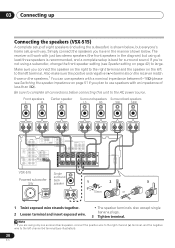
... terminals on the receiver match those on connecting up 03 Connecting the speakers (VSX-415) A complete setup of less than 8Ω). Be sure to complete all connections before connecting this unit to the AC power source. Front speakers L R Center speaker Surround speakers C LS RS R ...SUB WOOFER R L SURROUND DVD 5.1CH INPUT FRONT SPEAKER RL CENTER SPEAKER SURROUND SPEAKERS RL L R SURROUND PREOUT Powered subwoofer SW INPUT 1 2 10mm or ª · VSX-415 AC OUTLET The SURROUND PREOUT terminal is best. If you're not using at least three speakers is recommended...
... terminals on the receiver match those on connecting up 03 Connecting the speakers (VSX-415) A complete setup of less than 8Ω). Be sure to complete all connections before connecting this unit to the AC power source. Front speakers L R Center speaker Surround speakers C LS RS R ...SUB WOOFER R L SURROUND DVD 5.1CH INPUT FRONT SPEAKER RL CENTER SPEAKER SURROUND SPEAKERS RL L R SURROUND PREOUT Powered subwoofer SW INPUT 1 2 10mm or ª · VSX-415 AC OUTLET The SURROUND PREOUT terminal is best. If you're not using at least three speakers is recommended...
Owner's Manual
Page 20
... / LD) IN ¥ Y PB PR Y PB PR MONITOR OUT (T V / SAT)IN ø S R FRONT L CENTER R SURROUND BACK L R SURROUND L P E A SINGLE K SEE INSTRUCTION MANUAL E R S AC OUTLET VSX-515 Single surround Powered subwoofer SW back speaker 1 2 3 INPUT 10mm or 1 Twist exposed wire strands together. 2 Loosen terminal and insert exposed wire. • The speaker terminals also accept...speaker on the right to the right terminal and the speaker on page 42) to the left terminal. 03 Connecting up Connecting the speakers (VSX-515) A complete setup of less than 8Ω).
... / LD) IN ¥ Y PB PR Y PB PR MONITOR OUT (T V / SAT)IN ø S R FRONT L CENTER R SURROUND BACK L R SURROUND L P E A SINGLE K SEE INSTRUCTION MANUAL E R S AC OUTLET VSX-515 Single surround Powered subwoofer SW back speaker 1 2 3 INPUT 10mm or 1 Twist exposed wire strands together. 2 Loosen terminal and insert exposed wire. • The speaker terminals also accept...speaker on the right to the right terminal and the speaker on page 42) to the left terminal. 03 Connecting up Connecting the speakers (VSX-515) A complete setup of less than 8Ω).
Owner's Manual
Page 21
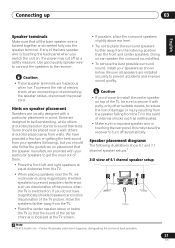
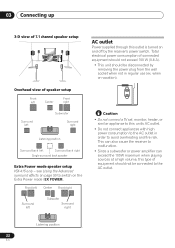
...few tips on getting the best sound from your speakers as a safety measure. To prevent the risk of 6.1 channel speaker setup Note 1 VSX-415 model only - Caution • If you choose to install the center speaker on placement that the speaker manufacturer provided with putty, ... (following illustrations show 6.1 and 7.1 channel speaker setups.1 3-D view of electric shock when connecting or disconnecting the speaker cables, disconnect the power cord. Use good quality speaker wire to connect the speakers to the receiver. Some are designed to be floorstanding, while others should also ...
...few tips on getting the best sound from your speakers as a safety measure. To prevent the risk of 6.1 channel speaker setup Note 1 VSX-415 model only - Caution • If you choose to install the center speaker on placement that the speaker manufacturer provided with putty, ... (following illustrations show 6.1 and 7.1 channel speaker setups.1 3-D view of electric shock when connecting or disconnecting the speaker cables, disconnect the power cord. Use good quality speaker wire to connect the speakers to the receiver. Some are designed to be floorstanding, while others should also ...
Owner's Manual
Page 22
...should not be disconnected by the receiver's power switch. when on the Extra Power mode (EX POWER). This can also cause the receiver to malfunction. • Since a subwoofer or power amplifier can exceed the 100W maximum when ...Surround back left Subwoofer Surround right AC outlet Power supplied through this outlet is turned on and off by removing the power plug from the wall socket when not in... AC outlet. • Do not connect appliances with high power consumption to switch on vacation). Front left Center Front right Surround left Surround back right Single surround...
...should not be disconnected by the receiver's power switch. when on the Extra Power mode (EX POWER). This can also cause the receiver to malfunction. • Since a subwoofer or power amplifier can exceed the 100W maximum when ...Surround back left Subwoofer Surround right AC outlet Power supplied through this outlet is turned on and off by removing the power plug from the wall socket when not in... AC outlet. • Do not connect appliances with high power consumption to switch on vacation). Front left Center Front right Surround left Surround back right Single surround...

Owner's Manual
Page 28
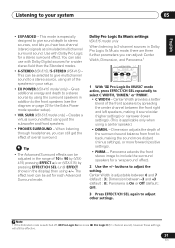
...9 /ENTER Use the arrow buttons when setting up the surround sound for recall (page 46). page 37, VSX-515 - Adds or subtracts the amount of effect with the advanced surround modes (page 30). 6 SLEEP Use to...SELECTOR buttons Press to set the sleep timer (page 36). Button What it does DVD Turns DVD power on multilingual DVD-Video discs. LEVEL +/- Also used to the receiver controls on page 47). 12... DVD CONTROL buttons You can use these buttons to control a Pioneer DVD player connected to the next track or chapter. 28 En buttons can be used for DVD...
...9 /ENTER Use the arrow buttons when setting up the surround sound for recall (page 46). page 37, VSX-515 - Adds or subtracts the amount of effect with the advanced surround modes (page 30). 6 SLEEP Use to...SELECTOR buttons Press to set the sleep timer (page 36). Button What it does DVD Turns DVD power on multilingual DVD-Video discs. LEVEL +/- Also used to the receiver controls on page 47). 12... DVD CONTROL buttons You can use these buttons to control a Pioneer DVD player connected to the next track or chapter. 28 En buttons can be used for DVD...
Owner's Manual
Page 31
... mode active, press EFFECT/CH SEL repeatedly to the front speakers (see the diagram on page 22 for the Extra Power mode speaker setup). • VIR. or (VSX-515) by using the surround speakers in addition to select C WIDTH, 'DIMEN.' Panorama extends the front stereo image to adjust... the setting. buttons to include the surround speakers for a wider stereo field than the Standard modes. • 6-STEREO (VSX-515) / 5-STEREO (VSX-415) - Tip • The Advanced Surround effects can also use with Dolby Pro Logic for each Advanced Surround mode. Dimension adjusts the...
... mode active, press EFFECT/CH SEL repeatedly to the front speakers (see the diagram on page 22 for the Extra Power mode speaker setup). • VIR. or (VSX-515) by using the surround speakers in addition to select C WIDTH, 'DIMEN.' Panorama extends the front stereo image to adjust... the setting. buttons to include the surround speakers for a wider stereo field than the Standard modes. • 6-STEREO (VSX-515) / 5-STEREO (VSX-415) - Tip • The Advanced Surround effects can also use with Dolby Pro Logic for each Advanced Surround mode. Dimension adjusts the...
Owner's Manual
Page 36
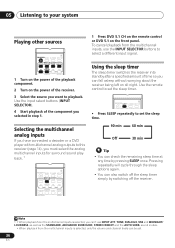
... INPUT SELECTOR DVD/LD DVD 5.1CH TV/SAT DVR/VCR CD-R/ CD TAPE/MD FM AM ADVANCED MIDNIGHT/ 1 Turn on the power of the playback component. 2 Turn on the power of the receiver. 3 Select the source you can fall asleep without worrying about the receiver being left on the front panel. Using...
... INPUT SELECTOR DVD/LD DVD 5.1CH TV/SAT DVR/VCR CD-R/ CD TAPE/MD FM AM ADVANCED MIDNIGHT/ 1 Turn on the power of the playback component. 2 Turn on the power of the receiver. 3 Select the source you can fall asleep without worrying about the receiver being left on the front panel. Using...
Owner's Manual
Page 47
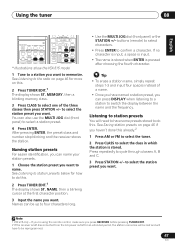
... the remote control, make sure you press RECEIVER before pressing TUNER EDIT. 2 If the receiver is left disconnected from the AC power outlet for an extended period, the station memories will be up to do this . to name. Naming station presets For easier identification... DIALOG E SELECT EDIT CLASS DVD TUNER MPX AUDIO TUNING STATION DISPLAY ADVANCED MIDNIGHT/ STANDARD SURROUND STEREO LOUDNESS SUB TITLE DVD CONTROL * Illustrations show the VSX-515 model 1 Tune to a station you want to cycle through classes A, B and C. 3 Press STATION +/- buttons (remote) to select characters. ...
... the remote control, make sure you press RECEIVER before pressing TUNER EDIT. 2 If the receiver is left disconnected from the AC power outlet for an extended period, the station memories will be up to do this . to name. Naming station presets For easier identification... DIALOG E SELECT EDIT CLASS DVD TUNER MPX AUDIO TUNING STATION DISPLAY ADVANCED MIDNIGHT/ STANDARD SURROUND STEREO LOUDNESS SUB TITLE DVD CONTROL * Illustrations show the VSX-515 model 1 Tune to a station you want to cycle through classes A, B and C. 3 Press STATION +/- buttons (remote) to select characters. ...
Owner's Manual
Page 49
... causing the noise. 49 En Remedy • Connect the power plug to turn on the remote control to the wall outlet. • Disconnect the power plug from the outlet and insert again to return to your nearest Pioneer authorized service center or your dealer for trouble and malfunctions. ...this component, check the points below , ask your nearest Pioneer authorized service center or your dealer to carry out repair work. • If the unit does not operate normally due to external effects such as static electricity disconnect the power plug from the outlet, and insert again. •...
... causing the noise. 49 En Remedy • Connect the power plug to turn on the remote control to the wall outlet. • Disconnect the power plug from the outlet and insert again to return to your nearest Pioneer authorized service center or your dealer for trouble and malfunctions. ...this component, check the points below , ask your nearest Pioneer authorized service center or your dealer to carry out repair work. • If the unit does not operate normally due to external effects such as static electricity disconnect the power plug from the outlet, and insert again. •...
Owner's Manual
Page 52
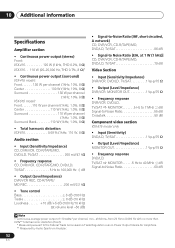
... Specifications Amplifier section • Continuous power output (stereo) Front: VSX-415 120 W (1kHz, THD 0.2%, 8 Ω) VSX-515 . . 110 W (20-20,000 Hz, THD 0.7%, 8 Ω)1 • Continuous power output (surround) VSX-415 model: Front. . . . . . 130 W per channel (1kHz, 10%, 8 Ω) Center 130 W (1kHz, 10%, 8 Ω) Surround 130 W per channel (1kHz, 10%, 8 Ω) VSX-515 model: Front. . . . . . 110 W per channel...
... Specifications Amplifier section • Continuous power output (stereo) Front: VSX-415 120 W (1kHz, THD 0.2%, 8 Ω) VSX-515 . . 110 W (20-20,000 Hz, THD 0.7%, 8 Ω)1 • Continuous power output (surround) VSX-415 model: Front. . . . . . 130 W per channel (1kHz, 10%, 8 Ω) Center 130 W (1kHz, 10%, 8 Ω) Surround 130 W per channel (1kHz, 10%, 8 Ω) VSX-515 model: Front. . . . . . 110 W per channel...
Owner's Manual
Page 53
... 350 µV/m Signal-to-Noise Ratio 50 dB Antenna Loop antenna Miscellaneous Power requirements AC 120V / 60Hz Power consumption: VSX-415 260 W / 340 VA VSX-515 300 W / 420 VA In standby 0.5 W Dimensions: VSX-415. . . .169/16 (W) x 61/4 (H) x 159/16 (D) in. 420 (W) x 158 (H) x 394.5 (D) mm VSX-515. . . . 169/16 (W) x 61/4 (H) x 157/8 ...an electric shock. Check the power cord once in the cord or tie it damaged, ask your nearest Pioneer authorized service center or your hands are subject to possible modifications without package) VSX-415 18.1 lb (8.5 kg) VSX-515 21.1 lb (9.9 kg) ...
... 350 µV/m Signal-to-Noise Ratio 50 dB Antenna Loop antenna Miscellaneous Power requirements AC 120V / 60Hz Power consumption: VSX-415 260 W / 340 VA VSX-515 300 W / 420 VA In standby 0.5 W Dimensions: VSX-415. . . .169/16 (W) x 61/4 (H) x 159/16 (D) in. 420 (W) x 158 (H) x 394.5 (D) mm VSX-515. . . . 169/16 (W) x 61/4 (H) x 157/8 ...an electric shock. Check the power cord once in the cord or tie it damaged, ask your nearest Pioneer authorized service center or your hands are subject to possible modifications without package) VSX-415 18.1 lb (8.5 kg) VSX-515 21.1 lb (9.9 kg) ...


