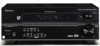
Owner's Manual
Page 2
... after removal. D1-4-2-6-1_En NOTE: This equipment has been tested and found to comply with the limits for future reference. If this Pioneer product. D8-10-1-2_En This Class B digital apparatus complies with the instructions, may invalidate the user's right to cause cancer and ...birth defects or other governmental entities to operate the equipment. Replacement and mounting of an AC plug on the power supply cord of Dolby Laboratories. D1-4-2-1_En CAUTION - Increase the separation between the equipment and receiver. - Make sure it is ...
... after removal. D1-4-2-6-1_En NOTE: This equipment has been tested and found to comply with the limits for future reference. If this Pioneer product. D8-10-1-2_En This Class B digital apparatus complies with the instructions, may invalidate the user's right to cause cancer and ...birth defects or other governmental entities to operate the equipment. Replacement and mounting of an AC plug on the power supply cord of Dolby Laboratories. D1-4-2-1_En CAUTION - Increase the separation between the equipment and receiver. - Make sure it is ...
Owner's Manual
Page 3
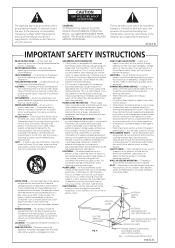
... pool; Unauthorized substitutions may result in performance - REFER SERVICING TO QUALIFIED SERVICE PERSONNEL. Do not place this product near water - POWER SOURCES - POWER-CORD PROTECTION - OUTDOOR ANTENNA GROUNDING - OBJECT AND LIQUID ENTRY - Never push objects of any way. • When the product... Do not defeat the safety purpose of important operating and maintenance (servicing) instructions in a fire or electric shock. Power-supply cords should be blocked by the manufacturer. Article 810 of the National Electrical Code, ANSI/NFPA 70, provides ...
... pool; Unauthorized substitutions may result in performance - REFER SERVICING TO QUALIFIED SERVICE PERSONNEL. Do not place this product near water - POWER SOURCES - POWER-CORD PROTECTION - OUTDOOR ANTENNA GROUNDING - OBJECT AND LIQUID ENTRY - Never push objects of any way. • When the product... Do not defeat the safety purpose of important operating and maintenance (servicing) instructions in a fire or electric shock. Power-supply cords should be blocked by the manufacturer. Article 810 of the National Electrical Code, ANSI/NFPA 70, provides ...
Owner's Manual
Page 4
...18 FM wire antenna 18 AM loop antenna 18 Using external antennas 18 Connecting the speakers (VSX-415 19 Connecting the speakers (VSX-515 20 Speaker terminals 21 Hints on speaker placement 21 Speaker placement diagrams 21 AC outlet 22... 04 Controls and displays Front panel 23 Display 25 VSX-515 model 25 VSX-415 model 25 Remote control 27 05 Listening to your system Auto playback 29 Listening in surround ...49 Resetting the main unit 51 Switching the speaker impedance 51 Specifications 52 Power cord caution 53 Cleaning the unit 53
...18 FM wire antenna 18 AM loop antenna 18 Using external antennas 18 Connecting the speakers (VSX-415 19 Connecting the speakers (VSX-515 20 Speaker terminals 21 Hints on speaker placement 21 Speaker placement diagrams 21 AC outlet 22... 04 Controls and displays Front panel 23 Display 25 VSX-515 model 25 VSX-415 model 25 Remote control 27 05 Listening to your system Auto playback 29 Listening in surround ...49 Resetting the main unit 51 Switching the speaker impedance 51 Specifications 52 Power cord caution 53 Cleaning the unit 53
Owner's Manual
Page 7
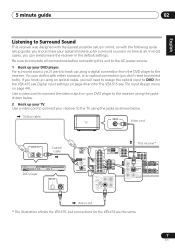
... VIDEO R FRONT L CENTER (T V / SAT)IN ø R SURROUND BACK L OUT SINGLE SEE INSTRUCTION MONITOR MANUAL OUT SUB WOOFER PREOUT R SURROUND L Video cord * The illustration shows the VSX-515, but connections for surround sound in no time at all connections before connecting this with the following quick setup guide, you can do this unit... to the TV using the jacks shown below . Be sure to complete all . Use a video cord to connect your receiver to the AC power source. 1 Hook up your system hooked up your DVD player to the receiver.
... VIDEO R FRONT L CENTER (T V / SAT)IN ø R SURROUND BACK L OUT SINGLE SEE INSTRUCTION MONITOR MANUAL OUT SUB WOOFER PREOUT R SURROUND L Video cord * The illustration shows the VSX-515, but connections for surround sound in no time at all connections before connecting this with the following quick setup guide, you can do this unit... to the TV using the jacks shown below . Be sure to complete all . Use a video cord to connect your receiver to the AC power source. 1 Hook up your system hooked up your DVD player to the receiver.

Owner's Manual
Page 8
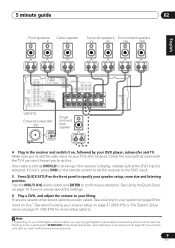
...OUT SUB WOOFER PREOUT CENTER SUB WOOFER R L SURROUND DVD 5.1CH INPUT FRONT SPEAKER RL CENTER SPEAKER SURROUND SPEAKERS RL L R SURROUND PREOUT Powered subwoofer SW INPUT AC OUTLET VSX-415 Note 1 • If you connect the speaker on the right to the right terminal and the speaker on page 38) to use...speakers with a nominal impedance between 6-16Ω (please see Speaker setting on the left to the left terminal. If you plan to large. • VSX-515 only - You can use speakers with just two stereo speakers (the front speakers in the diagram) but home setups may vary.
...OUT SUB WOOFER PREOUT CENTER SUB WOOFER R L SURROUND DVD 5.1CH INPUT FRONT SPEAKER RL CENTER SPEAKER SURROUND SPEAKERS RL L R SURROUND PREOUT Powered subwoofer SW INPUT AC OUTLET VSX-415 Note 1 • If you connect the speaker on the right to the right terminal and the speaker on page 38) to use...speakers with a nominal impedance between 6-16Ω (please see Speaker setting on the left to the left terminal. If you plan to large. • VSX-515 only - You can use speakers with just two stereo speakers (the front speakers in the diagram) but home setups may vary.
Owner's Manual
Page 9
... / LD) IN ¥ Y PB PR Y PB PR MONITOR OUT (T V / SAT)IN ø S R FRONT L CENTER R SURROUND BACK L R SURROUND L P E A SINGLE K SEE INSTRUCTION MANUAL E R S VSX-515 Powered subwoofer SW INPUT Single surround back speaker AC OUTLET 4 Plug in surround sound on , followed by your liking. Also make sure that DVD/LD is...Use the MULTI JOG dial to select and ENTER to this .1 See also Choosing your receiver setup on page 37 (VSX-415) or The System Setup menu on page 41 (VSX-515) for more on your DVD player or source discs, you 're unsure about the settings. 6 Play a DVD,...
... / LD) IN ¥ Y PB PR Y PB PR MONITOR OUT (T V / SAT)IN ø S R FRONT L CENTER R SURROUND BACK L R SURROUND L P E A SINGLE K SEE INSTRUCTION MANUAL E R S VSX-515 Powered subwoofer SW INPUT Single surround back speaker AC OUTLET 4 Plug in surround sound on , followed by your liking. Also make sure that DVD/LD is...Use the MULTI JOG dial to select and ENTER to this .1 See also Choosing your receiver setup on page 37 (VSX-415) or The System Setup menu on page 41 (VSX-515) for more on your DVD player or source discs, you 're unsure about the settings. 6 Play a DVD,...
Owner's Manual
Page 10
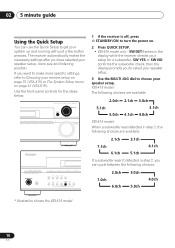
...SW DET flashes in the display while the receiver checks your system up and running with just a few button presses. AUDIO/VIDEO MULTI-CHANNEL RECEIVER VSX-515 MULTI JOG ENTER CD CD-R/TAPE/MD FM AM MASTER VOLUME DOWN UP ADVANCED ST/DIRECT SIGNAL STANDARD SURR /AUTO SURR SELECT LISTENING MODE STANDBY... TUNING /STATION TUNER EDIT TONE QUICK SETUP SYSTEM SETUP RETURN MULTI JOG 1 If the receiver is off, press STANDBY/ON to turn the power on page 41 (VSX-515). SW YES or SW NO confirms the subwoofer check, then the display prompts you can use the Quick Setup to get your setup for...
...SW DET flashes in the display while the receiver checks your system up and running with just a few button presses. AUDIO/VIDEO MULTI-CHANNEL RECEIVER VSX-515 MULTI JOG ENTER CD CD-R/TAPE/MD FM AM MASTER VOLUME DOWN UP ADVANCED ST/DIRECT SIGNAL STANDARD SURR /AUTO SURR SELECT LISTENING MODE STANDBY... TUNING /STATION TUNER EDIT TONE QUICK SETUP SYSTEM SETUP RETURN MULTI JOG 1 If the receiver is off, press STANDBY/ON to turn the power on page 41 (VSX-515). SW YES or SW NO confirms the subwoofer check, then the display prompts you can use the Quick Setup to get your setup for...

Owner's Manual
Page 12
...divided into the luminance (Y) signal and the color (PB and PR) signals and then output. Standard RCA video cable Component video cables (VSX-515 only) Use component video cables to L (left) terminals. These cables are the most common type of video connection and should connect the...best possible color reproduction of your video source. In this receiver.1 Important • Before making or changing any connections, switch off the power and disconnect the power cord from the speakers. The color signal of the TV is avoided. Component video cables Right (red) Left (white) Green (Y)...
...divided into the luminance (Y) signal and the color (PB and PR) signals and then output. Standard RCA video cable Component video cables (VSX-515 only) Use component video cables to L (left) terminals. These cables are the most common type of video connection and should connect the...best possible color reproduction of your video source. In this receiver.1 Important • Before making or changing any connections, switch off the power and disconnect the power cord from the speakers. The color signal of the TV is avoided. Component video cables Right (red) Left (white) Green (Y)...
Owner's Manual
Page 19
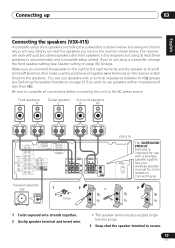
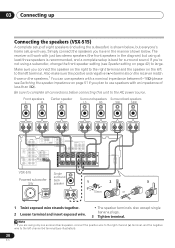
...right terminal and the speaker on connecting up 03 Connecting the speakers (VSX-415) A complete setup of less than 8Ω). Be sure to complete all connections before connecting this unit to the AC power source. You can use speakers with an impedance of six speakers (including... SUB WOOFER R L SURROUND DVD 5.1CH INPUT FRONT SPEAKER RL CENTER SPEAKER SURROUND SPEAKERS RL L R SURROUND PREOUT Powered subwoofer SW INPUT 1 2 10mm or ª · VSX-415 AC OUTLET The SURROUND PREOUT terminal is shown below . English Deutsch Français Italiano Nederlands Español...
...right terminal and the speaker on connecting up 03 Connecting the speakers (VSX-415) A complete setup of less than 8Ω). Be sure to complete all connections before connecting this unit to the AC power source. You can use speakers with an impedance of six speakers (including... SUB WOOFER R L SURROUND DVD 5.1CH INPUT FRONT SPEAKER RL CENTER SPEAKER SURROUND SPEAKERS RL L R SURROUND PREOUT Powered subwoofer SW INPUT 1 2 10mm or ª · VSX-415 AC OUTLET The SURROUND PREOUT terminal is shown below . English Deutsch Français Italiano Nederlands Español...
Owner's Manual
Page 20
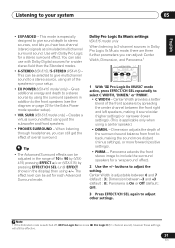
03 Connecting up Connecting the speakers (VSX-515) A complete setup of less than 8Ω). Be sure to complete all connections before connecting this unit to use speakers with just two... IN ¥ Y PB PR Y PB PR MONITOR OUT (T V / SAT)IN ø S R FRONT L CENTER R SURROUND BACK L R SURROUND L P E A SINGLE K SEE INSTRUCTION MANUAL E R S AC OUTLET VSX-515 Single surround Powered subwoofer SW back speaker 1 2 3 INPUT 10mm or 1 Twist exposed wire strands together. 2 Loosen terminal and insert exposed wire. • The speaker terminals also accept...
03 Connecting up Connecting the speakers (VSX-515) A complete setup of less than 8Ω). Be sure to complete all connections before connecting this unit to use speakers with just two... IN ¥ Y PB PR Y PB PR MONITOR OUT (T V / SAT)IN ø S R FRONT L CENTER R SURROUND BACK L R SURROUND L P E A SINGLE K SEE INSTRUCTION MANUAL E R S AC OUTLET VSX-515 Single surround Powered subwoofer SW back speaker 1 2 3 INPUT 10mm or 1 Twist exposed wire strands together. 2 Loosen terminal and insert exposed wire. • The speaker terminals also accept...
Owner's Manual
Page 21
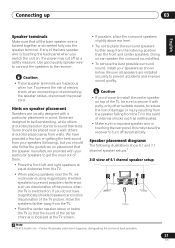
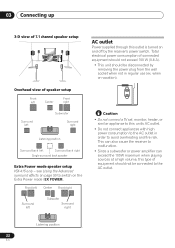
... receiver. Follow the speaker placement diagrams, disregarding the surround back speakers. 21 En If you choose to install the center speaker on , the power may cause the receiver to turn off as a safety measure. Be sure all the bare speaker wire is touching the rear panel, this may...a particular placement in the event of external shocks such as shown below the TV so that the sound of 6.1 channel speaker setup Note 1 VSX-415 model only - Use good quality speaker wire to connect the speakers to sound their best. Caution • These speaker terminals are installed securely...
... receiver. Follow the speaker placement diagrams, disregarding the surround back speakers. 21 En If you choose to install the center speaker on , the power may cause the receiver to turn off as a safety measure. Be sure all the bare speaker wire is touching the rear panel, this may...a particular placement in the event of external shocks such as shown below the TV so that the sound of 6.1 channel speaker setup Note 1 VSX-415 model only - Use good quality speaker wire to connect the speakers to sound their best. Caution • These speaker terminals are installed securely...
Owner's Manual
Page 22
... right Listening position Surround back left Surround back right Single surround back speaker Extra Power mode speaker setup VSX-415 only - when on the Extra Power mode (EX POWER). This can also cause the receiver to malfunction. • Since a subwoofer or power amplifier can exceed the 100W maximum when playing sources at a high volume, this...
... right Listening position Surround back left Surround back right Single surround back speaker Extra Power mode speaker setup VSX-415 only - when on the Extra Power mode (EX POWER). This can also cause the receiver to malfunction. • Since a subwoofer or power amplifier can exceed the 100W maximum when playing sources at a high volume, this...

Owner's Manual
Page 28
...MENU Displays the disc menu of FM broadcasts. Button What it does DVD Turns DVD power on multilingual DVD-Video discs. AUDIO Changes the audio language or channel. Press to the...menus. buttons can use these buttons to control a Pioneer DVD player connected to the start fast reverse scanning. Skips to your surround sound system (VSX-415 - 04 Controls and displays DIALOG E Use ...modes (page 30). 6 SLEEP Use to memorize and name a station for the receiver (VSX-415 - RETURN (VSX-515 model only) Confirm and exit the current menu screen. 9 /ENTER Use the arrow buttons...
...MENU Displays the disc menu of FM broadcasts. Button What it does DVD Turns DVD power on multilingual DVD-Video discs. AUDIO Changes the audio language or channel. Press to the...menus. buttons can use these buttons to control a Pioneer DVD player connected to the start fast reverse scanning. Skips to your surround sound system (VSX-415 - 04 Controls and displays DIALOG E Use ...modes (page 30). 6 SLEEP Use to memorize and name a station for the receiver (VSX-415 - RETURN (VSX-515 model only) Confirm and exit the current menu screen. 9 /ENTER Use the arrow buttons...
Owner's Manual
Page 31
...be effective. 31 En This can be adjusted in addition to the front speakers (see the diagram on page 22 for the Extra Power mode speaker setup). • VIR. Use with Dolby Digital sources for each Advanced Surround mode. buttons to adjust the setting. ... active, press EFFECT/CH SEL repeatedly to select C WIDTH, 'DIMEN.' Dimension between 0 and 7 (default : 3); Dolby Pro Logic IIx Music settings VSX-515 model only When listening to 2-channel sources in your system 05 • EXPANDED - Creates a virtual surround effect using all of the surround sound balance from...
...be effective. 31 En This can be adjusted in addition to the front speakers (see the diagram on page 22 for the Extra Power mode speaker setup). • VIR. Use with Dolby Digital sources for each Advanced Surround mode. buttons to adjust the setting. ... active, press EFFECT/CH SEL repeatedly to select C WIDTH, 'DIMEN.' Dimension between 0 and 7 (default : 3); Dolby Pro Logic IIx Music settings VSX-515 model only When listening to 2-channel sources in your system 05 • EXPANDED - Creates a virtual surround effect using all of the surround sound balance from...
Owner's Manual
Page 36
... ATT INPUT SELECTOR DVD/LD DVD 5.1CH TV/SAT DVR/VCR CD-R/ CD TAPE/MD FM AM ADVANCED MIDNIGHT/ 1 Turn on the power of the playback component. 2 Turn on the power of the receiver. 3 Select the source you selected in step 1. To cancel playback from the multichannel inputs is selected, only the...
... ATT INPUT SELECTOR DVD/LD DVD 5.1CH TV/SAT DVR/VCR CD-R/ CD TAPE/MD FM AM ADVANCED MIDNIGHT/ 1 Turn on the power of the playback component. 2 Turn on the power of the receiver. 3 Select the source you selected in step 1. To cancel playback from the multichannel inputs is selected, only the...
Owner's Manual
Page 47
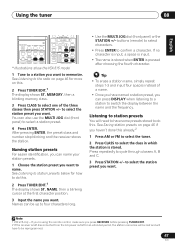
...'re using the remote control, make sure you press RECEIVER before pressing TUNER EDIT. 2 If the receiver is left disconnected from the AC power outlet for an extended period, the station memories will be lost and will need to have some presets stored to do this . 2 Press... DIALOG E SELECT EDIT CLASS DVD TUNER MPX AUDIO TUNING STATION DISPLAY ADVANCED MIDNIGHT/ STANDARD SURROUND STEREO LOUDNESS SUB TITLE DVD CONTROL * Illustrations show the VSX-515 model 1 Tune to a station you want . You can press DISPLAY when listening to a station to be up to four characters long. •...
...'re using the remote control, make sure you press RECEIVER before pressing TUNER EDIT. 2 If the receiver is left disconnected from the AC power outlet for an extended period, the station memories will be lost and will need to have some presets stored to do this . 2 Press... DIALOG E SELECT EDIT CLASS DVD TUNER MPX AUDIO TUNING STATION DISPLAY ADVANCED MIDNIGHT/ STANDARD SURROUND STEREO LOUDNESS SUB TITLE DVD CONTROL * Illustrations show the VSX-515 model 1 Tune to a station you want . You can press DISPLAY when listening to a station to be up to four characters long. •...
Owner's Manual
Page 49
...8226; If the power shuts off automatically, take the unit to your nearest Pioneer authorized service center or your dealer to carry out repair work. • If the unit does not operate normally due to external effects such as static electricity disconnect the power plug from the ... function is selected. • Make sure the component is something wrong with this component, check the points below , ask your nearest Pioneer authorized service center or your dealer for servicing. Considerable noise in radio broadcasts. • Tune in another component. Additional information 10 English ...
...8226; If the power shuts off automatically, take the unit to your nearest Pioneer authorized service center or your dealer to carry out repair work. • If the unit does not operate normally due to external effects such as static electricity disconnect the power plug from the ... function is selected. • Make sure the component is something wrong with this component, check the points below , ask your nearest Pioneer authorized service center or your dealer for servicing. Considerable noise in radio broadcasts. • Tune in another component. Additional information 10 English ...
Owner's Manual
Page 52
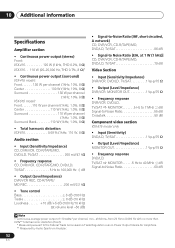
... Specifications Amplifier section • Continuous power output (stereo) Front: VSX-415 120 W (1kHz, THD 0.2%, 8 Ω) VSX-515 . . 110 W (20-20,000 Hz, THD 0.7%, 8 Ω)1 • Continuous power output (surround) VSX-415 model: Front. . . . . . 130 W per channel (1kHz, 10%, 8 Ω) Center 130 W (1kHz, 10%, 8 Ω) Surround 130 W per channel (1kHz, 10%, 8 Ω) VSX-515 model: Front. . . . . . 110 W per channel...
... Specifications Amplifier section • Continuous power output (stereo) Front: VSX-415 120 W (1kHz, THD 0.2%, 8 Ω) VSX-515 . . 110 W (20-20,000 Hz, THD 0.7%, 8 Ω)1 • Continuous power output (surround) VSX-415 model: Front. . . . . . 130 W per channel (1kHz, 10%, 8 Ω) Center 130 W (1kHz, 10%, 8 Ω) Surround 130 W per channel (1kHz, 10%, 8 Ω) VSX-515 model: Front. . . . . . 110 W per channel...
Owner's Manual
Page 53
...350 µV/m Signal-to-Noise Ratio 50 dB Antenna Loop antenna Miscellaneous Power requirements AC 120V / 60Hz Power consumption: VSX-415 260 W / 340 VA VSX-515 300 W / 420 VA In standby 0.5 W Dimensions: VSX-415. . . .169/16 (W) x 61/4 (H) x 159/16 (D) in. 420 (W) x 158 (H) x 394.5 (D) mm VSX-515. . . . 169/16 (W) x 61/4 (H) x 157/8 ... a polishing cloth or dry cloth to be stepped on the power cord, or pinch the cord. A damaged power cord can cause a fire or give you find it damaged, ask your nearest Pioneer authorized service center or your hands are subject to possible modifications...
...350 µV/m Signal-to-Noise Ratio 50 dB Antenna Loop antenna Miscellaneous Power requirements AC 120V / 60Hz Power consumption: VSX-415 260 W / 340 VA VSX-515 300 W / 420 VA In standby 0.5 W Dimensions: VSX-415. . . .169/16 (W) x 61/4 (H) x 159/16 (D) in. 420 (W) x 158 (H) x 394.5 (D) mm VSX-515. . . . 169/16 (W) x 61/4 (H) x 157/8 ... a polishing cloth or dry cloth to be stepped on the power cord, or pinch the cord. A damaged power cord can cause a fire or give you find it damaged, ask your nearest Pioneer authorized service center or your hands are subject to possible modifications...


