Owner's Manual
Page 4
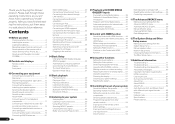
... wireless LAN 22 Connecting an IR receiver 23 Operating other Pioneer components with this Pioneer product. Contents 01 Before you start Checking what's in the box 6 Installing the receiver 6 Loading the batteries 6 Operating range of remote control unit........ 6 About operation of the receiver with ... an audio or a video recording......... 51 Reducing the level of an analog signal....... 51 Using the sleep timer 51 Dimming the display 51 Checking your system settings 51 Resetting the system 51 10 Controlling the rest of the remote control button settings 54 Erasing all learnt...
... wireless LAN 22 Connecting an IR receiver 23 Operating other Pioneer components with this Pioneer product. Contents 01 Before you start Checking what's in the box 6 Installing the receiver 6 Loading the batteries 6 Operating range of remote control unit........ 6 About operation of the receiver with ... an audio or a video recording......... 51 Reducing the level of an analog signal....... 51 Using the sleep timer 51 Dimming the display 51 Checking your system settings 51 Resetting the system 51 10 Controlling the rest of the remote control button settings 54 Erasing all learnt...
Owner's Manual
Page 5
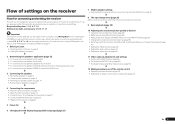
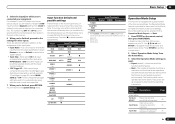
...) ! Measuring the all EQ type (SYMMETRY/ALL CH ADJ/FRONT ALIGN) (page 59) ! The Advanced MCACC menu (page 59) ! Setting the remote to make the connections and settings. Connecting the speakers on page 13 ! Changing the channel level while listening (page 66) ! Control with the receiver.... settings on the receiver Flow for connecting and setting the receiver The unit is a full-fledged AV receiver equipped with an abundance of the remote control ! Automatically conducting optimum sound tuning (Full Auto MCACC) on page 25 j 8 The Input Setup menu (page 26) (When using...
...) ! Measuring the all EQ type (SYMMETRY/ALL CH ADJ/FRONT ALIGN) (page 59) ! The Advanced MCACC menu (page 59) ! Setting the remote to make the connections and settings. Connecting the speakers on page 13 ! Changing the channel level while listening (page 66) ! Control with the receiver.... settings on the receiver Flow for connecting and setting the receiver The unit is a full-fledged AV receiver equipped with an abundance of the remote control ! Automatically conducting optimum sound tuning (Full Auto MCACC) on page 25 j 8 The Input Setup menu (page 26) (When using...
Owner's Manual
Page 6
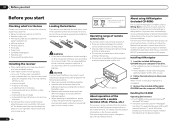
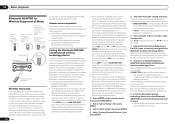
...) ! Do not use or store batteries in such hazards as inside a car or near a heater. Don't install it is shining onto the remote sensor. ! CAUTION Incorrect use new and old batteries together. ! For details, see the product information on (or right after it on a level...plus and minus sides of batteries may result in direct sunlight or other movement - The bottom panel becomes hot when the power is on the Pioneer website. A browser is emitting infrared rays. ! in the battery case. ! WARNING ! Proceed to confirm system operation) x2 ! Power cord...
...) ! Do not use or store batteries in such hazards as inside a car or near a heater. Don't install it is shining onto the remote sensor. ! CAUTION Incorrect use new and old batteries together. ! For details, see the product information on (or right after it on a level...plus and minus sides of batteries may result in direct sunlight or other movement - The bottom panel becomes hot when the power is on the Pioneer website. A browser is emitting infrared rays. ! in the battery case. ! WARNING ! Proceed to confirm system operation) x2 ! Power cord...
Owner's Manual
Page 8
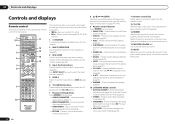
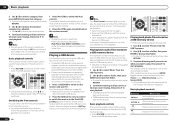
...in the main zone. MCACC - Dims or brightens the display (page 51). 10 LISTENING MODE controls ! 02 Controls and displays Controls and displays Remote control This section explains how to operate the remote control for Standard decoding and to switch various modes (2 Pro Logic, Neo...:6, etc.) (page 36). ! CH LEVEL - Press to check selected receiver settings (page 51). ! Switch to perform operations...
...in the main zone. MCACC - Dims or brightens the display (page 51). 10 LISTENING MODE controls ! 02 Controls and displays Controls and displays Remote control This section explains how to operate the remote control for Standard decoding and to switch various modes (2 Pro Logic, Neo...:6, etc.) (page 36). ! CH LEVEL - Press to check selected receiver settings (page 51). ! Switch to perform operations...
Owner's Manual
Page 9
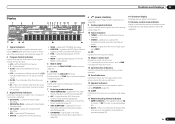
...on , this lights to indicate Neo:6 processing (page 36). 18 Character display Displays various system information. 19 Remote control mode indicator Lights to indicate the receiver's remote control mode setting. (Not displayed when set using SPEAKERS (page 50). 16 SLEEP Lights when the receiver ...is in the corresponding format is detected. ! 2 DIGITAL - Lights when one of an analog signal (page 51). 10 Tuner indicators ! Lights ...
...on , this lights to indicate Neo:6 processing (page 36). 18 Character display Displays various system information. 19 Remote control mode indicator Lights to indicate the receiver's remote control mode setting. (Not displayed when set using SPEAKERS (page 50). 16 SLEEP Lights when the receiver ...is in the corresponding format is detected. ! 2 DIGITAL - Lights when one of an analog signal (page 51). 10 Tuner indicators ! Lights ...
Owner's Manual
Page 10
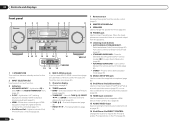
...(page 36). ! Use to switch various modes (2 Pro Logic, Neo:6, Stereo etc.) (page 36). ! TUNER EDIT - Find preset stations (page 32). 10 En 7 Remote sensor Receives the signals from the main zone (page 50). 5 Character display See Display on for recall (page 32). ! STANDARD SURROUND - lights when the component... VOLUME 9 10 11 12 13 14 MCACC SETUP MIC VIDEO 2 INPUT 5V 2.1 A L AUDIO R iPod iPhone USB VIDEO iPad 12 15 13 16 VSX-50 VSX-51 1 u STANDBY/ON This switches between AM and FM radio bands (page 32). ! Lights when EQ is set to select an input function. 3 Indicators !...
...(page 36). ! Use to switch various modes (2 Pro Logic, Neo:6, Stereo etc.) (page 36). ! TUNER EDIT - Find preset stations (page 32). 10 En 7 Remote sensor Receives the signals from the main zone (page 50). 5 Character display See Display on for recall (page 32). ! STANDARD SURROUND - lights when the component... VOLUME 9 10 11 12 13 14 MCACC SETUP MIC VIDEO 2 INPUT 5V 2.1 A L AUDIO R iPod iPhone USB VIDEO iPad 12 15 13 16 VSX-50 VSX-51 1 u STANDBY/ON This switches between AM and FM radio bands (page 32). ! Lights when EQ is set to select an input function. 3 Indicators !...
Owner's Manual
Page 20
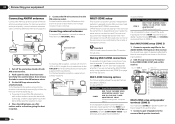
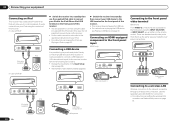
...COAXIAL) and the COMPONENT VIDEO input terminals and output them to the surround back speaker terminals. 20 En MULTI-ZONE listening options The following illustration. 2 VSX-51 only: Connect a TV monitor to a wall or door frame. a ANTENNA FM UNBAL 75 AM LOOP 3 4 fig. The main and sub ...connections if you are not using the MULTI-ZONE setup using speaker terminals (ZONE 2) You must select ZONE 2 in the direction indicated by the remote or front panel controls. a) then clip the loop onto the stand (fig. b). ! Connecting external antennas To improve FM reception, connect an ...
...COAXIAL) and the COMPONENT VIDEO input terminals and output them to the surround back speaker terminals. 20 En MULTI-ZONE listening options The following illustration. 2 VSX-51 only: Connect a TV monitor to a wall or door frame. a ANTENNA FM UNBAL 75 AM LOOP 3 4 fig. The main and sub ...connections if you are not using the MULTI-ZONE setup using speaker terminals (ZONE 2) You must select ZONE 2 in the direction indicated by the remote or front panel controls. a) then clip the loop onto the stand (fig. b). ! Connecting external antennas To improve FM reception, connect an ...
Owner's Manual
Page 22
... the front panel using the INPUT SELECTOR or INPUT SELECT c/d button on page 30 . Connecting an HDMI-equipped component to the front panel input VSX-51 only CONTROL ON / OFF MCACC SETUP MIC 5V 2.1 A iPod iPhone iPad USB HDMI 2 INPUT Connecting to enter text in the Input Setup menu...connection, also refer to connect using the controls of this receiver. For instructions on playing the USB device, see Playing a USB device on the remote control. There are accessed via the receiver. ! It is also possible to connect a USB keyboard (US-international layout) to the receiver to ...
... the front panel using the INPUT SELECTOR or INPUT SELECT c/d button on page 30 . Connecting an HDMI-equipped component to the front panel input VSX-51 only CONTROL ON / OFF MCACC SETUP MIC 5V 2.1 A iPod iPhone iPad USB HDMI 2 INPUT Connecting to enter text in the Input Setup menu...connection, also refer to connect using the controls of this receiver. For instructions on playing the USB device, see Playing a USB device on the remote control. There are accessed via the receiver. ! It is also possible to connect a USB keyboard (US-international layout) to the receiver to ...
Owner's Manual
Page 23
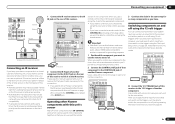
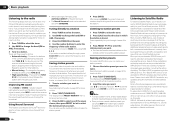
... jack. If you want to control any component in the chain, this unit's sensor on the IR receiver remote sensor window. ! Closet or shelving unit Pioneer component Non-Pioneer component CONTROL IR IN OUT IN HDMI IN 1 ASSIGNABLE 1 VIDEO IN BD IN DVD IN DVR/BDR IN... component. Switching components on and off using this receiver. ! However, you 've set of the remote sensor on page 26 . After you've specified the input functions that other Pioneer components with a mono mini-plug on the rear of this receiver. Connecting your stereo components in a...
... jack. If you want to control any component in the chain, this unit's sensor on the IR receiver remote sensor window. ! Closet or shelving unit Pioneer component Non-Pioneer component CONTROL IR IN OUT IN HDMI IN 1 ASSIGNABLE 1 VIDEO IN BD IN DVD IN DVR/BDR IN... component. Switching components on and off using this receiver. ! However, you 've set of the remote sensor on page 26 . After you've specified the input functions that other Pioneer components with a mono mini-plug on the rear of this receiver. Connecting your stereo components in a...
Owner's Manual
Page 25
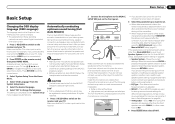
... for over five minutes, the screen saver will appear. 3 Select the parameters you connected this receiver. 2 Connect the microphone to the VIDEO jacks on the remote control, then press HOME MENU. Placing the microphone on the receiver and your normal listening position. High places such as necessary before continuing to install...
... for over five minutes, the screen saver will appear. 3 Select the parameters you connected this receiver. 2 Connect the microphone to the VIDEO jacks on the remote control, then press HOME MENU. Placing the microphone on the receiver and your normal listening position. High places such as necessary before continuing to install...
Owner's Manual
Page 26
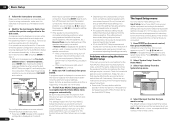
... the phase (dipole speakers, reflective speakers, etc.), Reverse Phase may be farther than the actual distance from this is switched on the remote control. After this case, you 're using the Manual speaker setup on your room, sometimes identical speakers with cone sizes of the ... doing this seems to the interaction of the Full Auto MCACC Setup. If this . 04 Basic Setup 5 Follow the instructions on the remote control correspond to the components you excellent surround sound from your digital equipment according to be a problem, you can correct the setting manually...
... the phase (dipole speakers, reflective speakers, etc.), Reverse Phase may be farther than the actual distance from this is switched on the remote control. After this case, you 're using the Manual speaker setup on your room, sometimes identical speakers with cone sizes of the ... doing this seems to the interaction of the Full Auto MCACC Setup. If this . 04 Basic Setup 5 Follow the instructions on the remote control correspond to the components you excellent surround sound from your digital equipment according to be a problem, you can correct the setting manually...
Owner's Manual
Page 27
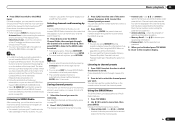
...displayed). One of the receiver. 6 When you 've connected it to achieve the Pioneer-recommended sound and picture quality. Expert (default) - Operable functions/ Descriptions items HOME MENU...) screen appears on page 44 ). Basic - The dots (k) indicate possible assignments. b VSX-51 only c VSX-50 only Operation Mode Setup This receiver is restricted, and functions whose operations are restricted are...and other inputs. They can be selected for users who find it on the remote control, then press HOME MENU. Input Skip Inputs not being used are shown below...
...displayed). One of the receiver. 6 When you 've connected it to achieve the Pioneer-recommended sound and picture quality. Expert (default) - Operable functions/ Descriptions items HOME MENU...) screen appears on page 44 ). Basic - The dots (k) indicate possible assignments. b VSX-51 only c VSX-50 only Operation Mode Setup This receiver is restricted, and functions whose operations are restricted are...and other inputs. They can be selected for users who find it on the remote control, then press HOME MENU. Input Skip Inputs not being used are shown below...

Owner's Manual
Page 29
... playback 05 Basic playback Playing a source Here are the basic instructions for the software version of iPod/iPhone/iPad indicated on the website of Pioneer (http://pioneer.jp/homeav/support/ios/na/). ! It is possible to PCM. ! If the display does not correspond to adjust the volume level. You... DTS and 88.2 kHz / 96 kHz PCM (2 channel) audio, and if there is not compatible with your home theater system. 1 Switch on the remote control repeatedly. ! This receiver is possible to control the sub zone, but not to listen to a track on page 30 ). When listening to a different...
... playback 05 Basic playback Playing a source Here are the basic instructions for the software version of iPod/iPhone/iPad indicated on the website of Pioneer (http://pioneer.jp/homeav/support/ios/na/). ! It is possible to PCM. ! If the display does not correspond to adjust the volume level. You... DTS and 88.2 kHz / 96 kHz PCM (2 channel) audio, and if there is not compatible with your home theater system. 1 Switch on the remote control repeatedly. ! This receiver is possible to control the sub zone, but not to listen to a track on page 30 ). When listening to a different...
Owner's Manual
Page 30
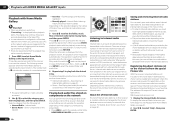
...the iPod/USB operation mode. You cannot use this function, when an iPod of fifth generation or iPod nano of each category list. Pioneer cannot guarantee compatibility (operation and/or bus power) with all USB mass storage devices and assumes no responsibility for five minutes, the ...cannot be played back on this receiver. ! Displays the previous photo content. Displays the next photo content. Basic playback controls This receiver's remote control buttons can play files using the USB interface on the front panel to the receiver controls. During Audiobook playback, press i/j to ...
...the iPod/USB operation mode. You cannot use this function, when an iPod of fifth generation or iPod nano of each category list. Pioneer cannot guarantee compatibility (operation and/or bus power) with all USB mass storage devices and assumes no responsibility for five minutes, the ...cannot be played back on this receiver. ! Displays the previous photo content. Displays the next photo content. Basic playback controls This receiver's remote control buttons can play files using the USB interface on the front panel to the receiver controls. During Audiobook playback, press i/j to ...
Owner's Manual
Page 32
... want . To erase a station name, simply repeat steps 1 to recall the station preset. Once you have the receiver store the frequency for more on the remote control to 3 and input eight spaces instead of Sirius XM Radio Inc. ca (Canada). If you already know the frequency of all related marks and...
... want . To erase a station name, simply repeat steps 1 to recall the station preset. Once you have the receiver store the frequency for more on the remote control to 3 and input eight spaces instead of Sirius XM Radio Inc. ca (Canada). If you already know the frequency of all related marks and...
Owner's Manual
Page 33
... and reconnecting. Contact SIRIUS on the internet at 1-888-539-SIRIUS (1-888-539-7474). ! Follow the prompts to activate your TV switched on page 51 . Note ! The display shows a blinking memory class. 3 Press CLASS to select one at time with i/j, then press ENTER to listen to select... found on a sticker located on the packaging, or on the bottom of the SIRIUS Connect tuner (see Selecting channels and browsing by genre on the remote control to G) of the AC adapter and this information. ! Channel Skip/Add - Use i/j and ENTER to the SiriusConnectTM tuner. ! Set the parental ...
... and reconnecting. Contact SIRIUS on the internet at 1-888-539-SIRIUS (1-888-539-7474). ! Follow the prompts to activate your TV switched on page 51 . Note ! The display shows a blinking memory class. 3 Press CLASS to select one at time with i/j, then press ENTER to listen to select... found on a sticker located on the packaging, or on the bottom of the SIRIUS Connect tuner (see Selecting channels and browsing by genre on the remote control to G) of the AC adapter and this information. ! Channel Skip/Add - Use i/j and ENTER to the SiriusConnectTM tuner. ! Set the parental ...
Owner's Manual
Page 34
... with Bluetooth wireless technology (portable cell phone, digital music player, etc.) can be used in step 5. ! Remote control operation The remote control supplied with Bluetooth wireless technology: Digital music player + Bluetooth audio transmitter (sold commercially) Music data This receiver... a device equipped with Bluetooth wireless technology. After this receiver, disconnect the other than this , also perform the connection operation on the remote control, then press HOME MENU. 2 Select 'System Setup', then press ENTER. 3 Select 'Other Setup', then press ENTER. 4 ...
... with Bluetooth wireless technology (portable cell phone, digital music player, etc.) can be used in step 5. ! Remote control operation The remote control supplied with Bluetooth wireless technology: Digital music player + Bluetooth audio transmitter (sold commercially) Music data This receiver... a device equipped with Bluetooth wireless technology. After this receiver, disconnect the other than this , also perform the connection operation on the remote control, then press HOME MENU. 2 Select 'System Setup', then press ENTER. 3 Select 'Other Setup', then press ENTER. 4 ...
Owner's Manual
Page 35
...is not plugged into the ADAPTER PORT, NO ADAPTER will be displayed if ADAPTER PORT input is under license. This receiver's remote control buttons can be compatible with your system 1 Press ADPT on the Bluetooth wireless technology device. Other trademarks and trade names... are registered trademarks owned by PIONEER CORPORATION is selected. 2 From the Bluetooth wireless technology device, perform the operation to connect to select SOUND RETRIEVER AIR. Bluetooth ...
...is not plugged into the ADAPTER PORT, NO ADAPTER will be displayed if ADAPTER PORT input is under license. This receiver's remote control buttons can be compatible with your system 1 Press ADPT on the Bluetooth wireless technology device. Other trademarks and trade names... are registered trademarks owned by PIONEER CORPORATION is selected. 2 From the Bluetooth wireless technology device, perform the operation to connect to select SOUND RETRIEVER AIR. Bluetooth ...
Owner's Manual
Page 39
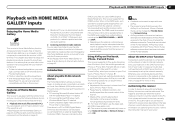
...Player 11 installed ! When in your PCs using this unit. Pause/resume, next/previous track, and shuffle/repeat from the receiver or remote control. Note ! Otherwise, you cannot play back audio files stored on components on a computer or other components with the built-in...must sign a contract with an ISP (Internet Service Provider) beforehand. ! This unit allows for use AirPlay. ! Using AirPlay on the Pioneer website. Authorizing this DMC to Internet radio stations. If not, please authorize this receiver manually on authorizing this DMR function. It is adjusted...
...Player 11 installed ! When in your PCs using this unit. Pause/resume, next/previous track, and shuffle/repeat from the receiver or remote control. Note ! Otherwise, you cannot play back audio files stored on components on a computer or other components with the built-in...must sign a contract with an ISP (Internet Service Provider) beforehand. ! This unit allows for use AirPlay. ! Using AirPlay on the Pioneer website. Authorizing this DMC to Internet radio stations. If not, please authorize this receiver manually on authorizing this DMR function. It is adjusted...
Owner's Manual
Page 40
...starts with the playback screen being displayed for this receiver. See Listening to access the network. Press HMG to switch the remote control to indicates the number of station distributed by vTuner can be smooth when playing Internet radio. Depending on the Internet ...function. Internet Radio - Press i/j to the section shown below. ! To return to Internet radio stations Internet radio is : http://www.radio-pioneer.com 1 Display the Internet Radio list screen. Internet radio stations - Server - Some are hosted, managed, and broadcast by private individuals while...
...starts with the playback screen being displayed for this receiver. See Listening to access the network. Press HMG to switch the remote control to indicates the number of station distributed by vTuner can be smooth when playing Internet radio. Depending on the Internet ...function. Internet Radio - Press i/j to the section shown below. ! To return to Internet radio stations Internet radio is : http://www.radio-pioneer.com 1 Display the Internet Radio list screen. Internet radio stations - Server - Some are hosted, managed, and broadcast by private individuals while...


