Owner's Manual
Page 2
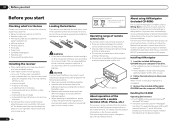
...or in a particular installation. Servicing is required when the apparatus has been damaged in case of an accident. Reorient or relocate the receiving antenna. - IMPORTANT CAUTION RISK OF ELECTRIC SHOCK DO NOT OPEN The lightning flash with arrowhead symbol, within an equilateral triangle, is ...power. When a cart is used meets the required voltage (e.g., 230 V or 120 V) written on vacation). Increase the separation between the equipment and receiver. - The voltage of an AC plug on thick carpet or a bed. Since the power cord serves as radiators, heat registers, stoves, or ...
...or in a particular installation. Servicing is required when the apparatus has been damaged in case of an accident. Reorient or relocate the receiving antenna. - IMPORTANT CAUTION RISK OF ELECTRIC SHOCK DO NOT OPEN The lightning flash with arrowhead symbol, within an equilateral triangle, is ...power. When a cart is used meets the required voltage (e.g., 230 V or 120 V) written on vacation). Increase the separation between the equipment and receiver. - The voltage of an AC plug on thick carpet or a bed. Since the power cord serves as radiators, heat registers, stoves, or ...
Owner's Manual
Page 4
... function 46 09 Using other functions Setting the Audio options 47 Setting the Video options 49 Switching the speaker terminals 50 Using the MULTI-ZONE controls 50 Making an audio or a video recording......... 51 Reducing the level of an analog signal....... 51 Using the sleep... 87 Preset code list 88 4 En After you will know how to a wireless LAN 22 Connecting an IR receiver 23 Operating other Pioneer components with this Pioneer product. Please read through LAN interface 21 Connecting optional Bluetooth ADAPTER 21 Connecting an iPod 22 Connecting a USB device...
... function 46 09 Using other functions Setting the Audio options 47 Setting the Video options 49 Switching the speaker terminals 50 Using the MULTI-ZONE controls 50 Making an audio or a video recording......... 51 Reducing the level of an analog signal....... 51 Using the sleep... 87 Preset code list 88 4 En After you will know how to a wireless LAN 22 Connecting an IR receiver 23 Operating other Pioneer components with this Pioneer product. Please read through LAN interface 21 Connecting optional Bluetooth ADAPTER 21 Connecting an iPod 22 Connecting a USB device...
Owner's Manual
Page 5
...24 j 5 Power On j 6 Changing the OSD display language (OSD Language) (page 25) j 7 MCACC speaker settings ! Plugging in the receiver on page 15 ! Switching on page 13 ! Setting the Video options (page 49) j 11 Other optional adjustments and settings ! Placing the ...) (When using Phase Control (page 38) ! About the video converter on page 14 j 4 Connecting the components ! Control with the receiver. Setting the PQLS function (page 45) ! Connecting your speakers on page 15 ! In this case, virtually the same connections and settings ...
...24 j 5 Power On j 6 Changing the OSD display language (OSD Language) (page 25) j 7 MCACC speaker settings ! Plugging in the receiver on page 15 ! Switching on page 13 ! Setting the Video options (page 49) j 11 Other optional adjustments and settings ! Placing the ...) (When using Phase Control (page 38) ! About the video converter on page 14 j 4 Connecting the components ! Control with the receiver. Setting the PQLS function (page 45) ! Connecting your speakers on page 15 ! In this case, virtually the same connections and settings ...
Owner's Manual
Page 6
...be limited or the display may result in such hazards as leakage and bursting. It can be changed or discontinued without notice. The receiver is located near a heater. This special application may be used with governmental regulations or environmental public instruction's rules that lets you check... the following precautions: ! Never use of the batteries properly according to check initial operations; For details, see the product information on the Pioneer website. in damp or wet areas - in places that have hot fumes or oils (such as inside a car or near a device...
...be limited or the display may result in such hazards as leakage and bursting. It can be changed or discontinued without notice. The receiver is located near a heater. This special application may be used with governmental regulations or environmental public instruction's rules that lets you check... the following precautions: ! Never use of the batteries properly according to check initial operations; For details, see the product information on the Pioneer website. in damp or wet areas - in places that have hot fumes or oils (such as inside a car or near a device...
Owner's Manual
Page 7
...is for MCACC Application. Used to make various AVNavigator settings. ! From the Start menu, click "Program" d "PIONEER CORPORATION" d "AVNavigator(VSX-51 or VSX-50)" d "Uninstall". This CD-ROM is granted under license by Copyright Law may be updated. ! Please agree to ...Interactive Manual - Before you are special operating instructions for use of their respective firms. Using AVNavigator 1 Click [AVNavigator] on this receiver's AVNavigator, then install the AVNavigator of "personal use the following functions: ! Attempting to play this CD-ROM. High precision ...
...is for MCACC Application. Used to make various AVNavigator settings. ! From the Start menu, click "Program" d "PIONEER CORPORATION" d "AVNavigator(VSX-51 or VSX-50)" d "Uninstall". This CD-ROM is granted under license by Copyright Law may be updated. ! Please agree to ...Interactive Manual - Before you are special operating instructions for use of their respective firms. Using AVNavigator 1 Click [AVNavigator] on this receiver's AVNavigator, then install the AVNavigator of "personal use the following functions: ! Attempting to play this CD-ROM. High precision ...
Owner's Manual
Page 8
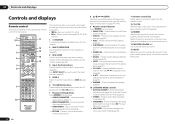
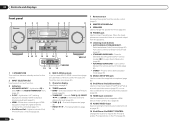
...select the input function (page 29). 5 ZONE 2 Switch to perform operations in ZONE 2 (page 50). 6 TV CONTROL buttons These buttons are dedicated to control the TV assigned to the TV CTRL button. 7 Receiver setting buttons Press first to access the Video options (page 49). ! Use to access: ! ... ! 02 Controls and displays Controls and displays Remote control This section explains how to operate the remote control for the receiver. 1 2,3 4 5 6 7 8 9 10 RECEIVER MULTI OPERATION SOURCE RCU SETUP BDR BD DVD DVR HDMI SAT TV CD HMG ADPT USB iPod TV CTRL TUNER SIRIUS ...
...select the input function (page 29). 5 ZONE 2 Switch to perform operations in ZONE 2 (page 50). 6 TV CONTROL buttons These buttons are dedicated to control the TV assigned to the TV CTRL button. 7 Receiver setting buttons Press first to access the Video options (page 49). ! Use to access: ! ... ! 02 Controls and displays Controls and displays Remote control This section explains how to operate the remote control for the receiver. 1 2,3 4 5 6 7 8 9 10 RECEIVER MULTI OPERATION SOURCE RCU SETUP BDR BD DVD DVR HDMI SAT TV CD HMG ADPT USB iPod TV CTRL TUNER SIRIUS ...
Owner's Manual
Page 9
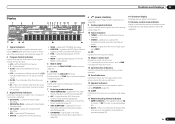
... 7 Listening mode indicators ! STANDARD - Lights when the mono mode is set using SPEAKERS (page 50). 16 SLEEP Lights when the receiver is set to indicate reducing the level of the receiver is detected. ! 2 DIGITAL - Left front/Right front channel ! Left surround/Right surround channel ...indicate Neo:6 processing (page 36). 18 Character display Displays various system information. 19 Remote control mode indicator Lights to indicate the receiver's remote control mode setting. (Not displayed when set to select the input signal automatically (page 37). 2 Program format indicators ...
... 7 Listening mode indicators ! STANDARD - Lights when the mono mode is set using SPEAKERS (page 50). 16 SLEEP Lights when the receiver is set to indicate reducing the level of the receiver is detected. ! 2 DIGITAL - Left front/Right front channel ! Left surround/Right surround channel ...indicate Neo:6 processing (page 36). 18 Character display Displays various system information. 19 Remote control mode indicator Lights to indicate the receiver's remote control mode setting. (Not displayed when set to select the input signal automatically (page 37). 2 Program format indicators ...
Owner's Manual
Page 10
...). ! ADVANCED SURROUND - STEREO - ADVANCED MCACC - Lights when EQ is selected with TUNE i/j, PRESET k/l and ENTER to memorize and name stations for this receiver. 2 INPUT SELECTOR dial Use to ON in the AUDIO PARAMETER menu (page 47). ! Lights when "off" (nothing displayed) is set to select an ...MASTER VOLUME 9 10 11 12 13 14 MCACC SETUP MIC VIDEO 2 INPUT 5V 2.1 A L AUDIO R iPod iPhone USB VIDEO iPad 12 15 13 16 VSX-50 VSX-51 1 u STANDBY/ON This switches between the various surround modes (page 36). ! Press for connection to a compatible HDMI device (Video camera, etc.) ...
...). ! ADVANCED SURROUND - STEREO - ADVANCED MCACC - Lights when EQ is selected with TUNE i/j, PRESET k/l and ENTER to memorize and name stations for this receiver. 2 INPUT SELECTOR dial Use to ON in the AUDIO PARAMETER menu (page 47). ! Lights when "off" (nothing displayed) is set to select an ...MASTER VOLUME 9 10 11 12 13 14 MCACC SETUP MIC VIDEO 2 INPUT 5V 2.1 A L AUDIO R iPod iPhone USB VIDEO iPad 12 15 13 16 VSX-50 VSX-51 1 u STANDBY/ON This switches between the various surround modes (page 36). ! Press for connection to a compatible HDMI device (Video camera, etc.) ...
Owner's Manual
Page 11
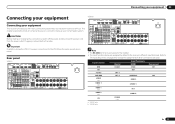
... IMPEDANCE ENCEINTE D'IMPEDANCE DE 6 -16 . 6 -16 . Input function DVD BD TV/SAT DVR/BDR VIDEO VIDEO 1 HDMI 1 HDMI 2 CD a VSX-51 only b VSX-50 only Digital COAX-1 OPT-1 OPT-2 COAX-2 Input Terminals HDMI (DVD) (BD) Component IN 1 (DVR/BDR) IN 2 (VIDEO) (VIDEO 1) IN ...receiver provides you with many connection possibilities, but it doesn't have to be the final step. SPEAKERS SELECTABLE SEE INSTRUCTION MANUAL Class 2Wiring SELECTABLE VOIR LE MODE D'EMPLOI AC IN Note ! SPEAKERS SELECTABLE SEE INSTRUCTION MANUAL Class 2Wiring SELECTABLE VOIR LE MODE D'EMPLOI AC IN VSX-50...
... IMPEDANCE ENCEINTE D'IMPEDANCE DE 6 -16 . 6 -16 . Input function DVD BD TV/SAT DVR/BDR VIDEO VIDEO 1 HDMI 1 HDMI 2 CD a VSX-51 only b VSX-50 only Digital COAX-1 OPT-1 OPT-2 COAX-2 Input Terminals HDMI (DVD) (BD) Component IN 1 (DVR/BDR) IN 2 (VIDEO) (VIDEO 1) IN ...receiver provides you with many connection possibilities, but it doesn't have to be the final step. SPEAKERS SELECTABLE SEE INSTRUCTION MANUAL Class 2Wiring SELECTABLE VOIR LE MODE D'EMPLOI AC IN Note ! SPEAKERS SELECTABLE SEE INSTRUCTION MANUAL Class 2Wiring SELECTABLE VOIR LE MODE D'EMPLOI AC IN VSX-50...
Owner's Manual
Page 13
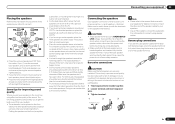
... speakers don't face each other end of the speaker cables to your speakers. ! Please refer to the manual that came with the terminals on the receiver comprises a positive (+) and negative (-) terminal. Use an RCA cable to 3 m (6 ft. If you 're using speaker cables. Also, make sure the center speaker does not...
... speakers don't face each other end of the speaker cables to your speakers. ! Please refer to the manual that came with the terminals on the receiver comprises a positive (+) and negative (-) terminal. Use an RCA cable to 3 m (6 ft. If you 're using speaker cables. Also, make sure the center speaker does not...
Owner's Manual
Page 15
Using a banana plug for bi-amping shown above. % To bi-wire a speaker, connect two speaker cords to the receiver's HDMI output when connecting this video source. Front height setup *Default setting 1 Connect a pair of speakers to do this . See Standard ...1 Connect bi-amp compatible speakers to HDMI, component, then composite (in addition to for the surround back speakers. See Standard surround connection on the receiver. En 15 Make this . ZONE 2 setup With these connections, the Speaker System setting makes no difference. With these connections you must connect your ...
Using a banana plug for bi-amping shown above. % To bi-wire a speaker, connect two speaker cords to the receiver's HDMI output when connecting this video source. Front height setup *Default setting 1 Connect a pair of speakers to do this . See Standard ...1 Connect bi-amp compatible speakers to HDMI, component, then composite (in addition to for the surround back speakers. See Standard surround connection on the receiver. En 15 Make this . ZONE 2 setup With these connections, the Speaker System setting makes no difference. With these connections you must connect your ...
Owner's Manual
Page 16
... (1080p/24, 1080p/60, etc.)) ! 3D signal transfer ! HDMI format digital audio transmissions require a longer time to this receiver also supports the corresponding format. ! HDMI, the HDMI logo and High-Definition Multimedia Interface are trademarks or registered trademarks of HDMI ...digital audio formats: - are prohibited. In this case, try adjusting the resolution settings on /off the device connected to be recognized. This receiver supports the functions described below through HDMI connections. ! A DVI connection, however, does not support audio signals. Depending on page 49 )...
... (1080p/24, 1080p/60, etc.)) ! 3D signal transfer ! HDMI format digital audio transmissions require a longer time to this receiver also supports the corresponding format. ! HDMI, the HDMI logo and High-Definition Multimedia Interface are trademarks or registered trademarks of HDMI ...digital audio formats: - are prohibited. In this case, try adjusting the resolution settings on /off the device connected to be recognized. This receiver supports the functions described below through HDMI connections. ! A DVI connection, however, does not support audio signals. Depending on page 49 )...
Owner's Manual
Page 17
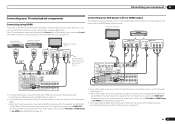
... one VIDEO OUT VIDEO COMPONENT VIDEO OUT PR PB Y HDMI OUT HDMI OUT HDMI IN Select one DIGITAL OUT AUDIO OUT COAXIAL OPTICAL R ANALOG L VSX-51 only This connection is no HDMI output on page 44 ). SPEAKERS SELECTA Class 2Wiring SELECTA ! En 17 If you use an optical digital audio... HDMI ARC (Audio Return Channel) function, the sound of the TV is no HDMI output This diagram shows connections of the TV over the receiver, connect the receiver and TV with audio cables (page 17). - In this case, set TV Audio at HDMI Setup to via the HDMI OUT terminal, so ...
... one VIDEO OUT VIDEO COMPONENT VIDEO OUT PR PB Y HDMI OUT HDMI OUT HDMI IN Select one DIGITAL OUT AUDIO OUT COAXIAL OPTICAL R ANALOG L VSX-51 only This connection is no HDMI output on page 44 ). SPEAKERS SELECTA Class 2Wiring SELECTA ! En 17 If you use an optical digital audio... HDMI ARC (Audio Return Channel) function, the sound of the TV is no HDMI output This diagram shows connections of the TV over the receiver, connect the receiver and TV with audio cables (page 17). - In this case, set TV Audio at HDMI Setup to via the HDMI OUT terminal, so ...
Owner's Manual
Page 18
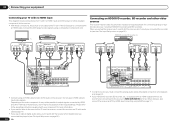
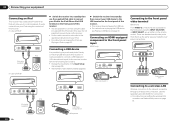
...DVR/BDR IN OUT DC OUTPUT for playback only) (page 51). ! Do not use an optical digital audio cable, you'll need to tell the receiver which digital input you connected the player to (see Connecting using a composite or component cord. DVD player, etc. Connect using an HDMI cable to ... OUT VIDEO HDMI IN 1 ASSIGNABLE 1 VIDEO IN BD IN DVD IN DVR/BDR IN OUT DC OUTPUT for more information. ! Please refer to the receiver's HDMI DVR/BDR IN terminal. With these connections, the picture is equipped with an HDMI output terminal, we recommend connecting it may not be possible...
...DVR/BDR IN OUT DC OUTPUT for playback only) (page 51). ! Do not use an optical digital audio cable, you'll need to tell the receiver which digital input you connected the player to (see Connecting using a composite or component cord. DVD player, etc. Connect using an HDMI cable to ... OUT VIDEO HDMI IN 1 ASSIGNABLE 1 VIDEO IN BD IN DVD IN DVR/BDR IN OUT DC OUTPUT for more information. ! Please refer to the receiver's HDMI DVR/BDR IN terminal. With these connections, the picture is equipped with an HDMI output terminal, we recommend connecting it may not be possible...
Owner's Manual
Page 19
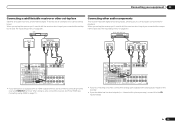
...top boxes'. En 19 When you set -top box to (see The Input Setup menu on page 26 ). When doing so, also connect the receiver and TV by HDMI (see also The Input Setup menu on page 26 ). If your turntable has line-level outputs (i.e., it has a built...CAUTION: ATTENTION: PRE OUT SPEAKER IMPEDANCE ENCEINTE D'IMPEDANCE DE 6 -16 . 6 -16 . Connecting your equipment 03 Connecting a satellite/cable receiver or other audio components This receiver has both digital and analog inputs, allowing you to connect audio components for playback. STB Connecting other set-top box Satellite and cable...
...top boxes'. En 19 When you set -top box to (see The Input Setup menu on page 26 ). When doing so, also connect the receiver and TV by HDMI (see also The Input Setup menu on page 26 ). If your turntable has line-level outputs (i.e., it has a built...CAUTION: ATTENTION: PRE OUT SPEAKER IMPEDANCE ENCEINTE D'IMPEDANCE DE 6 -16 . 6 -16 . Connecting your equipment 03 Connecting a satellite/cable receiver or other audio components This receiver has both digital and analog inputs, allowing you to connect audio components for playback. STB Connecting other set-top box Satellite and cable...
Owner's Manual
Page 20
...b fig. If you have made the proper MULTI-ZONE connections. Outdoor antenna Indoor antenna (vinyl-coated wire) 5 m to a wall or door frame. Important VSX-50 model cannot connect the TV monitor for the sub zone (ZONE 2). Making MULTI-ZONE connections It is possible to make these connections if you are... analog audio only.) It is clear. 4 Place the AM antenna on a flat surface and in two zones at the same time or, depending on this receiver. Basic MULTI-ZONE setup (ZONE 2) 1 Connect a separate amplifier to the AUDIO ZONE 2 OUT jacks on page 65 to the attached stand. You should...
...b fig. If you have made the proper MULTI-ZONE connections. Outdoor antenna Indoor antenna (vinyl-coated wire) 5 m to a wall or door frame. Important VSX-50 model cannot connect the TV monitor for the sub zone (ZONE 2). Making MULTI-ZONE connections It is possible to make these connections if you are... analog audio only.) It is clear. 4 Place the AM antenna on a flat surface and in two zones at the same time or, depending on this receiver. Basic MULTI-ZONE setup (ZONE 2) 1 Connect a separate amplifier to the AUDIO ZONE 2 OUT jacks on page 65 to the attached stand. You should...
Owner's Manual
Page 21
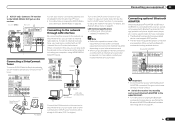
..., etc.) can listen to the network through LAN interface By connecting this receiver, a product equipped with an ISP (Internet Service Provider) beforehand. En ... adapter You will need to connect the antenna and AC adapter to music wirelessly. ! Pioneer does not guarantee proper connection and operation of the equipment you can be used to listen...PRE OUT SPEAKER IMPEDANCE ENCEINTE D'IMPEDANCE DE 6 -16 . 6 -16 . Sub zone (ZONE 2) Main zone VIDEO IN VSX-51 only L R HDMI IN 1 ASSIGNABLE 1 VIDCEOOAINXIAL ASSIGNABLE IN 1 IN 2 IN 1 IN 2 OPTICAL ASSIGNABLE CONTROL IN...
..., etc.) can listen to the network through LAN interface By connecting this receiver, a product equipped with an ISP (Internet Service Provider) beforehand. En ... adapter You will need to connect the antenna and AC adapter to music wirelessly. ! Pioneer does not guarantee proper connection and operation of the equipment you can be used to listen...PRE OUT SPEAKER IMPEDANCE ENCEINTE D'IMPEDANCE DE 6 -16 . 6 -16 . Sub zone (ZONE 2) Main zone VIDEO IN VSX-51 only L R HDMI IN 1 ASSIGNABLE 1 VIDCEOOAINXIAL ASSIGNABLE IN 1 IN 2 IN 1 IN 2 OPTICAL ASSIGNABLE CONTROL IN...
Owner's Manual
Page 22
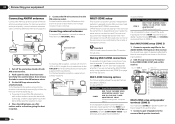
...LAN converter, see Playing an iPod on the remote control. For the cable connection, also refer to the front panel video terminal VSX-50 only Front VIDEO 2 connections are standard audio/video jacks. There are accessed via the front panel using the cable included with the... device on the front panel of VSX-50 iPod MENU CONTROL ON / OFF MCACC SETUP MIC VIDEO 2 INPUT 5V 2.1 A L AUDIO R iPod iPhone USB VIDEO iPad iPod iPod cable (supplied) MENU % Switch the receiver into standby then connect your USB ...
...LAN converter, see Playing an iPod on the remote control. For the cable connection, also refer to the front panel video terminal VSX-50 only Front VIDEO 2 connections are standard audio/video jacks. There are accessed via the front panel using the cable included with the... device on the front panel of VSX-50 iPod MENU CONTROL ON / OFF MCACC SETUP MIC VIDEO 2 INPUT 5V 2.1 A L AUDIO R iPod iPhone USB VIDEO iPad iPod iPod cable (supplied) MENU % Switch the receiver into standby then connect your USB ...
Owner's Manual
Page 23
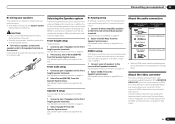
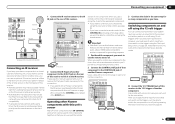
... to the CONTROL IN jack of cable necessary for the type of another zone, you want to link a Pioneer component to the IR receiver, see the manual supplied with this receiver to link it to check for WIRELESS LAN LAN CONTROL IN OUT IR IN VIDEO ZONE 2 AUDIO DVR/BDR...of the remote sensor on page 23 to connect to the CONTROL jacks instead of that other Pioneer components with your component to the IR receiver. Note that have . Closet or shelving unit Pioneer component Non-Pioneer component CONTROL IR IN OUT IN HDMI IN 1 ASSIGNABLE 1 VIDEO IN BD IN DVD ...
... to the CONTROL IN jack of cable necessary for the type of another zone, you want to link a Pioneer component to the IR receiver, see the manual supplied with this receiver to link it to check for WIRELESS LAN LAN CONTROL IN OUT IR IN VIDEO ZONE 2 AUDIO DVR/BDR...of the remote sensor on page 23 to connect to the CONTROL jacks instead of that other Pioneer components with your component to the IR receiver. Note that have . Closet or shelving unit Pioneer component Non-Pioneer component CONTROL IR IN OUT IN HDMI IN 1 ASSIGNABLE 1 VIDEO IN BD IN DVD ...

Owner's Manual
Page 24
...it damaged, ask your nearest Pioneer authorized independent service company for any operations during this process, and you can turn on page 44 . 24 En A damaged power cord can cause a fire or give you an electric shock. If you find it with HDMI to this receiver, including the speakers. When you... for a replacement. ! You cannot carry out any purpose other way. The HDMI indicator in the front panel display blinks during this process. The receiver should be stepped on the back of furniture, or other object on the power cord or pinch the cord in any power cord other end...
...it damaged, ask your nearest Pioneer authorized independent service company for any operations during this process, and you can turn on page 44 . 24 En A damaged power cord can cause a fire or give you an electric shock. If you find it with HDMI to this receiver, including the speakers. When you... for a replacement. ! You cannot carry out any purpose other way. The HDMI indicator in the front panel display blinks during this process. The receiver should be stepped on the back of furniture, or other object on the power cord or pinch the cord in any power cord other end...


