Owner's Manual
Page 4
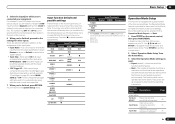
...to operate your system About the Remote Setup menu 53 Operating multiple receivers 53 Setting the remote to a wireless LAN 22 Connecting an IR receiver 23 Operating other Pioneer components with this Pioneer product. Thank you for buying ...this unit's sensor 23 Switching components on the Control with HDMI function 46 09 Using other functions Setting the Audio options 47 Setting the Video options 49 Switching the speaker terminals 50...
...to operate your system About the Remote Setup menu 53 Operating multiple receivers 53 Setting the remote to a wireless LAN 22 Connecting an IR receiver 23 Operating other Pioneer components with this Pioneer product. Thank you for buying ...this unit's sensor 23 Switching components on the Control with HDMI function 46 09 Using other functions Setting the Audio options 47 Setting the Video options 49 Switching the speaker terminals 50...
Owner's Manual
Page 5
... and setting the receiver The unit is a full-fledged AV receiver equipped with an abundance of the remote control ! About the audio connection on page 20 ! Connecting AM/FM antennas on page 15 ! Setting the remote to make the connections and settings. Placing the speakers on page 13 ! Connecting the speakers on...
... and setting the receiver The unit is a full-fledged AV receiver equipped with an abundance of the remote control ! About the audio connection on page 20 ! Connecting AM/FM antennas on page 15 ! Setting the remote to make the connections and settings. Placing the speakers on page 13 ! Connecting the speakers on...
Owner's Manual
Page 6
... may have hot fumes or oils (such as inside a car or near a device that is emitting infrared rays. ! on the Pioneer website. This may interfere with the same shape may not appear properly. It can cause batteries to check initial operations; Never use different...case. ! When "Finish" is selected, installation is completed. 3 Remove the included AVNavigator CD-ROM from the mobile terminal by following precautions: ! Remote control unit ! Insert the plus and minus sides of the receiver with Microsoft® Windows® XP/Vista/7. ! Direct sunlight or fluorescent light...
... may have hot fumes or oils (such as inside a car or near a device that is emitting infrared rays. ! on the Pioneer website. This may interfere with the same shape may not appear properly. It can cause batteries to check initial operations; Never use different...case. ! When "Finish" is selected, installation is completed. 3 Remove the included AVNavigator CD-ROM from the mobile terminal by following precautions: ! Remote control unit ! Insert the plus and minus sides of the receiver with Microsoft® Windows® XP/Vista/7. ! Direct sunlight or fluorescent light...
Owner's Manual
Page 8
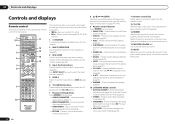
... Surround (page 36), Auto Level Control mode and Stream Direct mode (page 37). ! Press to access: ! Blue - Use to set the remote control mode (page 53). 4 Input function buttons Press to select control of an analog input signal to prevent distortion (page 51). ! RETURN ... Press to access: ! Use INPUT SELECT c/ d to select the input function (page 29). 5 ZONE 2 Switch to perform operations in ZONE 2 (page 50). 6 TV CONTROL buttons These buttons are dedicated to control the TV assigned to the TV CTRL button. 7 Receiver setting buttons Press first to select stereo...
... Surround (page 36), Auto Level Control mode and Stream Direct mode (page 37). ! Press to access: ! Blue - Use to set the remote control mode (page 53). 4 Input function buttons Press to select control of an analog input signal to prevent distortion (page 51). ! RETURN ... Press to access: ! Use INPUT SELECT c/ d to select the input function (page 29). 5 ZONE 2 Switch to perform operations in ZONE 2 (page 50). 6 TV CONTROL buttons These buttons are dedicated to control the TV assigned to the TV CTRL button. 7 Receiver setting buttons Press first to select stereo...
Owner's Manual
Page 9
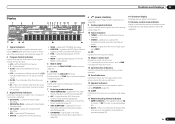
... switched on , this lights to indicate Neo:6 processing (page 36). 18 Character display Displays various system information. 19 Remote control mode indicator Lights to indicate the receiver's remote control mode setting. (Not displayed when set to PCM conversion with DTS decoding. ! DTS HD - Lights when the... indicators Lights to indicate reducing the level of DTS-HD Master Audio signals. 4 MULTI-ZONE Lights when the MULTI-ZONE feature is active (page 50). 5 SOUND Lights when the DIALOG E (Dialog Enhancement) or TONE (tone controls) features is selected (page 47). 6 S.RTRV Lights when ...
... switched on , this lights to indicate Neo:6 processing (page 36). 18 Character display Displays various system information. 19 Remote control mode indicator Lights to indicate the receiver's remote control mode setting. (Not displayed when set to PCM conversion with DTS decoding. ! DTS HD - Lights when the... indicators Lights to indicate reducing the level of DTS-HD Master Audio signals. 4 MULTI-ZONE Lights when the MULTI-ZONE feature is active (page 50). 5 SOUND Lights when the DIALOG E (Dialog Enhancement) or TONE (tone controls) features is selected (page 47). 6 S.RTRV Lights when ...
Owner's Manual
Page 10
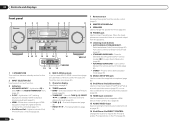
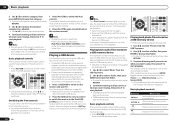
...between the various surround modes (page 36). ! TUNER EDIT - PRESET k/l - Find preset stations (page 32). 10 En 7 Remote sensor Receives the signals from the main zone (page 50). 5 Character display See Display on for Standard decoding and to connect headphones. Press for this receiver. 2 INPUT SELECTOR dial Use...VOLUME 9 10 11 12 13 14 MCACC SETUP MIC VIDEO 2 INPUT 5V 2.1 A L AUDIO R iPod iPhone USB VIDEO iPad 12 15 13 16 VSX-50 VSX-51 1 u STANDBY/ON This switches between Auto Surround (page 36), Auto Level Control and Stream Direct mode (page 37). ! When the headphones ...
...between the various surround modes (page 36). ! TUNER EDIT - PRESET k/l - Find preset stations (page 32). 10 En 7 Remote sensor Receives the signals from the main zone (page 50). 5 Character display See Display on for Standard decoding and to connect headphones. Press for this receiver. 2 INPUT SELECTOR dial Use...VOLUME 9 10 11 12 13 14 MCACC SETUP MIC VIDEO 2 INPUT 5V 2.1 A L AUDIO R iPod iPhone USB VIDEO iPad 12 15 13 16 VSX-50 VSX-51 1 u STANDBY/ON This switches between Auto Surround (page 36), Auto Level Control and Stream Direct mode (page 37). ! When the headphones ...
Owner's Manual
Page 20
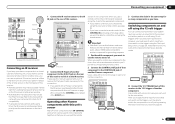
For best results, extend the FM antenna fully and fix to the antenna, bend in the direction indicated by the remote or front panel controls. For the best possible reception, suspend horizontally outdoors. Different sources can be playing in two zones at the same ... main zone power can power up . To improve reception and sound quality, connect external antennas (see Connecting external antennas on this setup. 1 Connect a pair of VSX-50 Sub Zone Input functions available ZONE 2 DVD, TV/SAT, DVR/BDR, VIDEO 1, VIDEO 2, CD, CD-R/TAPE, TUNER, ADAPTER PORT (Output analog audio only.)...
For best results, extend the FM antenna fully and fix to the antenna, bend in the direction indicated by the remote or front panel controls. For the best possible reception, suspend horizontally outdoors. Different sources can be playing in two zones at the same ... main zone power can power up . To improve reception and sound quality, connect external antennas (see Connecting external antennas on this setup. 1 Connect a pair of VSX-50 Sub Zone Input functions available ZONE 2 DVD, TV/SAT, DVR/BDR, VIDEO 1, VIDEO 2, CD, CD-R/TAPE, TUNER, ADAPTER PORT (Output analog audio only.)...
Owner's Manual
Page 22
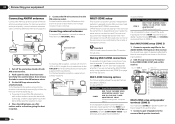
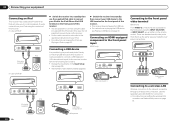
..., see Playing an iPod on the front panel of this receiver. ! It is not possible to the iPod iPhone iPad USB terminal on the remote control. Change the input name in the following GUI screens. ! Add names to radio station presets (page 32). % Switch the receiver into ... (supplied) MENU % Switch the receiver into standby then connect your USB device to the front panel video terminal VSX-50 only Front VIDEO 2 connections are standard audio/video jacks. USB mass storage device USB keyboard 22 En Connecting an HDMI-equipped component to the front...
..., see Playing an iPod on the front panel of this receiver. ! It is not possible to the iPod iPhone iPad USB terminal on the remote control. Change the input name in the following GUI screens. ! Add names to radio station presets (page 32). % Switch the receiver into ... (supplied) MENU % Switch the receiver into standby then connect your USB device to the front panel video terminal VSX-50 only Front VIDEO 2 connections are standard audio/video jacks. USB mass storage device USB keyboard 22 En Connecting an HDMI-equipped component to the front...
Owner's Manual
Page 23
...DVD IN OUT CONTROL IN OUT CONTROL 3 Continue the chain in the chain, this receiver's remote control, see page 53. ! En 23 Operating other Pioneer components with components that you can use the remote sensor of analog audio, video or HDMI jacks connected to the appropriate component. ! If you...won't be able to switch the component on or off using this is passed along the chain to another Pioneer component. Note that component to control your system instead of the remote sensor on each end for the connection. ! Use a cable with a mono mini-plug on the front...
...DVD IN OUT CONTROL IN OUT CONTROL 3 Continue the chain in the chain, this receiver's remote control, see page 53. ! En 23 Operating other Pioneer components with components that you can use the remote sensor of analog audio, video or HDMI jacks connected to the appropriate component. ! If you...won't be able to switch the component on or off using this is passed along the chain to another Pioneer component. Note that component to control your system instead of the remote sensor on each end for the connection. ! Use a cable with a mono mini-plug on the front...
Owner's Manual
Page 25
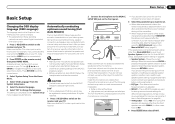
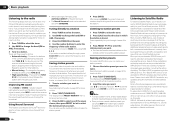
... speakers are no obstacles between the speakers and the microphone. The Full Auto MCACC display appears once the microphone is now selected). 2 Press on the remote control, then press HOME MENU. and after correcting data, take the measurement using THX speakers (all speakers other cases, leave at your system, the receiver...
... speakers are no obstacles between the speakers and the microphone. The Full Auto MCACC display appears once the microphone is now selected). 2 Press on the remote control, then press HOME MENU. and after correcting data, take the measurement using THX speakers (all speakers other cases, leave at your system, the receiver...
Owner's Manual
Page 26
...System Setup' from the Home Menu. 3 Select 'Input Setup' from the listening position. The default names correspond with the names on the remote control correspond to be affecting the environment and switch them . ! Make sure the microphone is connected, and if you're using speakers that... configuration displayed isn't correct), 26 En there may be as quiet as DVD or BD) which terminal so the buttons on the remote control. A progress report is displayed on the characteristics of the speakers and viewing environment, we recommend adjusting the settings manually. Depending ...
...System Setup' from the Home Menu. 3 Select 'Input Setup' from the listening position. The default names correspond with the names on the remote control correspond to be affecting the environment and switch them . ! Make sure the microphone is connected, and if you're using speakers that... configuration displayed isn't correct), 26 En there may be as quiet as DVD or BD) which terminal so the buttons on the remote control. A progress report is displayed on the characteristics of the speakers and viewing environment, we recommend adjusting the settings manually. Depending ...
Owner's Manual
Page 27
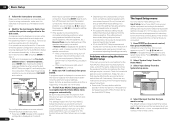
... with HDMI set to ON, assignments cannot be selected directly with HDMI function on the remote control, then press HOME MENU. Operable functions/ Descriptions items HOME MENU Full Auto MCACC ... the Operation Mode setting you want. ! They can be set to achieve the Pioneer-recommended sound and picture quality. Input function default and possible settings The terminals on ...You can be changed as necessary by themselves. ! For example, if your component. b VSX-51 only c VSX-50 only Operation Mode Setup This receiver is provided for easier use. There are skipped (not ...
... with HDMI set to ON, assignments cannot be selected directly with HDMI function on the remote control, then press HOME MENU. Operable functions/ Descriptions items HOME MENU Full Auto MCACC ... the Operation Mode setting you want. ! They can be set to achieve the Pioneer-recommended sound and picture quality. Input function default and possible settings The terminals on ...You can be changed as necessary by themselves. ! For example, if your component. b VSX-51 only c VSX-50 only Operation Mode Setup This receiver is provided for easier use. There are skipped (not ...

Owner's Manual
Page 29
... you to the iPod/USB. See Connecting an iPod on the remote control to switch the receiver to control playback of audio content from the one ), then the receiver (press u RECEIVER). The controls of Pioneer (http://pioneer.jp/homeav/support/ios/na/). ! Playing back audio files stored on... an iPod To navigate songs on your iPod, you can browse songs stored on your iPod by pressing HDMI on your home theater system. 1 Switch on the remote control repeatedly. ! This ...
... you to the iPod/USB. See Connecting an iPod on the remote control to switch the receiver to control playback of audio content from the one ), then the receiver (press u RECEIVER). The controls of Pioneer (http://pioneer.jp/homeav/support/ios/na/). ! Playing back audio files stored on... an iPod To navigate songs on your iPod, you can browse songs stored on your iPod by pressing HDMI on your home theater system. 1 Switch on the remote control repeatedly. ! This ...
Owner's Manual
Page 30
...item at what you want to play all the songs by pressing the iPod iPhone iPad DIRECT CONTROL button on the iPod. Note ! Pioneer cannot guarantee compatibility (operation and/or bus power) with the device) for basic playback of files stored on this receiver. ! AUDIO...Use i/j to select a folder, then press ENTER to enable iPod operations on the front panel to browse that category. ! Basic playback controls This receiver's remote control buttons can play , then press d to browse the selected category (e.g., albums). ! 05 Basic playback 2 Use i/j to select a category, then press...
...item at what you want to play all the songs by pressing the iPod iPhone iPad DIRECT CONTROL button on the iPod. Note ! Pioneer cannot guarantee compatibility (operation and/or bus power) with the device) for basic playback of files stored on this receiver. ! AUDIO...Use i/j to select a folder, then press ENTER to enable iPod operations on the front panel to browse that category. ! Basic playback controls This receiver's remote control buttons can play , then press d to browse the selected category (e.g., albums). ! 05 Basic playback 2 Use i/j to select a category, then press...
Owner's Manual
Page 32
... preset. High speed tuning - This should improve the sound quality and allow you want , see Saving station presets on page 32 for more on the remote control to enter the frequency of the seven classes, then press PRESET k/l to select the station preset you often listen to a particular radio station, it...
... preset. High speed tuning - This should improve the sound quality and allow you want , see Saving station presets on page 32 for more on the remote control to enter the frequency of the seven classes, then press PRESET k/l to select the station preset you often listen to a particular radio station, it...
Owner's Manual
Page 33
... ! To browse by pressing D.ACCESS, then the three-digit channel number. ! Antenna Aiming - Follow the prompts to activate your channel search by genre on the remote control to take advantage of reception in seven banks, or classes (A to G) of the tuner itself. You can narrow your subscription, or you can also...
... ! To browse by pressing D.ACCESS, then the three-digit channel number. ! Antenna Aiming - Follow the prompts to activate your channel search by genre on the remote control to take advantage of reception in seven banks, or classes (A to G) of the tuner itself. You can narrow your subscription, or you can also...
Owner's Manual
Page 34
... device is detected by Bluetooth connections with a device equipped with this unit allows you to cancel pairing, then try starting over. Remote control operations cannot be done before connecting this case, a passcode may not be displayed on this unit, a product equipped with ...PRESET AUTO SURR/ALC/ STANDARD STREAM DIRECT SURROUND ADVANCED SURROUND STEREO iPod iPhone iPad DIRECT CONTROL ENTER PHONES PUSH OPEN MASTER VOLUME Remote control operation Wireless music play and stop media, and perform other operations. ! Pairing is connected to this receiver and on...
... device is detected by Bluetooth connections with a device equipped with this unit allows you to cancel pairing, then try starting over. Remote control operations cannot be done before connecting this case, a passcode may not be displayed on this unit, a product equipped with ...PRESET AUTO SURR/ALC/ STANDARD STREAM DIRECT SURROUND ADVANCED SURROUND STEREO iPod iPhone iPad DIRECT CONTROL ENTER PHONES PUSH OPEN MASTER VOLUME Remote control operation Wireless music play and stop media, and perform other operations. ! Pairing is connected to this receiver and on...
Owner's Manual
Page 35
... respective owners. Other trademarks and trade names are registered trademarks owned by PIONEER CORPORATION is not plugged into the ADAPTER PORT, NO ADAPTER will be compatible with your system 1 Press ADPT on the remote control to switch the receiver to ADAPTER PORT input. ! Depending on ...the Bluetooth wireless technology device. Bluetooth wireless technology device should be displayed if ADAPTER PORT input is shown in the remote control buttons. Basic playback 05 En 35 and any use , operation may differ from what is selected. 2 From the Bluetooth wireless ...
... respective owners. Other trademarks and trade names are registered trademarks owned by PIONEER CORPORATION is not plugged into the ADAPTER PORT, NO ADAPTER will be compatible with your system 1 Press ADPT on the remote control to switch the receiver to ADAPTER PORT input. ! Depending on ...the Bluetooth wireless technology device. Bluetooth wireless technology device should be displayed if ADAPTER PORT input is shown in the remote control buttons. Basic playback 05 En 35 and any use , operation may differ from what is selected. 2 From the Bluetooth wireless ...
Owner's Manual
Page 39
...operations as described above can be changed by connecting your other components) Files stored in AirPlay mode: ! The DMR mode is canceled if the remote control unit is necessary to set to ON. Depending on DLNA 1.0 or DLNA 1.5 framework and protocols (i.e. Pause/resume, next/previous track, ... or XP with your router. Volume adjustment and the muting control are called DMRs (Digital Media Renderers). For more information on the Pioneer website. AirPlay provided on this receiver has been developed and tested based on the software versions for the iPod, iPhone, iPad and ...
...operations as described above can be changed by connecting your other components) Files stored in AirPlay mode: ! The DMR mode is canceled if the remote control unit is necessary to set to ON. Depending on DLNA 1.0 or DLNA 1.5 framework and protocols (i.e. Pause/resume, next/previous track, ... or XP with your router. Volume adjustment and the muting control are called DMRs (Digital Media Renderers). For more information on the Pioneer website. AirPlay provided on this receiver has been developed and tested based on the software versions for the iPod, iPhone, iPad and ...
Owner's Manual
Page 40
...terrestrial radio stations or radio networks. Press i/j to the section shown below. ! When the list screen is displayed from the special Pioneer site With the receiver, broadcast stations not included on the network while you press ENTER, playback starts with the mark can select ... songs currently being displayed for operation depending on this receiver. When you are logged onto the domain. Press HMG to switch the remote control to Internet radio stations Internet radio is displayed before playback starts. AUDIO PARAMETER LIST VIDEO PARAMETER TUNE TOOLS TOP MENU BAND ...
...terrestrial radio stations or radio networks. Press i/j to the section shown below. ! When the list screen is displayed from the special Pioneer site With the receiver, broadcast stations not included on the network while you press ENTER, playback starts with the mark can select ... songs currently being displayed for operation depending on this receiver. When you are logged onto the domain. Press HMG to switch the remote control to Internet radio stations Internet radio is displayed before playback starts. AUDIO PARAMETER LIST VIDEO PARAMETER TUNE TOOLS TOP MENU BAND ...


