
Owner's Manual
Page 4
... To establish a safe level: • Start your musical enjoyment. After all, we want you find it damaged, ask your nearest PIONEER authorized service center or your sensitive hearing. Since hearing damage from traffic 50 Light traffic, normal conversation, quiet office 60 Air conditioner at ... Vacuum cleaner, hair dryer, noisy restaurant 80 Average city traffic, garbage disposals, alarm clock at a low setting. • Slowly increase the sound until it at a safe level BEFORE your equipment at a safe level. ELECTR N• STRIES •A ONIC INDU EIA EST 1924 SSOCIATIO We...
... To establish a safe level: • Start your musical enjoyment. After all, we want you find it damaged, ask your nearest PIONEER authorized service center or your sensitive hearing. Since hearing damage from traffic 50 Light traffic, normal conversation, quiet office 60 Air conditioner at ... Vacuum cleaner, hair dryer, noisy restaurant 80 Average city traffic, garbage disposals, alarm clock at a low setting. • Slowly increase the sound until it at a safe level BEFORE your equipment at a safe level. ELECTR N• STRIES •A ONIC INDU EIA EST 1924 SSOCIATIO We...
Owner's Manual
Page 5
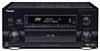
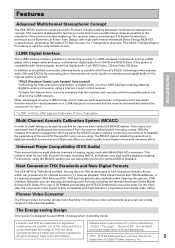
...Advanced Direct Energy MOS-FET output devices, generating 160 watts (FTC 6Ω) of power for use a wide range of getting good surround sound from SACD and DVD-A discs (if the player is compatible with minimum effort. The receiver uses a revolutionary 3-D Frame Construction technique and... channels. THX technologies are using a precision quartz in standby mode. Features PREPARATION PREPARATION Advanced Multichannel Stereophonic Concept The VSX-49TXi receiver is constructed with Pioneer's PQLS* technology when playing audio CDs and SACDs. All rights reserved.
...Advanced Direct Energy MOS-FET output devices, generating 160 watts (FTC 6Ω) of power for use a wide range of getting good surround sound from SACD and DVD-A discs (if the player is compatible with minimum effort. The receiver uses a revolutionary 3-D Frame Construction technique and... channels. THX technologies are using a precision quartz in standby mode. Features PREPARATION PREPARATION Advanced Multichannel Stereophonic Concept The VSX-49TXi receiver is constructed with Pioneer's PQLS* technology when playing audio CDs and SACDs. All rights reserved.

Owner's Manual
Page 6
... Panel 34 Remote Control 36 Basic Receiver LCD Screens 37 Receiver MAIN Screen 37 Receiver SUB Screen 38 Display 39 Setting Up for Surround Sound ........ 40 SPEAKER SYSTEMS 41 CHANNEL LEVEL (channel balance 43 SPEAKER DISTANCE 44 Acoustic Calibration EQ 45 Data Copy of Acoustic Calibration EQ 47... (DIGITAL NR Function 56 Listening in MIDNIGHT Mode 57 Listening in LOUDNESS Mode 57 Adjusting Bass and Treble (Tone Control 58 Listening with SOUND DELAY 58 DVD Audio/MULTI CHANNEL IN Playback 59 DUAL MONO Setting and Playback 60 Input Attenuator 60 Tape 2 Monitor 60 Using the ...
... Panel 34 Remote Control 36 Basic Receiver LCD Screens 37 Receiver MAIN Screen 37 Receiver SUB Screen 38 Display 39 Setting Up for Surround Sound ........ 40 SPEAKER SYSTEMS 41 CHANNEL LEVEL (channel balance 43 SPEAKER DISTANCE 44 Acoustic Calibration EQ 45 Data Copy of Acoustic Calibration EQ 47... (DIGITAL NR Function 56 Listening in MIDNIGHT Mode 57 Listening in LOUDNESS Mode 57 Adjusting Bass and Treble (Tone Control 58 Listening with SOUND DELAY 58 DVD Audio/MULTI CHANNEL IN Playback 59 DUAL MONO Setting and Playback 60 Input Attenuator 60 Tape 2 Monitor 60 Using the ...

Owner's Manual
Page 7
... Additional Amplifiers 78 Pre Out Power Setup 79 Using an separate stereo pre-amplifier 79 Using a separate power amplifier for main room stereo sound 79 Multi-Room 80 MULTI-ROOM connections 80 MULTI-ROOM setup 81 Controlling the MULTI-ROOM system from the main room 82 Controlling the... MULTI-ROOM system from the sub room 83 The PIONEER SR System: Operating other PIONEER components 84 Multi Operations 85 Performing multi operations 86 System off 87 Using System off 88 Editing Remote Control Screen Names (...
... Additional Amplifiers 78 Pre Out Power Setup 79 Using an separate stereo pre-amplifier 79 Using a separate power amplifier for main room stereo sound 79 Multi-Room 80 MULTI-ROOM connections 80 MULTI-ROOM setup 81 Controlling the MULTI-ROOM system from the main room 82 Controlling the... MULTI-ROOM system from the sub room 83 The PIONEER SR System: Operating other PIONEER components 84 Multi Operations 85 Performing multi operations 86 System off 87 Using System off 88 Editing Remote Control Screen Names (...

Owner's Manual
Page 8
... result in such hazards as shown above. The remote control uses a lot of power due to operate the remote control properly an alarm will sound and a warning screen will need re-adjusting (see below . Depending on the remote. Do not use alkaline batteries. Change Battery !! Before.... Observe the following precautions. • Never use of batteries may have received all of the batteries properly according to back of the alarm sounding or all batteries with new ones. AM Loop Antenna FM wire Antenna "AA" IEC LR6 batteries x 4 Microphone AC power cord Remote Control...
... result in such hazards as shown above. The remote control uses a lot of power due to operate the remote control properly an alarm will sound and a warning screen will need re-adjusting (see below . Depending on the remote. Do not use alkaline batteries. Change Battery !! Before.... Observe the following precautions. • Never use of batteries may have received all of the batteries properly according to back of the alarm sounding or all batteries with new ones. AM Loop Antenna FM wire Antenna "AA" IEC LR6 batteries x 4 Microphone AC power cord Remote Control...

Owner's Manual
Page 11
... control will stay on the remote screen is easier to adjust the number of time if no command is 10 seconds. You can choose the sound of 5-60 seconds. VOL + VOL - If you leave it on before the timer turns it on the remote control screen. LCD TIMER: In order to... 60 seconds.) BEEP: When you have the backlight on or not and use lock TV CONTROL FUNCTION CH + CH - You can also turn the beep sound off . If no commands are entered. FUNCTION ENTER STANDBY/ON MULTI SYSTEM OPERATION OFF MUTING MASTER VOLUME + - 1 Decide whether you'd like to change the contrast...
... control will stay on the remote screen is easier to adjust the number of time if no command is 10 seconds. You can choose the sound of 5-60 seconds. VOL + VOL - If you leave it on before the timer turns it on the remote control screen. LCD TIMER: In order to... 60 seconds.) BEEP: When you have the backlight on or not and use lock TV CONTROL FUNCTION CH + CH - You can also turn the beep sound off . If no commands are entered. FUNCTION ENTER STANDBY/ON MULTI SYSTEM OPERATION OFF MUTING MASTER VOLUME + - 1 Decide whether you'd like to change the contrast...

Owner's Manual
Page 12
...you follow the instructions to get a more than two channels of the surround sound setups to set up seven speakers and a subwoofer and simply play your DVDs with anywhere from your system is the VSX-49TXi receiver and it seems so difficult is the listening mode you choose on ... is the actual product (like a DVD) or broadcast (like your home theater. 3) The Listening Modes This receiver has many more details on the VSX-49TXi receiver. You can also hook up your speaker configuration. 2) The 'source' material you will contribute to this your equipment, like cable TV) you...
...you follow the instructions to get a more than two channels of the surround sound setups to set up seven speakers and a subwoofer and simply play your DVDs with anywhere from your system is the VSX-49TXi receiver and it seems so difficult is the listening mode you choose on ... is the actual product (like a DVD) or broadcast (like your home theater. 3) The Listening Modes This receiver has many more details on the VSX-49TXi receiver. You can also hook up your speaker configuration. 2) The 'source' material you will contribute to this your equipment, like cable TV) you...

Owner's Manual
Page 14
Quick Start Guide Part1 2 Speaker Connections Home theater is designed to be done automatically by following the Auto Surround Sound Setup instructions from the center speaker. Hook up to the left surround back terminal. • If you use a THX certified subwoofer use a mono (single plug)... SUB W. See page 109-110 for watching films because in digital soundtracks the dialog comes from page 16 in order to hook up all the sound channels on speaker placement. Make sure you won't hear any dialog. A center speaker is off or when you listen to digital soundtracks you connect ...
Quick Start Guide Part1 2 Speaker Connections Home theater is designed to be done automatically by following the Auto Surround Sound Setup instructions from the center speaker. Hook up to the left surround back terminal. • If you use a THX certified subwoofer use a mono (single plug)... SUB W. See page 109-110 for watching films because in digital soundtracks the dialog comes from page 16 in order to hook up all the sound channels on speaker placement. Make sure you won't hear any dialog. A center speaker is off or when you listen to digital soundtracks you connect ...
Owner's Manual
Page 16
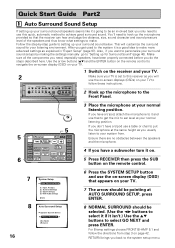
...on your normal listening position. Surround Setup] [3. RETURN brings you want to personalize your surround sound setups by -step guide to setting up your listening environment. Input Assign] [2. Follow the step...microphone provided so that the receiver can hear and judge the distance, size, sound character and sound pressure level of the speakers and thus know what settings to make more advanced...idea to make . You'll need to use this receiver as you will customize the surround sound for Surround Sound" (page 40). Use the arrow buttons (5∞) and the ENTER button on the remote...
...on your normal listening position. Surround Setup] [3. RETURN brings you want to personalize your surround sound setups by -step guide to setting up your listening environment. Input Assign] [2. Follow the step...microphone provided so that the receiver can hear and judge the distance, size, sound character and sound pressure level of the speakers and thus know what settings to make more advanced...idea to make . You'll need to use this receiver as you will customize the surround sound for Surround Sound" (page 40). Use the arrow buttons (5∞) and the ENTER button on the remote...

Owner's Manual
Page 18
...control screen. 4 Press the STANDARD button on the remote control. If you don't see pages 52-55. 2 To get a more refined sound, make the sound settings in the display on the receiver. The system will automatically exit from the microphone, etc.) the final settings may be incorrect. After ...the mic. Check for auto setup (too much ambient noise, obstacles blocking the speakers from the setup process. • If you good surround sound. For more information see the STANDARD button, press the RECEIVER button then press MAIN to access the main remote control screen. 5 Play a DVD...
...control screen. 4 Press the STANDARD button on the remote control. If you don't see pages 52-55. 2 To get a more refined sound, make the sound settings in the display on the receiver. The system will automatically exit from the microphone, etc.) the final settings may be incorrect. After ...the mic. Check for auto setup (too much ambient noise, obstacles blocking the speakers from the setup process. • If you good surround sound. For more information see the STANDARD button, press the RECEIVER button then press MAIN to access the main remote control screen. 5 Play a DVD...

Owner's Manual
Page 27
... face toward the direction providing the best reception. These antennas should provide adequate reception quality in most cases, but connecting outdoor antennas should noticeably improve sound quality.
... face toward the direction providing the best reception. These antennas should provide adequate reception quality in most cases, but connecting outdoor antennas should noticeably improve sound quality.
Owner's Manual
Page 28
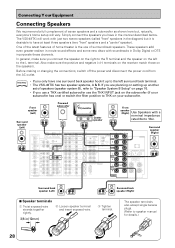
.... In general, make sure the positive and negative (+/-) terminals on the receiver match those on the left to the left surround back terminal. • The VSX-49TXi has two speaker systems, A & B. PRE OUT 2 SURROUND L SURROUND BACK L (Single) CENTER SURROUND BACK L (Single) CONTROL IN MULTIROOM & SOURCE DVD /LD IN TV IN SAT ... you use a THX certified subwoofer use of speakers (speaker system B), refer to "Speaker System B Setup" on page 76. • If you have in movie sound effects and some new discs with a nominal impedance rated 6Ω to speaker manual for details.) 28
.... In general, make sure the positive and negative (+/-) terminals on the receiver match those on the left to the left surround back terminal. • The VSX-49TXi has two speaker systems, A & B. PRE OUT 2 SURROUND L SURROUND BACK L (Single) CENTER SURROUND BACK L (Single) CONTROL IN MULTIROOM & SOURCE DVD /LD IN TV IN SAT ... you use a THX certified subwoofer use of speakers (speaker system B), refer to "Speaker System B Setup" on page 76. • If you have in movie sound effects and some new discs with a nominal impedance rated 6Ω to speaker manual for details.) 28

Owner's Manual
Page 29
...CAUTION! • Do not connect appliances with high power consumption such as distortion in regular use, e.g. To achieve the best possible surround sound, install your system. AC Outlet [switched 100 W max] Power supplied through this unit. • The receiver should not exceed 100 ...Speaker placement If you do so. PREPARATION PREPARATION Connecting Your Equipment Placing Your Speakers Proper speaker placement is essential to realize the best sound from the TV. • Install the center speaker above or below . Also, it with suitable means. Make sure all speakers ...
...CAUTION! • Do not connect appliances with high power consumption such as distortion in regular use, e.g. To achieve the best possible surround sound, install your system. AC Outlet [switched 100 W max] Power supplied through this unit. • The receiver should not exceed 100 ...Speaker placement If you do so. PREPARATION PREPARATION Connecting Your Equipment Placing Your Speakers Proper speaker placement is essential to realize the best sound from the TV. • Install the center speaker above or below . Also, it with suitable means. Make sure all speakers ...

Owner's Manual
Page 32
... signals from the remote control. 5 Display (see p.39) 32 6 MCACC indicator (see p.56) Lights when the ACOUSTIC CAL EQ is on. (After the Auto Surround Sound Setup has been completed the ACOUSTIC CAL EQ is in the MULTIROOM & SOURCE mode.) The input indicators show the current component. 2 STANDBY/ON button-power...
... signals from the remote control. 5 Display (see p.39) 32 6 MCACC indicator (see p.56) Lights when the ACOUSTIC CAL EQ is on. (After the Auto Surround Sound Setup has been completed the ACOUSTIC CAL EQ is in the MULTIROOM & SOURCE mode.) The input indicators show the current component. 2 STANDBY/ON button-power...

Owner's Manual
Page 33
...camera (etc.), that has an optical digital connection. RCA VIDEO / AUDIO (L/R) : Video input for private listening (no sound will change.): ANALOG - ON/OFF button: Use to get proper surround sound. 26 Front VIDEO INPUT jacks (see p.51) Use to select the volume of signal being made. 24 MULTI CH INPUT...amping the speakers. CONTROL button: Used together with the INPUT SELECTOR to select the function or use the multi room feature (requires an optional PIONEER Multi-Room Remote Sensor Unit MR-100 or another IR receiver). For this button to select the number of video input. 23 TAPE 2 ...
...camera (etc.), that has an optical digital connection. RCA VIDEO / AUDIO (L/R) : Video input for private listening (no sound will change.): ANALOG - ON/OFF button: Use to get proper surround sound. 26 Front VIDEO INPUT jacks (see p.51) Use to select the volume of signal being made. 24 MULTI CH INPUT...amping the speakers. CONTROL button: Used together with the INPUT SELECTOR to select the function or use the multi room feature (requires an optional PIONEER Multi-Room Remote Sensor Unit MR-100 or another IR receiver). For this button to select the number of video input. 23 TAPE 2 ...

Owner's Manual
Page 35
... OUTLET AC IN SPEAKERS ª ı· L R 14 15 17 18 11 CONTROL IN/OUT terminal You can use this jack to hook up other PIONEER equipment, that bears the Î mark, so that you can control them all pointing the remote control(s) at one that has the possibility on inputting... SPEAKER terminals Use these terminals to connect speakers to the receiver (see p.94). 15 RS-232C Connection This is a future-oriented port that handles surround sound and is the one remote sensor. 12 MONITOR OUT terminals (connect a TV or monitor here, see p.13 & 19) Use these terminals to output a video ...
... OUTLET AC IN SPEAKERS ª ı· L R 14 15 17 18 11 CONTROL IN/OUT terminal You can use this jack to hook up other PIONEER equipment, that bears the Î mark, so that you can control them all pointing the remote control(s) at one that has the possibility on inputting... SPEAKER terminals Use these terminals to connect speakers to the receiver (see p.94). 15 RS-232C Connection This is a future-oriented port that handles surround sound and is the one remote sensor. 12 MONITOR OUT terminals (connect a TV or monitor here, see p.13 & 19) Use these terminals to output a video ...

Owner's Manual
Page 38
...signal. buttons TONE button This button has two functions. button Use to lower the input level of a recording as follows: A]B]A&B]off (for Surround Sound" starting on p.40. 5 VIDEO SELECT button Use to toggle between the different video input possibilities. 6 SPEAKER A/B button (see p.57) Switches ...the LOUDNESS mode on or off . You can also adjust the effect level (see p.55) or SOUND DELAY in INPUT ASSIGN (see p.44, memo). Displays & Controls Receiver SUB Screen 1 Receiver MAIN SUB TONE BASS/ TREBLE - 2 DISPLAY VIDEO DIMMER SELECT...
...signal. buttons TONE button This button has two functions. button Use to lower the input level of a recording as follows: A]B]A&B]off (for Surround Sound" starting on p.40. 5 VIDEO SELECT button Use to toggle between the different video input possibilities. 6 SPEAKER A/B button (see p.57) Switches ...the LOUDNESS mode on or off . You can also adjust the effect level (see p.55) or SOUND DELAY in INPUT ASSIGN (see p.44, memo). Displays & Controls Receiver SUB Screen 1 Receiver MAIN SUB TONE BASS/ TREBLE - 2 DISPLAY VIDEO DIMMER SELECT...

Owner's Manual
Page 40
...the settings you made at that time were adequate move on to the front panel of the receiver is connected as in some speakers enhances sound separation and is a kind of your TV and receiver are displayed. TV CONTROL use it. SIGNAL SELECT REMOTE SETUP CD CD-R/ TAPE1 TUNER...CH IN CD CD-R/ TAPE1 TUNER ADVANCED ADVANCED CINEMA CONCERT LISTENING CH SEL. For more information on your speakers for Surround Sound To ensure the best possible surround sound, complete the following setup operations. Some of speakers you want in the Quick Start Guide. Setting Up for the most ...
...the settings you made at that time were adequate move on to the front panel of the receiver is connected as in some speakers enhances sound separation and is a kind of your TV and receiver are displayed. TV CONTROL use it. SIGNAL SELECT REMOTE SETUP CD CD-R/ TAPE1 TUNER...CH IN CD CD-R/ TAPE1 TUNER ADVANCED ADVANCED CINEMA CONCERT LISTENING CH SEL. For more information on your speakers for Surround Sound To ensure the best possible surround sound, complete the following setup operations. Some of speakers you want in the Quick Start Guide. Setting Up for the most ...

Owner's Manual
Page 41
...hooked up . SURROUND BACK • Select the number of surround back speakers you connected. phone must be set to SMALL. Setting Up for Surround Sound SPEAKER SYSTEMS The following steps show you how to select the correct setup for the type and number of speakers you have hooked up to...8734; buttons to the subwoofer. In this case, LFE signals and bass frequencies of the channel set to SMALL (it isn't use this case, the sound of the surround channels is background noise, from other speakers or subwoofer. • If you did not connect a subwoofer. (If you select SMALL for ...
...hooked up . SURROUND BACK • Select the number of surround back speakers you connected. phone must be set to SMALL. Setting Up for Surround Sound SPEAKER SYSTEMS The following steps show you how to select the correct setup for the type and number of speakers you have hooked up to...8734; buttons to the subwoofer. In this case, LFE signals and bass frequencies of the channel set to SMALL (it isn't use this case, the sound of the surround channels is background noise, from other speakers or subwoofer. • If you did not connect a subwoofer. (If you select SMALL for ...

Owner's Manual
Page 42
...) 2.1. If you selected MANUAL THX in step 2 the Crossover Frequency is set to select LARGE for your front speakers and PLUS for all the bass sounds to it may not, however, yield the best bass results. Next, proceed to step 9. 3,4 2.1. This may seem logical to 80Hz and this case, arrange the... cancellations." Then go to the next screen. 5 With the 5∞ buttons choose the set of bass, it by selecting SMALL for the entire soundtrack, which sounds best. Go to CHANNEL LEVEL below. If you can't get good results, listen to the bass response with it set to PLUS and YES or...
...) 2.1. If you selected MANUAL THX in step 2 the Crossover Frequency is set to select LARGE for your front speakers and PLUS for all the bass sounds to it may not, however, yield the best bass results. Next, proceed to step 9. 3,4 2.1. This may seem logical to 80Hz and this case, arrange the... cancellations." Then go to the next screen. 5 With the 5∞ buttons choose the set of bass, it by selecting SMALL for the entire soundtrack, which sounds best. Go to CHANNEL LEVEL below. If you can't get good results, listen to the bass response with it set to PLUS and YES or...


