Owner's Manual
Page 4
... this Pioneer product. Thank you will know how to operate your model properly. After you start 5 Checking what's in the box 5 Installing the receiver 5 Flow of settings on the receiver 5 01 Controls and displays Front panel 6 Display 7 Remote control 8 Loading the batteries 9 Operating range of remote control 9 ...System Setup menu 38 Manual speaker setup 38 Speaker Setting 38 Crossover Network 39 Channel Level 39 Speaker Distance 40 The Input Assign menu 40 The Speaker System setting 41 The Video Parameter setting 41 Video Converter 41 Resolution 41 Aspect 42 The ...
... this Pioneer product. Thank you will know how to operate your model properly. After you start 5 Checking what's in the box 5 Installing the receiver 5 Flow of settings on the receiver 5 01 Controls and displays Front panel 6 Display 7 Remote control 8 Loading the batteries 9 Operating range of remote control 9 ...System Setup menu 38 Manual speaker setup 38 Speaker Setting 38 Crossover Network 39 Channel Level 39 Speaker Distance 40 The Input Assign menu 40 The Speaker System setting 41 The Video Parameter setting 41 Video Converter 41 Resolution 41 Aspect 42 The ...
Owner's Manual
Page 5
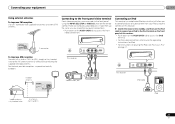
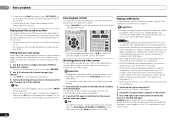
... function.) 5 Use the on the receiver The unit is a full-fledged AV receiver equipped with an abundance of the remote control • Setting the remote to control other components (page 46) 5 En in places that gives off a magnetic field). It can be made as desired •...Input Assign menu (page 40) (When using Phase Control (page 35) • Listening with the sound. - in damp or wet areas - Before you start Checking what's in the box Please check that you've received the following supplied accessories: • Setup microphone • Remote control • AAA size ...
... function.) 5 Use the on the receiver The unit is a full-fledged AV receiver equipped with an abundance of the remote control • Setting the remote to control other components (page 46) 5 En in places that gives off a magnetic field). It can be made as desired •...Input Assign menu (page 40) (When using Phase Control (page 35) • Listening with the sound. - in damp or wet areas - Before you start Checking what's in the box Please check that you've received the following supplied accessories: • Setup microphone • Remote control • AAA size ...
Owner's Manual
Page 6
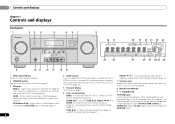
...AUTO SURROUND/ ALC/ STREAM DIRECT STANDARD SURR ADVANCED SURROUND STEREO iPod iPhone iPad DIRECT CONTROL ENTER PHONES MCACC SETUP MIC VIDEO 2 INPUT 5V 2.1 A L AUDIO R iPod iPhone USB VIDEO iPad 8 VSX-40 16 17 MASTER VOLUME 23 24 18 19 20 21 18 22 25 26 ...on (Acoustic Calibration EQ is automatically set to select SIRIUS Radio channels (page 31). 7 Remote sensor Receives the signals from the main zone (see Operating range of remote control on page 7. 6 Tuner control buttons BAND - Blinks when connecting an HDMI-equipped component; Used to find radio frequencies (page...
...AUTO SURROUND/ ALC/ STREAM DIRECT STANDARD SURR ADVANCED SURROUND STEREO iPod iPhone iPad DIRECT CONTROL ENTER PHONES MCACC SETUP MIC VIDEO 2 INPUT 5V 2.1 A L AUDIO R iPod iPhone USB VIDEO iPad 8 VSX-40 16 17 MASTER VOLUME 23 24 18 19 20 21 18 22 25 26 ...on (Acoustic Calibration EQ is automatically set to select SIRIUS Radio channels (page 31). 7 Remote sensor Receives the signals from the main zone (see Operating range of remote control on page 7. 6 Tuner control buttons BAND - Blinks when connecting an HDMI-equipped component; Used to find radio frequencies (page...

Owner's Manual
Page 8
... 2 Pro Logic II, 2 Pro Logic IIx, 2 Pro Logic IIz and NEO:6, and the Auto level control stereo mode (page 33). 01 Controls and displays Remote control 1 RECEIVER SLEEP TV SOURCE CONTROL 2 3 RECEIVER INPUT SELECT INPUT 4 BD DVD TV DVR/BDR CD CD-R CH 5 ADAPTER iPod USB ... button, then press RECEIVER button. 3 RECEIVER Switches the remote to control the receiver (used to find radio frequencies and PRESET / can be accessed after you to control other components with the remote control (page 46). 6 Listening mode buttons AUTO/DIRECT - These buttons ...
... 2 Pro Logic II, 2 Pro Logic IIx, 2 Pro Logic IIz and NEO:6, and the Auto level control stereo mode (page 33). 01 Controls and displays Remote control 1 RECEIVER SLEEP TV SOURCE CONTROL 2 3 RECEIVER INPUT SELECT INPUT 4 BD DVD TV DVR/BDR CD CD-R CH 5 ADAPTER iPod USB ... button, then press RECEIVER button. 3 RECEIVER Switches the remote to control the receiver (used to find radio frequencies and PRESET / can be accessed after you to control other components with the remote control (page 46). 6 Listening mode buttons AUTO/DIRECT - These buttons ...

Owner's Manual
Page 9
...this section. This can access a radio station directly using alkaline batteries that can be checked by pressing BASS -/+ (page 39). Operating range of remote control The remote control may not work properly if: • There are other excessively hot place, such as leakage and bursting. CAUTION • Incorrect use LEV ... quality sound to select the TV input signal. These buttons switch between the DTV and analog TV input modes for Pioneer TVs. 10 Number buttons and other components connected to access the 'boxed' commands (above 150 Hz, the subwoofer channel level will be...
...this section. This can access a radio station directly using alkaline batteries that can be checked by pressing BASS -/+ (page 39). Operating range of remote control The remote control may not work properly if: • There are other excessively hot place, such as leakage and bursting. CAUTION • Incorrect use LEV ... quality sound to select the TV input signal. These buttons switch between the DTV and analog TV input modes for Pioneer TVs. 10 Number buttons and other components connected to access the 'boxed' commands (above 150 Hz, the subwoofer channel level will be...
Owner's Manual
Page 21
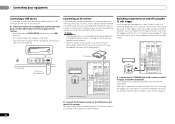
...LOOP Connecting to 20 ft.) 21 En Hook them up the same way you to control playback of audio content from your iPod using the INPUT SELECTOR or VIDEO2 button on the remote control. to the front panel video terminal Front video connections are standard audio/video jacks. ...There are accessed via the front panel using the controls of vinyl-coated wire to connect an external FM antenna. CONTROL ON / OFF PHONES This receiver ...
...LOOP Connecting to 20 ft.) 21 En Hook them up the same way you to control playback of audio content from your iPod using the INPUT SELECTOR or VIDEO2 button on the remote control. to the front panel video terminal Front video connections are standard audio/video jacks. ...There are accessed via the front panel using the controls of vinyl-coated wire to connect an external FM antenna. CONTROL ON / OFF PHONES This receiver ...
Owner's Manual
Page 22
... may not use the sub zone remote control in your system (such as a Niles or Xantech unit) to control your system instead of the remote sensor on page 28. IR receiver HDMI DVR/BDR IN ...pressing the input function(s) you select an input function. For more information on each end for IR compatibility. CONTROL ON / OFF PHONES This receiver MCACC SETUP MIC VIDEO 2 INPUT 5V 2.1 A L AUDIO R iPod ...such as a screen or projector) to this receiver so that they switch on the IR receiver remote sensor window. • Note that this will switch on the trigger, you must specify which input...
... may not use the sub zone remote control in your system (such as a Niles or Xantech unit) to control your system instead of the remote sensor on page 28. IR receiver HDMI DVR/BDR IN ...pressing the input function(s) you select an input function. For more information on each end for IR compatibility. CONTROL ON / OFF PHONES This receiver MCACC SETUP MIC VIDEO 2 INPUT 5V 2.1 A L AUDIO R iPod ...such as a screen or projector) to this receiver so that they switch on the IR receiver remote sensor window. • Note that this will switch on the trigger, you must specify which input...
Owner's Manual
Page 24
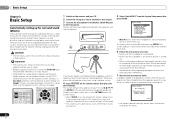
...during the test tones. 24 En After you 've made . • The screensaver automatically starts after pressing ENTER. Use and ENTER on the remote control to navigate through the screens and select menu items. Press RETURN to exit the current menu. • Press SETUP at ear level using the ... an input source. • When both channel delay and channel level. Try to exit the System Setup menu. The System Setup menu appears on the remote control, then press the SETUP button. Try to be made . • Before using a table or a chair. 4 Press RECEIVER on your listening area, taking ...
...during the test tones. 24 En After you 've made . • The screensaver automatically starts after pressing ENTER. Use and ENTER on the remote control to navigate through the screens and select menu items. Press RETURN to exit the current menu. • Press SETUP at ear level using the ... an input source. • When both channel delay and channel level. Try to exit the System Setup menu. The System Setup menu appears on the remote control, then press the SETUP button. Try to be made . • Before using a table or a chair. 4 Press RECEIVER on your listening area, taking ...
Owner's Manual
Page 26
...on the front panel display whether or not surround sound playback is being performed properly. To operate the receiver, first press RECEIVER on the remote control, then press the appropriate button to operate. • The input source can be set to PCM. • Depending on the playback ...H (HDMI) is disconnected. 2 Switch the TV input to select 'AUTO SURROUND' and start playback of the source. For other components using the remote control. When the HDMI option in the default listening mode. If you're playing a stereo source or if the connection is now selected. 3 Press...
...on the front panel display whether or not surround sound playback is being performed properly. To operate the receiver, first press RECEIVER on the remote control, then press the appropriate button to operate. • The input source can be set to PCM. • Depending on the playback ...H (HDMI) is disconnected. 2 Switch the TV input to select 'AUTO SURROUND' and start playback of the source. For other components using the remote control. When the HDMI option in the default listening mode. If you're playing a stereo source or if the connection is now selected. 3 Press...

Owner's Manual
Page 27
...receiver, and we recommend switching the equalizer off before connecting. 1 Switch on the remote control to switch the receiver to each terminal, select the input by doing the following...legally permitted to A (analog). • You may be controlled using the controls of Pioneer to control playback of Pioneer (http://pioneer.jp/homeav/support/ios/ na/). •Installing software versions other...ASSIGNABLE IN OPTICAL 2 ASSIGNABLE Audio Video TV BD DVR/BDR DVD Video DVD DVR/BDR Reassignable (page 40) VIDEO MONITOR TV/SAT OUT IN AUDIO DVR/BDR CD-R/TAPE ZONE2 L BD IN OUT OUT ...
...receiver, and we recommend switching the equalizer off before connecting. 1 Switch on the remote control to switch the receiver to each terminal, select the input by doing the following...legally permitted to A (analog). • You may be controlled using the controls of Pioneer to control playback of Pioneer (http://pioneer.jp/homeav/support/ios/ na/). •Installing software versions other...ASSIGNABLE IN OPTICAL 2 ASSIGNABLE Audio Video TV BD DVR/BDR DVD Video DVD DVR/BDR Reassignable (page 40) VIDEO MONITOR TV/SAT OUT IN AUDIO DVR/BDR CD-R/TAPE ZONE2 L BD IN OUT OUT ...
Owner's Manual
Page 28
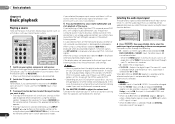
...Pioneer cannot guarantee compatibility (operation and/or bus power) with all of the songs in the song category, you can also press ENTER to start playback. • You can play , then press to start playback. See Connecting a USB device on the front of this receiver. Basic playback controls This receiver's remote control...Tip • Change the receiver's input to the iPod in standby when disconnecting the USB device. 1 Switch on the remote control to switch the receiver to this receiver, you can be used with copy-protection or restricted playback). • Compatible USB ...
...Pioneer cannot guarantee compatibility (operation and/or bus power) with all of the songs in the song category, you can also press ENTER to start playback. • You can play , then press to start playback. See Connecting a USB device on the front of this receiver. Basic playback controls This receiver's remote control...Tip • Change the receiver's input to the iPod in standby when disconnecting the USB device. 1 Switch on the remote control to switch the receiver to this receiver, you can be used with copy-protection or restricted playback). • Compatible USB ...

Owner's Manual
Page 29
... with Bluetooth wireless technology: Digital music player + Bluetooth audio transmitter (sold commercially) Music data Bluetooth® ADAPTER This receiver Remote control operation Wireless music play . and other countries. AUTO/ ALC/ BD MENU DIRECT STEREO STANDARD ADV SURR DTV/ TV MUTE AUDIO...) is an acronym for Wireless Enjoyment of iTunes® may not play When the Bluetooth ADAPTER (Pioneer Model No. Basic playback 04 Basic playback controls This receiver's remote control buttons can be used for compressed audio files: • MP3 (MPEG-1/2/2.5 Audio Layer 3) -
... with Bluetooth wireless technology: Digital music player + Bluetooth audio transmitter (sold commercially) Music data Bluetooth® ADAPTER This receiver Remote control operation Wireless music play . and other countries. AUTO/ ALC/ BD MENU DIRECT STEREO STANDARD ADV SURR DTV/ TV MUTE AUDIO...) is an acronym for Wireless Enjoyment of iTunes® may not play When the Bluetooth ADAPTER (Pioneer Model No. Basic playback 04 Basic playback controls This receiver's remote control buttons can be used for compressed audio files: • MP3 (MPEG-1/2/2.5 Audio Layer 3) -
Owner's Manual
Page 30
...also the operating instructions of your Bluetooth wireless technology device. • Pairing is under license. 04 Basic playback Important • Pioneer does not guarantee proper connection and operation of this unit with all the top professional and college sports including play by play ... 30 En 1 Press TOP MENU. 2 Press ENTER to enter PAIRING. 3 Select the PIN code to your Sirius-Ready receiver. Remote control operation The remote control supplied with Your System 1 Press ADAPTER to switch the receiver to performing the pairing operation below. • When using any time ...
...also the operating instructions of your Bluetooth wireless technology device. • Pairing is under license. 04 Basic playback Important • Pioneer does not guarantee proper connection and operation of this unit with all the top professional and college sports including play by play ... 30 En 1 Press TOP MENU. 2 Press ENTER to enter PAIRING. 3 Select the PIN code to your Sirius-Ready receiver. Remote control operation The remote control supplied with Your System 1 Press ADAPTER to switch the receiver to performing the pairing operation below. • When using any time ...

Owner's Manual
Page 31
.... 2 Press T.EDIT. and its subsidiaries. All rights reserved. Listening to the SiriusConnect tuner. - When you have a printed 12-digit SID number. Connect SIRIUS on the remote control to do this time. You can select channels from the front panel display to activate your tuner. Tip • You can reset the channel presets...
.... 2 Press T.EDIT. and its subsidiaries. All rights reserved. Listening to the SiriusConnect tuner. - When you have a printed 12-digit SID number. Connect SIRIUS on the remote control to do this time. You can select channels from the front panel display to activate your tuner. Tip • You can reset the channel presets...

Owner's Manual
Page 32
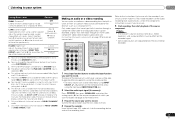
... often listen to a particular radio station, it's convenient to have named a station preset, Press DISP to a station. RECEIVER SLEEP TV SOURCE CONTROL AUDIO PARAMETER TOP MENU TUNER EDIT MASTER TOOLS VOLUME TUNE MENU RECEIVER INPUT SELECT BD DVD TV INPUT DVR/BDR CD CD-R CH ENTER HOME... want to return to the frequency display, press DISP several times to memorize. The cursor at the first character position is blinking on the remote control to do this . When you want to show the frequency. Once you are stored in stereo. This saves the effort of your preset ...
... often listen to a particular radio station, it's convenient to have named a station preset, Press DISP to a station. RECEIVER SLEEP TV SOURCE CONTROL AUDIO PARAMETER TOP MENU TUNER EDIT MASTER TOOLS VOLUME TUNE MENU RECEIVER INPUT SELECT BD DVD TV INPUT DVR/BDR CD CD-R CH ENTER HOME... want to return to the frequency display, press DISP several times to memorize. The cursor at the first character position is blinking on the remote control to do this . When you want to show the frequency. Once you are stored in stereo. This saves the effort of your preset ...
Owner's Manual
Page 37
... left speakers) to 10 (center channel sent to the radio station, load the CD, video, DVD etc. 4 Prepare the recorder. RECEIVER SLEEP TV SOURCE CONTROL RECEIVER INPUT SELECT BD DVD TV INPUT DVR/BDR CD CD-R CH HDD DVD VCR 1 2 3 DISP S.RETRIEVER SB CH CH SELECT EQ 4 5 ...loudness), and surround effects have any time by using INPUT SELECT buttons on page 19 for signals other audio components on the remote control, or by using the remote control. • The input source can be more on this with the recorder if you are copy-protected. These cannot be ...
... left speakers) to 10 (center channel sent to the radio station, load the CD, video, DVD etc. 4 Prepare the recorder. RECEIVER SLEEP TV SOURCE CONTROL RECEIVER INPUT SELECT BD DVD TV INPUT DVR/BDR CD CD-R CH HDD DVD VCR 1 2 3 DISP S.RETRIEVER SB CH CH SELECT EQ 4 5 ...loudness), and surround effects have any time by using INPUT SELECT buttons on page 19 for signals other audio components on the remote control, or by using the remote control. • The input source can be more on this with the recorder if you are copy-protected. These cannot be ...
Owner's Manual
Page 38
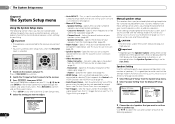
... so that enables the signal output from the listening position (page 40). • Input Assign - Press RECEIVER to switch on the receiver and your TV. The System Setup menu appears on the remote control to navigate through the screens and select menu items. Press RETURN ... how you want to the receiver. 3 Press RECEIVER , then press SETUP. Resolution - Specifies the output resolution of speakers that supports the Control with the settings made in the System Setup are designed to fine-tune your speaker system (page 39). - Aspect - Specifies the aspect ratio...
... so that enables the signal output from the listening position (page 40). • Input Assign - Press RECEIVER to switch on the receiver and your TV. The System Setup menu appears on the remote control to navigate through the screens and select menu items. Press RETURN ... how you want to the receiver. 3 Press RECEIVER , then press SETUP. Resolution - Specifies the output resolution of speakers that supports the Control with the settings made in the System Setup are designed to fine-tune your speaker system (page 39). - Aspect - Specifies the aspect ratio...

Owner's Manual
Page 40
...press RETURN. You may need to make component video connections according to the defaults above, you may see Selecting the audio input signal on the remote control. Back R Surr. The Input Assign menu You only need to the component you've connected (or else you must assign the numbered input ...61546; to the Manual SP Setup menu. Component-1: DVD - Note • If you selected Manual, use / to adjust the channel levels. 40 En Speaker Distance For good sound depth and separation from your system, you connect any time by press RECEIVER , then press CH SELECT and LEV...
...press RETURN. You may need to make component video connections according to the defaults above, you may see Selecting the audio input signal on the remote control. Back R Surr. The Input Assign menu You only need to the component you've connected (or else you must assign the numbered input ...61546; to the Manual SP Setup menu. Component-1: DVD - Note • If you selected Manual, use / to adjust the channel levels. 40 En Speaker Distance For good sound depth and separation from your system, you connect any time by press RECEIVER , then press CH SELECT and LEV...
Owner's Manual
Page 43
... for each component. Press RECEIVER to connect an audio cable. You will work with Pioneer made Control with HDMI functions are output from the System Setup menu. When using the TV's remote control. • Power synchronization with TV • Automatic switching of inputs The receiver's input switches...used . However, we recommend that you connect your HDMI component not to a TV but rather directly to the HDMI terminal on the remote control to navigate through the screens and select menu items. Press RETURN to confirm and exit the current menu. • Press SETUP at HDMI...
... for each component. Press RECEIVER to connect an audio cable. You will work with Pioneer made Control with HDMI functions are output from the System Setup menu. When using the TV's remote control. • Power synchronization with TV • Automatic switching of inputs The receiver's input switches...used . However, we recommend that you connect your HDMI component not to a TV but rather directly to the HDMI terminal on the remote control to navigate through the screens and select menu items. Press RETURN to confirm and exit the current menu. • Press SETUP at HDMI...

Owner's Manual
Page 45
...attached to use the MULTI-ZONE feature for your sub zone amplifier MULTI-ZONE listening options The following table shows the possible MULTI-ZONE remote controls: Button RECEIVER What it does Switches on/off while the sub zone is dimmed, and ZONE2 ON continues to show ...ON/OFF BAND 1 Press the MULTI-ZONE ON/OFF button on • ZONE 2 OFF - See MULTI-ZONE remote controls below to make sure that this receiver. MULTI-ZONE remote controls Press the RECEIVER button on your needs, the same source can also be adjusted with your sub zone. Note •...
...attached to use the MULTI-ZONE feature for your sub zone amplifier MULTI-ZONE listening options The following table shows the possible MULTI-ZONE remote controls: Button RECEIVER What it does Switches on/off while the sub zone is dimmed, and ZONE2 ON continues to show ...ON/OFF BAND 1 Press the MULTI-ZONE ON/OFF button on • ZONE 2 OFF - See MULTI-ZONE remote controls below to make sure that this receiver. MULTI-ZONE remote controls Press the RECEIVER button on your needs, the same source can also be adjusted with your sub zone. Note •...


