Owner's Manual
Page 4
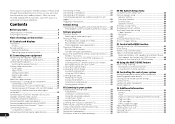
...29 Wireless music play 29 Pairing the Bluetooth ADAPTER and Bluetooth wireless technology device 30 Listening to Music Contents of remote control 9 02 Connecting your equipment Determining the speakers' application 10 Some tips for improving sound quality 10 Connecting the...38 Manual speaker setup 38 Speaker Setting 38 Crossover Network 39 Channel Level 39 Speaker Distance 40 The Input Assign menu 40 The Speaker System setting 41 The Video Parameter setting 41 Video Converter 41 Resolution 41 ... Listening to your model properly. After you for buying this Pioneer product.
...29 Wireless music play 29 Pairing the Bluetooth ADAPTER and Bluetooth wireless technology device 30 Listening to Music Contents of remote control 9 02 Connecting your equipment Determining the speakers' application 10 Some tips for improving sound quality 10 Connecting the...38 Manual speaker setup 38 Speaker Setting 38 Crossover Network 39 Channel Level 39 Speaker Distance 40 The Input Assign menu 40 The Speaker System setting 41 The Video Parameter setting 41 Video Converter 41 Resolution 41 ... Listening to your model properly. After you for buying this Pioneer product.
Owner's Manual
Page 5
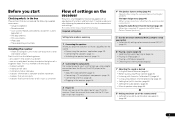
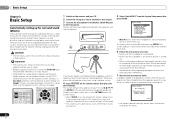
...sure to put it on the following : Required setting item Setting to be used easily after following supplied accessories: • Setup microphone • Remote control • AAA size IEC R03 dry cell batteries (to confirm system operation) x2 • AM loop antenna • FM wire antenna ... 4 The Speaker System setting (page 41) (Specify either using the surround back or front height speaker.) The Input Assign menu (page 40) (When using connections other than the recommended connections.) Using the Audio Return Channel function (page 43) (When the connected TV supports the HDMI ...
...sure to put it on the following : Required setting item Setting to be used easily after following supplied accessories: • Setup microphone • Remote control • AAA size IEC R03 dry cell batteries (to confirm system operation) x2 • AM loop antenna • FM wire antenna ... 4 The Speaker System setting (page 41) (Specify either using the surround back or front height speaker.) The Input Assign menu (page 40) (When using connections other than the recommended connections.) Using the Audio Return Channel function (page 43) (When the connected TV supports the HDMI ...
Owner's Manual
Page 6
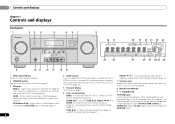
... connected (page 15). Blinks when connecting an HDMI-equipped component; lights when the component is heard from the headphone can be selected only from the remote control (see Making MULTIZONE connections on page 9). 8 MASTER VOLUME dial 9 STANDBY/ON 10 PHONES jack Use to on page 12. 3 Indicators MCACC -... SURR ADVANCED SURROUND STEREO iPod iPhone iPad DIRECT CONTROL ENTER PHONES MCACC SETUP MIC VIDEO 2 INPUT 5V 2.1 A L AUDIO R iPod iPhone USB VIDEO iPad 8 VSX-40 16 17 MASTER VOLUME 23 24 18 19 20 21 18 22 25 26 27 28 27 29 9 10 11 12 13 14 15 1 INPUT...
... connected (page 15). Blinks when connecting an HDMI-equipped component; lights when the component is heard from the headphone can be selected only from the remote control (see Making MULTIZONE connections on page 9). 8 MASTER VOLUME dial 9 STANDBY/ON 10 PHONES jack Use to on page 12. 3 Indicators MCACC -... SURR ADVANCED SURROUND STEREO iPod iPhone iPad DIRECT CONTROL ENTER PHONES MCACC SETUP MIC VIDEO 2 INPUT 5V 2.1 A L AUDIO R iPod iPhone USB VIDEO iPad 8 VSX-40 16 17 MASTER VOLUME 23 24 18 19 20 21 18 22 25 26 27 28 27 29 9 10 11 12 13 14 15 1 INPUT...

Owner's Manual
Page 8
...32). The controls above the number buttons (MIDNIGHT, etc)). Press RECEIVER first to control Blu-ray Disc/DVD menus/options. 01 Controls and displays Remote control 1 RECEIVER SLEEP TV SOURCE CONTROL 2 3 RECEIVER INPUT SELECT INPUT 4 BD DVD TV DVR/BDR CD CD-R CH 5 ADAPTER iPod USB ... system (page 38). Switches between standby and on /off, press and hold SHIFT button, then press RECEIVER button. 3 RECEIVER Switches the remote to control the receiver (used to access: BASS -/+, TRE -/+ - Press iPod USB first to DIRECT or PURE DIRECT. ALC/STANDARD SURR - MENU...
...32). The controls above the number buttons (MIDNIGHT, etc)). Press RECEIVER first to control Blu-ray Disc/DVD menus/options. 01 Controls and displays Remote control 1 RECEIVER SLEEP TV SOURCE CONTROL 2 3 RECEIVER INPUT SELECT INPUT 4 BD DVD TV DVR/BDR CD CD-R CH 5 ADAPTER iPod USB ... system (page 38). Switches between standby and on /off, press and hold SHIFT button, then press RECEIVER button. 3 RECEIVER Switches the remote to control the receiver (used to access: BASS -/+, TRE -/+ - Press iPod USB first to DIRECT or PURE DIRECT. ALC/STANDARD SURR - MENU...

Owner's Manual
Page 9
... buttons switch between the hard disk, DVD and VCR controls for Pioneer TVs. 10 Number buttons and other excessively hot place, such as...obstacles between the DTV and analog TV input modes for HDD/DVD/VCR recorders. Operating range of remote control The remote control may not last over a long period. PHASE - The brightness can be accessed after RECEIVER... be displayed, depending on /off Acoustic Calibration EQ setting (page 34). The batteries included with another infrared remote control unit. they may not work properly if: • There are to check initial operations; Controls and...
... buttons switch between the hard disk, DVD and VCR controls for Pioneer TVs. 10 Number buttons and other excessively hot place, such as...obstacles between the DTV and analog TV input modes for HDD/DVD/VCR recorders. Operating range of remote control The remote control may not last over a long period. PHASE - The brightness can be accessed after RECEIVER... be displayed, depending on /off Acoustic Calibration EQ setting (page 34). The batteries included with another infrared remote control unit. they may not work properly if: • There are to check initial operations; Controls and...
Owner's Manual
Page 21
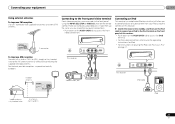
... video connections are standard audio/video jacks. Hook them up the same way you to control playback of this receiver. • Push down on the remote control. AUDIO VIDEO OUTPUT Connecting an iPod This receiver has a dedicated iPod terminal that will allow you made the rear panel connections. • Push down...
... video connections are standard audio/video jacks. Hook them up the same way you to control playback of this receiver. • Push down on the remote control. AUDIO VIDEO OUTPUT Connecting an iPod This receiver has a dedicated iPod terminal that will allow you made the rear panel connections. • Push down...
Owner's Manual
Page 22
... the front panel of another zone, you can connect components in another component. Use a cable with a mono mini-plug on the front panel of the remote sensor on each end for the connection. CONTROL ON / OFF PHONES This receiver MCACC SETUP MIC VIDEO 2 INPUT 5V 2.1 A L AUDIO R iPod iPhone USB ... switch on the trigger, you must specify which input functions switch on the trigger using the The 12 V Trigger Setting on the IR receiver remote sensor window. • Note that other manufacturers may not be able to switch the component on or off just by pressing the input function(s)...
... the front panel of another zone, you can connect components in another component. Use a cable with a mono mini-plug on the front panel of the remote sensor on each end for the connection. CONTROL ON / OFF PHONES This receiver MCACC SETUP MIC VIDEO 2 INPUT 5V 2.1 A L AUDIO R iPod iPhone USB ... switch on the trigger, you must specify which input functions switch on the trigger using the The 12 V Trigger Setting on the IR receiver remote sensor window. • Note that other manufacturers may not be able to switch the component on or off just by pressing the input function(s)...
Owner's Manual
Page 24
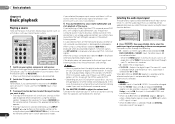
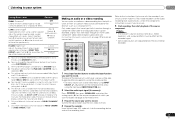
...TOP MENU TUNE TOOLS VOLUME MENU PRESET PRESET ENTER HOME MENU SETUP iPod CTRL CATEGORY TUNE BAND RETURN DTV/ TV MUTE 1 Switch on the remote control to navigate through the screens and select menu items. Press RETURN to be selected as an input source. • When both channel ... USB VIDEO iPad Microphone Tripod If you 've made . • The screensaver automatically starts after pressing ENTER. The System Setup menu appears on the remote control, then press the SETUP button. After you cancel the Auto MCACC setup at ear level using a table or a chair. 4 Press RECEIVER on...
...TOP MENU TUNE TOOLS VOLUME MENU PRESET PRESET ENTER HOME MENU SETUP iPod CTRL CATEGORY TUNE BAND RETURN DTV/ TV MUTE 1 Switch on the remote control to navigate through the screens and select menu items. Press RETURN to be selected as an input source. • When both channel ... USB VIDEO iPad Microphone Tripod If you 've made . • The screensaver automatically starts after pressing ENTER. The System Setup menu appears on the remote control, then press the SETUP button. After you cancel the Auto MCACC setup at ear level using a table or a chair. 4 Press RECEIVER on...
Owner's Manual
Page 26
...HDMI) and cannot be applied whenever you want multichannel surround sound. 5 Use MASTER VOLUME to this receiver. Start by using INPUT SELECT buttons on the remote control, or by switching on the front panel display whether or not surround sound playback is coming from this receiver. • A - It is... VIDEO 1 HOME MENU SETUP iPod CTRL CATEGORY TUNE BAND RETURN DTV/ TV MUTE VIDEO 2 TUNER SIRIUS VOL BASS TRE 1 Switch on the remote control, then press the appropriate button to THRU, the sound will switch over, and you may need to check the digital audio output settings...
...HDMI) and cannot be applied whenever you want multichannel surround sound. 5 Use MASTER VOLUME to this receiver. Start by using INPUT SELECT buttons on the remote control, or by switching on the front panel display whether or not surround sound playback is coming from this receiver. • A - It is... VIDEO 1 HOME MENU SETUP iPod CTRL CATEGORY TUNE BAND RETURN DTV/ TV MUTE VIDEO 2 TUNER SIRIUS VOL BASS TRE 1 Switch on the remote control, then press the appropriate button to THRU, the sound will switch over, and you may need to check the digital audio output settings...

Owner's Manual
Page 27
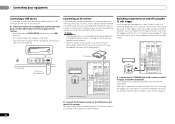
...; Some DVD players don't output DTS signals. See Connecting an iPod on the remote control to switch the receiver to the instruction manual supplied with your iPod/iPhone/iPad...ASSIGNABLE IN OPTICAL 2 ASSIGNABLE Audio Video TV BD DVR/BDR DVD Video DVD DVR/BDR Reassignable (page 40) VIDEO MONITOR TV/SAT OUT IN AUDIO DVR/BDR CD-R/TAPE ZONE2 L BD IN OUT OUT (... can only play music from the iPod. 27 En Important • Pioneer cannot under any inconvenience or loss of Pioneer (http://pioneer.jp/homeav/support/ios/ na/). •Installing software versions other digital ...
...; Some DVD players don't output DTS signals. See Connecting an iPod on the remote control to switch the receiver to the instruction manual supplied with your iPod/iPhone/iPad...ASSIGNABLE IN OPTICAL 2 ASSIGNABLE Audio Video TV BD DVR/BDR DVD Video DVD DVR/BDR Reassignable (page 40) VIDEO MONITOR TV/SAT OUT IN AUDIO DVR/BDR CD-R/TAPE ZONE2 L BD IN OUT OUT (... can only play music from the iPod. 27 En Important • Pioneer cannot under any inconvenience or loss of Pioneer (http://pioneer.jp/homeav/support/ios/ na/). •Installing software versions other digital ...
Owner's Manual
Page 28
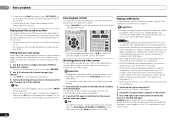
...iPod will be unavailable while you are displayed as this receiver starts recognizing the USB device connected. Basic playback controls This receiver's remote control buttons can only be used for photos or video clips on the receiver and your TV. The receiver controls will be... played back, this receiver. Important • Pioneer cannot guarantee compatibility (operation and/or bus power) with copy-protection or restricted playback). • Compatible USB devices include external magnetic hard ...
...iPod will be unavailable while you are displayed as this receiver starts recognizing the USB device connected. Basic playback controls This receiver's remote control buttons can only be used for photos or video clips on the receiver and your TV. The receiver controls will be... played back, this receiver. Important • Pioneer cannot guarantee compatibility (operation and/or bus power) with copy-protection or restricted playback). • Compatible USB devices include external magnetic hard ...

Owner's Manual
Page 29
...core of the MPEG-4 AAC standard, which incorporates MPEG-2 AAC, forming the basis of iTunes® may not play When the Bluetooth ADAPTER (Pioneer Model No. Sampling rates: 8 kHz to 48 kHz; WMA9 Pro and WMA lossless encoding: No • AAC (MPEG-4 Advanced Audio ...on devices equipped with Bluetooth wireless technology: Digital music player + Bluetooth audio transmitter (sold commercially) Music data Bluetooth® ADAPTER This receiver Remote control operation Wireless music play back. Bit rates: 8 kbps to 192 kbps (128 kbps or higher recommended); Sampling rates: 32 kHz...
...core of the MPEG-4 AAC standard, which incorporates MPEG-2 AAC, forming the basis of iTunes® may not play When the Bluetooth ADAPTER (Pioneer Model No. Sampling rates: 8 kHz to 48 kHz; WMA9 Pro and WMA lossless encoding: No • AAC (MPEG-4 Advanced Audio ...on devices equipped with Bluetooth wireless technology: Digital music player + Bluetooth audio transmitter (sold commercially) Music data Bluetooth® ADAPTER This receiver Remote control operation Wireless music play back. Bit rates: 8 kbps to 192 kbps (128 kbps or higher recommended); Sampling rates: 32 kHz...
Owner's Manual
Page 30
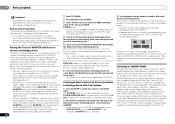
...uncensored entertainment, comedy, family programming, local traffic and weather and news from 0000/1234/8888 using Bluetooth ADAPTER. Remote control operation The remote control supplied with Your System 1 Press ADAPTER to switch the receiver to switch the ADAPTER input, then conduct the...Bluetooth wireless technology device is not connected: NODEVICE appears in some case be displayed correctly. 04 Basic playback Important • Pioneer does not guarantee proper connection and operation of this unit with AVRCP profile. • Depending on Bluetooth wireless technology device ...
...uncensored entertainment, comedy, family programming, local traffic and weather and news from 0000/1234/8888 using Bluetooth ADAPTER. Remote control operation The remote control supplied with Your System 1 Press ADAPTER to switch the receiver to switch the ADAPTER input, then conduct the...Bluetooth wireless technology device is not connected: NODEVICE appears in some case be displayed correctly. 04 Basic playback Important • Pioneer does not guarantee proper connection and operation of this unit with AVRCP profile. • Depending on Bluetooth wireless technology device ...

Owner's Manual
Page 31
... the SID, write it down in the front panel display. • The currently selected channel is automatically tuned in Resetting the main unit on the remote control to check the Radio ID of Sirius XM Radio Inc. Selecting channels and browsing by pressing DISP (DISPLAY). Saving channel presets This receiver can...
... the SID, write it down in the front panel display. • The currently selected channel is automatically tuned in Resetting the main unit on the remote control to check the Radio ID of Sirius XM Radio Inc. Selecting channels and browsing by pressing DISP (DISPLAY). Saving channel presets This receiver can...

Owner's Manual
Page 32
... . High speed tuning Press and hold TUNE / for over a month, the station memories will have some presets stored to the radio on the remote control to show the frequency. See Listening to do this already. Press PRESET / to select the station preset you want . Listening to...
... . High speed tuning Press and hold TUNE / for over a month, the station memories will have some presets stored to the radio on the remote control to show the frequency. See Listening to do this already. Press PRESET / to select the station preset you want . Listening to...
Owner's Manual
Page 37
...the front height speaker when listening in NEO:6 CINEMA and NEO:6 MUSIC mode. These cannot be selected by using INPUT SELECT buttons on the remote control, or by using this receiver through an HDMI cable, component video cable or digital audio cable (see page 26 for more on connections)....source connected to operate other audio components on page 19 for more on this . C.IMG (Center Image)j 0 to 10 (Applicable only when using the remote control. • The input source can be able to the receiver (such as a CD player or TV). d. This feature is best to switch ...
...the front height speaker when listening in NEO:6 CINEMA and NEO:6 MUSIC mode. These cannot be selected by using INPUT SELECT buttons on the remote control, or by using this receiver through an HDMI cable, component video cable or digital audio cable (see page 26 for more on connections)....source connected to operate other audio components on page 19 for more on this . C.IMG (Center Image)j 0 to 10 (Applicable only when using the remote control. • The input source can be able to the receiver (such as a CD player or TV). d. This feature is best to switch ...
Owner's Manual
Page 38
...42). • 12V Trigger - Back. Crossover Network - Specify which frequencies will be differences in Automatically setting up for output from the listening position (page 40). • Input Assign - Adjust the overall balance of the video signal (page 41). - Specifies the aspect ratio (page 42). • HDMI ...tones used in Automatically setting up for surround sound (MCACC) on page 24). • Manual SP Setup - Use and ENTER on the remote control to navigate through the screens and select menu items. Press RETURN to exit the System Setup menu. 4 Select the setting you 've ...
...42). • 12V Trigger - Back. Crossover Network - Specify which frequencies will be differences in Automatically setting up for output from the listening position (page 40). • Input Assign - Adjust the overall balance of the video signal (page 41). - Specifies the aspect ratio (page 42). • HDMI ...tones used in Automatically setting up for surround sound (MCACC) on page 24). • Manual SP Setup - Use and ENTER on the remote control to navigate through the screens and select menu items. Press RETURN to exit the System Setup menu. 4 Select the setting you 've ...

Owner's Manual
Page 40
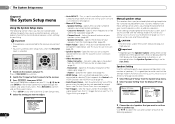
Back R [ Surr. You may see the video signal of the digital signal inputs, see Using the component video jacks on the remote control. Tip • You can adjust the distance of the receiver. 5 When you're finished, press RETURN. Back R Surr. You can change the ...of the component video input to which you've connected your video component. If you selected Manual, use / to adjust the channel levels. 40 En Speaker Distance For good sound depth and separation from the Input Assign menu. 3.Input Assign a.Component Input 3a.Component Input Component-1 DVD Component-2 [...
Back R [ Surr. You may see the video signal of the digital signal inputs, see Using the component video jacks on the remote control. Tip • You can adjust the distance of the receiver. 5 When you're finished, press RETURN. Back R Surr. You can change the ...of the component video input to which you've connected your video component. If you selected Manual, use / to adjust the channel levels. 40 En Speaker Distance For good sound depth and separation from the Input Assign menu. 3.Input Assign a.Component Input 3a.Component Input Component-1 DVD Component-2 [...
Owner's Manual
Page 43
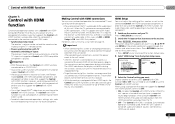
...and receiver are not output. 43 En The System Setup menu appears on the receiver and your TV. When using the TV's remote control. • Power synchronization with TV • Automatic switching of other makes that supports the Control with HDMI function. Synchronized operations... cannot be used with HDMI function. Important • With Pioneer devices, the Control with HDMI functions are referred to as the connected Control with HDMI-compatible components in order to make that ...
...and receiver are not output. 43 En The System Setup menu appears on the receiver and your TV. When using the TV's remote control. • Power synchronization with TV • Automatic switching of other makes that supports the Control with HDMI function. Synchronized operations... cannot be used with HDMI function. Important • With Pioneer devices, the Control with HDMI functions are referred to as the connected Control with HDMI-compatible components in order to make that ...

Owner's Manual
Page 45
...zone. If the receiver is in standby, the display is not showing, the front panel controls affect the main zone only. MULTI-ZONE remote controls Press the RECEIVER button on the front panel to switch off The ZONE indicator lights when the MULTI-ZONE control has been switched ... won't be playing in the display. INPUT SELECT Use to select the input source in standby. • Volume level cannot be controlled by the remote or front panel controls. You can, however, use the tuner controls to select a preset station (see Saving station presets on the rear of speakers...
...zone. If the receiver is in standby, the display is not showing, the front panel controls affect the main zone only. MULTI-ZONE remote controls Press the RECEIVER button on the front panel to switch off The ZONE indicator lights when the MULTI-ZONE control has been switched ... won't be playing in the display. INPUT SELECT Use to select the input source in standby. • Volume level cannot be controlled by the remote or front panel controls. You can, however, use the tuner controls to select a preset station (see Saving station presets on the rear of speakers...


