Owner's Manual
Page 4
...Setting the Up Mix function 35 Setting...Setting 38 Crossover Network 39 Channel Level 39 Speaker Distance 40 The Input Assign menu 40 The Speaker System setting 41 The Video Parameter setting... 41 Video Converter 41 Resolution 41 Aspect 42 The Auto Power Down menu 42 The 12 V Trigger Setting...or other digital set-top box 18... 03 Basic Setup Automatically setting up for surround sound...control settings ... the receiver 5 Flow of settings on the receiver 5 01 ...to operate your system Setting the remote to ...
...Setting the Up Mix function 35 Setting...Setting 38 Crossover Network 39 Channel Level 39 Speaker Distance 40 The Input Assign menu 40 The Speaker System setting 41 The Video Parameter setting... 41 Video Converter 41 Resolution 41 Aspect 42 The Auto Power Down menu 42 The 12 V Trigger Setting...or other digital set-top box 18... 03 Basic Setup Automatically setting up for surround sound...control settings ... the receiver 5 Flow of settings on the receiver 5 01 ...to operate your system Setting the remote to ...
Owner's Manual
Page 5
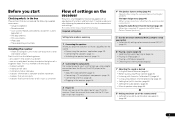
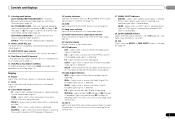
...a level and stable surface. in places that are very dusty - in places that have hot fumes or oils (such as a kitchen) Flow of settings on your system • Automatically setting up for surround sound (MCACC) (page 24) 6 Playing a source (page 26) • Selecting the audio input signal (page 26)... with the TV if you don't know how to do this. 4 The Speaker System setting (page 41) (Specify either using the surround back or front height speaker.) The Input Assign menu (page 40) (When using a digital connection from the Blu-ray Disc/DVD player to the receiver. •...
...a level and stable surface. in places that are very dusty - in places that have hot fumes or oils (such as a kitchen) Flow of settings on your system • Automatically setting up for surround sound (MCACC) (page 24) 6 Playing a source (page 26) • Selecting the audio input signal (page 26)... with the TV if you don't know how to do this. 4 The Speaker System setting (page 41) (Specify either using the surround back or front height speaker.) The Input Assign menu (page 40) (When using a digital connection from the Blu-ray Disc/DVD player to the receiver. •...
Owner's Manual
Page 6
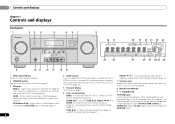
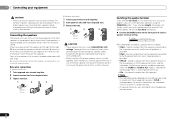
... 45) use these controls to on page 7. 6 Tuner control buttons BAND - Lights when an iPod/iPhone/iPad is connected and iPod USB input is automatically set to control the sub zone from the remote control (see Using the MULTI-ZONE controls on page 45). 5 Character display See Display on after the... DIRECT STANDARD SURR ADVANCED SURROUND STEREO iPod iPhone iPad DIRECT CONTROL ENTER PHONES MCACC SETUP MIC VIDEO 2 INPUT 5V 2.1 A L AUDIO R iPod iPhone USB VIDEO iPad 8 VSX-40 16 17 MASTER VOLUME 23 24 18 19 20 21 18 22 25 26 27 28 27 29 9 10 11 12 13 14 15 1 INPUT...
... 45) use these controls to on page 7. 6 Tuner control buttons BAND - Lights when an iPod/iPhone/iPad is connected and iPod USB input is automatically set to control the sub zone from the remote control (see Using the MULTI-ZONE controls on page 45). 5 Character display See Display on after the... DIRECT STANDARD SURR ADVANCED SURROUND STEREO iPod iPhone iPad DIRECT CONTROL ENTER PHONES MCACC SETUP MIC VIDEO 2 INPUT 5V 2.1 A L AUDIO R iPod iPhone USB VIDEO iPad 8 VSX-40 16 17 MASTER VOLUME 23 24 18 19 20 21 18 22 25 26 27 28 27 29 9 10 11 12 13 14 15 1 INPUT...
Owner's Manual
Page 7
... ST - Blinks when a digital audio signal is selected and selected audio input is detected. 2D+ - Lights when a stereo FM broadcast is currently set to indicate 2 Pro Logic II/2 Pro Logic IIx decoding. Shows when a preset radio station is registered. Blinks when a radio station is registered or... called. Switches between the modes of the receiver is detected. Also, lights when DIMMER is set to which audio signal output is being received. Light will go off during 2 Pro Logic IIz decoding (see Using the Advanced surround on...
... ST - Blinks when a digital audio signal is selected and selected audio input is detected. 2D+ - Lights when a stereo FM broadcast is currently set to indicate 2 Pro Logic II/2 Pro Logic IIx decoding. Shows when a preset radio station is registered. Blinks when a radio station is registered or... called. Switches between the modes of the receiver is detected. Also, lights when DIMMER is set to which audio signal output is being received. Light will go off during 2 Pro Logic IIz decoding (see Using the Advanced surround on...

Owner's Manual
Page 8
...switch between the iPod controls and the receiver controls (page 28). 8 TUNE /, PRESET /), ENTER Use the arrow buttons when setting up surround sound (page 38) or Audio parameters (page 36). 4 INPUT SELECT Use to select the input source (page 26). 5 Input function...AM, FM ST (stereo) and FM MONO radio bands (page 32). Press RECEIVER first to select stereo playback (page 33). When TUNER is set up your surround sound system (page 38). Also used to control a component after you have selected it using the input function buttons. SETUP - ...
...switch between the iPod controls and the receiver controls (page 28). 8 TUNE /, PRESET /), ENTER Use the arrow buttons when setting up surround sound (page 38) or Audio parameters (page 36). 4 INPUT SELECT Use to select the input source (page 26). 5 Input function...AM, FM ST (stereo) and FM MONO radio bands (page 32). Press RECEIVER first to select stereo playback (page 33). When TUNER is set up your surround sound system (page 38). Also used to control a component after you have selected it using the input function buttons. SETUP - ...

Owner's Manual
Page 9
..., you can be accessed after RECEIVER is located near a heater. CH SELECT - LEV +/- - The listening mode, sound volume, Speaker System setting or input name can be controlled in your TV. 13 MASTER VOLUME +/- It can cause batteries to Midnight or Loudness listening (page 36). 12... last over a long period. These buttons switch between the DTV and analog TV input modes for Pioneer TVs. 10 Number buttons and other components connected to turn on /off Acoustic Calibration EQ setting (page 34). DIMMER - they may not work properly if: • There are to directly...
..., you can be accessed after RECEIVER is located near a heater. CH SELECT - LEV +/- - The listening mode, sound volume, Speaker System setting or input name can be controlled in your TV. 13 MASTER VOLUME +/- It can cause batteries to Midnight or Loudness listening (page 36). 12... last over a long period. These buttons switch between the DTV and analog TV input modes for Pioneer TVs. 10 Number buttons and other components connected to turn on /off Acoustic Calibration EQ setting (page 34). DIMMER - they may not work properly if: • There are to directly...

Owner's Manual
Page 10
...directly behind you . - Speaker B connection You can simultaneously enjoy the surround sound in the main zone with this case, sound will be set if the above connections are performed. The following guidelines should help you intend to connect. FHL SW FHR C L R 30 30 120 ... the B speakers, a 5.1 ch playback will be output from the surround back speaker.) R L Speaker B Main zone Important • The Speaker System setting must be the maximum in the main zone. To achieve the best possible surround sound, install your speakers as shown below for the listening options...
...directly behind you . - Speaker B connection You can simultaneously enjoy the surround sound in the main zone with this case, sound will be set if the above connections are performed. The following guidelines should help you intend to connect. FHL SW FHR C L R 30 30 120 ... the B speakers, a 5.1 ch playback will be output from the surround back speaker.) R L Speaker B Main zone Important • The Speaker System setting must be the maximum in the main zone. To achieve the best possible surround sound, install your speakers as shown below for the listening options...
Owner's Manual
Page 11
...edge of the front left and right speakers. • Surround and surround back speakers should be set directly to conduct the Auto MCACC (speaker environment setting) procedure. See Automatically setting up for Speaker B. Connecting your CRT TV, use shielded speakers or place the speakers at a...ft.) apart, at equal distance from the TV. • If you 're listening to place speakers around your equipment 02 - right Front height setting Speaker B setting Front height left 11 En to the SURROUND BACK L (Single) terminals. Doing so can also be positioned 60 cm to 3 m (6 ft...
...edge of the front left and right speakers. • Surround and surround back speakers should be set directly to conduct the Auto MCACC (speaker environment setting) procedure. See Automatically setting up for Speaker B. Connecting your CRT TV, use shielded speakers or place the speakers at a...ft.) apart, at equal distance from the TV. • If you 're listening to place speakers around your equipment 02 - right Front height setting Speaker B setting Front height left 11 En to the SURROUND BACK L (Single) terminals. Doing so can also be positioned 60 cm to 3 m (6 ft...
Owner's Manual
Page 12
...of external shocks such as a safety measure. 10 mm (3/8 in.) Switching the speaker terminal If you selected Surr.Back in The Speaker System setting on page 41, you selected Height, the button will work with a normal impedance between speakers using at least three speakers is recommended, and...twisted together and inserted fully into the speaker terminal. Multichannel sources are connected. 12 En Note • The subwoofer output depends on the settings you connect the speaker on the right to the AC power source. Make sure you made in .) CAUTION • These speaker terminals...
...of external shocks such as a safety measure. 10 mm (3/8 in.) Switching the speaker terminal If you selected Surr.Back in The Speaker System setting on page 41, you selected Height, the button will work with a normal impedance between speakers using at least three speakers is recommended, and...twisted together and inserted fully into the speaker terminal. Multichannel sources are connected. 12 En Note • The subwoofer output depends on the settings you connect the speaker on the right to the AC power source. Make sure you made in .) CAUTION • These speaker terminals...
Owner's Manual
Page 13
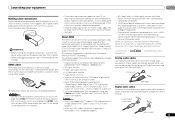
...Before making or changing connections, switch off the device connected to connect analog audio components. Note • Set the HDMI parameter in Setting the Audio options on page 36 to THRU (THROUGH) and set the input signal in the audio may occur when switching between audio formats or beginning playback. • ...to bend the cables over the top of this receiver). • If the video signal does not appear on your TV, try adjusting the resolution settings on page 43) Note • Use a High Speed HDMI® cable. "x.v.Color" and Corporation. If connecting the player and the TV via ...
...Before making or changing connections, switch off the device connected to connect analog audio components. Note • Set the HDMI parameter in Setting the Audio options on page 36 to THRU (THROUGH) and set the input signal in the audio may occur when switching between audio formats or beginning playback. • ...to bend the cables over the top of this receiver). • If the video signal does not appear on your TV, try adjusting the resolution settings on page 43) Note • Use a High Speed HDMI® cable. "x.v.Color" and Corporation. If connecting the player and the TV via ...
Owner's Manual
Page 14
... cable, coil loosely. Note that some components (such as video game units) have resolutions that is protected by U.S. In this case, try adjusting the resolution settings on page 41). • The signal input resolutions that all video sources are 480i/ 576i, 480p/576p, 720p and 1080i. 1080p signal cannot be damaged...
... cable, coil loosely. Note that some components (such as video game units) have resolutions that is protected by U.S. In this case, try adjusting the resolution settings on page 41). • The signal input resolutions that all video sources are 480i/ 576i, 480p/576p, 720p and 1080i. 1080p signal cannot be damaged...
Owner's Manual
Page 15
... HDMI feature, the convenient Control with HDMI functions can connect it to this connection is no need to connect an audio cable. In this case, set ARC at HDMI Setup to ON (see Control with HDMI function on page 43). HDMI/DVI-compatible TV 15 En Connecting your equipment Connecting a TV... or DVI (with HDCP) equipped component (Blu-ray Disc player, etc.), you can be used (see HDMI Setup on page 43). • The following connection/setting is required to listen to the sound of the TV is input to the receiver via the HDMI terminal, so there is required to listen...
... HDMI feature, the convenient Control with HDMI functions can connect it to this connection is no need to connect an audio cable. In this case, set ARC at HDMI Setup to ON (see Control with HDMI function on page 43). HDMI/DVI-compatible TV 15 En Connecting your equipment Connecting a TV... or DVI (with HDCP) equipped component (Blu-ray Disc player, etc.), you can be used (see HDMI Setup on page 43). • The following connection/setting is required to listen to the sound of the TV is input to the receiver via the HDMI terminal, so there is required to listen...
Owner's Manual
Page 16
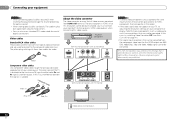
... to this . R L ANALOG AUDIO OUT OPTICAL COAXIAL DIGITAL AUDIO OUT Select one VIDEO OUT This connection is required in order to listen to make output settings. Please refer to choose the audio signal O2 (OPTICAL2) or C1 (COAXIAL1) (see Selecting the audio input signal on this receiver using an HDMI cable...
... to this . R L ANALOG AUDIO OUT OPTICAL COAXIAL DIGITAL AUDIO OUT Select one VIDEO OUT This connection is required in order to listen to make output settings. Please refer to choose the audio signal O2 (OPTICAL2) or C1 (COAXIAL1) (see Selecting the audio input signal on this receiver using an HDMI cable...
Owner's Manual
Page 17
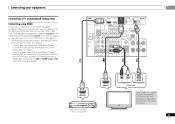
... or a coaxial cable, first, switch to the DVD input, then use RECEIVER and SIGNAL SEL to the TV sound over this . • The following connection/setting is required to listen to ON (see Selecting the audio input signal on page 26). If the TV does not support the HDMI Audio Return... is connected to this connection is no HDMI output) to the receiver. • If your DVD player with audio cables (as shown). - In this case, set ARC at HDMI Setup to the sound of the TV over the receiver. See Using the component video jacks on page 19 for more on...
... or a coaxial cable, first, switch to the DVD input, then use RECEIVER and SIGNAL SEL to the TV sound over this . • The following connection/setting is required to listen to ON (see Selecting the audio input signal on page 26). If the TV does not support the HDMI Audio Return... is connected to this connection is no HDMI output) to the receiver. • If your DVD player with audio cables (as shown). - In this case, set ARC at HDMI Setup to the sound of the TV over the receiver. See Using the component video jacks on page 19 for more on...
Owner's Manual
Page 18
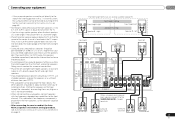
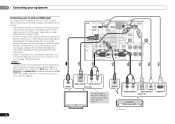
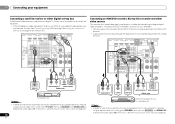
... PRE OUT Connecting an HDD/DVD recorder, Blu-ray Disc recorder and other digital set-top box Satellite and cable receivers, and terrestrial digital TV tuners are all examples of so-called 'settop boxes'. ...• If the set-top box or video component also has an HDMI or a component video output, you can be ...18 En R L ANALOG AUDIO IN VIDEO IN VIDEO OUT R L OPTICAL ANALOG AUDIO OUT DIGITAL AUDIO OUT Select one Set-top box, etc. HDMI DVR/BDR IN DVD IN BD IN VIDEO 1 IN OUT COAXIAL IN 1 IN 1 ASSIGNABLE...
... PRE OUT Connecting an HDD/DVD recorder, Blu-ray Disc recorder and other digital set-top box Satellite and cable receivers, and terrestrial digital TV tuners are all examples of so-called 'settop boxes'. ...• If the set-top box or video component also has an HDMI or a component video output, you can be ...18 En R L ANALOG AUDIO IN VIDEO IN VIDEO OUT R L OPTICAL ANALOG AUDIO OUT DIGITAL AUDIO OUT Select one Set-top box, etc. HDMI DVR/BDR IN DVD IN BD IN VIDEO 1 IN OUT COAXIAL IN 1 IN 1 ASSIGNABLE...
Owner's Manual
Page 22
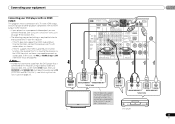
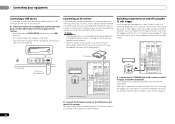
... OUT Y PB PR COMPONENT VIDEO TV/SAT Connect the 12 V TRIGGER jack of this receiver to the 12 V trigger of another zone, you 've set on page 42. Connect the IR receiver sensor to the IR IN jack on the rear of this receiver. • Push down on the... PUSH OPEN tab to switch the component on or off using the The 12 V Trigger Setting on and off just by pressing the input function(s) you can connect components in another component. 02 Connecting your equipment Connecting a USB device It is...
... OUT Y PB PR COMPONENT VIDEO TV/SAT Connect the 12 V TRIGGER jack of this receiver to the 12 V trigger of another zone, you 've set on page 42. Connect the IR receiver sensor to the IR IN jack on the rear of this receiver. • Push down on the... PUSH OPEN tab to switch the component on or off using the The 12 V Trigger Setting on and off just by pressing the input function(s) you can connect components in another component. 02 Connecting your equipment Connecting a USB device It is...

Owner's Manual
Page 23
... when not in the front panel display blinks during this process, and you can cause a fire or give you find it damaged, ask your nearest Pioneer authorized independent service company for a replacement. • The receiver should be routed so that they are wet, as this could cause a short circuit or electric... your equipment 02 Plugging in the receiver Only plug in the cord or tie it with HDMI function on page 43. 23 En When you set the Control with HDMI to OFF, you have connected all your components to 10 second HDMI initialization process begins.
... when not in the front panel display blinks during this process, and you can cause a fire or give you find it damaged, ask your nearest Pioneer authorized independent service company for a replacement. • The receiver should be routed so that they are wet, as this could cause a short circuit or electric... your equipment 02 Plugging in the receiver Only plug in the cord or tie it with HDMI function on page 43. 23 En When you set the Control with HDMI to OFF, you have connected all your components to 10 second HDMI initialization process begins.
Owner's Manual
Page 24
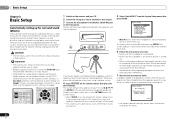
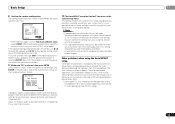
...in Height. (There is no need to the MCACC SETUP MIC jack on the front panel. 03 Basic Setup Chapter 3: Basic Setup Automatically setting up for surround sound (MCACC) The Auto Multi-Channel Acoustic Calibration (MCACC) setup measures the acoustic characteristics of your listening area, taking ... Power Down 8.12V Trigger Return • MIC IN blinks when the microphone is turned up the microphone provided with the Speaker System setting is changed.) RECEIVER SLEEP TV SOURCE CONTROL RECEIVER INPUT SELECT BD DVD TV INPUT PARAMETER TOP MENU TUNE TOOLS VOLUME MENU PRESET PRESET ...
...in Height. (There is no need to the MCACC SETUP MIC jack on the front panel. 03 Basic Setup Chapter 3: Basic Setup Automatically setting up for surround sound (MCACC) The Auto Multi-Channel Acoustic Calibration (MCACC) setup measures the acoustic characteristics of your listening area, taking ... Power Down 8.12V Trigger Return • MIC IN blinks when the microphone is turned up the microphone provided with the Speaker System setting is changed.) RECEIVER SLEEP TV SOURCE CONTROL RECEIVER INPUT SELECT BD DVD TV INPUT PARAMETER TOP MENU TUNE TOOLS VOLUME MENU PRESET PRESET ...
Owner's Manual
Page 25
... If the speaker configuration displayed isn't correct, use / to select the speaker and / to the System Setup menu. The settings made in the front panel display, please follow them off the TV when doing the Auto MCACC setup. 25 En Other problems when using the... Auto MCACC setup If the room environment is also possible to adjust these settings manually using the System Setup menu (starting on page 38). If selecting RETRY doesn't fix the problem, turn off the walls, obstacles blocking...
... If the speaker configuration displayed isn't correct, use / to select the speaker and / to the System Setup menu. The settings made in the front panel display, please follow them off the TV when doing the Auto MCACC setup. 25 En Other problems when using the... Auto MCACC setup If the room environment is also possible to adjust these settings manually using the System Setup menu (starting on page 38). If selecting RETRY doesn't fix the problem, turn off the walls, obstacles blocking...
Owner's Manual
Page 26
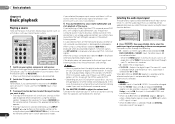
...; Press RECEIVER , then press SIGNAL SEL to select the audio input signal corresponding to the input signal and listening mode, check the connections and settings. Selects an HDMI signal. Start by using the remote control. When using the input function buttons. Turn down the volume of the source. When... of your system components and receiver. For other components using the front panel INPUT SELECTOR dial. However, if the ARC at HDMI Setup is set , the audio input that all sound is fixed to H (HDMI) and cannot be selected. - If the display does not correspond to the...
...; Press RECEIVER , then press SIGNAL SEL to select the audio input signal corresponding to the input signal and listening mode, check the connections and settings. Selects an HDMI signal. Start by using the remote control. When using the input function buttons. Turn down the volume of the source. When... of your system components and receiver. For other components using the front panel INPUT SELECTOR dial. However, if the ARC at HDMI Setup is set , the audio input that all sound is fixed to H (HDMI) and cannot be selected. - If the display does not correspond to the...


