Owner's Manual
Page 4
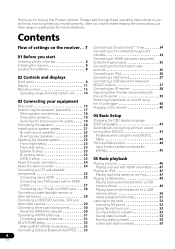
... the video converter 24 Connecting your TV and playback components 25 Connecting using HDMI 25 Connecting your DVD player with this Pioneer product. Contents Flow of remote control unit . . . . 14 03 Connecting your equipment Rear panel 15 Determining the speakers' application 17 Other speaker connections 18 Placing the speakers 19 Some tips for Advanced MCACC output 37 Connecting an IR receiver 38 Operating other audio components 30 About the WMA9 Pro decoder 30 Connecting AM/FM antennas 31 Connecting external antennas 31 MULTI-ZONE setup...
... the video converter 24 Connecting your TV and playback components 25 Connecting using HDMI 25 Connecting your DVD player with this Pioneer product. Contents Flow of remote control unit . . . . 14 03 Connecting your equipment Rear panel 15 Determining the speakers' application 17 Other speaker connections 18 Placing the speakers 19 Some tips for Advanced MCACC output 37 Connecting an IR receiver 38 Operating other audio components 30 About the WMA9 Pro decoder 30 Connecting AM/FM antennas 31 Connecting external antennas 31 MULTI-ZONE setup...
Owner's Manual
Page 5
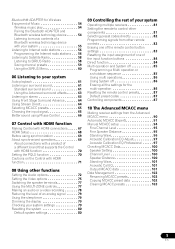
... the remote control button settings 83 Resetting the input assignment of one of the input function buttons 84 Direct function 84 Multi operation and System off 85 Programming a Multi operation or a shutdown sequence 85 Using multi operations 86 Using System off 86 Erasing all the settings for the multi-operation 86 Resetting the remote control presets 87 Default preset codes 87 Controlling components 87 10 The Advanced MCACC menu Making receiver settings from the Advanced MCACC menu 90 Automatic MCACC (Expert 91 Manual MCACC setup 94 Fine Channel Level 95 Fine Speaker...
... the remote control button settings 83 Resetting the input assignment of one of the input function buttons 84 Direct function 84 Multi operation and System off 85 Programming a Multi operation or a shutdown sequence 85 Using multi operations 86 Using System off 86 Erasing all the settings for the multi-operation 86 Resetting the remote control presets 87 Default preset codes 87 Controlling components 87 10 The Advanced MCACC menu Making receiver settings from the Advanced MCACC menu 90 Automatic MCACC (Expert 91 Manual MCACC setup 94 Fine Channel Level 95 Fine Speaker...
Owner's Manual
Page 7
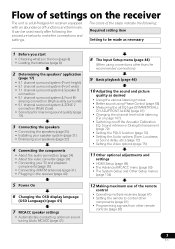
...) • 9.1 channel surround system (Front wide) • 7.1 channel surround system & Speaker B connection • 5.1 channel surround system & Front Bi- Flow of settings on /off the Acoustic Calibration EQ, Sound retriever or Dialog Enhancement (page 72) • Setting the PQLS function (page 70) • Setting the Audio options (Tone, Loudness or Sound delay, etc.) (page 72) • Setting the Video options (page 75) 11 Other optional adjustments and settings • HDMI Setup (page 68...
...) • 9.1 channel surround system (Front wide) • 7.1 channel surround system & Speaker B connection • 5.1 channel surround system & Front Bi- Flow of settings on /off the Acoustic Calibration EQ, Sound retriever or Dialog Enhancement (page 72) • Setting the PQLS function (page 70) • Setting the Audio options (Tone, Loudness or Sound delay, etc.) (page 72) • Setting the Video options (page 75) 11 Other optional adjustments and settings • HDMI Setup (page 68...
Owner's Manual
Page 9
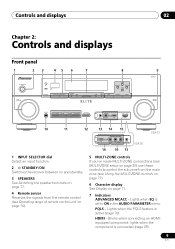
...Front panel 1 23 45 6 7 8 STANDBY/ON INPUT SELECTOR PHASE CONTROL SPEAKERS CONTROL MULTI-ZONE ON/OFF ADVANCED MCACC PQLS HDMI iPod iPhone BAND TUNE PRESET PRESET TUNE TUNER EDIT ENTER 9 VSX-31 MASTER VOLUME PHONES AUTO/ALC/DIRECT LISTENING MODE STEREO STANDARD ADV SURROUND iPod iPhone DIRECT CONTROL MCACC SETUP MIC iPod iPhone USB VIDEO CAMERA HDMI 5 10 11 12 13 14 15 VIDEO 2 INPUT USB iPod iPhone VIDEO L AUDIO R MCACC SETUP MIC 14 16 13 VSX-30 VSX-31 1 INPUT SELECTOR dial Select an input function. 2 STANDBY/ON Switches the receiver between...
...Front panel 1 23 45 6 7 8 STANDBY/ON INPUT SELECTOR PHASE CONTROL SPEAKERS CONTROL MULTI-ZONE ON/OFF ADVANCED MCACC PQLS HDMI iPod iPhone BAND TUNE PRESET PRESET TUNE TUNER EDIT ENTER 9 VSX-31 MASTER VOLUME PHONES AUTO/ALC/DIRECT LISTENING MODE STEREO STANDARD ADV SURROUND iPod iPhone DIRECT CONTROL MCACC SETUP MIC iPod iPhone USB VIDEO CAMERA HDMI 5 10 11 12 13 14 15 VIDEO 2 INPUT USB iPod iPhone VIDEO L AUDIO R MCACC SETUP MIC 14 16 13 VSX-30 VSX-31 1 INPUT SELECTOR dial Select an input function. 2 STANDBY/ON Switches the receiver between...

Owner's Manual
Page 13
.... 6 Receiver controls Press RECEIVER first to access: AUDIO PARAMETER - RETURN - Press to access the Audio options (page 72). Use to confirm and exit the current menu screen. 13 En RECEIVER MULTI SOURCE OPERATION 1 R.SETUP 2 BD DVD DVR/BDR HDMI 10 TV CD NET RADIO ADAPTER 3 iPod USB TUNER SIRIUS TV CTRL 11 INPUT SELECT ZONE 2 RECEIVER 4 12 MASTER INPUT VOLUME TV CONTROL 5 13 CH VOL MUTE 14 AUDIO PARAMETER VIDEO PARAMETER 6 LIST TUNE TOOLS TOP MENU 7 BAND T.EDIT GUIDE PRESET ENTER PRESET CATEGORY HOME MENU TUNE iPod...
.... 6 Receiver controls Press RECEIVER first to access: AUDIO PARAMETER - RETURN - Press to access the Audio options (page 72). Use to confirm and exit the current menu screen. 13 En RECEIVER MULTI SOURCE OPERATION 1 R.SETUP 2 BD DVD DVR/BDR HDMI 10 TV CD NET RADIO ADAPTER 3 iPod USB TUNER SIRIUS TV CTRL 11 INPUT SELECT ZONE 2 RECEIVER 4 12 MASTER INPUT VOLUME TV CONTROL 5 13 CH VOL MUTE 14 AUDIO PARAMETER VIDEO PARAMETER 6 LIST TUNE TOOLS TOP MENU 7 BAND T.EDIT GUIDE PRESET ENTER PRESET CATEGORY HOME MENU TUNE iPod...

Owner's Manual
Page 34
... Internet radio stations.1 IN 4 OUT LAN COAXIAL ASSIGNABLE (10/100) IN 1 IN 2 I (DVD) (CD) PRE OUT D TV/SAT VIDEO IN IN CD IN R CD-R/TAPE OUT IN FRONT SUBWOOFER CENTE L Internet Modem CONTROL T IN OUT SIRIUS H SIRIUS H SiriusConnect™ HOME tuner AC adapter You will need to connect the antenna and AC adapter to the SiriusConnect™ tuner. • For instructions on playing the SIRIUS Radio, see Network Setup menu...
... Internet radio stations.1 IN 4 OUT LAN COAXIAL ASSIGNABLE (10/100) IN 1 IN 2 I (DVD) (CD) PRE OUT D TV/SAT VIDEO IN IN CD IN R CD-R/TAPE OUT IN FRONT SUBWOOFER CENTE L Internet Modem CONTROL T IN OUT SIRIUS H SIRIUS H SiriusConnect™ HOME tuner AC adapter You will need to connect the antenna and AC adapter to the SiriusConnect™ tuner. • For instructions on playing the SIRIUS Radio, see Network Setup menu...

Owner's Manual
Page 44
.... The default names correspond with the names next to the terminals on the rear panel (such as DVD) which terminal so the buttons on the remote control correspond to the components you want to switch on. 2 Press RECEIVER on your room, sometimes identical speakers with cone sizes of around 12 cm (5 inches) will need to change the DVD input function's Digital In setting from the System Setup menu. 4.System Setup A/V RECEIVER...
.... The default names correspond with the names next to the terminals on the rear panel (such as DVD) which terminal so the buttons on the remote control correspond to the components you want to switch on. 2 Press RECEIVER on your room, sometimes identical speakers with cone sizes of around 12 cm (5 inches) will need to change the DVD input function's Digital In setting from the System Setup menu. 4.System Setup A/V RECEIVER...
Owner's Manual
Page 46
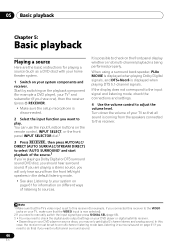
... that the VIDEO input is displayed when playing DTS 5.1-channel signals. Turn down the volume of the source.3 If you're playing a Dolby Digital or DTS surround sound DVD disc, you should hear surround sound. You can use the input function buttons on the remote control, INPUT SELECT, or the front panel INPUT SELECTOR dial.2 3 Press RECEIVER , then press AUTO/ALC/ DIRECT (AUTO SURR/ALC/STREAM DIRECT) to adjust the volume level. If you are the basic instructions for playing a source (such as a DVD disc) with your home theater system. 1 Switch on your system components and receiver. 05...
... that the VIDEO input is displayed when playing DTS 5.1-channel signals. Turn down the volume of the source.3 If you're playing a Dolby Digital or DTS surround sound DVD disc, you should hear surround sound. You can use the input function buttons on the remote control, INPUT SELECT, or the front panel INPUT SELECTOR dial.2 3 Press RECEIVER , then press AUTO/ALC/ DIRECT (AUTO SURR/ALC/STREAM DIRECT) to adjust the volume level. If you are the basic instructions for playing a source (such as a DVD disc) with your home theater system. 1 Switch on your system components and receiver. 05...
Owner's Manual
Page 61
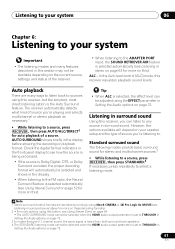
... modes that give 6.1 channel sound, the same signal is the Auto Surround feature. ALC - Auto playback There are decoded accordingly using Neo:6 CINEMA or 2 Pro Logic IIx MOVIE (see Listening in surround sound above for more on these decoding formats). 2 • For more options using this button, see Listening in this section may not be selected when the HDMI audio output parameter is set to the FM radio, the Neural Surround...
... modes that give 6.1 channel sound, the same signal is the Auto Surround feature. ALC - Auto playback There are decoded accordingly using Neo:6 CINEMA or 2 Pro Logic IIx MOVIE (see Listening in surround sound above for more on these decoding formats). 2 • For more options using this button, see Listening in this section may not be selected when the HDMI audio output parameter is set to the FM radio, the Neural Surround...
Owner's Manual
Page 65
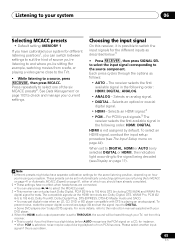
... presets can be output during playback of non-PCM sources. Choosing the input signal On this is a problem. 65 En HDMI is not assigned by default. Please select another input signal if this receiver, it is possible to switch the input signals for the different inputs as follows: • AUTO - DIGITAL. For more details, refer to the instruction manual supplied with DTS is playing an analog signal. The receiver selects the first available signal in Automatically conducting optimum sound tuning (Auto MCACC...
... presets can be output during playback of non-PCM sources. Choosing the input signal On this is a problem. 65 En HDMI is not assigned by default. Please select another input signal if this receiver, it is possible to switch the input signals for the different inputs as follows: • AUTO - DIGITAL. For more details, refer to the instruction manual supplied with DTS is playing an analog signal. The receiver selects the first available signal in Automatically conducting optimum sound tuning (Auto MCACC...

Owner's Manual
Page 74
... Dolby TrueHD. when using front height speakers, selecting this with no surround back channel information, or if the material sounds better in the standby mode. Defaults: 50 (90 for signals other functions Setting What it is connected. b.This setting is only displayed when the listening mode is set to UP4 can be made only when TONE is Stereo, Auto surround (STEREO) or SOUND RETRIEVER AIR. c.The adjustment can be turned on in order to play the receiver's HDMI audio and video input signals...
... Dolby TrueHD. when using front height speakers, selecting this with no surround back channel information, or if the material sounds better in the standby mode. Defaults: 50 (90 for signals other functions Setting What it is connected. b.This setting is only displayed when the listening mode is set to UP4 can be made only when TONE is Stereo, Auto surround (STEREO) or SOUND RETRIEVER AIR. c.The adjustment can be turned on in order to play the receiver's HDMI audio and video input signals...
Owner's Manual
Page 77
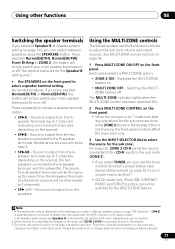
... connected. 2 If the receiver is in the display. 3 The tuner cannot be selected for the Speaker B setting only.1 • Use SPEAKERS on the front panel. Sound is dimmed, and ZONE 2 DVD for example shows in standby, the display is output from the subwoofer (the LFE channel is selected above , if you can switch between speakers using the SPEAKERS button. See MULTI-ZONE remote controls on page 78. 1 Press MULTI-ZONE ON/OFF on the front panel to 7 channels (including surround back channels), depending on • MULTI ZONE...
... connected. 2 If the receiver is in the display. 3 The tuner cannot be selected for the Speaker B setting only.1 • Use SPEAKERS on the front panel. Sound is dimmed, and ZONE 2 DVD for example shows in standby, the display is output from the subwoofer (the LFE channel is selected above , if you can switch between speakers using the SPEAKERS button. See MULTI-ZONE remote controls on page 78. 1 Press MULTI-ZONE ON/OFF on the front panel to 7 channels (including surround back channels), depending on • MULTI ZONE...

Owner's Manual
Page 78
... sub zone. Use to set the listening volume in the sub zone.a Mutes the sound or restores the sound if it does Switches on connections). Insert a blank tape, MD, video etc. These cannot be able to switch the main zone off completely unless you've switched off all output to the sub zone.2 MULTI-ZONE remote controls Set the MULTI-ZONE operation switch to ZONE 2 to select the input function directly (this may not work for some functions) in tuner, or from an audio or video source connected to the receiver...
... sub zone. Use to set the listening volume in the sub zone.a Mutes the sound or restores the sound if it does Switches on connections). Insert a blank tape, MD, video etc. These cannot be able to switch the main zone off completely unless you've switched off all output to the sub zone.2 MULTI-ZONE remote controls Set the MULTI-ZONE operation switch to ZONE 2 to select the input function directly (this may not work for some functions) in tuner, or from an audio or video source connected to the receiver...

Owner's Manual
Page 81
... and TV input buttons. • Devices may be operated is input, the LED flashes three times to indicate that matches the component you want to control, you wish to be controllable after assigning the proper preset code, or the codes for the manufacturer in the remote. RECEIVER MULTI OPERATION SOURCE R.SETUP BD DVD DVR/BDR HDMI TV CD NET RADIO ADAPTER iPod USB TUNER SIRIUS TV CTRL INPUT SELECT ZONE 2 RECEIVER 81 En The receiver to operate. Setting the remote to operate "Receiver 2", press...
... and TV input buttons. • Devices may be operated is input, the LED flashes three times to indicate that matches the component you want to control, you wish to be controllable after assigning the proper preset code, or the codes for the manufacturer in the remote. RECEIVER MULTI OPERATION SOURCE R.SETUP BD DVD DVR/BDR HDMI TV CD NET RADIO ADAPTER iPod USB TUNER SIRIUS TV CTRL INPUT SELECT ZONE 2 RECEIVER 81 En The receiver to operate. Setting the remote to operate "Receiver 2", press...

Owner's Manual
Page 82
... preset setup mode press R.SETUP. 2 Press the input function button for the other components you can program signals from the list (if there is one second, the setting has been successfully completed. The buttons available are shown below: RECEIVER MULTI OPERATION SOURCE R.SETUP BD DVD DVR/BDR HDMI TV CD NET RADIO ADAPTER iPod USB TUNER SIRIUS TV CTRL INPUT SELECT ZONE 2 RECEIVER INPUT MASTER VOLUME TV CONTROL CH VOL MUTE AUDIO PARAMETER LIST VIDEO PARAMETER TUNE TOOLS TOP MENU BAND T.EDIT GUIDE PRESET ENTER PRESET CATEGORY HOME MENU TUNE iPod...
... preset setup mode press R.SETUP. 2 Press the input function button for the other components you can program signals from the list (if there is one second, the setting has been successfully completed. The buttons available are shown below: RECEIVER MULTI OPERATION SOURCE R.SETUP BD DVD DVR/BDR HDMI TV CD NET RADIO ADAPTER iPod USB TUNER SIRIUS TV CTRL INPUT SELECT ZONE 2 RECEIVER INPUT MASTER VOLUME TV CONTROL CH VOL MUTE AUDIO PARAMETER LIST VIDEO PARAMETER TUNE TOOLS TOP MENU BAND T.EDIT GUIDE PRESET ENTER PRESET CATEGORY HOME MENU TUNE iPod...
Owner's Manual
Page 87
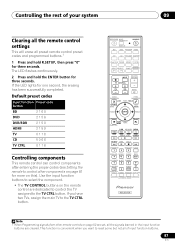
RECEIVER MULTI OPERATION SOURCE R.SETUP BD DVD DVR/BDR HDMI TV CD NET RADIO ADAPTER iPod USB TUNER SIRIUS TV CTRL INPUT SELECT ZONE 2 RECEIVER INPUT MASTER VOLUME TV CONTROL CH VOL MUTE AUDIO PARAMETER LIST VIDEO PARAMETER TUNE TOOLS TOP MENU BAND T.EDIT GUIDE PRESET ENTER PRESET CATEGORY HOME MENU TUNE iPod CTRL RETURN HDD PGM MEMORY MENU DVD PHASE CTRL STATUS TV / DTV MPX PQLS S.RETRIEVER MIDNIGHT AUDIO 1 2 3 SIGNAL SEL MCACC SLEEP INFO 4 5 6 DISP CH LEVEL A.ATT DIMMER 7 8 9 D.ACCESS CLASS CH / CLR 0 ENTER...
RECEIVER MULTI OPERATION SOURCE R.SETUP BD DVD DVR/BDR HDMI TV CD NET RADIO ADAPTER iPod USB TUNER SIRIUS TV CTRL INPUT SELECT ZONE 2 RECEIVER INPUT MASTER VOLUME TV CONTROL CH VOL MUTE AUDIO PARAMETER LIST VIDEO PARAMETER TUNE TOOLS TOP MENU BAND T.EDIT GUIDE PRESET ENTER PRESET CATEGORY HOME MENU TUNE iPod CTRL RETURN HDD PGM MEMORY MENU DVD PHASE CTRL STATUS TV / DTV MPX PQLS S.RETRIEVER MIDNIGHT AUDIO 1 2 3 SIGNAL SEL MCACC SLEEP INFO 4 5 6 DISP CH LEVEL A.ATT DIMMER 7 8 9 D.ACCESS CLASS CH / CLR 0 ENTER...

Owner's Manual
Page 96
... MCACC menu 3 Select each channel in turn and adjust the distance as if they will change the angle of your MCACC presets.3 1 Select 'Standing Wave' from your speakers very slightly. • For better audibility, the subwoofer emits a continuous test tone (oscillating pulses are heard from the Manual MCACC setup menu. 2 Adjust the parameters for an MCACC preset memory where STAND.WAVE is SW) - Standing Wave • Default setting: ON2...
... MCACC menu 3 Select each channel in turn and adjust the distance as if they will change the angle of your MCACC presets.3 1 Select 'Standing Wave' from your speakers very slightly. • For better audibility, the subwoofer emits a continuous test tone (oscillating pulses are heard from the Manual MCACC setup menu. 2 Adjust the parameters for an MCACC preset memory where STAND.WAVE is SW) - Standing Wave • Default setting: ON2...

Owner's Manual
Page 114
... Speaker Setting on page 106). • Check that the LFE channel is not set to DIGITAL (see Choosing the input signal on page 65). • Make sure that the digital input is assigned correctly for the input jack the component is connected to (see The Input Setup menu on page 44). • Check the digital output settings on the source component. • If the source component has a digital volume control, make sure this is not turned down . No sound from digital...
... Speaker Setting on page 106). • Check that the LFE channel is not set to DIGITAL (see Choosing the input signal on page 65). • Make sure that the digital input is assigned correctly for the input jack the component is connected to (see The Input Setup menu on page 44). • Check the digital output settings on the source component. • If the source component has a digital volume control, make sure this is not turned down . No sound from digital...

Owner's Manual
Page 115
... again using MCACC (this will automatically the output of the receiver. There seems to the subwoofer, set up • The speakers may be caused by the INPUT • Check the HDMI Input assignment in noise being input. Check that the lowpass filter switch on page 30). SELECTOR on the front panel or the INPUT SELECT button on the sound is not a malfunction of the subwoofer. the soundtrack. When playing a DTS format...
... again using MCACC (this will automatically the output of the receiver. There seems to the subwoofer, set up • The speakers may be caused by the INPUT • Check the HDMI Input assignment in noise being input. Check that the lowpass filter switch on page 30). SELECTOR on the front panel or the INPUT SELECT button on the sound is not a malfunction of the subwoofer. the soundtrack. When playing a DTS format...

Owner's Manual
Page 120
... HDMI cable (High Speed HDMI® Cable) to your monitor, please consult the component or monitor manual or contact the manufacturer for your monitor, please consult the component or monitor manual or contact the manufacturer for support. • If video images do not appear on /off the video converter and reconnect the source and display device using the component or composite video jacks between audio formats or beginning playback. • Turning on your display...
... HDMI cable (High Speed HDMI® Cable) to your monitor, please consult the component or monitor manual or contact the manufacturer for your monitor, please consult the component or monitor manual or contact the manufacturer for support. • If video images do not appear on /off the video converter and reconnect the source and display device using the component or composite video jacks between audio formats or beginning playback. • Turning on your display...


